Table of Contents >> Show >> Hide
- Before You Build: A Quick Plan That Saves Time (and Regret)
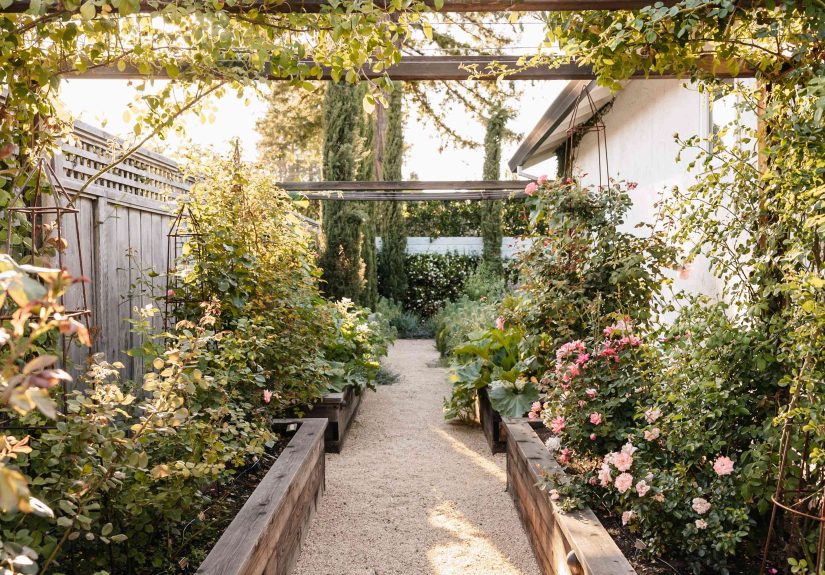
- 13 Cheap DIY Garden Path Ideas
- 1) Mulch Path (The “Weekend Win”)
- 2) Wood Chip Path (Mulch’s Slightly Crunchier Cousin)
- 3) Pine Needle Path (If You’ve Got Pines, You’ve Got Material)
- 4) Pea Gravel Path (The “Crisp and Clean” Option)
- 5) Crushed Stone Path (More Stable Than Pea Gravel)
- 6) Decomposed Granite Path (Rustic, Elegant, and Budget-Friendly)
- 7) Stepping Stones + Gravel (The Beginner-Friendly Crowd Pleaser)
- 8) Salvaged Brick Path (Vintage Charm on a Shoestring)
- 9) Concrete Pavers (Affordable and Clean-Lined)
- 10) DIY Concrete Stepping Stones (Custom Shapes, Low Cost)
- 11) Urbanite Path (Recycled Concrete with a Cool Name)
- 12) Wood Slice Path (Whimsical, but Choose Durable Wood)
- 13) Grass-and-Paver “Strip” Path (Minimal Materials, Maximum Neat)
- How to Keep a Budget Garden Path Looking Good
- Real-World Lessons From Building Budget Garden Paths (Experience-Based)
- Conclusion
A garden path is basically your yard’s way of saying, “Welcome! Please don’t trample my basil.”
The good news: you don’t need a fancy hardscape budget (or a contractor named Chip who shows up with a crew and a drone)
to build a walkway that looks intentional, feels sturdy, and keeps your shoes from doing the “mud-suction dance.”
This guide walks you through 13 cheap DIY garden path ideas that use easy-to-find materialsmany of which you might already
have in a pile somewhere behind the shed. We’ll cover what to build, how to make it last, and how to avoid the classic
path problems: weeds, sinking stones, and the mysterious “why does it squish” zone.
Before You Build: A Quick Plan That Saves Time (and Regret)
1) Let the yard tell you where the path wants to be
The cheapest path is the one you don’t have to re-do. Watch where people naturally walkbetween the gate and the back door,
the grill and the patio, the compost and the garden bed. Mark the route with a hose, rope, or flour line. Walk it a few times.
If it feels awkward, your future self will absolutely “shortcut” it (right over your plants).
2) Decide your “feel”: soft, crunchy, or solid
- Soft paths (mulch, wood chips, pine needles) feel natural and are beginner-friendly.
- Crunchy paths (gravel, decomposed granite) drain well and look tidy with edging.
- Solid stepping paths (pavers, brick, concrete stones) are stable and great for high-traffic routes.
3) Prep is the difference between “cute path” and “wobbly regret”
You don’t need to excavate like you’re searching for buried treasure, but you do need to remove sod and level the base.
A flat, compacted base prevents sinking and shifting. And if weeds are your yard’s love language, consider a breathable
weed barrier strategy (more on that below).
13 Cheap DIY Garden Path Ideas
1) Mulch Path (The “Weekend Win”)
Mulch is one of the fastest, least expensive ways to define a walkway. It’s forgiving underfoot, easy to refresh, and
blends into cottage-style or woodland gardens.
- How to do it: Remove sod, level the soil, roll out cardboard (optional), then add a thick layer of mulch.
- Pro tip: Add simple edging (stones, metal, or even salvaged bricks) to keep mulch from migrating into beds.
- Best for: Low-to-medium traffic paths; informal garden areas.
2) Wood Chip Path (Mulch’s Slightly Crunchier Cousin)
Arborist wood chips are often low-cost (sometimes free) and can look surprisingly polished. They knit together as they
settle, and they’re great for drainage.
- How to do it: Excavate a few inches, add cardboard or breathable landscape cloth if needed, then pile chips thick.
- Maintenance: Top off yearly. If chips start “disappearing,” that’s decomposition doing its job.
3) Pine Needle Path (If You’ve Got Pines, You’ve Got Material)
Pine straw/needles create a soft, springy path with a warm, natural color. It’s popular in regions where pine needles are
plentiful and cheap.
- How to do it: Define the edges, clear the route, lay a thick layer of pine needles, and rake smooth.
- Best for: Woodland gardens, shade paths, and places where you want a quiet, natural look.
4) Pea Gravel Path (The “Crisp and Clean” Option)
Pea gravel drains well, looks neat, and is easy to spread. It’s a classic cheap DIY garden path idea because it scales to
almost any yard size.
- How to do it: Remove sod, add edging, lay a compactable base layer (optional but helpful), then top with pea gravel.
- Pro tip: Use edging. Without it, gravel will slowly wander into your lawn like it pays rent there.
5) Crushed Stone Path (More Stable Than Pea Gravel)
If you want a gravel-style look with less rolling underfoot, consider crushed stone (often called “crusher run” or similar
depending on your area). The mix of sizes compacts better than rounded gravel.
- How to do it: Compact the base, add layers, and tamp as you go.
- Best for: High-traffic routes, wheelbarrow runs, and rainy climates.
6) Decomposed Granite Path (Rustic, Elegant, and Budget-Friendly)
Decomposed granite (DG) gives you that “fancy garden tour” vibe without the “fancy invoice.” It compacts well and looks
natural, especially in dry or Mediterranean-style landscapes.
- How to do it: Excavate, add edging, lay weed barrier if desired, spread DG in layers, and compact thoroughly.
- Pro tip: Light misting while compacting helps settle DG into a firmer surface.
7) Stepping Stones + Gravel (The Beginner-Friendly Crowd Pleaser)
This combo is one of the most forgiving paths to build: big stones do the walking, gravel fills the gaps and drains well.
It also looks intentionally designed, even if you built it while wearing mismatched socks.
- How to do it: Set stones first (level with the ground or slightly above), then add gravel around them.
- Tip: Space steps to your natural stride. If it feels like hopscotch, you’ll avoid it.
8) Salvaged Brick Path (Vintage Charm on a Shoestring)
Reclaimed bricks are often cheaper than new pavers and instantly add character. You can lay them in a simple running bond,
basket weave, or herringbone pattern depending on patience levels.
- How to do it: Create a compacted base, set bricks tightly, sweep sand into joints, and tamp.
- Look upgrade: Mix tones for a weathered, “always been here” effect.
9) Concrete Pavers (Affordable and Clean-Lined)
Basic concrete pavers are widely available and can look modern or classic depending on how you place them.
Keep it simple with a straight run, or stagger them with ground cover between for a softer look.
- How to do it: Compact the base, set pavers level, and fill joints with sand or fine gravel.
- Best for: Patio-to-garden connections and high-use walkways.
10) DIY Concrete Stepping Stones (Custom Shapes, Low Cost)
Want stepping stones in a specific size, shape, or vibe (like leaf impressions or geometric forms)? DIY concrete stones can
be surprisingly budget-friendly, especially when you keep the design simple.
- How to do it: Use a mold (plastic trays, forms, or purpose-made molds), pour concrete, and cure properly.
- Strength tip: For larger stones, consider wire mesh reinforcement so they’re less likely to crack over time.
11) Urbanite Path (Recycled Concrete with a Cool Name)
“Urbanite” is simply broken concrete reused as a path or patio material. If you can source clean pieces (from a demo,
a neighbor’s project, or local reuse networks), this can be one of the cheapest walkway materials out there.
- How to do it: Select flat pieces, set them like irregular stepping stones, and fill gaps with gravel or ground cover.
- Style tip: Keep a consistent gap size so it looks intentional, not like a concrete jigsaw puzzle incident.
12) Wood Slice Path (Whimsical, but Choose Durable Wood)
Cross-sections of logs (“wood cookies”) create a storybook look. This is best as a short, decorative path or in drier zones,
since wood breaks down over timeespecially in wet climates.
- How to do it: Set slices on a compacted base of sand or fine gravel; keep tops level and stable.
- Reality check: This is charming, not forever. Expect replacement as the wood weathers.
13) Grass-and-Paver “Strip” Path (Minimal Materials, Maximum Neat)
For a modern look with fewer materials, lay pavers with wide gaps and let grass or low ground cover fill in. You get a
walkway that’s easy on the budget and still feels designed.
- How to do it: Set pavers flush with the lawn so mowing is easy, then seed or plug the gaps.
- Best for: Front-yard style upgrades, side-yard access routes, and “I want it tidy” people.
How to Keep a Budget Garden Path Looking Good
Weed control without the drama
Weeds love open, sunny spacepaths included. A breathable barrier under gravel or mulch can reduce weeding, but it isn’t
a magic “never weed again” force field. Fine debris will eventually collect on top and create a place for seeds to sprout.
The goal is “less weeding,” not “weeding becomes a myth.”
Edging is your secret weapon
Edging is what makes cheap materials look intentional. It keeps gravel in place, holds mulch where it belongs, and prevents
your path from slowly becoming a vague suggestion. Bricks, stones, metal edging, or even pressure-treated boards can work.
Drainage wins every time
If your yard holds water, prioritize permeable materials like gravel, DG, or spaced stepping stones. In soggy areas, raise
the path slightly or use a compacted base so it doesn’t turn into a seasonal trench.
Real-World Lessons From Building Budget Garden Paths (Experience-Based)
If you’ve never built a garden path before, here’s the truth: your first path teaches you more than your tenth Pinterest
board ever will. The biggest lesson is that “cheap” doesn’t mean “lazy”it means you spend your effort where it counts.
For example, the first time someone tries a mulch path, they usually nail the look on day one… and then wonder why it’s
thin and patchy by mid-summer. The fix is simple: start thicker than you think. Mulch settles, breaks down, and migrates.
If the path is a main route (like door-to-gate), plan on topping it off each year the way you’d repaint a fence. It’s normal.
Another real-life discovery: edging is not “extra.” It’s the difference between “garden walkway” and “my yard spilled.”
People often skip edging to save money, then spend the next two months kicking gravel back into place like it’s a part-time job.
Even budget edgingsalvaged bricks, fieldstones, or inexpensive metal stripsgives your path a boundary. Once you add it,
the whole yard looks more finished, even if the path material itself is basic.
The third lesson is about the ground underneath. Beginners tend to focus on the top layer because that’s what you see in
photos. But what you don’t see is what stops the wobble. If you’ve ever stepped on a paver that rocked like a tiny seesaw,
that’s a base problem, not a paver problem. Taking an extra hour to remove sod, level the soil, and tamp it down pays off
every single time. It’s also why stepping stones set into the ground often feel better than stones placed on top of grass.
Flush, level stones are the “quiet luxury” of DIY pathsno one notices them, because nothing goes wrong.
And then there’s the “weeds will find a way” reality. A weed barrier can reduce weeding, but it doesn’t erase it. Over time,
dust and leaf litter build up on top of fabric, creating a new thin layer of “soil” where seeds sprout. That’s why a path
stays nice when you occasionally rake it, blow off debris, and refresh the top layer. Think of it like sweeping a porch:
low effort, big payoff. If you want the lowest-maintenance setup, many DIYers find that a compactable material like crushed
stone or DGpaired with solid edginghits the sweet spot. It looks tidy, drains well, and doesn’t need constant reshaping.
Finally, there’s the design lesson: the cheapest paths look expensive when they look intentional. A meandering mulch path
can feel like a garden feature if the edges are crisp. A gravel path can look upscale if the width stays consistent and the
transitions make sense. Even “free” materials like urbanite feel polished when you repeat a patternsimilar gaps, similar
sizes, a clear route. In other words, your budget path doesn’t need luxury materials. It needs a plan, a level base, and
a finish detail or two that says, “Yes, I meant to do that.”
Conclusion
A budget-friendly walkway isn’t about cutting cornersit’s about choosing smart materials and building them the right way.
Whether you go with mulch, gravel, decomposed granite, salvaged brick, or DIY stepping stones, you can create a garden path
that looks great, holds up to real life, and keeps foot traffic where it belongs (hint: not on your plants).
Start with the route people actually take, use edging to keep things neat, and give your path a stable base so it stays
comfortable underfoot. The result is a DIY garden path that feels like a true upgradewithout the “why did I do this” price tag.