Table of Contents >> Show >> Hide
- What Makes a Bathroom “Before-and-After” Worth It?
- 15 Before-and-After Bathroom Remodels (and the Design Lessons They Teach)
- 1) The “Dark Cave” Bathroom Becomes Bright and Airy
- 2) The Tiny Bathroom Learns the Power of a Floating Vanity
- 3) The Tub Nobody Uses Gets Replaced by a Luxe Shower
- 4) The Awkward Layout Gets a New Traffic Plan
- 5) The Builder-Grade Bathroom Becomes a Spa (Without Becoming High-Maintenance)
- 6) The Dated Tile Gets a Modern Reset
- 7) The “Everything Is Chrome” Bathroom Learns Mixed Metals
- 8) The Small Shower Gets Bigger by Going Frameless
- 9) The “Zero Storage” Bathroom Finally Gets a Place for Stuff
- 10) The Half Bath Goes Bold (Because It Can)
- 11) The Vanity Area Gets “Real” Lighting
- 12) The “Laundry List of Little Fixes” Remodel That Looks Expensive
- 13) The “One Sink for Two People” Bathroom Adds Double-Vanity Function
- 14) The “Old-School Tub Surround” Gets a Clean, Modern Wall System
- 15) The Accessibility Upgrade That Looks Like Great Design
- Design Patterns You’ll Notice Across Great Bathroom Remodels
- Quick Planning Tips Before You Start Swinging a Hammer
- Experience-Based Lessons: What Remodelers Wish You Knew (Extra Inspiration)
- Conclusion
Bathrooms have a special talent: they can look “fine” for years… right up until you try to hang a towel and realize there’s nowhere to put it.
Or you step into a shower the size of a phone booth and wonder if your elbows can file a formal complaint.
The good news? Few rooms deliver a bigger glow-up per square foot than a bathroom.
Below are 15 classic (and wildly satisfying) before-and-after bathroom remodel transformationsbased on real, common makeover patterns designers,
remodelers, and homeowners share again and again. Each one includes what typically changed, why it works, and what you can steal for your own space
(legally, pleasesteal the idea, not your contractor’s tile saw).
What Makes a Bathroom “Before-and-After” Worth It?
A successful remodel isn’t just prettier. It’s smarter: better storage, better lighting, easier cleaning, improved ventilation, and a layout that
doesn’t make you do gymnastics around the door swing. The best transformations usually tackle at least two of these:
- Layout fixes (moving or resizing the shower, vanity, or door)
- Light upgrades (layered lighting, brighter finishes, better mirrors)
- Storage that hides clutter without eating floor space
- Material swaps (durable floors, moisture-friendly paint, tile that actually belongs in a wet zone)
- Style coherence (one clear vibe instead of five competing decades)
15 Before-and-After Bathroom Remodels (and the Design Lessons They Teach)
1) The “Dark Cave” Bathroom Becomes Bright and Airy
Before: Low light, heavy colors, dated vanity, and a mirror that seems to absorb joy.
After: Lighter wall color, reflective finishes, a larger mirror, and improved lightingoften with a glass shower door instead of a curtain.
Designers frequently add a pale tile or a simple wall treatment to bounce light around.
Steal this: If you do only one thing, upgrade lighting and mirror size. It changes the whole mood fast.
2) The Tiny Bathroom Learns the Power of a Floating Vanity
Before: A bulky vanity crowding the floor, making the room feel smaller than it is.
After: A floating vanity (or a vanity with legs) reveals more floor, which tricks your brain into reading the space as larger.
Often paired with a wall-mounted faucet or slimmer countertop.
Steal this: Keep the vanity depth modest. In small rooms, every inch matters more than your opinion on grout colors.
3) The Tub Nobody Uses Gets Replaced by a Luxe Shower
Before: A soaking tub that’s mostly a dust collector and a laundry-holding zone.
After: A larger shower with a bench, niche storage, and upgraded fixtures. This is one of the most common “wow” remodel moves
because it improves daily life immediately.
Steal this: Add a built-in niche (or two). Shampoo bottles deserve a home that isn’t the tub ledge.
4) The Awkward Layout Gets a New Traffic Plan
Before: The door hits the toilet, the toilet stares into your soul, and the vanity blocks the path.
After: A reworked layoutsometimes as simple as swapping a hinged door for a pocket door or changing the swing.
Bigger remodels relocate plumbing for a better flow.
Steal this: If relocation is too pricey, start with the door. A door change can feel like gaining square footage.
5) The Builder-Grade Bathroom Becomes a Spa (Without Becoming High-Maintenance)
Before: Flat lighting, generic finishes, and “hotel beige” everywhere.
After: Warmer lighting, a calming palette, upgraded showerhead, and thoughtful details like hooks, a teak stool, or a towel warmer.
The vibe shifts from “functional” to “exhale.”
Steal this: Choose one spa hero feature (rain showerhead, better lighting, heated towel rack). Don’t try to spa-bomb every surface.
6) The Dated Tile Gets a Modern Reset
Before: Busy patterns, mismatched borders, or tile that screams a specific year.
After: Larger-format tile or classic shapes (subway, hex, stacked rectangles) with a clean layout. Modern grout colors can
either disappear (tone-on-tone) or make tile pop (contrast).
Steal this: Pick a tile that won’t feel like a “trend souvenir” in five years. Classic doesn’t mean boringit means flexible.
7) The “Everything Is Chrome” Bathroom Learns Mixed Metals
Before: One-note metal finish across faucet, shower, lighting, and hardware.
After: Mixed metalslike brass with black, or nickel with bronzeadd depth. The key is intentional repetition so it feels curated, not chaotic.
Steal this: Use one dominant finish and one accent finish. Any more and your bathroom starts auditioning for a jewelry box.
8) The Small Shower Gets Bigger by Going Frameless
Before: A shower enclosure with heavy framing that visually chops up the room.
After: A clear glass panel (frameless or minimal frame) keeps sightlines open and makes the room feel largereven if nothing moved.
Steal this: Add a handheld sprayer. It’s a small upgrade that pays you back every time you rinse the shower (or the dog).
9) The “Zero Storage” Bathroom Finally Gets a Place for Stuff
Before: Counter clutter everywhere: toothbrushes, skincare bottles, hair tools, mystery items.
After: A recessed medicine cabinet, drawer organizers, shelves over the toilet, or a tall linen tower.
Many remodels also add a vanity with deep drawers instead of cabinets.
Steal this: Add outlets inside drawers or cabinets for hidden charging (especially for electric toothbrushes and hair tools).
10) The Half Bath Goes Bold (Because It Can)
Before: A tiny powder room that’s… technically a room.
After: Dramatic wallpaper, a painted ceiling, a statement mirror, or an art-like tile moment. Powder rooms are perfect for risk,
because they’re small and you spend limited time there.
Steal this: Use bold wallpaper above wainscoting for a high-style look that’s also more scuff-resistant.
11) The Vanity Area Gets “Real” Lighting
Before: One overhead light doing all the work and doing it poorly.
After: Layered lighting: overhead + vanity lights at eye level + optional accent lighting (like a shower light or under-vanity glow).
This improves both function and mood.
Steal this: Put vanity lights at the sides of the mirror (or use a well-designed lighted mirror). Flattering light beats “interrogation” light.
12) The “Laundry List of Little Fixes” Remodel That Looks Expensive
Before: Nothing is catastrophically wrongjust worn, mismatched, and tired.
After: Paint, new hardware, updated mirror, modern faucet, fresh towel bars, and a cleaner palette. This is the high-impact,
lower-demo approach that can look shockingly elevated when done with restraint.
Steal this: Replace builder-grade accessories (towel bars, paper holder, light fixture). Small swaps add up fast.
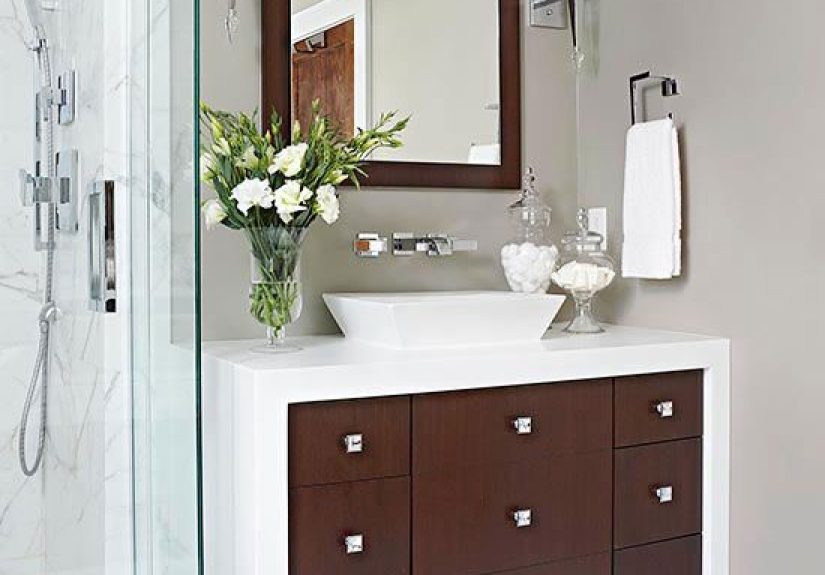
13) The “One Sink for Two People” Bathroom Adds Double-Vanity Function
Before: Two adults sharing one sink like it’s a reality TV challenge.
After: Double vanity (or a longer counter with two faucets) plus better storage. Some remodels keep one sink but add a makeup station,
which can be just as life-changing.
Steal this: If space is tight, consider two wall-mounted faucets and shallow sinks to preserve counter space.
14) The “Old-School Tub Surround” Gets a Clean, Modern Wall System
Before: A chunky tub surround, awkward shelves, or water-stained walls.
After: Tile to the ceiling, a simple niche, and a streamlined curtain or glass. Even modest updateslike re-tiling just the wet zone
and painting elsewherecan make it feel brand new.
Steal this: Take tile higher than you think. It looks more custom and protects walls from daily splashes.
15) The Accessibility Upgrade That Looks Like Great Design
Before: Tight clearances, slippery floor, tricky tub entry, or a shower curb that feels like a hurdle.
After: Curbless shower (or low-threshold), non-slip flooring, comfort-height toilet, blocking in walls for future grab bars,
and a layout that’s easier to navigate. When planned well, it looks polishednot clinical.
Steal this: Plan for “future you.” Add blocking now, even if you don’t install grab bars yet.
Design Patterns You’ll Notice Across Great Bathroom Remodels
They simplify the visual noise
The most impressive after photos often have fewer competing finishes. That doesn’t mean boringit means intentional.
One hero tile + supportive neutrals is a classic formula.
They fix lighting before chasing decor
A gorgeous vanity in a dim cave still looks… like a gorgeous vanity in a dim cave. Better lighting makes everything feel more expensive,
including the things you already own.
They add storage that doesn’t steal space
Recessed cabinets, deep drawers, niches, and wall shelves are the secret sauce. Clutter is the fastest way to erase “after” energy.
They prioritize daily comfort
The remodels people love most are the ones that make mornings easier: smarter layouts, better showers, warmer light, fewer awkward reaches,
and hardware that isn’t placed like a practical joke.
Quick Planning Tips Before You Start Swinging a Hammer
Pick your “must-not-change” list
If budget is tight, keeping plumbing in place can save serious money. If function is the bigger issue, layout changes may be worth it.
Decide early whether this is a refresh or a reinvention.
Choose durable, bathroom-friendly materials
Bathrooms demand moisture-resistant paint, properly installed tile, and ventilation that can handle steam. A beautiful finish that can’t survive
humidity is just expensive sadness.
Don’t forget the unsexy upgrades
Vent fan, waterproofing, shutoff valves, GFCI outlets, good caulk linesthese don’t show up in glam photos, but they protect your investment.
Experience-Based Lessons: What Remodelers Wish You Knew (Extra Inspiration)
If you read enough bathroom remodel stories, a pattern emerges: the “after” photo is the victory lap, but the real wisdom lives in the messy middle.
Here are experience-based lessons homeowners and pros commonly shareso your remodel feels less like a suspense thriller and more like a satisfying
makeover montage.
1) The layout is the real makeover (even when it doesn’t look dramatic)
People often start with tile samples because they’re fun and bite-sized. But the homeowners who feel happiest long-term tend to talk about flow:
how the door opens, whether you can stand at the vanity without bumping into the toilet, and whether the shower feels like a “place” instead of
a cramped rinse station. Even small layout shiftslike swapping a swinging door for a pocket door, or moving a towel hook within arm’s reachcan
make the bathroom feel calmer every day.
2) “We’ll add storage later” is a lie you tell yourself
In before-and-after remodel stories, the happiest endings almost always include hidden storage: deep drawers, recessed cabinets, niches, or a linen tower.
When storage is missing, the counter becomes a chaotic stage for every bottle and tool you own, and the “after” starts sliding back toward “before.”
The experienced approach is to plan storage as part of the design, not an accessory. Think in categories: daily items in drawers, backups in a cabinet,
guest supplies in a labeled bin. Your future self will say thank youpossibly with tears.
3) Lighting is where “expensive” is born
Remodelers regularly mention that lighting was the surprise hero. A bathroom can have beautiful finishes and still feel flat if the lighting is harsh,
dim, or only overhead. People who upgrade to layered lighting often say it makes mornings smoother and evenings more relaxing. Side lighting at the mirror
reduces shadows, a warmer temperature feels more spa-like, and a dimmer gives you instant mood control. The lesson: if you have to choose between
the fanciest tile and better lighting, lighting is the move.
4) The “nice-looking” tile choice still needs a smart tile plan
Homeowners with the best results talk less about the tile itself and more about where it goes. Taking tile higher (often to the ceiling in wet zones)
looks custom and prevents splash damage. Planning grout lines so they align neatly, choosing trim that finishes edges cleanly, and placing niches so they
don’t awkwardly slice through patternsthese details separate “good” from “wow.” Experience teaches that the installation plan matters as much as the tile.
5) The budget doesn’t just disappearit leaks through decisions
People often report that “little upgrades” stacked quickly: swapping fixtures, then adding a new mirror, then changing lighting, then realizing the
old fan can’t keep up. The experienced strategy is to pick a few high-impact splurges and keep the rest steady. Many choose one statement element
(a vanity, a tile wall, or a showpiece light), then build around it with simpler, durable choices. This keeps the bathroom coherent and prevents
budget creep from turning your remodel into an accidental second mortgage.
The big takeaway from remodel experience: a great bathroom “after” is rarely about one magical product. It’s the sum of small, smart choices
layout, lighting, storage, and finishes that work together. If you plan those four well, your bathroom won’t just look better in photos;
it’ll feel better every single day.
Conclusion
The best before-and-after bathroom remodels don’t rely on one trendy trickthey solve real problems and then wrap the solution in a style you love.
Whether you’re dreaming of a spa shower, fighting a tiny layout, or just trying to escape the grip of “sad beige bathroom syndrome,” the inspiration
is the same: fix function first, then make it gorgeous. Your future mornings will be faster, your evenings will be calmer, and your towel will finally
have a proper place to live.