Table of Contents >> Show >> Hide
- Why crown molding works so well (even in “meh” rooms)
- Quick guide to choosing crown molding that looks right
- Idea 1: Paint the crown the same color as the walls
- Idea 2: Paint the crown the same color as the ceiling
- Idea 3: Go high-contrast for instant “architectural pop”
- Idea 4: Try a “two-tone band” with a thin reveal
- Idea 5: Build up a “stacked” crown for taller ceilings
- Idea 6: Use a simple stepped profile for modern rooms
- Idea 7: Add dentil detail for classic, traditional charm
- Idea 8: Pair crown molding with picture rail for old-house energy
- Idea 9: Frame a tray ceiling with crown molding
- Idea 10: Add hidden LED lighting behind crown for a soft glow
- Idea 11: Wrap crown around built-ins for a seamless, custom look
- Idea 12: Add crown molding to kitchen cabinets (yes, it matters)
- Idea 13: Use crown to “finish” wallpaper or a bold paint treatment
- Idea 14: Bring crown into the bathroom with moisture-friendly materials
- Idea 15: Try a “reverse” crown on vaulted or angled ceilings
- Idea 16: Mix stained wood crown with painted trim for warmth
- Common crown molding mistakes (and how to avoid them)
- Real-world experiences: what homeowners and pros learn after the crown goes up
- Conclusion: character lives in the details
Crown molding is the home-design equivalent of putting a crisp collar on a plain T-shirt: it instantly looks more “put together.”
Whether you live in a century-old charmer or a newer build that feels a little… builder-beige, the right ceiling trim can add
architectural character, define a room’s style, and make everything look more intentional (yes, even the corner where the dog toys live).
In this guide, you’ll find 16 crown molding ideasranging from classic and traditional to clean-lined and modernplus practical tips on
choosing the right size, profile, and finish so your molding looks like it belongs (not like it’s wearing someone else’s hat).
Expect specific examples, design logic, and a few playful nudges to try something beyond plain white.
Why crown molding works so well (even in “meh” rooms)
Crown molding sits where the wall meets the ceiling, and that transition is visually powerful. A clean, well-proportioned crown can:
sharpen edges, soften awkward angles, hide small gaps, and make walls look taller or more polished depending on how it’s installed and painted.
It’s also one of the fastest ways to add “finished” millwork vibes without remodeling your entire house.
Quick guide to choosing crown molding that looks right
Match the scale to your ceiling height
Proportion matters more than price. In general, shorter ceilings look better with smaller profiles; taller ceilings can handle wider, more dramatic
crowns or even layered “built-up” combinations. As a starting point, many trim pros recommend roughly 2.5–6 inches for typical 8-foot ceilings,
and stepping up as ceilings get taller (especially 9–10+ feet) so the trim doesn’t disappear from across the room.
Pick a profile that matches your home’s “accent” style
Traditional homes often suit more detail (think dentil blocks or classic ogee curves), while modern and transitional spaces usually look best
with simpler, cleaner lineslike a stepped profile or a square-edge look built from a few flat boards.
Choose materials based on the room
Painted trim is commonly done in MDF, wood, or polyurethane. For humid areas (bathrooms, laundry rooms), moisture-resistant options like
polyurethane or PVC can be smart. For a stained wood look, real wood typically performs better and looks more natural.
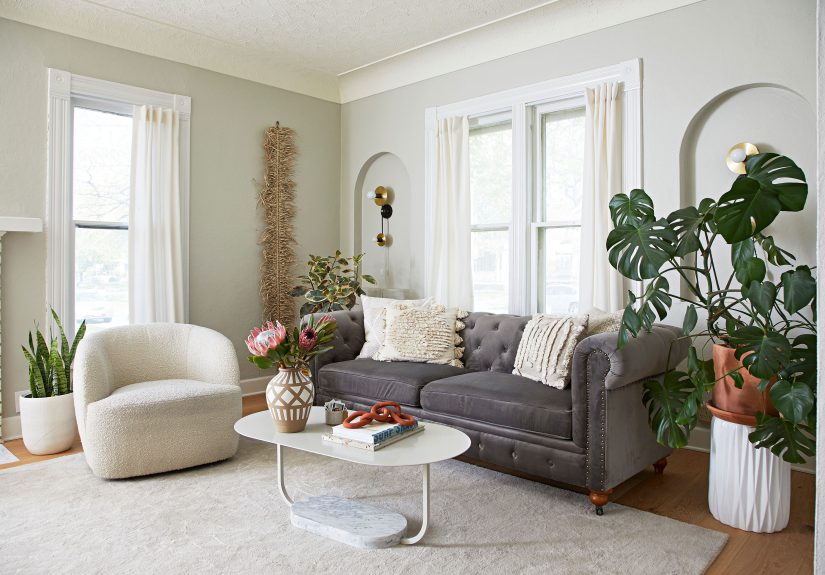
Idea 1: Paint the crown the same color as the walls
This is one of the simplest ways to make crown molding feel modern and intentional. Instead of a bright white stripe at the ceiling,
the molding blends inso the room feels taller, smoother, and less “outlined.”
Best for
Bedrooms, offices, living rooms, and any space where you want calm instead of contrast.
How to pull it off
Use the exact wall color in the same sheen family (often satin or semi-gloss on trim). The shape will still cast shadows and read as detail,
just without the high-contrast border.
Idea 2: Paint the crown the same color as the ceiling
If your goal is to make the ceiling look “lifted,” this trick is sneaky-effective. Painting crown molding ceiling-color reduces the visual break
at the top of the wall, which can help rooms feel airierespecially if the ceiling is already a bright, clean white.
Best for
Lower ceilings, smaller rooms, hallways, and spaces where you want height without drama.
How to pull it off
Paint the crown and ceiling the same color and sheen (typically flat or matte on ceilings). This keeps the focus on light and openness.
Idea 3: Go high-contrast for instant “architectural pop”
Want the molding to announce itself like it’s hosting a fancy dinner party? High-contrast crown is the move. Think bright white crown against
colored walls, or a deep charcoal crown against pale walls for a more modern edge.
Best for
Dining rooms, foyers, and spaces where you want crisp definition.
How to pull it off
Keep the rest of the trim consistent (baseboards, door casings) so the room doesn’t feel like it’s wearing mismatched socks.
Idea 4: Try a “two-tone band” with a thin reveal
This is a designer-style detail that looks custom: paint the crown one color, but add a slim strip (or “reveal”) between the molding and wall in
a second coloroften the wall color or ceiling color. It creates a tailored, layered look without huge cost.
Best for
Transitional interiors, nurseries, and rooms where you want subtle detail up high.
How to pull it off
Use painter’s tape carefully and keep the reveal consistent. Even a 1/4-inch to 1/2-inch band can look high-end.
Idea 5: Build up a “stacked” crown for taller ceilings
Layered crown moldingalso called built-up or stacked crownuses multiple trim pieces (like a backer board, crown, and small cove or bed molding)
to create depth. It reads custom, substantial, and very “this home has character.”
Best for
9–10+ foot ceilings, formal dining rooms, primary bedrooms, and grand entries.
How to pull it off
A simple recipe: a flat backer board (for height), a main crown profile, and a small detail trim below. Keep it symmetrical and proportional
to the room.
Idea 6: Use a simple stepped profile for modern rooms
If ornate crown feels too “wedding cake,” go stepped. A minimal, geometric crown looks clean and contemporary, and it pairs beautifully with
modern windows, slab cabinets, and simple baseboards.
Best for
Modern, Scandinavian, minimalist, and midcentury-leaning spaces.
How to pull it off
Choose a profile with crisp planes. Or “fake it” with a few flat boards that create a subtle shadowline.
Idea 7: Add dentil detail for classic, traditional charm
Dentil moldingthose small, repeating “teeth” blockssignals traditional architecture and looks especially good in formal spaces. It’s like a
tuxedo for your ceiling line.
Best for
Traditional dining rooms, libraries, historic homes, and formal living rooms.
How to pull it off
Let dentil be the star. Keep other patterns (like busy wallpaper or heavy drapes) in check so the room doesn’t feel overloaded.
Idea 8: Pair crown molding with picture rail for old-house energy
Picture rail sits a few inches below the ceiling and was originally used to hang art without punching holes everywhere. Combine it with crown
and you get layered, historic detailespecially when painted in a cohesive scheme.
Best for
Vintage, colonial, Victorian-inspired, and European-leaning interiors.
How to pull it off
Keep spacing consistent around the room. This detail looks best when it wraps all walls, not just one “accent corner.”
Idea 9: Frame a tray ceiling with crown molding
Tray ceilings practically beg for molding. Crown can outline the tray, emphasize the stepped shape, and make the ceiling feel more intentional
like it was designed, not accidentally created by ductwork.
Best for
Primary bedrooms, dining rooms, and living rooms with trays or ceiling steps.
How to pull it off
Highlight the geometry: match the crown to the tray perimeter. Consider adding subtle lighting if the tray has depth.
Idea 10: Add hidden LED lighting behind crown for a soft glow
Crown molding can double as a light rail. A concealed LED strip aimed upward creates indirect “cove lighting” that makes ceilings feel higher and
rooms feel warmerwithout an overhead glare situation.
Best for
Media rooms, bedrooms, modern living rooms, and moody dining spaces.
How to pull it off
Use a profile or build-up that creates space behind the crown. Aim the light up to wash the ceiling evenly.
Idea 11: Wrap crown around built-ins for a seamless, custom look
Crown molding looks extra “built-in” when it continues across cabinetry, bookcases, or a fireplace surround. The room reads more cohesive
like the millwork was planned as one architectural system.
Best for
Living rooms with built-ins, library walls, and fireplace features.
How to pull it off
Align the crown heights so the transition is smooth. If the built-ins stop below the ceiling, consider a small bridging detail so it still feels
intentional.
Idea 12: Add crown molding to kitchen cabinets (yes, it matters)
Cabinet crown closes the gap between uppers and ceiling, which instantly looks more finished. It also helps kitchens feel taller and less “boxy,”
especially with standard-height cabinets.
Best for
Kitchens with upper cabinets that stop short of the ceiling, or kitchens aiming for a more classic look.
How to pull it off
Match the profile to the kitchen style: Shaker kitchens often look best with simpler crown, while traditional kitchens can handle more detail.
Idea 13: Use crown to “finish” wallpaper or a bold paint treatment
Wallpaper near the ceiling can look abrupt if it just… stops. Crown molding creates a clean cap that makes bold walls look intentional and polished.
It’s basically the punctuation mark at the end of a statement wall.
Best for
Powder rooms, dining rooms, nurseries, and accent-wall spaces.
How to pull it off
Choose a crown that isn’t overly busy if the wallpaper is patterned. Let the wall treatment be the star, and crown be the frame.
Idea 14: Bring crown into the bathroom with moisture-friendly materials
Bathrooms are often ignored in the trim department, which is a missed opportunity. Crown molding can make a bath feel more spa-like and “designed.”
Just be smart about material choice if moisture is a factor.
Best for
Primary baths, powder rooms, and guest baths that need a little charm boost.
How to pull it off
Use moisture-resistant trim (often polyurethane/PVC) and a durable paint finish. Pair with beadboard or wainscoting for classic cottage energy.
Idea 15: Try a “reverse” crown on vaulted or angled ceilings
Vaulted ceilings can make traditional crown tricky, but you can still add architectural interest by shifting the emphasis: use flat panels or boards
that run along the ceiling plane, or use trim to highlight beams and angles instead of forcing a standard wall-to-ceiling crown.
Best for
Vaulted ceilings, A-frames, bonus rooms, and modern great rooms.
How to pull it off
Keep profiles simple and consistent. The goal is to celebrate the angle, not fight it.
Idea 16: Mix stained wood crown with painted trim for warmth
Not all crown molding has to be painted. A stained wood crown can add warmth, especially in rooms with wood floors, ceiling beams, or natural textures.
It’s a great way to bring in “quiet richness” without going full formal.
Best for
Craftsman homes, rustic-modern spaces, and rooms with other wood accents.
How to pull it off
Keep the stain tone aligned with other woods in the room. If everything is cool gray, a super-orange stain can look accidental.
Common crown molding mistakes (and how to avoid them)
Going too big for the room
Oversized crown in a small room can feel heavy and visually lower the ceiling. If your ceilings are standard height, choose a profile that looks
balanced from the doorwaynot just impressive from two feet away.
Mixing styles that don’t speak the same language
Highly ornate crown with ultra-minimal baseboards can look mismatched. You don’t need everything to match perfectly, but aim for consistency in
level of detail.
Forgetting the finish plan
Crown looks best when the paint sheen and color choices are intentional. Decide early: match the walls, match the ceiling, go contrasting, or go tonal.
“We’ll figure it out later” is how trim ends up three different whites.
Real-world experiences: what homeowners and pros learn after the crown goes up
Here’s the part that doesn’t show up in perfectly staged photos: crown molding teaches you a lot about your house’s personalityespecially the
parts of its personality that involve “nothing is actually square.” People who add crown often share the same surprise: the design decision is the
easy part. The finishing decisions are where the magic (and the mild eye twitch) happens.
One common experience: the first piece you install makes you question every life choice, and the third piece makes you feel like you could start a
trim empire. Corners are the great equalizer. Even in well-built homes, walls can bow slightly and ceilings can dip. That’s why many trim guides
emphasize planning your approach for inside corners (and why coping often gets recommended for tighter-looking joins). The takeaway most homeowners
repeat is simple: measure carefully, expect tiny variations, and prioritize a clean visual line from across the roomnot perfection at nose distance.
Paint decisions also come with real-life lessons. People who choose high-contrast crown love the crisp look, but they also notice every shadow line
and every tiny ripple in drywall. That’s not a reason to avoid contrastit’s a reason to prep thoughtfully. Meanwhile, those who paint crown the same
color as the wall often rave about how sophisticated it looks, especially in bedrooms and offices. The “surprise win” is how it hides minor ceiling
flaws and makes the room feel calmer. It’s a popular choice for anyone who wants architectural detail without a bright line shouting, “Look! I bought trim!”
Another shared experience: crown molding changes how lighting feels. The moment crown goes up, overhead lights can feel harsher because the ceiling
line becomes more defined. That’s why some homeowners end up adding softer lampsor, in more ambitious cases, cove lighting. People who try LED
uplighting behind crown often describe it as the fastest way to make a room feel “finished” at night. It’s not just pretty; it changes the mood.
The lesson here: crown isn’t only decoration. It’s part of how your room handles light and shadow.
And then there’s the “style identity” moment. Many people discover their home has a trim personality. A super-ornate crown might look gorgeous in a
formal dining room but feel out of place in a minimalist kitchen. Homeowners who are happiest long-term usually choose crown that matches the house’s
era or intended vibe: simpler profiles in modern spaces, more detail in traditional rooms, and layered crowns in tall-ceiling areas where you want drama.
If you’re unsure, a lot of folks recommend starting with one room (often a bedroom or dining room), living with it, and then repeating the same
language throughout the house for a cohesive feel.
The biggest “after” experience people mention? Crown molding makes everything else look more deliberate. Sometimes that’s amazing. Sometimes it
gently exposes other things you might want to updatelike mismatched vent covers or an old ceiling fan that suddenly looks like it’s apologizing for
being there. But overall, most homeowners say crown molding is worth it because it adds character, raises the perceived quality of the space, and makes
everyday rooms feel a little more specialwithout needing a full renovation budget.
Conclusion: character lives in the details
Crown molding isn’t just “extra trim.” It’s a design tool that can make ceilings feel taller, rooms feel more polished, and plain spaces feel like they
have a point of view. Whether you go tonal, high-contrast, stacked, or softly lit, the best crown molding idea is the one that fits your home’s scale
and styleand makes you smile every time you look up.