Table of Contents >> Show >> Hide
- Why Cleaning a Hummingbird Feeder Matters
- Before You Start: What You’ll Need
- Method 1: Clean With Hot Water and a Bottle Brush
- Method 2: Clean With a Vinegar Solution
- Method 3: Deep-Clean With a Diluted Bleach Solution
- How Often Should You Clean a Hummingbird Feeder?
- Common Mistakes to Avoid
- How to Keep a Hummingbird Feeder Cleaner Longer
- Backyard Lessons: Real-World Experiences With Cleaning a Hummingbird Feeder
- Final Thoughts
Cleaning a hummingbird feeder is not exactly the glamorous side of backyard birding. It does not come with dramatic slow-motion wingbeats or that magical moment when a ruby-throated hummingbird hovers like a tiny helicopter with opinions. Still, if you want hummingbirds to keep visiting your yard, feeder cleaning is the job that matters most.
Why? Because sugar water spoils fast. In warm weather, nectar can turn cloudy, ferment, or grow mold before you know it. And once black gunk starts lurking around the feeding ports, your cute little hummingbird café starts looking less like a five-star nectar bar and more like a health code violation with wings. The good news is that keeping a feeder clean is simple when you know the right method for the situation.
In this guide, you’ll learn three effective ways to clean a hummingbird feeder, when to use each one, how often to clean it, and the common mistakes that make your feeder dirtier than it needs to be. Whether your feeder just needs a quick rinse or looks like it survived a biology experiment, there’s a fix here for you.
Why Cleaning a Hummingbird Feeder Matters
A hummingbird feeder is basically a sugar-water container sitting outdoors in sun, shade, wind, pollen, dust, and bug traffic. That is not a recipe for long-term freshness. When nectar sits too long, it can spoil and encourage mold, bacteria, and fermentation. Dirty ports can also trap residue, which is why a feeder that looks “mostly fine” from the outside can still be gross where the birds actually drink.
Regular hummingbird feeder cleaning helps protect the birds and keeps nectar tasting fresh. It also helps you spot issues early, like cloudy solution, black mold, ants, or a feeding port that is starting to clog. In other words, cleaning is not busywork. It is basic feeder maintenance, and it makes a visible difference.
Before You Start: What You’ll Need
You do not need a fancy bird-sanitation lab. Most of the time, a few simple supplies will do the job:
- A bottle brush or feeder brush
- A small brush, pipe cleaner, or cleaning brush for feeding ports
- Hot water
- White vinegar
- Household bleach for occasional deep-cleaning
- A sink, basin, or bucket
- Clean drying space or dish rack
One tip that saves time: choose a feeder that comes apart easily. A beautiful feeder is great, but a feeder with impossible-to-reach corners is how people end up whispering threats at plastic flowers over the kitchen sink.
Method 1: Clean With Hot Water and a Bottle Brush
Best for routine cleaning
If your feeder looks clean, the nectar is still clear, and you are just doing normal maintenance, this is usually the best place to start. A hot-water rinse and scrub is the everyday workhorse of hummingbird feeder care.
How to do it:
- Empty the old nectar completely. Do not “top off” old nectar with fresh sugar water.
- Take the feeder apart as much as possible.
- Rinse all parts with hot water.
- Use a bottle brush to scrub the reservoir and a smaller brush to clean feeding ports, lids, seams, and perches.
- Rinse again thoroughly.
- Let every part air-dry fully before refilling.
This method works well because many feeder problems come from simple buildup: dried sugar, a thin film inside the bottle, pollen, dust, and tiny bits of residue in the ports. A brush physically removes that grime before it turns into a bigger issue.
Use this method when you are cleaning on schedule and there is no visible mold. It is especially useful if you are changing nectar every few days in summer or at least weekly in cooler weather. Think of it as the “stay ahead of the mess” approach.
Pro tip: Keep a small brush dedicated to feeder cleaning only. A retired toothbrush works for grooves and tight corners, but do not reuse it for anything else unless your household enjoys chaos.
Method 2: Clean With a Vinegar Solution
Best for extra deodorizing and light sanitizing
If your feeder has a little more buildup or you want a stronger clean without jumping straight to bleach, white vinegar is a popular next step. Many birding and extension sources recommend vinegar for hummingbird feeders because it helps loosen residue and can freshen parts without leaving soap behind.
How to do it:
- Empty the feeder and disassemble it.
- Mix a vinegar cleaning solution. A common approach is 4 parts hot water to 1 part white vinegar.
- Soak the feeder parts for several minutes, or longer if buildup is stubborn.
- Scrub the reservoir and especially the feeding ports with the proper brushes.
- Rinse thoroughly several times with clean water.
- Allow all parts to air-dry before refilling with fresh nectar.
This method is handy when your feeder has that sticky, lightly cloudy, “something is beginning to go wrong here” feeling. It is stronger than plain hot water but still approachable for routine care. Vinegar can also help if you notice a faint smell or a film that does not rinse away easily.
The most important part is the rinse. Vinegar may be useful, but you still do not want leftover cleaning solution mixing with fresh nectar. Hummingbirds came for sugar water, not artisan salad dressing.
When to choose vinegar:
- Your feeder has light buildup but no serious mold
- You want a deeper clean than hot water alone
- You prefer to avoid soap residue on hummingbird feeders
- You are cleaning frequently and want a simple, repeatable method
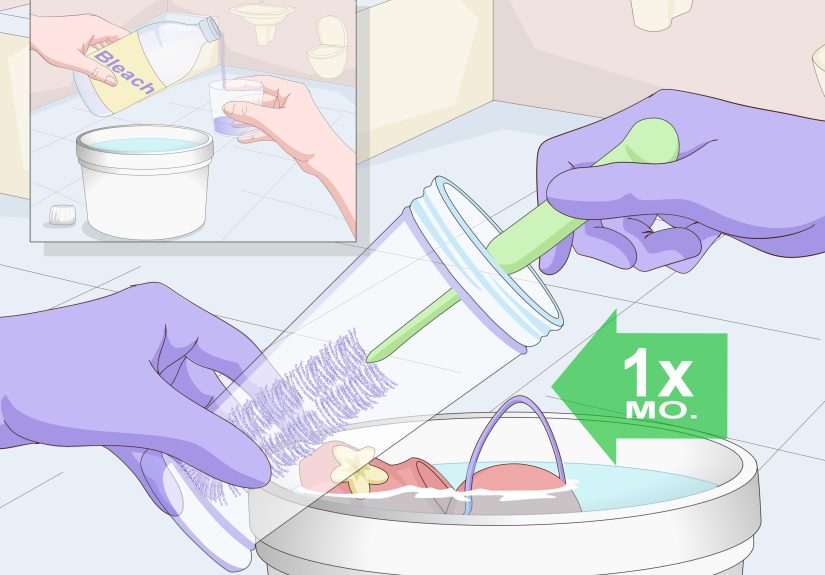
Method 3: Deep-Clean With a Diluted Bleach Solution
Best for visible mold, heavy residue, or neglected feeders
If you spot black mold, cloudy sludge, or crusty buildup around the ports, it is time for the stronger option: a diluted bleach solution. This is the deep-clean method for feeders that need a reset.
How to do it:
- Dump the old nectar and fully disassemble the feeder.
- Mix a mild bleach solution. A widely recommended ratio is 1 part bleach to 9 parts water. Some guidance gives a similar mild formula, such as 1/4 cup bleach to 1 gallon of water.
- Soak the feeder parts for about 10 minutes.
- Scrub away all visible debris, paying close attention to seams, flowers, and feeding holes.
- Rinse every piece extremely well, more than once, until no bleach smell remains.
- Let the feeder air-dry completely before adding fresh nectar.
This is not the method you need every single time, but it is the one to use when a feeder is visibly dirty or moldy. Deep-cleaning is also smart after a long gap in maintenance, after very hot weather, or anytime the feeder has been sitting with spoiled nectar. If a hummingbird feeder looks suspicious, trust your instincts and clean it thoroughly.
Important: bleach is effective, but only when diluted properly and rinsed thoroughly. Never use full-strength bleach, and never refill a feeder until it is fully rinsed and dry. If you can still smell bleach, the feeder is not ready.
How Often Should You Clean a Hummingbird Feeder?
This is the question every hummingbird enthusiast asks, right after, “Why are they fighting like tiny feathered gladiators?” The answer depends mostly on the weather.
- Hot weather: clean and refill every 1 to 3 days if needed, or at minimum every few days.
- Mild weather: every 3 to 5 days is a good rule.
- Cooler weather: at least once a week, sometimes twice weekly depending on conditions.
- Any time the nectar is cloudy, moldy, or smells off: clean it immediately.
The safest habit is to check the feeder daily. You do not always need to scrub it every single morning, but you do want to notice changes before the birds do. If the nectar level is low because the hummingbirds emptied it, clean the feeder before refilling. If the sugar water is still mostly full but looks questionable, dump it anyway. Fresh nectar is cheaper than a bad feeder problem.
Common Mistakes to Avoid
1. Topping off old nectar
Fresh sugar water poured into old nectar does not magically create clean nectar. It creates old nectar with a fresh accent. Always empty, clean, and refill.
2. Ignoring the feeding ports
The reservoir may look spotless while the feeding holes are quietly collecting mold or sticky residue. Always clean the ports and tiny crevices.
3. Using the wrong sweetener
Stick with plain white granulated sugar and water. Do not use honey, brown sugar, raw sugar, artificial sweeteners, or red dye.
4. Relying on looks alone
Just because nectar looks clear from a distance does not mean the feeder is clean. Take it apart and inspect the inside, especially in warm weather.
5. Using soap carelessly
General bird-feeder guidance sometimes allows soap, but many hummingbird-specific recommendations prefer hot water, vinegar, or properly diluted bleach because soap residue can linger. If your feeder manufacturer says it is dishwasher-safe, follow those instructions and rinse thoroughly.
6. Filling the feeder too much
If birds are not emptying the feeder before cleaning day, use less nectar. Smaller batches stay fresher and create less waste.
How to Keep a Hummingbird Feeder Cleaner Longer
You cannot stop nature from being nature, but you can make cleaning easier.
- Hang the feeder in partial shade so nectar stays fresh longer.
- Use more than one feeder if birds are territorial.
- Choose a feeder with a wide mouth and removable parts.
- Fill only the amount of nectar birds will drink in a few days.
- Keep extra homemade nectar in the refrigerator for quick refills.
- Do a fast visual mold check every time you walk by.
These small habits reduce spoilage and make cleaning a hummingbird feeder feel less like a project and more like a quick backyard routine.
Backyard Lessons: Real-World Experiences With Cleaning a Hummingbird Feeder
Anyone who keeps hummingbird feeders for more than a week learns the same lesson: the birds are adorable, but the feeder schedule is not negotiable. The first few days, everything feels easy. You mix the nectar, hang the feeder, and wait for nature to reward your effort with airborne jewels. Then the sun heats up, a little sugar film appears, an ant discovers the buffet, and suddenly you realize hummingbird feeding is part joy, part hospitality, and part sanitation department.
One of the most common experiences people have is underestimating how quickly nectar changes in warm weather. A feeder that looked perfectly fine on Tuesday morning can start looking suspicious by Wednesday afternoon, especially if it hangs in direct sun. That is why experienced backyard birders often become slightly obsessive about quick checks. Not dramatic checks. Just the kind where you walk past the window, squint at the feeder, and think, “Hmm. You seem innocent, but I’m taking you apart anyway.”
Another real-world lesson is that feeder design matters more than people expect. Many people buy the prettiest feeder on the shelf and only later discover it has narrow necks, decorative creases, and flower ports apparently designed by someone who has never cleaned anything sticky in their life. By the second or third cleaning, most people become converts to the boring-but-brilliant feeder that unscrews easily and lets a brush reach the bottom. Convenience wins. Hummingbirds do not care whether your feeder looks like hand-blown art from a boutique gift shop. They care whether the nectar is fresh.
There is also the classic “I’ll clean it tomorrow” moment. Nearly everyone has one. Life gets busy, the feeder still has nectar in it, and postponing seems harmless. But hummingbird feeder maintenance punishes procrastination quickly. Tomorrow becomes “Why is there black stuff in the port?” and then “Why am I holding this feeder like it betrayed me personally?” In practice, quick routine cleaning is easier than delayed deep-cleaning. Five regular minutes beats a surprise scrubbing session every time.
Many backyard bird lovers also notice how cleaning changes bird activity. Fresh nectar and clean ports often lead to more frequent visits, more confident feeding, and less hesitation at the feeder. A clean setup simply works better. You may even find that when you keep up with the routine, other problems shrink too. Ants become easier to manage, mold never gets a foothold, and the entire hobby feels calmer.
And perhaps the most relatable experience of all: once hummingbirds become regular visitors, cleaning stops feeling like a chore and starts feeling like part of the ritual. You make fresh nectar, rinse the feeder, check the ports, refill, hang it back up, and wait. A few minutes later, a bird zips in like it is doing an inspection. Somehow, that tiny visitor makes the whole process feel worth it. It is a small routine, but it creates one of the best kinds of backyard rewards: a clean feeder, healthy birds, and front-row seats to one of nature’s most charming performances.
Final Thoughts
If you want the simplest possible answer to how to clean a hummingbird feeder, here it is: clean it often, clean it thoroughly, and never let old nectar linger. Use hot water and a bottle brush for routine cleaning, a vinegar solution for a stronger everyday wash, and a diluted bleach soak when mold or heavy residue shows up. Scrub the ports, rinse everything well, and let the feeder dry before refilling.
That routine may not be glamorous, but it is the secret to a safer, healthier feeder. And once you get into the habit, it becomes easy. The hummingbirds get clean nectar, you get better backyard birdwatching, and everybody wins. Even your future self, who no longer has to deep-clean a feeder that looks like it has seen things.