Table of Contents >> Show >> Hide
- First: What “Tomato Rot” Usually Means (So You Treat the Right Problem)
- Easy Way #1: Water for Consistency, Not Drama
- Easy Way #2: Mulch Like You Mean It (And Keep Fruit Off Bare Soil)
- Easy Way #3: Feed Tomatoes for Balance (Calcium Is Important, but So Is “Not Overdoing It”)
- Easy Way #4: Practice “Clean and Dry” Gardening (Because Rot Loves Chaos)
- Quick Troubleshooting Cheat Sheet
- Conclusion: The Four Habits That Save Tomato Harvests
- Extra: Common Garden Experiences That Help You Win the “Rot Season” (About )
Tomatoes have a talent for looking perfect on Monday and auditioning for a zombie movie by Friday. One minute you’re dreaming of BLTs, the next you’re holding a fruit that feels like a stress ball filled with regret. The good news: most “tomato rot” problems are preventable with a few boring-but-mighty habits. (Boring is fine. Boring is what saves harvests.)
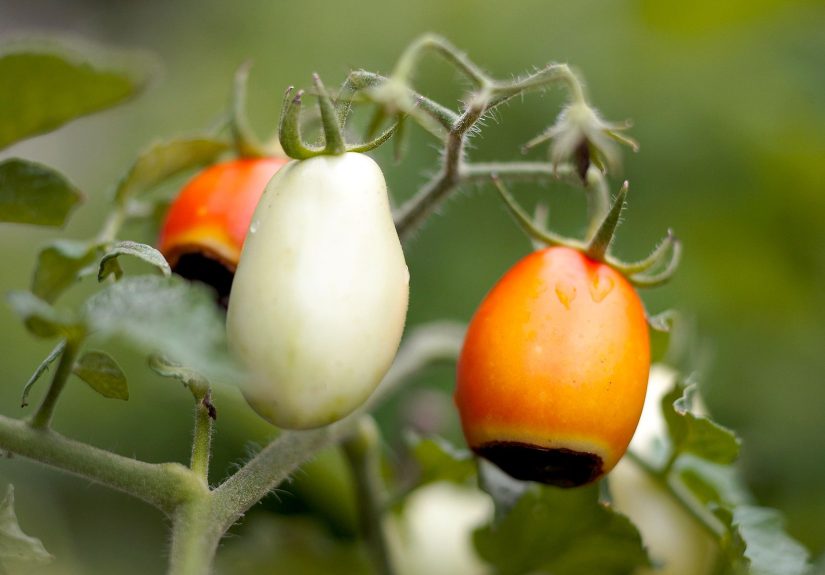
This guide focuses on the most common rot scenarios home gardeners run intoespecially blossom-end rot (that black leathery spot on the bottom) and the soil- and moisture-related fruit rots that spread when tomatoes stay wet, touch the ground, or crack and invite microbes to the party.
First: What “Tomato Rot” Usually Means (So You Treat the Right Problem)
Blossom-end rot (BER): not a “germ,” a calcium delivery issue
Blossom-end rot is a physiological disorderusually tied to inconsistent soil moisture that disrupts calcium movement into developing fruit. It’s not typically caused by pests or a fungus, and dumping eggshells on top of the soil won’t fix it overnight (sorry, internet).
Fruit rots: fungi and bacteria that love wet fruit, cracks, and soil contact
Rots like buckeye rot, anthracnose, and various soft rots thrive when fruit stays wet, splashed with soil, or damaged. These problems often show up after warm rains, overhead watering, crowded foliage, and fruit resting on bare groundbasically, when your tomato bed becomes a tiny swamp.
Easy Way #1: Water for Consistency, Not Drama
If tomatoes had a group chat, their #1 complaint would be: “Why are we either in a drought or a flood?” Moisture swings are a big driver of blossom-end rot and cracking, and cracks are basically open doors for rot organisms. Your goal is steady, even moistureespecially as fruit sets and sizes up.
Do this: deep watering on a schedule
- Water deeply so moisture reaches the root zone. Shallow sprinkles train shallow roots and increase stress.
- Use a simple rhythm (adjusting for weather): during dry stretches, many gardens do well with a thorough soak about once a week rather than daily sips.
- Check soil moisture under the mulch before watering again. If it’s still damp a few inches down, wait.
Upgrade that makes life easier: drip or soaker hose
Drip irrigation or a soaker hose delivers water where tomatoes want it (at the roots), while keeping foliage and fruit drier. Bonus: it reduces splashing soil onto fruitone of the sneaky ways rot pathogens hitch a ride.
Quick example: If you’re leaving town for 4–5 days in hot weather, a cheap hose timer on a soaker hose can be the difference between “harvest” and “tomato crime scene.” Consistency beats heroics.
Easy Way #2: Mulch Like You Mean It (And Keep Fruit Off Bare Soil)
Mulch is the unsung hero of tomato rot prevention. It helps stabilize soil moisture (hello, fewer BER problems), reduces soil splash, and keeps fruit cleaner. Think of it as a “doorman” that prevents soilborne trouble from entering the club.
Choose a mulch you’ll actually use
- Straw (not hay if you can avoid ithay often brings weed seeds)
- Shredded leaves (partially decomposed is ideal)
- Untreated grass clippings in thin layers (let them dry a bit so they don’t mat)
- Plastic mulch (especially helpful in very rainy periods, paired with drip irrigation)
How to apply it without creating a slug spa
- Lay down 2–3 inches of organic mulch once soil has warmed.
- Keep mulch pulled back an inch or two from the stem to discourage stem issues.
- In heavy rain climates or poorly drained spots, consider raised beds to keep the root zone from staying waterlogged.
Also: help tomatoes stay off the ground. Use cages, stakes, or trellises and keep heavy clusters supported. Ground contact plus warm moisture equals rot roulette.
Easy Way #3: Feed Tomatoes for Balance (Calcium Is Important, but So Is “Not Overdoing It”)
Blossom-end rot is associated with low calcium in the fruit, but the plot twist is that your soil can contain calcium and you can still get BER if the plant can’t move it into fast-growing fruit. That’s why moisture consistency and healthy roots matter so much. Nutrition is still part of the solutionjust not the “dump random supplements and hope” approach.
Start with a soil test (the least exciting, most effective move)
A soil test helps you understand pH and nutrient balance. Many vegetables, including tomatoes, generally perform well around a slightly acidic to near-neutral soil (often cited near pH ~6.5). If pH is off, calcium availability and overall nutrient uptake can suffer.
Avoid the fertilizer mistakes that invite rot
- Don’t overdo nitrogen. Too much nitrogen can push lots of leafy growth that stays humid and shades fruitideal for rot. It can also contribute to uneven growth and cracking.
- Keep roots happy: avoid aggressive cultivating near the plant base that can damage roots and disrupt water/calcium uptake.
- Choose steady feeding: slow-release organic amendments or measured fertilizer applications beat random heavy doses.
If BER appears: triage (not magic)
If you spot early blossom-end rot on the first fruits, don’t panic and torch the garden. Correct watering first. Remove badly affected fruit so the plant can focus on healthy set. Some extension guidance notes that a calcium chloride spray can be used as an emergency measure, but it works best alongside fixing moisture problems and following label directions carefully.
Reality check: BER often hits the earliest fruit the hardest; later fruit can improve once watering and growth stabilize.
Easy Way #4: Practice “Clean and Dry” Gardening (Because Rot Loves Chaos)
Most fruit rots need moisture, time, and opportunity. Your job is to remove at least one of those. “Clean and dry” is a simple strategy: keep foliage and fruit dry when possible, reduce disease pressure, and don’t let infected material linger.
Keep water off leaves and fruit
- Avoid overhead watering when possible, especially once fruit is forming and ripening.
- Water early in the day so any splashes dry quickly.
- Space plants and prune lightly for airflowthink “breezy,” not “tomato jungle.”
Sanitation: small habits, big payoff
- Pick up fallen fruit. Rot on the ground is like a daycare for pathogens.
- Remove and discard obviously diseased fruit (don’t compost it unless your compost gets truly hot).
- Rotate away from tomatoes/peppers/eggplant for a couple of seasons if fruit rots were severe. Many pathogens persist in residue and soil.
Harvest and handle to avoid “mystery countertop rot”
A lot of rot shows up after harvest because fruit was cracked, bruised, or harvested wet. Harvest when fruit is dry, handle gently, and don’t pile tomatoes like you’re building a fruit pyramid for a museum exhibit. If you wash tomatoes, dry them well and store them with airflow (and keep an eye on any with tiny cracks).
Quick Troubleshooting Cheat Sheet
- Black/leathery spot on the blossom end: likely blossom-end rot → stabilize watering, mulch, avoid root damage, balance fertility.
- Soft, watery, rapidly collapsing rot: often bacterial/fungal soft rot → keep fruit dry, avoid bruising, harvest promptly, improve airflow.
- Rings/large lesions after warm wet weather, fruit near soil: soil-related rots (e.g., buckeye rot) → mulch, stake, raised beds, avoid splashing.
- Rot enters through cracks: cracking from moisture swings → consistent watering + mulch + choose crack-resistant varieties next season.
Conclusion: The Four Habits That Save Tomato Harvests
You don’t need a chemistry set to prevent most tomato rot disasters. You need consistency. Keep soil moisture steady, mulch to buffer swings, support plants so fruit stays off the ground, feed for balance (not leaf explosions), and practice simple hygiene that keeps the garden drier and cleaner.
If you adopt just one thing this season, make it this: mulch + consistent watering. It’s the two-for-one coupon that helps prevent blossom-end rot, reduces cracking, and makes fruit rots less likely. Your tomatoes won’t send a thank-you card, but they’ll stop self-destructingclose enough.
Extra: Common Garden Experiences That Help You Win the “Rot Season” (About )
In real backyards, tomato rot prevention usually isn’t about a single silver bulletit’s about noticing patterns and fixing the boring stuff first. One of the most commonly reported “aha” moments is that blossom-end rot often appears right when life gets busy: a heat wave hits, watering gets skipped, then a big rainstorm or an enthusiastic overwatering session follows. The plant swings from thirsty to flooded, calcium delivery to fruit gets disrupted, and the first big tomatoes take the hit. Gardeners who switch from “whenever I remember” watering to a simple schedule (with a soaker hose or drip line) often report that the next wave of fruit looks dramatically better.
Another frequent experience: mulch feels optional… until you grow tomatoes without it. Bare soil splashes during storms, fruit gets muddy, and the lowest tomatoes seem to rot first. Add a thick layer of straw (or shredded leaves), and suddenly fruit stays cleaner and the bed holds moisture longer between waterings. People also notice they can water less often without stressing plants, which is basically rot prevention disguised as lazinessa gardening dream.
Support systems are another “wish I’d done this earlier” story. A tomato cage can look like overkill in May, but in July it becomes the difference between fruit dangling in airflow and fruit lying in damp grass like it’s sunbathing in a swamp. Once gardeners stake or cage and prune a little for airflow, the plant dries faster after rain, and fruit rots are less likely to explode across clusters. Even a small improvement in airflow can matter during humid weeks, when leaves stay wet and the canopy turns into a sauna.
Fertilizer experiences can be surprisingly dramatic. Many gardeners try to “help” tomatoes with extra nitrogen, and the plants respond by growing into lush, leafy monsters. The downside shows up later: shaded fruit, slower drying, more cracking, and a higher chance of rot sneaking in through damaged skins. A calmer, balanced feeding approach tends to produce sturdier growth and fewer problemsespecially when paired with steady moisture.
Finally, there’s the post-harvest lesson: a tomato that looks fine at picking can still rot quickly if it was harvested wet, bruised, or already cracked. People who start harvesting when fruit is dry, handling gently, and separating “perfect” tomatoes from “use first” tomatoes (tiny cracks, small soft spots) often find their kitchen waste drops fast. It’s not glamorous, but it’s effectiveand it keeps your harvest on plates instead of in the trash.
Bottom line: Most seasons, rot is beaten by steady moisture, clean fruit, and airflownot by panic shopping in the garden aisle.