Table of Contents >> Show >> Hide
- First: Are You Sure It’s Yeast?
- Before You Clean: A 2-Minute Safety Check
- What You’ll Need (Keep It Simple)
- Way #1: The “Fill–Massage–Shake–Wipe” Method (The Vet-Standard Clean)
- Way #2: The Cotton-Ball Soak Method (For “Nope” Dogs and Sensitive Ears)
- Way #3: Clean, Pause, Then Medicate (When Your Vet Prescribed Ear Drops)
- Way #4: The Dry-Out & Maintenance Method (Because Yeast Loves Moisture)
- What NOT to Put in Your Dog’s Ear (Even If the Internet Shouts in All Caps)
- How Often Should You Clean During a Yeast Infection?
- When You Should Call the Vet (Sooner Than Later)
- Quick FAQ
- Conclusion
- Owner Experiences: What It Really Looks Like at Home (And How People Actually Make It Work)
- The “My Dog Thinks the Bottle Is a Threat to National Security” Situation
- The “The Smell Came Back Two Days Later” Situation
- The “My Dog Shakes and Sprays Everything Like a Lawn Sprinkler” Situation
- The “My Dog Is Too Sore to Let Me Near the Ear” Situation
- The “I Can’t Get the Drops In” Situation
- The “We Finally Got ControlHow Do We Keep It That Way?” Situation
A dog ear yeast infection is basically the world’s least charming bakery: warm, dark, slightly moist, and producing an unmistakable “who left gym socks in a sauna?” aroma.
The good news is that cleaning can help your dog feel better and can make prescribed ear meds work better. The important news is that cleaning alone usually doesn’t “cure”
a true yeast infectionespecially if there’s inflammation, allergies, or a secondary bacterial party happening in there.
This guide walks you through four safe, vet-aligned ways to clean your dog’s ears during a yeast infection, with clear steps, comfort hacks, and the
“please don’t do that” list (because your dog does not need a DIY chemistry experiment inside their head).
First: Are You Sure It’s Yeast?
Yeast (often Malassezia) commonly overgrows when the ear canal gets inflamed or stays dampthink swimming, humid weather, floppy ears, or allergies.
But yeast isn’t the only culprit. Ear mites, foreign material (like foxtails), bacteria, polyps, and underlying skin allergies can look a lot like “yeast.”
Rule of thumb: if this is your dog’s first ear infection, if the ear is very painful, or if symptoms keep coming back, a veterinary exam is the fastest way to
stop guessing and start fixing. A vet can look down the canal and check the eardrum, then confirm yeast under the microscope and choose the right cleaner and medication.
Before You Clean: A 2-Minute Safety Check
Skip home cleaning and call a vet promptly if you notice:
- Yelping, snapping, or intense pain when you touch the ear
- Head tilt, dizziness, loss of balance, unusual eye movements
- Heavy swelling that narrows the ear opening
- Bleeding, a lot of pus-like discharge, or a strong “rotting” odor
- Suspected foreign object (sudden onset after a walk in tall grass)
Why the caution? If the eardrum is damaged or there’s middle-ear involvement, flushing can be harmful. When in doubt, let a professional check the ear first.
What You’ll Need (Keep It Simple)
- Vet-approved dog ear cleaner (ask your vet which type is best for yeast)
- Cotton balls or gauze squares (lint-free is best)
- A towel (your dog will shake; this is physics)
- Treats (high-value: tiny chicken bits, freeze-dried liver, etc.)
- Optional: disposable gloves if the discharge gives you the ick (no judgment)
What you do NOT need: cotton swabs shoved into the canal, rubbing alcohol, hydrogen peroxide, essential oils, or a heroic attitude.
We’re aiming for “calm spa appointment,” not “audition for a disaster movie.”
Way #1: The “Fill–Massage–Shake–Wipe” Method (The Vet-Standard Clean)
This is the classic, most effective home technique for many dogs with mild-to-moderate yeast buildupespecially when the canal contains waxy, brown debris.
It uses the cleaner to loosen gunk, then lets your dog’s natural head shake help bring it up and out.
Best for
- Yeasty odor + waxy debris
- Dogs who tolerate the bottle
- Cleaning before applying prescribed ear drops
Step-by-step
- Set up your towel zone. Choose an easy-to-wipe spot. Put the towel on your lap or the floor.
- Lift the ear flap (pinna). You’re opening the canal so the solution can get where the yeast lives.
- Fill the canal with cleaner. Aim the nozzle just at the openingdon’t jam it inside. Use enough solution to wet the canal.
(Your vet can tell you the right amount for your dog’s size.) - Massage the base of the ear for 20–30 seconds. You should hear a gentle “squish.” That’s the cleaner doing its job.
- Let your dog shake. Step back unless you want a Jackson Pollock masterpiece on your shirt.
- Wipe what you can see. Wrap gauze around your finger or use a cotton ball to wipe the inner flap and the visible part of the canal.
Only go as deep as your fingertip naturally reaches. - Reward immediately. Treat + praise. Your dog should associate ear cleaning with “weird, but worth it.”
Comfort & success tips
- Warm the bottle in your hands for a minute so the solution isn’t cold and startling.
- Go slow with anxious dogs: one ear, treat, break, then the other.
- If the ear is very tender, switch to Way #2 and ask your vet whether inflammation control is needed first.
Way #2: The Cotton-Ball Soak Method (For “Nope” Dogs and Sensitive Ears)
Some dogs hate the sensation of liquid being squeezed directly into the ear. Others will tolerate cleaning better if you apply the solution to cotton first.
This method is also useful when the ear is irritated and you’re trying to be extra gentle.
Best for
- Dogs who flinch or panic when the bottle approaches
- Ears that are irritated but not severely swollen or bleeding
- Owners who want more control over how much liquid is used
Step-by-step
- Soak a cotton ball or gauze with the ear cleaner until it’s damp (not dripping like a wet sponge apocalypse).
- Lift the ear flap and wipe the inside of the flap firstthis removes surface wax and discharge.
- Gently wipe the visible canal opening using your fingertip wrapped with gauze (or the cotton ball), rotating as you go.
Think “polish the doorway,” not “redecorate the hallway.” - Repeat with fresh gauze/cotton until the wipe comes away mostly clean.
Expect some discoloration during yeast infections; you’re reducing buildup, not chasing perfection. - Finish with a treat jackpot. Two or three small treats in a row makes a point.
Important: This method won’t flush deep debris like Way #1 can, but it’s often the best “starter” approach for sensitive dogsespecially if a vet has told you to
avoid flushing until the canal is less inflamed.
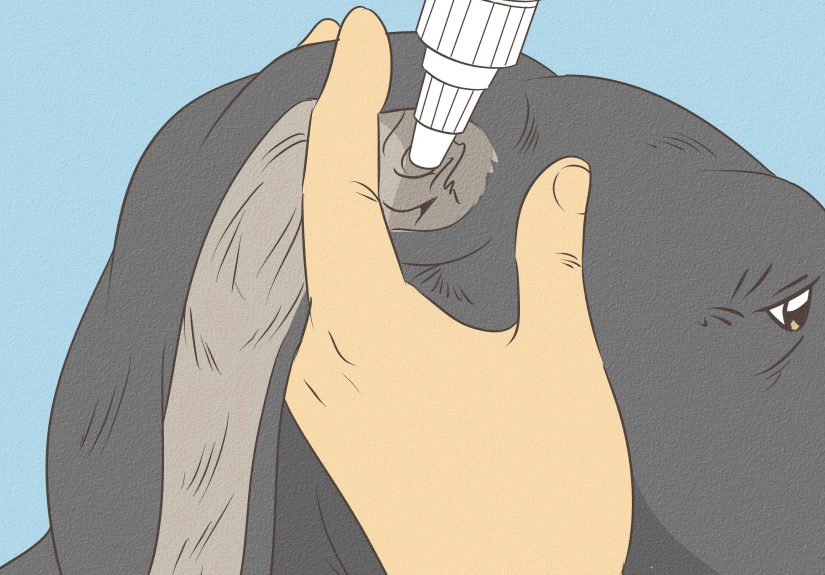
Way #3: Clean, Pause, Then Medicate (When Your Vet Prescribed Ear Drops)
When a dog has a yeast infection, vets often prescribe topical antifungal drops (sometimes combined with anti-inflammatory medication).
Cleaning first can remove wax and discharge so the medicine can actually contact the skin where yeast overgrows.
One catch: some ear cleansers can interfere with certain medications, so your vet may recommend a waiting period (or a specific cleanser that pairs well with the drops).
If your vet didn’t mention timing, it’s worth asking.
Best for
- Dogs currently on prescription ear medication
- Recurring yeast infections where wax buildup blocks medicine
- Owners who want a repeatable routine that actually sticks
Step-by-step routine
- Choose your cleaning method: Way #1 if your dog tolerates flushing; Way #2 if they don’t.
- Clean the ear to reduce visible wax/discharge.
- Wait if instructed (commonly 5–15 minutes, but follow your vet’s instructions).
- Apply medication at the dose your vet prescribed (drops or measured mL).
Keep the nozzle cleandon’t touch the ear with the bottle tip if you can avoid it. - Massage the base of the ear again for 15–20 seconds so the medication spreads.
- Treat, praise, and stop. Over-handling sore ears can make dogs dread the whole process.
A realistic example schedule (adjust to your vet)
- Morning: Clean → wait as directed → medicate
- Evening: Medicate (and clean only if your vet recommends twice-daily cleaning)
If you’re struggling to apply drops, ask your vet about alternate formats (flushes, gels, or in-clinic treatments). Some dogs do better with fewer, more effective
administrations than with a twice-daily wrestling match.
Way #4: The Dry-Out & Maintenance Method (Because Yeast Loves Moisture)
Yeast thrives in warm, damp environments. So while the right cleanser helps remove debris, keeping the ear canal from staying wet can help prevent the “yeast comeback tour.”
This method focuses on smart drying habits and gentle maintenanceespecially for swimmers, bath enthusiasts, and floppy-eared cuties.
Best for
- Dogs who swim or get frequent baths
- Dogs with chronic “yeasty ear” tendencies
- Maintenance once the active infection is improving
What to do
- After water exposure: Dry the ear flap and the visible ear opening with gauze or a soft cloth.
- Use only vet-approved drying/acidifying products if recommended for your dog. The goal is to discourage yeast-friendly moisture and pH changes.
(This is not the moment for kitchen concoctions.) - Wipe, don’t dig: Ear wipes can be helpful for the flap and outer opening, especially if your dog hates flushing.
Save the deep clean for when it’s truly needed. - Watch the “over-cleaning” trap: Cleaning too often can irritate the ear canal and strip protective oils, making things worse.
Stick to the schedule your vet recommends.
Think of this like brushing teeth: consistency beats intensity. The goal is calmer ears that don’t smell like a sourdough starter with opinions.
What NOT to Put in Your Dog’s Ear (Even If the Internet Shouts in All Caps)
- Alcohol: Can sting and dry irritated tissue.
- Hydrogen peroxide: Can be irritating and worsen inflammation.
- Essential oils: Risk of irritation and toxicity (plus dosing is not DIY-friendly).
- Human ear products: Not automatically safe for dogs; ingredients and concentrations vary.
- Cotton swabs deep in the canal: Can push debris deeper or injure the ear canal/eardrum.
- Random “home remedies” during active infection: Some may change moisture or irritate tissue, worsening yeast and inflammation.
If you want an at-home option, ask your vet for a product that’s specifically appropriate for yeast.
How Often Should You Clean During a Yeast Infection?
There’s no one-size-fits-all schedule because ear canals vary (breed anatomy, hair, wax production) and infections vary (mild yeast vs. severe, painful otitis).
That said, many veterinary protocols use a more frequent cleaning phase early on, then taper to maintenance once the yeast is controlled.
- Mild yeast overgrowth: Often improves with regular cleaning plus any prescribed meds, then maintenance cleaning weekly or as advised.
- Moderate infection with heavy wax: May require daily cleaning for a short period (commonly 1–3 weeks) under veterinary direction, then weekly maintenance.
- Very inflamed/painful ears: Cleaning may need to wait until pain and swelling are controlled by a vetforcing it can cause trauma and make your dog fear handling.
If the ear looks worse after cleaning (more redness, more odor, more pain), stop and check with your vet. “Powering through” is for marathon training, not infected ear canals.
When You Should Call the Vet (Sooner Than Later)
- Symptoms last more than 24–48 hours or worsen
- Your dog has repeated ear infections (often tied to allergies or chronic skin disease)
- Thick discharge, significant swelling, bleeding, or severe odor
- Head tilt, imbalance, or hearing changes
- You suspect a foreign body or ear mites
Quick FAQ
Can cleaning alone cure a dog ear yeast infection?
Sometimes cleaning helps mild yeast overgrowth, but true infections commonly need prescription antifungal and anti-inflammatory treatmentespecially if the canal is inflamed.
Cleaning is often a key support step, not the whole solution.
Should I pluck hair from inside my dog’s ears?
It depends. Excess hair can trap moisture, but plucking can also irritate the canal. If your dog has recurring yeast infections, ask your vet what’s appropriate for your dog’s ear anatomy
and skin sensitivity. No universal rule applies.
My dog’s ears smell yeasty but look “fine.” Should I still clean them?
Mild odor can be an early warning sign. A gentle clean with a vet-approved product may helpespecially after swimming. If odor returns quickly, or if your dog is scratching or shaking,
it’s time for a vet check.
Conclusion
Cleaning a dog’s ears during a yeast infection isn’t glamorous, but it can be a game-changer for comfortand for helping medication actually reach the skin.
Choose the method your dog tolerates best:
flush and wipe (Way #1), cotton-soak gentle clean (Way #2), clean-then-medicate (Way #3), or
dry-out maintenance (Way #4).
Keep it vet-approved, keep it gentle, and keep cotton swabs out of the ear canal. Your dog’s goal is “ears that feel normal,” not “ears that could star in a disinfectant commercial.”
If symptoms persist, escalate quicklyear infections can become chronic when the underlying cause isn’t addressed.
Owner Experiences: What It Really Looks Like at Home (And How People Actually Make It Work)
The tidy step-by-step instructions are greatuntil you’re holding an ear-cleaner bottle in one hand and your dog is doing interpretive dance with the other half of their body.
Here are a few real-life-style scenarios (composite examples) that reflect what many dog owners run into, plus the small tweaks that often turn chaos into progress.
The “My Dog Thinks the Bottle Is a Threat to National Security” Situation
A lot of owners report that the moment the ear cleaner appears, their dog vanishes like a magician’s assistant. The fix is usually not “be faster.”
It’s making the process predictable and less intense. People often start by leaving the bottle out (cap on) during calm moments, pairing it with treats, then touching the ear flap
briefly, treat, done. After a day or two, they graduate to Way #2 (cotton ball soak) because it feels less intrusive than a squirt of liquid. Once the dog stops flinching at ear handling,
some owners can switch to Way #1 for deeper cleaningespecially when wax buildup is heavy.
The “The Smell Came Back Two Days Later” Situation
Yeast can be stubborn, and owners often describe a frustrating pattern: clean, smell improves, thenbam“bread factory” returns. In these cases, the most useful step is usually
getting a vet-confirmed diagnosis and a plan that addresses inflammation and any underlying cause (allergies are a frequent suspect). Owners also find that consistency matters:
doing the right cleaning schedule for the recommended time window beats doing one epic clean and hoping the ear learned its lesson.
The “My Dog Shakes and Sprays Everything Like a Lawn Sprinkler” Situation
The shake is normal and even helpfulit brings loosened debris outward. Owners who keep their sanity usually set up a “shake zone” first: towel on the floor, dog sitting between their knees,
cleaner applied, massage, then a deliberate step back so the dog can shake without redecorating the room. Many people also keep wipes handy for the outer ear flap afterward,
which makes the whole process feel less messy (and less like you’re losing a battle).
The “My Dog Is Too Sore to Let Me Near the Ear” Situation
This is the scenario where owners most often realize: cleaning can’t be the first step if the ear is genuinely painful. People describe their dog yelping or snappingnot out of aggression,
but because it hurts. In those cases, the most successful path is typically veterinary treatment to reduce pain and swelling first, then gentle cleaning once the ear is less inflamed.
Owners who try to “push through” often report the opposite of what they want: more inflammation, more resistance, and a dog who now believes ear cleaning is a betrayal.
A calmer ear is easier to treat, and a calmer dog is safer to handle.
The “I Can’t Get the Drops In” Situation
Many owners say the hardest part isn’t cleaningit’s medication. One common trick is doing a short clean (Way #2 or a very gentle Way #1), then giving a treat, then medicating,
then giving another treat. Breaking it into two tiny events can reduce the “here it comes” dread. Another small win is warming the drops in your hands so they’re not cold,
and positioning the dog so they feel supported (standing with their rear against a wall, or lying down with your body blocking a backward escape).
If it’s still a daily struggle, owners often do best by calling the vet and asking about alternative formats or in-clinic options rather than letting the infection linger.
The “We Finally Got ControlHow Do We Keep It That Way?” Situation
Once the yeast is under control, owners often find that the maintenance routine is where success lives: drying ears after swimming, cleaning only as recommended (not constantly),
and addressing the root cause when infections repeat. For some dogs, that means allergy management. For others, it’s minimizing moisture and sticking to the right ear-cleaning product.
The big “aha” many people report is realizing that prevention looks boring. And boring is goodbecause boring ears don’t smell like yeast.