Table of Contents >> Show >> Hide
- What You Can (Realistically) Finish in 48 Hours
- Your “No Panic” 48-Hour Game Plan
- Tools and Materials Checklist (Weekend-Friendly)
- Step-by-Step DIY Tutorial (48 Hours, No Meltdowns)
- Step 1: Deep clean like you’re being judged by a hotel manager
- Step 2: Remove what gets in your way
- Step 3: Patch, sand, and tape (the “boring” part that makes it look expensive)
- Step 4: Paint for a bathroom (aka: moisture happens here)
- Step 5 (Optional but powerful): Give the vanity a glow-up
- Step 6: Upgrade your “touch points” (tiny changes, huge payoff)
- Step 7: Lighting and mirror upgrades (the “instant makeover” combo)
- Step 8: Re-caulk for crisp, clean edges
- Step 9: Style it like a finished room (not a utility closet with a sink)
- Budget Examples (Choose Your Adventure)
- Common Mistakes That Blow Up a 48-Hour Bathroom Makeover
- 48-Hour Finish Checklist (Your Final 20 Minutes)
- Real-World Experiences: What Weekend Bathroom Makeovers Teach You (Extra )
- Conclusion
You know that moment when you walk into your bathroom and think, “This place has… potential,”
but what you really mean is, “This place has not emotionally supported me since 2012”?
Good news: you don’t need a full demolition (or a second mortgage) to get a bathroom that feels clean,
updated, and intentionally designed. You need a plan, a short shopping list, and a fearless relationship with painter’s tape.
This DIY tutorial is built for real life: one weekend, limited tools, and the fact that paint always takes longer than your confidence tells you it will.
The goal is a 48-hour bathroom makeover that looks fresh, functions better, and doesn’t leave you crying in the tub with a caulk gun.
What You Can (Realistically) Finish in 48 Hours
A “weekend bathroom remodel” works when you focus on surface-level, high-impact upgradesthe kind that change what you see and touch every day.
Think of it as the 80/20 rule for bathrooms: 20% of the work delivers 80% of the “Whoa, this looks new” effect.
Perfect 48-hour projects
- Paint (walls, ceiling, trimsometimes vanity/cabinets if you prep well)
- Swap hardware (faucet, towel bars, toilet paper holder, cabinet pulls)
- Replace lighting (vanity light, bulbs, mirror)
- Re-caulk (tub, shower, sink edges for crisp, clean lines)
- Style upgrades (new shower curtain, mats, towels, storage baskets, art)
Not ideal for a 48-hour sprint
- Moving plumbing or electrical
- Full tile replacement (demo + mortar + grout + cure times)
- Major waterproofing changes
- New flooring that requires adhesives/leveling with long cure times
Translation: you can absolutely make your bathroom look dramatically better in a weekendjust don’t pick tasks that require
three drying cycles and a building inspector.
Your “No Panic” 48-Hour Game Plan
The secret to finishing on time isn’t working fasterit’s avoiding the classic DIY time thieves:
extra hardware-store runs, surprise surface repairs, and “Wait, which shutoff valve is the right one?”
Day 0 (Friday night): Set yourself up to win (45–90 minutes)
- Measure: mirror width, vanity light width, faucet hole spacing, towel bar spacing.
- Choose your finish: pick one metal (chrome, brushed nickel, matte black, brass) and stick with it.
- Buy materials: paint, caulk, hardware, new showerhead, bulbs, etc.
- Clear the room: counters empty, towels out, rugs out, shower items in a bin.
Day 1 (Saturday): Clean, prep, paint, and the “touch points”
- Morning: deep clean + remove fixtures/hardware + patch + sand + tape
- Midday: prime where needed + first coat of paint
- Afternoon: second coat + start on vanity/cabinet paint (optional) + install simple hardware
- Evening: quick styling reset so you can still use the bathroom
Day 2 (Sunday): Fixtures, caulk, lighting, style, and punch list
- Morning: faucet/showerhead swap + mirror/light upgrade
- Midday: re-caulk + detail cleaning
- Afternoon: towel bars/hooks + storage + final style pass
- Evening: admire your work like a home-reno superhero
Tools and Materials Checklist (Weekend-Friendly)
Tools
- Painter’s tape, drop cloths, microfiber rags
- Spackle + putty knife, sanding sponge (fine grit)
- Angled brush + small foam roller + roller frame
- Screwdrivers, adjustable wrench, channel-lock pliers
- Utility knife + caulk removal tool (optional, but helpful)
- Caulk gun
- Voltage tester (for lighting work)
Materials
- Bathroom-rated paint or durable washable interior paint (satin/semigloss is common for moisture areas)
- Primer (as neededespecially if repairing stains, raw patches, or glossy surfaces)
- Mildew-resistant bathroom caulk (often 100% silicone for wet zones)
- New faucet and/or showerhead (optional but high-impact)
- New vanity light or updated bulbs
- Mirror or medicine cabinet refresh (swap or frame it)
- Hardware set (pulls, towel hooks, toilet paper holder, etc.)
- Finishing touches: towels, bath mat, shower curtain, art, storage baskets
Step-by-Step DIY Tutorial (48 Hours, No Meltdowns)
Step 1: Deep clean like you’re being judged by a hotel manager
Paint and caulk hate soap scum. Before anything else, clean the walls, trim, vanity, and corners.
Degrease the vanity area (especially around handles) and scrub mildew-prone zones. Let everything dry fully.
This one step makes the difference between “fresh makeover” and “mysterious peeling six weeks later.”
Step 2: Remove what gets in your way
The fastest-looking paint job is the one you don’t have to paint around. Remove:
- Switch plates and outlet covers
- Towel bars and hooks (label screws in a bag)
- Mirror (if you’re replacing it)
- Hardware on the vanity (if painting the vanity)
Older home note: If your home was built before 1978, be careful when sanding or scraping painted surfaces.
Minimize dust, contain the area, and clean thoroughlylead safety matters.
Step 3: Patch, sand, and tape (the “boring” part that makes it look expensive)
Fill nail holes and dings. Once dry, sand smooth. Then tape trim lines and protect floors and fixtures.
If you want crisp edges, press the tape down firmly and remove it while the paint is still slightly tacky.
Step 4: Paint for a bathroom (aka: moisture happens here)
Bathrooms are steamy, splashy rooms, so durability matters. A washable interior paint in a
satin or semi-gloss finish is often chosen for moisture-prone spaces. Some brands market
moisture/mildew resistanceuseful in bathrooms with frequent humidity.
How to paint fast without it looking “fast”
- Cut in first around edges with an angled brush.
- Roll next in sections (top to bottom) to keep a wet edge.
- Two coats almost always look better than one “hero coat.”
- Ventilate: run the fan and open a window if possible so paint dries and cures properly.
Example: If your bathroom has a dark, dated color (like early-2000s mocha),
switching to a warm white or soft greige instantly brightens the spaceespecially when you pair it with a
clean white shower curtain and a mirror that reflects light.
Step 5 (Optional but powerful): Give the vanity a glow-up
A vanity refresh is one of the biggest visual upgrades you can do in a weekend. If the vanity is structurally fine,
painting it and adding new pulls can make it look like a custom piecewithout replacing the whole unit.
Fast vanity makeover method
- Clean thoroughly (handles attract oils and product residue).
- Lightly sand glossy surfaces so paint grips.
- Prime if needed.
- Use thin coats. Let them dry fully between coats.
- Finish with upgraded hardware that matches your faucet/lighting finish.
Time saver: If painting the vanity feels too risky for your schedule, skip it.
Just swap pulls, add a modern faucet, and paint the wallsyour bathroom will still look dramatically updated.
Step 6: Upgrade your “touch points” (tiny changes, huge payoff)
Touch points are the things you interact with every day. Updating them makes the entire room feel newerbecause it literally is.
- Faucet: A new faucet changes the whole vanity vibe.
- Showerhead: Low effort, high satisfaction.
- Hardware: Matching pulls and towel hooks create a coordinated look.
Faucet swap: the 5-minute version of the truth
The “real” time depends on how tight your existing fittings are and how much you enjoy lying in a cabinet like a camping trip.
But generally: shut off water, disconnect supply lines, remove old faucet, install the new faucet, reconnect, and check for leaks.
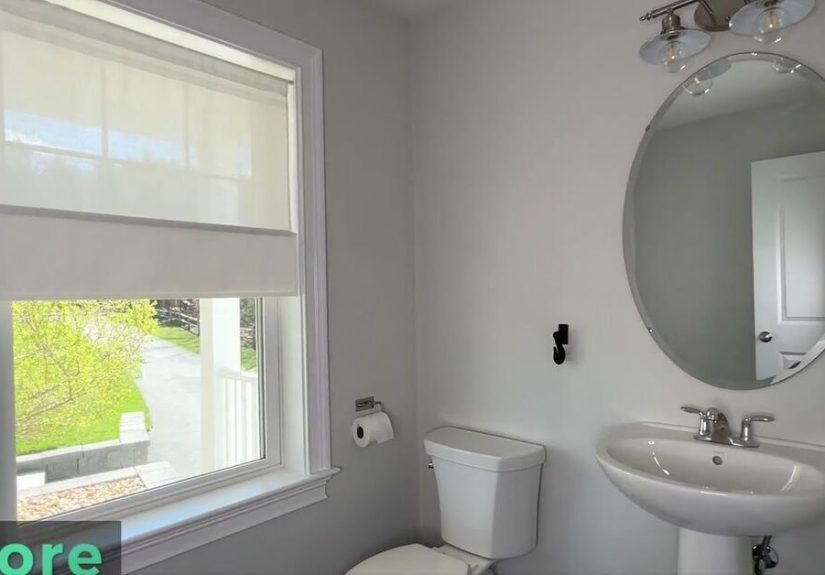
Step 7: Lighting and mirror upgrades (the “instant makeover” combo)
Lighting makes bathrooms look either flattering and fresh… or like you’re auditioning for a detective show.
Swapping a vanity light fixture and updating bulbs can transform the room in under an hour.
Safety first: Turn off power at the breaker (not just the wall switch) and confirm power is off with a tester before touching wiring.
If anything looks confusing, damaged, or nonstandard, pause and call a pro. Your bathroom makeover should not become a
“learning opportunity” involving sparks.
Mirror trick (budget-friendly)
- Replace a tiny builder mirror with a larger framed mirror for more impact.
- Or add a simple DIY frame kit to the existing mirror for a custom look.
Step 8: Re-caulk for crisp, clean edges
Fresh caulk is one of the most underrated “new bathroom” upgrades. Old caulk can discolor, crack, and collect mildew.
Removing it and laying a clean new bead makes your tub, sink, and shower surround look instantly cleaner.
Caulk refresh checklist
- Remove old caulk carefully (utility knife/caulk tool works well).
- Clean residue so the new caulk bonds properly.
- Dry completelycaulk and moisture are not friends.
- Tape your lines if you want sharp edges (especially if you’re new to caulking).
- Apply steadily, then smooth quickly before it skins over.
Pro tip: Use the right product in the right place. Bathrooms often need waterproof,
mildew-resistant caulk (frequently silicone in wet zones).
Step 9: Style it like a finished room (not a utility closet with a sink)
The fastest way to make a bathroom feel “done” is to treat it like a designed space.
That means coordinated textiles, a little texture, and storage that doesn’t look like panic.
Quick styling moves that work
- Hang a new shower curtain high and wide to make the room feel taller.
- Use two matching bath towels + one accent hand towel for a tidy, spa look.
- Add a small tray on the counter for soap and daily items.
- Swap in a fresh bath mat (color ties everything together).
- Add one piece of art or a small plant (real or convincing fakeno judgment).
Budget Examples (Choose Your Adventure)
Costs vary by location and finishes, but here are realistic weekend-refresh ranges:
$150–$300: “Fresh and Clean”
- Paint + supplies
- New shower curtain + towels
- New hardware set (hooks/pulls)
- Better bulbs + a framed print
$300–$700: “Noticeably New”
- Everything above
- New faucet and showerhead
- New mirror or mirror frame
- Re-caulk + small storage upgrades
$700–$1,200: “Weekend Wow”
- Everything above
- New vanity light fixture
- Vanity paint + hardware upgrade
- Optional peel-and-stick accent upgrades (as time allows)
Common Mistakes That Blow Up a 48-Hour Bathroom Makeover
- Skipping cleaning: paint and caulk won’t stick to grime.
- Choosing complicated upgrades: avoid anything with long cure times.
- Mixing metal finishes randomly: “eclectic” is different from “accidental.”
- Not measuring: vanity lights and mirrors are not “close enough” purchases.
- Forgetting ventilation: bathrooms need airflowespecially during paint and cure.
- Starting caulk too late: caulk needs time to set before it gets soaked.
48-Hour Finish Checklist (Your Final 20 Minutes)
- Touch-up paint on edges and corners
- Reinstall covers (switches/outlets) and align screws neatly
- Check faucet connections for drips
- Wipe down mirror and fixtures (remove fingerprintsyes, yours)
- Run exhaust fan and keep ventilation going to support curing
- Put away tools and take your “after” photos immediately (before life happens)
Real-World Experiences: What Weekend Bathroom Makeovers Teach You (Extra )
A 48-hour bathroom makeover sounds simple until you’re standing in the aisle comparing six nearly identical whites
with names like “Cloud Whisper” and “Polar Fog” while your brain quietly powers down. If you’ve never done a speed-renovation,
here’s what people typically experienceand how to make it work without turning your weekend into an ongoing series.
First, the emotional curve is real. Hour one feels amazing: everything is cleared out, you’ve got a plan, and you’re basically the host of a home improvement show.
By hour six, you’ve discovered that “quick sanding” is a lie, painter’s tape has an opinion about corners, and the vanity hardware screws are all different lengths
for reasons known only to the manufacturer. This is normal. The trick is to front-load the messy work (cleaning, patching, sanding)
so you’re not trying to do precision tasks when you’re tired.
Second, the “one more thing” temptation is the #1 schedule destroyer. Plenty of DIYers start with “just paint and new towels,” then mid-project decide
they also need a new mirror, a floating shelf, updated lighting, and possibly a minor reconfiguration of the solar system. In a 48-hour makeover,
your best friend is a firm scope: pick one hero upgrade (paint, fixture swap, or vanity refresh) and let everything else support it.
For example, if you paint the walls a fresh warm white, let the supporting cast be a new matte black faucet, matching hooks, and a crisp shower curtain.
That combination reads as intentional and high-end without requiring you to rebuild anything.
Third, bathrooms reveal the truth about your homefast. Once the old towel bars come off, you might find surprise wall anchors, patchy drywall, or uneven paint lines
from someone’s “creative” past choices. This is why weekend makeovers succeed when you expect a little imperfection and plan for quick fixes.
Keep spackle, a sanding sponge, and a small brush handy for touch-ups. Most issues look big at 9:00 a.m. and small again after paint and new hardware.
Fourth, the biggest “wow” often comes from the least glamorous jobs: re-caulking, swapping bulbs, and matching finishes. People regularly report that the bathroom
starts feeling new the moment the old caulk is gone and the lighting becomes brighter and cleaner. It’s not just aestheticsthose changes make the space feel more hygienic,
which is basically the highest compliment you can give a bathroom.
Finally, the best weekend makeovers end with a tiny ritual: the first shower in the “new” bathroom. The paint isn’t fully cured, the towels are suspiciously fluffy,
and you keep staring at the faucet like you personally invented plumbing. That moment is the payoff. Take the photos, enjoy the upgrade,
and remember: you didn’t renovate a bathroomyou reclaimed a room you use every single day.
Conclusion
A 48-hour bathroom makeover is all about smart priorities: paint for freshness, fixtures for function, caulk for cleanliness,
and styling for that “finished” look. Keep the scope tight, prep like a pro, and spend your energy where your eyes and hands go every day.
By Sunday night, you can have a bathroom that feels brighter, cleaner, and genuinely enjoyablewithout ripping out a single tile.