Table of Contents >> Show >> Hide
- 1. Start with How You Want to Use the Space
- 2. Study Your Yard Like a Detective (Sun, Wind, Soil, Drainage)
- 3. Make a Simple Master Plan (Then Build It in Phases)
- 4. Use “Right Plant, Right Place” as Your Golden Rule
- 5. Design with Lines, Repetition, and a Focal Point
- 6. Get Scale and Spacing Right (Your Future Yard Will Thank You)
- 7. Keep It Flexible: Start, Watch, Adjust, Repeat
- Conclusion: A Beginner-Friendly Yard Starts with a Good Plan, Not a Big Budget
- Extra: Beginner Experiences and Lessons Learned (Real-World Style, ~)
If you’ve ever stood in your yard holding a shovel and a $14 hydrangea while whispering, “I have no idea what I’m doing,” welcome. You are not alone, and you are definitely not doomed. Great landscape design is not magic. It’s a processpart planning, part observation, part trial-and-error, and part resisting the urge to buy every plant that looks cute at the garden center.
The good news? Beginners do not need a fancy software program, a truck full of stone, or a landscape architecture degree to build a beautiful yard. What you do need is a simple plan, a little patience, and a willingness to design your outdoor space the same way you’d design a room inside your home: with purpose, proportion, and a few smart focal points.
Below are seven practical landscape design tips for beginners that can help you create a yard that looks good, works well, and won’t turn into a weekend chore monster. We’ll also cover common mistakes, real-world examples, and beginner experiences that can save you time, money, and a surprising number of “why did I plant that there?” moments.
1. Start with How You Want to Use the Space
Before you think about flowers, think about function. Beginner landscape design usually goes sideways when people start with plants instead of people. Your yard is not just a plant showroomit’s a place where life happens.
Ask the “real life” questions first
Do you need a play area for kids? A spot for grilling? A path from the driveway to the side gate? A quiet morning coffee corner? Space for pets to zoom like furry race cars? List your needs first, then your wants.
A beginner-friendly landscape plan often includes a few simple zones:
- Entry zone: curb appeal, walkway, lighting, and easy-care planting
- Living zone: patio, seating, dining, or fire pit area
- Utility zone: trash bins, hose storage, compost, shed access
- Garden zone: flowers, shrubs, raised beds, or a small kitchen garden
Why this matters
When you design around your daily routine, your landscape feels intentional. When you design around impulse purchases, you end up with three birdbaths, no seating, and a hose stretched across a walkway like a booby trap.
Beginner example: If you want to entertain outdoors, reserve space for a patio or seating area first. Then place planting beds around it to soften edges and add privacy. Don’t build the garden first and then discover there’s nowhere to put chairs.
2. Study Your Yard Like a Detective (Sun, Wind, Soil, Drainage)
One of the best landscape design tips for beginners is also the least glamorous: observe your yard before changing it. Yes, this is less exciting than buying six ornamental grasses. It is also how you avoid planting sun-loving shrubs in a soggy shade corner.
What to observe before you design
- Sun exposure: full sun, part sun, or shade (and how it changes by season)
- Wind patterns: strong gusts around corners, exposed areas, sheltered spots
- Drainage: puddling areas, runoff paths, low spots, slopes
- Soil conditions: clay, sandy, compacted, dry, or moisture-retentive
- Microclimates: hotter areas near walls, cooler shaded zones, windy edges
- Views and privacy: what you want to highlight or hide
Take notes at different times of day. Morning sun and afternoon sun can create very different planting opportunities. A patio that seems lovely at 9 a.m. can feel like a pizza oven at 5 p.m. in August.
Do a simple site sketch
Draw a rough map of your yard, house, doors, windows, existing trees, fences, and utility areas. It does not have to be pretty. Circles and rectangles are enough. Add arrows for wind, shaded areas, and spots that stay wet after rain. This basic site analysis will make every later decision easier.
Pro tip: Before digging for trees or hardscape footings, always check for utilities and use the 811 “call before you dig” service in the U.S. Future-you will be very grateful.
3. Make a Simple Master Plan (Then Build It in Phases)
Beginners often feel pressure to finish the whole yard at once. That’s how budgets disappear and backs get sore. A smarter move is to create a basic landscape master plan, then install it in stages.
What a beginner master plan should include
- Main activity areas (patio, lawn, play area, garden beds)
- Paths and circulation routes
- Major trees and shrubs (with mature size in mind)
- Screening/privacy zones
- Drainage or rainwater management improvements
- Future “someday” features (pergola, raised beds, lighting, water feature)
Your plan is your roadmap, not a prison sentence. It helps you avoid common mistakes like planting a tree where you later want a walkway or installing a path that cuts through your future vegetable bed.
Why phasing works so well for beginners
Landscapes change over time. Plants grow. Your style evolves. Your budget fluctuates. Building in phases lets you test ideas, spread out costs, and learn what actually works on your property.
Phase 1 example: Fix drainage, define one main bed, and add one small seating area.
Phase 2: Plant a shade tree, extend path lines, and add mulch/edging.
Phase 3: Add lighting, accents, and seasonal color.
Start small, but think big. That’s the sweet spot.
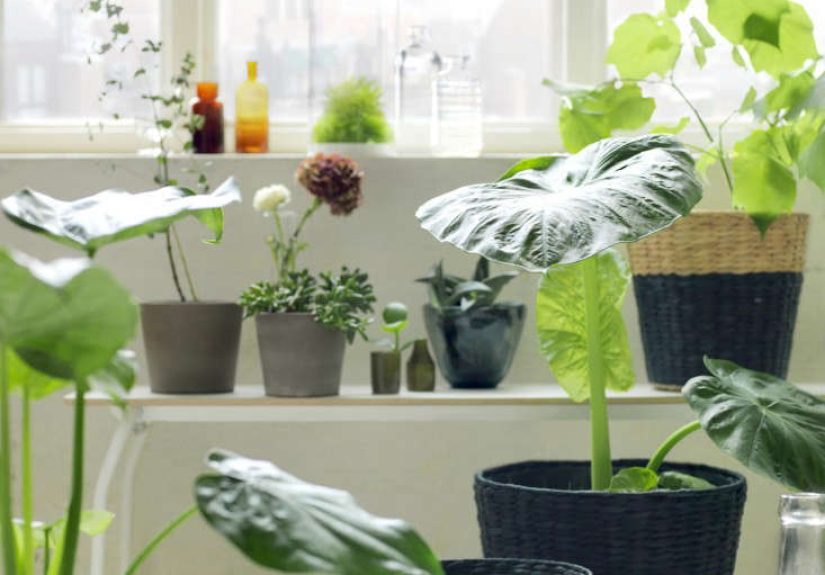
4. Use “Right Plant, Right Place” as Your Golden Rule
If you remember only one thing from this article, make it this: right plant, right place. This single principle can save beginners from most landscape headaches.
Plants thrive when their growing conditions match the site. When they don’t, they become expensive drama queensdrooping, diseased, overgrown, or requiring constant rescue missions.
Match plants to the site, not your shopping cart mood
Before buying a plant, check:
- Sun/shade requirements
- Water needs
- Mature height and width
- Hardiness zone compatibility
- Soil/drainage preference
- Maintenance level
- Traffic tolerance (kids, pets, walkway edges)
Also think about microclimates. A bed along a brick wall may be hotter and drier than the rest of the yard. A low corner may stay damp after rain. A narrow strip by a walkway may need plants that don’t sprawl into foot traffic.
Choose smarter, not fancier
For a low-maintenance landscape, prioritize:
- Plants suited to your local climate
- Native plants where appropriate
- Durable shrubs and perennials with repeat performance
- Trees placed with mature size and utility lines in mind
Beginner example: Instead of placing moisture-loving plants in a dry strip near a driveway, use heat-tolerant, drought-tolerant options and mulch well. Save the thirstier plants for areas closer to a hose or irrigation zone.
In other words: don’t force a fern to live your lavender lifestyle.
5. Design with Lines, Repetition, and a Focal Point
A yard starts to look “designed” when it has structure. You do not need complex geometry to get there. A few simple design principles go a long way: line, repetition, scale, and focal points.
Use lines to guide movement and the eye
Bed edges, paths, fences, hedges, and even rows of plants create visual lines. Strong, clean lines help define outdoor rooms and make a landscape feel intentional. Beginners often create too many fussy curves. Fewer, smoother lines usually look better and are easier to maintain.
Repeat key elements for unity
Repetition creates cohesion. Repeat a plant type, mulch color, paver material, or container style in several areas to tie the yard together. This doesn’t mean making everything identical. It means giving the eye a pattern to follow.
A common beginner mistake is creating what gardeners sometimes call a “plant zoo”: one of everything and no visual rhythm. Variety is good; random is exhausting.
Add a focal point (or two)
A focal point gives your landscape a destination. It could be:
- A specimen tree
- A bench
- A large planter
- A birdbath or sculpture
- A fire pit area
- A bold mass of flowering shrubs
Beginner example: Place a simple bench at the end of a path framed by repeated shrubs. Instantly, the space feels composedeven if the rest of the bed is still “under construction.”
6. Get Scale and Spacing Right (Your Future Yard Will Thank You)
Scale is one of the trickiest parts of landscape design for beginners, but it’s also one of the most important. A tiny shrub against a tall blank wall can look lost. A large tree planted too close to a house can become an expensive problem later.
Think in mature size, not nursery size
That adorable 2-gallon shrub in your cart is not staying adorable forever. Always design using the plant’s mature height and spread. Read tags, check reliable plant databases, and plan spacing accordingly.
This rule applies to everything:
- Trees: account for canopy spread, root space, utilities, and distance from structures
- Shrubs: avoid planting so close that they need constant shearing
- Perennials: allow room for clumps to expand
- Paths and patios: size them to actual use (two chairs need more than a “cute circle”)
Balance hardscape and softscape
A good beginner landscape includes both hardscape (patios, walkways, edging, walls) and softscape (plants, lawn, mulch areas). Too much hardscape can feel harsh; too much softscape can feel messy or hard to navigate.
Beginner example: A narrow path of stepping stones may look charming in photos, but if it’s the main route to your side gate, make it wide and stable enough for daily use. Beauty matters. So does not twisting your ankle while carrying groceries.
7. Keep It Flexible: Start, Watch, Adjust, Repeat
The best landscapes are not built in a weekend. They evolve. Beginners often assume they need to “get it perfect” on day one. You don’t. In fact, a willingness to edit is a sign you’re doing it right.
Use temporary solutions while plants fill in
Freshly planted landscapes can look sparse at first. That’s normal. Resist the urge to overcrowd just because the bed looks empty in year one. Use temporary fillers like annuals, mulch, or movable containers while trees and shrubs grow into place.
Observe what works (and what doesn’t)
After a season, ask:
- Which plants thrive with minimal effort?
- Which areas stay too wet or too dry?
- Do paths and seating areas get used?
- Where do weeds or erosion keep showing up?
- What feels cluttered, flat, or unfinished?
Landscape design is not a one-time event. It’s more like a series of smart upgrades. Move a plant. Widen a path. Add mulch. Swap out a struggling shrub. Shift a container for a better focal point. These small edits can dramatically improve your yard over time.
And yes, even experienced gardeners relocate plants. Often. Sometimes more than once. Consider it gardening cardio.
Conclusion: A Beginner-Friendly Yard Starts with a Good Plan, Not a Big Budget
Creating a beautiful yard does not require perfection or a huge landscaping budget. It requires a practical process: define your goals, study your site, create a simple plan, choose the right plants, use design principles, respect scale, and allow the landscape to evolve.
If you’re new to landscape design, start with one area you see every dayfront entry, patio edge, or a small side bed. Make it functional, clean, and well-planted. That small win builds confidence and gives you a template for the rest of the yard.
The biggest beginner mistake is trying to do everything at once. The best beginner move is designing with patience. Your landscape is not late. It’s growing.
Extra: Beginner Experiences and Lessons Learned (Real-World Style, ~)
One of the most useful things beginners can hear is this: almost nobody nails their landscape on the first try. The “before” phase of landscaping is usually a mix of excitement, confusion, and a few decisions made in the parking lot of a garden center.
A very common beginner experience starts with a shopping trip and no plan. Someone sees a flowering shrub, two perennials, and a decorative grass they love, brings them home, and realizes they all need different light and water conditions. One goes in full sun and thrives, one gets scorched, and one sits in wet soil wondering what bad choices led to this moment. That experience teaches the right-plant-right-place rule faster than any article can.
Another beginner lesson comes from underestimating size. A small tree or shrub looks so harmless in its nursery pot that it’s easy to plant it close to a walkway, window, or house corner. Two or three seasons later, it starts crowding the path or blocking the view. At first this feels like failure, but it is actually progress. It means the plant is healthy. Many beginners learn to relocate plants after they mature a bit, and that’s part of normal landscape developmentnot a disaster.
People also learn quickly that the yard behaves differently than expected across seasons. A spot that looks bright in winter may be deep shade in summer once deciduous trees leaf out. A section of lawn that seems fine in dry weather may become a muddy drainage path during heavy rain. This is why experienced gardeners keep observing and adjusting. Beginners who take noteseven simple phone photos over a few monthsusually make much better design decisions in year two.
There’s also the “I tried to finish everything in one weekend” experience. Many beginners spend a full Saturday edging beds, hauling mulch, planting, and placing decorative items, only to realize on Sunday that the layout feels rushed. The path is too narrow, the focal point is off-center, and there’s no easy access to the hose. The lesson here is golden: phase the project. Building one well-designed area at a time is less stressful and almost always looks better.
One of the best beginner wins happens when someone starts small and gets one zone right. Maybe it’s a front walkway lined with repeated shrubs and perennials, or a simple patio corner with a bench, mulch, and two containers. That space becomes proof that landscape design is learnable. Confidence grows. Then the next bed gets planned more carefully. Then a path is added. Then lighting. A year later, the whole yard looks more cohesivenot because it was expensive, but because it was intentional.
In short, beginner landscaping experiences are rarely perfect, but they are incredibly valuable. Every plant that struggles, every path that needs widening, and every “oops, too much shade” moment teaches design thinking. The goal is not to avoid all mistakes. The goal is to make smart, fixable ones while creating a yard you actually enjoy using.