Table of Contents >> Show >> Hide
- Why Replace a PlayStation Motherboard in 2025?
- Meet the nsOne: Not Sony’s One
- Anatomy of a PlayStation Motherboard: Old vs New
- Planning Your Non-Sony Motherboard Swap
- High-Level Overview: From Original to nsOne
- Going Further: HDMI, Open BIOS, and Quality of Life Mods
- Pros and Cons of a Non-Sony Motherboard Replacement
- Is a Non-Sony Motherboard Replacement Right for You?
- Hands-On Experiences with Non-Sony PlayStation Motherboard Replacements
- Conclusion: New Life for a Classic Console
If you’ve ever stared at a dead gray PlayStation and thought, “There has to be a better way,” good news: in 2025, there actually is. Thanks to a wave of hardware tinkerers and open-hardware enthusiasts, we now have a fully reverse-engineered, non-Sony replacement motherboard for the original PlayStation. Hackaday covered it with the kind of excitement usually reserved for rocket launches and cursed 3D printers, and for retro-gaming fans it really is that big of a deal.
This project, often referred to as nsOne (“Not Sony’s One”), is a drop-in replacement board that accepts original Sony chips and fits inside the original PS1 shell. It isn’t an emulator. It isn’t an FPGA clone. It’s honest-to-goodness PlayStation hardware running on a community-designed PCB. For anyone tired of chasing fragile 30-year-old motherboards on auctions, it’s like a second production run of the console you grew up with.
In this deep dive, we’ll explore why a non-Sony PlayStation motherboard replacement matters, what makes the nsOne so special, how a typical swap works at a high level, and which extra mods (HDMI, open BIOS, and more) pair well with this modern board. At the end, we’ll also share some hands-on style experiences and tips so you know exactly what you’re getting into before you pick up a screwdriver and void a warranty that technically expired sometime around the mid-2000s.
Why Replace a PlayStation Motherboard in 2025?
The original PlayStation launched in 1994 and went on to sell over 100 million units worldwide. That’s an incredible number of consoles, but it also means millions of boards have spent decades dealing with dust, heat cycles, spills, storage in attics, and the occasional rage-induced controller yank. Eventually, even well-built hardware starts to fail.
Aging Hardware and “Unobtainium” Parts
Common PS1 failures include boot issues, glitchy video, audio dropouts, or consoles that simply power on to a black screen. Traditional repair guides (like those from DIY repair communities and teardown experts) often walk you through cleaning, recapping, reflowing solder joints, and replacing optical drives. That’s greatright up until the day the board itself is cracked, corroded, or heavily damaged.
At that point, your choices used to be:
- Scavenge a donor console and hope its motherboard is healthy.
- Give up and switch to emulation or FPGA-based clones.
- Pay collector prices for consoles that might fail later anyway.
A community-designed replacement motherboard changes that equation. Instead of “this one board must survive forever,” you get a modern PCB design that can be manufactured in new batches. The rare parts become the custom Sony chips, not the board itself.
Preserving the Original Experience (Without the Original Headaches)
Why not just use emulators, tiny ARM boxes, or an FPGA console? Those are great options too, and newer FPGA systems can feel very close to the original hardware. But for some purists, nothing quite matches dropping an original disc into a drive, hearing that distinctive startup sound on real Sony silicon, and using the actual controller ports and memory cards.
A non-Sony motherboard replacement allows you to keep:
- Original controllers and memory cards
- Genuine disc drive (or optical drive emulators wired into the original interface)
- The classic case, branding, and physical feel
Meanwhile, you gain a fresh PCB, modern manufacturing, and the possibility of subtle improvements like better routing, cleaner power delivery, and more robust connectors.
Meet the nsOne: Not Sony’s One
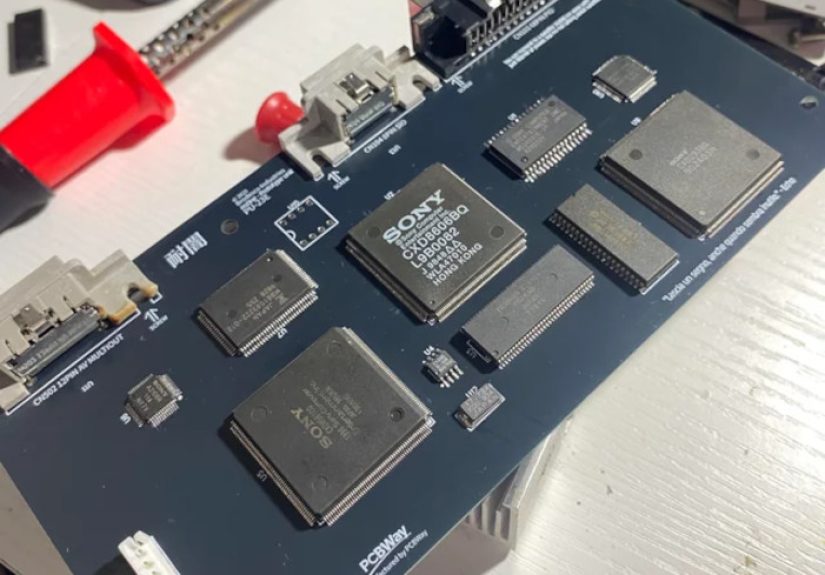
The star of Hackaday’s coverage is the nsOne, a reverse-engineered PlayStation 1 motherboard created outside of Sony. The big idea: rebuild the PS1 mainboard using the original chips, but on a completely new PCB that you can manufacture in 2025 and beyond.
Key Features of the nsOne
While specific revisions may evolve, the nsOne concept typically includes:
- Drop-in compatibility with original PS1 shells: The board is laid out so it fits Sony’s original mounting posts and port cutouts.
- Support for multiple PS1 revisions: The goal is compatibility with a wide range of case revisions (SCPH-100x through later models), so collectors and tinkerers can revive many different units.
- Real chips, modern PCB: The CPU, GPU, sound processor, and other custom Sony chips move over to the nsOne, but traces, power planes, and connectors are all new.
- Improved serviceability: Clear silkscreen labels, more modern connector choices, and cleaner routing make future debugging and repair less of a scavenger hunt.
- Open documentation: The project leans heavily on shared schematics, community feedback, and iterative refinementsomething the original proprietary board never offered hobbyists.
From a philosophical standpoint, the nsOne is a statement: even closed consoles can be mapped, understood, and rebuilt by a passionate community. Instead of relying solely on a shrinking pool of donor boards, retro gamers can now think in terms of sustainable hardware ecosystems.
How It Differs from FPGA and Emulation Projects
It’s easy to confuse the nsOne with the many FPGA-based “new old consoles” on the market, or with the ultra-small custom PlayStation boards that still use Sony chips but drastically shrink the form factor. The key differences:
- Emulation boxes run software that imitates the PlayStation hardware on a generic CPU. Great for convenience, not always perfect for edge-case timing or obscure titles.
- FPGA consoles recreate the hardware logic on a reconfigurable chip. These can be extremely accurate, but they’re still a rebuild of the logicnot the original chips.
- nsOne-style boards reuse the actual Sony CPU, GPU, and other custom ASICs. You’re still playing on original hardware; only the PCB and supporting circuitry have changed.
Think of it this way: emulation can be “good enough,” FPGA can be “very close,” but a replacement PCB is “exactly the same brain, in a younger body.”
Anatomy of a PlayStation Motherboard: Old vs New
To appreciate what’s happening when you swap to a non-Sony board, it helps to understand what the PS1 motherboard actually does. On the original console, the mainboard hosts:
- The MIPS-based CPU and GPU
- The sound processor (SPU)
- System RAM and video RAM
- BIOS ROM
- Controller and memory card interfaces
- AV output encoders and ports
- Power distribution and voltage regulation
All of these components are wired together on a four-layer (or more) PCB with fairly tight routing. Over time, traces can corrode, pads can lift, and vias can fail. Recapping and reflowing can only do so much if the underlying copper is compromised.
The nsOne rebuilds this entire network of connections on a fresh board. The chips and some supporting parts move over, but the “roads” they travel on are brand new. In many cases, designers also take the opportunity to:
- Refine grounding and power distribution for stability
- Use more robust or modern connectors where possible
- Label test pads and connectors to make future debugging easier
The result is a motherboard that behaves like a PS1 because it is a PS1, but built using current PCB manufacturing techniques and community-driven improvements.
Planning Your Non-Sony Motherboard Swap
Before you rip open your beloved console, you’ll want to decide if this project is right for you. Replacing a PlayStation motherboard is not quite “change a lightbulb” simple, but it’s achievable if you’re comfortable with basic electronics work and console disassembly.
Skills and Tools You’ll Need
For a typical nsOne-style swap, plan on having:
- Basic hand tools: Small Phillips screwdrivers, plastic spudgers, tweezers.
- Electrostatic discharge (ESD) awareness: An anti-static mat or wrist strap is strongly recommended when handling custom chips.
- Decent lighting and workspace: You’ll be moving multiple subassemblies; you don’t want to mix up screws and cables in the dark.
- Soldering gear (optional but helpful): Some replacement boards aim for minimal soldering, but having a fine-tip iron, quality solder, and flux is always a plus.
If you’re moving chips from a dead board to the nsOne yourself, that’s an advanced rework task involving hot air, careful preheating, and a good deal of experience. Many enthusiasts will instead opt for boards that come pre-populated with chips (from donor consoles) or buy from trusted builders who handle that step.
High-Level Overview: From Original to nsOne
Exact steps vary by board revision and case, but the general flow of a PlayStation motherboard swap looks like this:
- Open the console: Remove the screws on the bottom, lift the lid, and set it aside.
- Disconnect subassemblies: Unplug the optical drive, power supply module, controller/memory card front assembly, and any ribbon cables connected to the mainboard.
- Remove the original motherboard: Unscrew the board from the case and carefully lift it out, watching for stuck cables or shielding.
- Transfer any reusable components: Depending on your nsOne configuration, this may involve moving heatsinks, shielding, and other mechanical parts. If you’re doing chip transfers yourself, this step is much more involved.
- Install the nsOne: Place the new board into the shell, align it with standoffs and ports, and screw it in.
- Reconnect everything: Plug in the optical drive (or ODE), power module, controller ports, and any internal cables.
- Test before fully closing: Set the lid loosely, connect AV or HDMI (depending on your setup), power it on, and confirm that you get video, audio, and controller input.
- Button it up: Once it passes tests, reassemble the case completely.
It’s not a five-minute job, but it’s very doable if you take photos as you go and label things. Think of it like building a tiny custom PCexcept this one is stuck firmly in 1990s 3D polygon land.
Going Further: HDMI, Open BIOS, and Quality of Life Mods
Once you’ve installed a non-Sony PlayStation motherboard, the rabbit hole doesn’t end. In fact, it’s just getting interesting. Many enthusiasts pair replacement PCBs with modern upgrades that improve video quality, stability, and ease of use.
HDMI Output for Modern Displays
The original PS1 outputs analog video that looks great on CRTs but not so great on modern flat panels without an upscaler. HDMI mod boards and external upscalers can convert the console’s signal to crisp digital output. Some solutions are designed specifically for the PS1, offering clean video, low lag, and options like integer scaling and scanline overlays.
If you’re going through the trouble of a full motherboard swap, it’s the perfect time to think about an HDMI solution. Running a freshly revived console into a modern TV without a mess of adapters feels incredibly satisfying.
Open BIOS and Region Freedom
Another popular tweak is installing an open-source BIOS or using replacement firmware developed by the homebrew community. These BIOS projects can:
- Remove region locks
- Improve load behavior
- Offer additional debugging or boot features
On a replacement motherboard, BIOS handling is often slightly more flexiblethere may be easier ways to flash or swap firmware than on a stock Sony board. Just remember that anything altering copy protection or region behavior lives in a gray area legally; always use your own discs and respect local laws.
Portablizing and Custom Builds
Because the nsOne is “just” a modern PCB, it also pairs nicely with portablizing projects. Enthusiasts have documented everything from shrunken PS1 boards to full custom handhelds using original console chips. A board designed with modders in mind gives you mounting points, test pads, and connector layouts that are far less random than Sony’s 1990s compromises.
If your dream is a tiny PS1 that fits in a lunchbox, runs off battery power, and has a built-in screen, a non-Sony motherboard can be the foundation that makes that dream much more achievable.
Pros and Cons of a Non-Sony Motherboard Replacement
The Upsides
- Longevity: You’re not relying on a single aging PCB; new batches can be produced as long as demand exists.
- Faithful experience: Because the original custom chips are still in play, games behave exactly as they did on Sony’s board.
- Mod-friendly design: Cleaner layout and documentation make future upgrades and repairs easier.
- Community support: Enthusiast projects tend to grow a community of builders, testers, and troubleshooters who share their findings.
The Trade-Offs
- Cost: Between the replacement board, possible chip-population services, and any extra mods (HDMI, BIOS, ODE), this is not the cheapest route.
- Skill level: A complete novice can do basic disassembly, but chip transfers and troubleshooting are more advanced.
- Purist concerns: Some collectors want untouched, original hardware only. A console with a replacement board is fantastic for playing, but it’s not a “sealed museum piece.”
For most retro gamers, these trade-offs are worth it. It’s the difference between a favorite console that lives in a box “because it’s delicate” and one you actually plug in, play, and enjoy.
Is a Non-Sony Motherboard Replacement Right for You?
Here’s who stands to benefit most from projects like the nsOne:
- Owners of dead or unreliable PS1 consoles who don’t want to jump to emulation.
- Modders and tinkerers building custom cases, portable units, or display-focused setups.
- Preservation-minded fans who want to keep original hardware alive with a long-term supply of replacement boards.
- DIY enthusiasts who enjoy the process of teardown, transplant, and rebuild as much as the finished console.
If you’d rather just plug in a mini console or run a software emulator on a PC, that’s totally valid. But if your heart beats faster at the idea of a reverse-engineered PS1 motherboard humming away inside your original case, this is your playground.
Hands-On Experiences with Non-Sony PlayStation Motherboard Replacements
So what does this all feel like in practice? Let’s talk through a “lived-in” view of the process and what owners typically report once the dust (and static) settles.
From Dusty Shell to “New” Console
Imagine pulling an old PS1 out of storage. The plastic has yellowed a bit, there’s a sticker from 1999 still clinging to the top, and the console refuses to boot past the logo. In the past, that might have been the end of the story. With a non-Sony motherboard replacement, it becomes the beginning of a weekend project.
Most builders start by thoroughly cleaning the case, controller ports, and optical assembly. Once you’ve removed the original motherboard, the empty shell is oddly inspiringit looks like a kit waiting to be built, not a dead gadget.
Dropping the nsOne into place is usually the most satisfying step. The ports line up, screw holes match, and the new board just looks right. When you’ve spent years seeing PS1 internals covered in flux stains and scratched traces, a crisp green or black PCB with clear labels feels downright luxurious.
The First Power-On Moment
The first boot is where nerves kick in. You reconnect power, video, and a controller, hover over the switch, and wonder if you mis-seated a cable. When everything goes well, you’re rewarded with that classic PlayStation boot sequencelogo, swoosh, and allrunning on a board that didn’t exist when the console originally shipped.
In user reports, that moment is often described as a weird mix of nostalgia and relief. You’re not just emulating your childhood; you’re literally resurrecting it on fresh hardware. If you’ve paired the board with an HDMI solution, the image quality on a modern screen can be shockingly good, far sharper and more stable than improvised analog-to-digital chains.
Living with a Replaced Motherboard Day to Day
Once the novelty wears off, a non-Sony motherboard replacement mostly disappears into the backgroundand that’s exactly what you want. Games load as expected, memory cards behave normally, and controllers feel just like they always did. If you’ve upgraded the BIOS or added quality-of-life mods, you may get shorter load times, region flexibility, or nicer system menus, but the core experience remains distinctly “PS1.”
Long-term, owners often notice:
- Improved stability: Less random crashing or freezing compared with a failing original board.
- Smoother troubleshooting: Thanks to clear labeling and modern documentation, diagnosing issues is less of a guessing game.
- Confidence to play: You’re more willing to actually use the console, knowing that the mainboard is replaceable and not a one-of-a-kind relic.
What Can Go Wrong (and How People Solve It)
It’s not all sunshine and perfectly synchronized polygons. Builders do sometimes run into challenges:
- Cable routing quirks: Replacement boards may place connectors slightly differently, so cable runs can be tighter or looser than stock. A bit of rerouting or gentle twisting of ribbon cables usually fixes it.
- Power issues: If your original power module is weak or dirty, it can cause instability even with a brand-new motherboard. Many users clean or refurbish the power section at the same time.
- Chip transfer mishaps: If you handle your own chip rework, it’s possible to lift pads or damage ICs. This is a big reason many people prefer pre-populated boards or professional services.
The upside is that the community around projects like the nsOne tends to be very active. Builders share troubleshooting logs, oscilloscope captures, thermal images, and board revisions openly. So while you might still hit a snag, you’re rarely alone in solving it.
The Emotional Side: Preservation as a Hobby
Beyond the technical cool factor, there’s a surprisingly emotional component to these replacements. For many players, the PS1 was their first 3D console, the machine that introduced them to iconic franchises and weird experimental games. Being able to keep that hardware runningon new boards, in original shellsfeels like maintaining a classic car rather than switching to a modern hatchback.
In that sense, a non-Sony PlayStation motherboard replacement is more than a technical exercise. It’s a way to say, “This mattered to me, and I want it to keep working,” using open documentation, community collaboration, and 2025-era engineering chops. Hackaday’s coverage shines a spotlight on that spirit, but the momentum comes from countless hobbyists who’d rather pick up a soldering iron than accept a game over screen on their favorite console.
Conclusion: New Life for a Classic Console
Replacing a vintage PlayStation motherboard with a non-Sony, community-designed board might sound like a fringe project, but it hits a sweet spot where nostalgia, engineering, and preservation all overlap. You keep the real chips and authentic feel, while retiring a fragile, aging PCB in favor of a durable, well-documented design that can actually be reproduced.
Whether you follow the nsOne project out of pure curiosity, or you’re actively planning a full console rebuild, it’s hard not to be impressed. A 30-year-old gaming icon now has a 21st-century backboneand thanks to open hardware and enthusiastic coverage from places like Hackaday, that backbone is available to anyone willing to crack open a case and get to work.