Table of Contents >> Show >> Hide
- Why Silver Tarnishes
- How Baking Soda and Aluminum Clean Silver
- What You Will Need
- How to Clean Silver With Baking Soda and Aluminum
- Silver Items You Should Not Clean This Way
- Common Mistakes to Avoid
- How to Keep Silver From Tarnishing Quickly
- Frequently Asked Questions
- Real-World Experience: What Happens When You Try the Method
- Conclusion
Silver has a flair for drama. One month it is gleaming on the dining table; the next, it looks as though it spent the winter in a Victorian attic. Fortunately, lightly to moderately tarnished silver can often be refreshed with baking soda, aluminum foil, and hot waterno aggressive scrubbing required.
This household method works through an electrochemical reaction rather than simply grinding away the dark layer. That distinction matters because silver is relatively soft, and repeated rubbing with abrasive powders can gradually blur engraving, soften decorative details, and wear through thin silver plating.
However, the aluminum-and-baking-soda bath is not appropriate for every silver object. Plain sterling silver flatware and uncomplicated jewelry are usually the best candidates. Antiques, intentionally oxidized jewelry, delicate gemstones, glued components, hollow handles, and valuable collectibles deserve a more cautious approach.
Why Silver Tarnishes
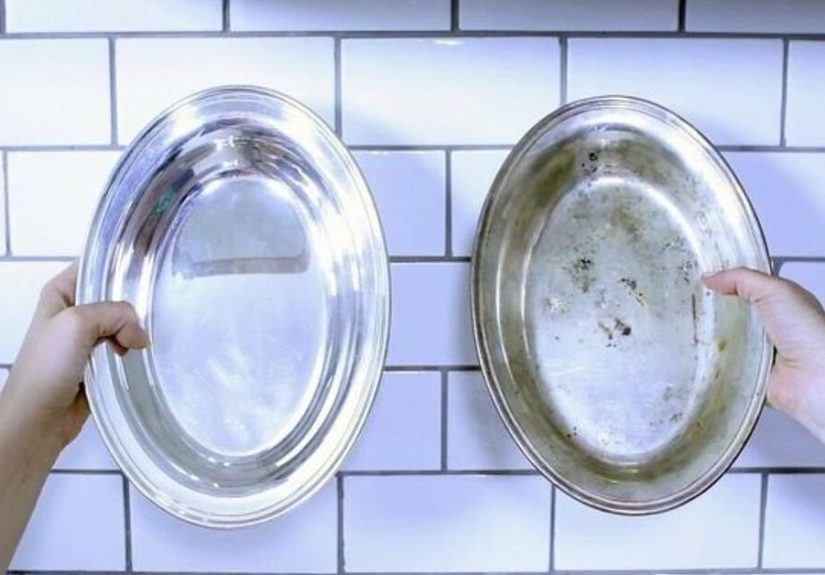
Tarnish is not ordinary dirt. It is a surface reaction that occurs when silver encounters sulfur-containing compounds in the environment. The resulting silver sulfide typically appears yellowish at first, then develops into brown, gray, blue-black, or nearly black discoloration.
Humidity, air pollution, perspiration, cosmetics, household chemicals, rubber, wool, certain papers, and sulfur-rich foods can accelerate the process. Eggs, onions, garlic, and some condiments are particularly unfriendly neighbors for silver serving pieces. This does not mean your silver is ruined. Tarnish usually sits on the surface and can be reduced or removed with an appropriate treatment.
Tarnish versus corrosion or damaged plating
Before cleaning, inspect the object in bright, indirect light. Evenly distributed gray or black discoloration is commonly tarnish. Green patches, reddish areas, deep pits, flaking surfaces, or exposed yellow metal may indicate corrosion or worn plating rather than simple tarnish.
If a silver-plated fork shows copper-colored spots beneath the silver, no household bath can replace the missing plating. Cleaning it more aggressively may make the exposed areas more noticeable. That piece may need professional replating instead of another kitchen experiment.
How Baking Soda and Aluminum Clean Silver
The method creates a small electrochemical cell. Tarnished silver must contact aluminum while both are surrounded by a conductive solution. Baking soda dissolved in hot water acts as an electrolyte, allowing charged particles to move through the solution.
During the reaction, aluminum is oxidized while silver sulfide is reduced. In simpler terms, sulfur associated with the tarnished surface is encouraged to leave the silver and react with the aluminum. The visible silver surface is restored without depending primarily on abrasive scrubbing. Heat speeds up the reaction, which is why hot water performs better than cold water.
You may notice bubbles, cloudy water, darkening aluminum, or a faint sulfur-like smell. These are signs that a reaction is occurring, not evidence that your spoon has begun communicating with another dimension.
What You Will Need
- A glass, ceramic, or heat-safe nonmetallic container
- Aluminum foil
- Baking soda
- Very hot water
- Mild, unscented dish soap
- A soft sponge or clean microfiber cloth
- Nonmetallic tongs or a wooden utensil
- A clean, soft towel for drying
- Heat-resistant gloves if the container becomes hot
For a manageable household batch, use approximately one tablespoon of baking soda per cup of hot water. Exact recipes vary because container size, water volume, temperature, and the amount of tarnish all affect performance. More baking soda is not necessarily better. A moderate solution, brief treatment, and repeated inspection offer greater control.
How to Clean Silver With Baking Soda and Aluminum
Step 1: Confirm that the object is suitable
Use this method primarily for plain sterling silver or structurally sound silverware without vulnerable attachments. Look for marks such as “Sterling,” “925,” “900,” or a known maker’s stamp. A hallmark can help with identification, although it does not reveal whether stones, solder, glue, enamel, lacquer, or intentional patina are present.
Do not assume that every silver-colored object is silver. Stainless steel, nickel silver, chrome-plated metal, pewter, and costume jewelry require different care. When identification is uncertain, begin with mild soap and water or consult a professional.
Step 2: Remove grease and surface dirt
Wash the silver gently in warm water with a small amount of mild dish soap. Use your fingers, a soft cloth, or a nonabrasive sponge. This preliminary cleaning removes skin oils, food residue, lotions, and dust that could block contact between the tarnished surface and the cleaning solution.
Rinse the item well. Do not soak objects with hollow handles, wooden components, fabric, loose stones, or seams that may trap liquid. Conservation guidance emphasizes keeping moisture out of enclosed spaces that cannot be thoroughly rinsed and dried.
Step 3: Line the container with aluminum foil
Place a sheet of aluminum foil across the bottom and partway up the sides of the container. Either side of standard household foil can work; what matters is exposed aluminum and direct electrical contact with the silver.
Arrange the items in a single layer. Each piece should touch the foil. Avoid piling several necklaces or utensils together because overlapping surfaces may clean unevenly, and chains can transform themselves into knots with ambitions.
Step 4: Add the baking soda
Sprinkle the measured baking soda into the container. A practical starting ratio is one tablespoon per cup of water. For a small bowl holding four cups, use approximately four tablespoons.
There is no need to scrub the dry powder onto the silver. Baking soda is mildly abrasive when used as a paste, so rubbing it directly over polished metal can create fine scratches. In this method, it should be dissolved in water and used mainly as the electrolyte.
Step 5: Pour in hot water carefully
Heat enough water to submerge the metal portions of the silver. Pour it slowly into the container, keeping your face and hands away from rising steam. For durable, plain flatware, very hot or recently boiled water is commonly used. For jewelry or thinner objects, slightly cooler hot water provides a more conservative starting point.
Never expose heat-sensitive stones, unknown adhesives, or fragile finishes to near-boiling water. Sudden temperature changes can damage certain gems, while heat may weaken glued settings. Warm soapy water is the safer general recommendation for many gemstone pieces.
Step 6: Let the reaction work briefly
Allow the silver to remain in contact with the foil for approximately two to five minutes. Light tarnish may disappear quickly. Heavier tarnish may need a second short treatment.
Check the item frequently rather than abandoning it in the bowl while you reorganize the garage. Use nonmetallic tongs to lift one edge and examine the surface. Rotate the piece if one area is not touching the aluminum, then return it to the solution briefly.
A dark, heavily tarnished object may not become mirror-bright in one bath. Ending the first cycle, rinsing, and preparing a fresh solution is safer than soaking indefinitely.
Step 7: Rinse extremely well
Remove the silver carefully and rinse it under clean, comfortably warm water. Pay attention to engraved lines, fork tines, chain links, hinges, and decorative recesses where baking soda residue may collect.
Incomplete rinsing can leave a pale film that makes the silver appear cloudy. For intricate pieces, use a very soft brush only when the construction is sturdy and no stones or finishes can be loosened.
Step 8: Dry and buff immediately
Pat the item dry with a soft, lint-free towel. Do not allow silver to air-dry because water droplets can leave spots. Once it is fully dry, buff lightly with a clean microfiber cloth or a silver polishing cloth to improve the luster.
The electrochemical bath can remove tarnish from recessed details that are difficult to reach with polish, but the surface may look slightly less reflective afterward. Gentle buffing restores a more even shine without enthusiastic elbow-powered sanding.
Silver Items You Should Not Clean This Way
Antique or historically important silver
Old silver may carry maker’s marks, surface texture, original tool marks, fire scale, coatings, repairs, or patina that contributes to its historical and financial value. Uniformly stripping dark material from every recess can make an antique look unnaturally new and erase visual evidence of craftsmanship.
Museum conservation guidance generally favors minimal intervention, careful examination, and controlled cleaning rather than automatically immersing historic objects in household solutions. Valuable family silver should receive the same respect, even if it has never appeared behind velvet ropes.
Intentionally oxidized or antiqued jewelry
Jewelry designers often darken recessed areas intentionally to emphasize texture and contrast. The aluminum method cannot distinguish attractive blackened detail from unwanted tarnish. It may lighten or remove the deliberate finish, leaving the design flat and visually unfinished.
Silver with pearls, opals, turquoise, amber, coral, or shell
Organic and porous gems can be sensitive to heat, chemicals, prolonged moisture, and sudden temperature changes. Pearls may also be attached with adhesive or strung on material that should not be soaked.
For these pieces, wipe the silver carefully with an appropriate polishing cloth while avoiding the stones. A jeweler should handle extensive tarnish around delicate settings. Jewelers and gem laboratories commonly recommend mild soap and warm water for compatible stones rather than aggressive household treatments.
Jewelry with glued components
Hot water can weaken adhesives beneath rhinestones, marcasite, imitation pearls, cameos, and costume-jewelry elements. If you see no visible prongs holding a stone, assume glue may be involved.
Enamel, niello, painted details, and mixed materials
Decorative finishes may respond differently from the surrounding silver. Wood, leather, bone, ivory, fabric, resin, and lacquer should not be immersed without specialized guidance.
Thin or damaged silver plate
Although the foil method is frequently used on ordinary silver-plated flatware, caution is necessary when plating is worn, flaking, scratched, or extremely thin. Exposed base metals can react differently, and repeated treatment will not repair lost silver.
Common Mistakes to Avoid
Using a gritty baking soda paste
Baking soda paste is popular online because it produces quick visual results. Unfortunately, rubbing a gritty paste over polished silver relies on abrasion. Fine scratches may be difficult to notice after one cleaning but can accumulate over time.
Adding unnecessary chemicals
Some recipes add salt, vinegar, lemon juice, toothpaste, ammonia, or commercial cleaners. Mixing products increases the chance of damaging silver, stones, finishes, or nearby surfaces. Baking soda, aluminum, hot water, and careful rinsing are sufficient for the basic electrochemical method.
Leaving the silver in too long
Longer treatment is not automatically more effective. Once the removable tarnish has reacted, additional soaking offers little benefit and exposes joints, plating, and hidden components to more heat and moisture.
Cleaning every dark area
Dark color in decorative recesses may be intentional. Examine the design before treatment. If the darkness creates crisp contrast around leaves, letters, scrolls, or geometric patterns, it may be part of the finish.
Skipping the rinse and drying stage
Residue and trapped moisture can leave dull patches or contribute to future problems. Rinse generously, dry immediately, and inspect crevices before putting the item away.
How to Keep Silver From Tarnishing Quickly
No storage method can prevent tarnish forever, but good habits can slow it dramatically.
- Wipe jewelry after wearing it to remove perspiration, lotion, and skin oils.
- Wash silver serving pieces promptly after contact with eggs, onions, mustard, salt, or acidic foods.
- Dry every piece thoroughly before storage.
- Store items separately to reduce scratching.
- Use anti-tarnish cloth, treated storage bags, or a silver-storage chest.
- Keep silver away from rubber bands, newspaper, damp cardboard, and sulfur-emitting materials.
- Maintain a stable, dry storage environment.
- Handle clean silver with clean, dry hands.
Frequent polishing removes a tiny amount of surface material each time. Preventive storage therefore protects both your schedule and the object itself. Museum-care resources recommend reducing exposure to sulfur compounds and using appropriate sulfur-scavenging storage materials for sensitive metals.
Frequently Asked Questions
Does the silver have to touch the aluminum foil?
Yes. Direct contact completes the electrochemical connection. An item floating above the foil may clean slowly, unevenly, or not at all.
Does the shiny side of the foil need to face upward?
No. The shiny and dull surfaces result mainly from the manufacturing process. Either side can participate as long as the silver touches exposed aluminum.
Can I use boiling water?
Very hot water speeds the reaction and is generally suitable for sturdy, plain sterling flatware. Avoid boiling water for jewelry with stones, adhesives, enamel, hollow construction, solder concerns, or mixed materials.
Why does the bath smell like sulfur?
The odor can occur as sulfur-containing compounds are involved in the reaction. Work in a ventilated room and avoid placing your face directly over the container.
Can this method remove scratches?
No. It targets tarnish, not dents, scratches, plating loss, firescale, or deep corrosion. Professional polishing may improve some surface damage, but aggressive polishing can also remove detail.
How often can I clean silver this way?
Use it only when tarnish is visible and simpler washing is not enough. Regular wiping, careful storage, and occasional gentle buffing should reduce the need for full treatments.
Real-World Experience: What Happens When You Try the Method
The first time many people try the baking soda and aluminum technique, the speed is the biggest surprise. A spoon that looked charcoal gray can become noticeably brighter within minutes. The result feels a little like a magic trick, except the magician is electrochemistry and the assistant is a roll of foil from the kitchen drawer.
In a typical test with several tarnished sterling teaspoons, the most reliable setup is a shallow glass baking dish lined with fresh aluminum. Prewashing the spoons matters more than expected. Pieces that still have oily fingerprints or dried food marks tend to develop uneven bright and dark patches because the solution cannot reach the tarnish uniformly.
Once hot water and baking soda are added, the reaction may begin almost immediately. Small bubbles collect near the points where the silver touches the foil. The aluminum gradually becomes darker or blotchy. A faint sulfur smell may appear, particularly when the tarnish is heavy. Opening a window makes the experience much more pleasantand prevents the kitchen from briefly smelling like an egg with poor career prospects.
Contact is the most important practical detail. In one batch, a spoon resting flat on the foil brightens evenly, while another spoon balanced partly on top of it remains dark along the raised edge. Moving the second spoon so that its bowl and handle both touch the aluminum usually corrects the problem. For chains, several contact points are helpful, but the chain should be spread out rather than dropped into a tangled pile.
The method also teaches an important lesson about expectations. Electrochemical cleaning can remove dark tarnish, but it does not always produce the high mirror shine associated with careful hand polishing. After rinsing, some pieces look clean but slightly pale or matte. Thirty seconds of gentle buffing with a soft silver cloth often improves the appearance dramatically.
Heavily tarnished engraved areas may require a second short bath. Replacing the used foil and solution works better than leaving the silver in the original bowl for an hour. Fresh aluminum provides more active surface, while a clean solution makes it easier to monitor progress.
Another practical discovery is that not every dark detail should disappear. On a decorative silver ring, black color in the carved pattern may be intentional oxidation. Treating the whole ring can remove the contrast that makes the design visible. The ring may come out technically cleaner but artistically less interesting. That experience is an excellent reminder to photograph unfamiliar pieces before cleaning and inspect their decorative intent.
Drying deserves as much attention as the bath itself. Fork tines, chain clasps, and embossed edges can hold water long after the broad surfaces appear dry. Blotting carefully, followed by several minutes in open air and a final soft-cloth inspection, helps prevent water spots and trapped moisture.
For routine household silver, the method is inexpensive, fast, and surprisingly satisfying. Its greatest advantage is reaching recessed areas without forceful scrubbing. Its greatest limitation is that it treats the entire exposed surface indiscriminately. Used selectively on the right object, it is an excellent maintenance technique. Used automatically on every silver-colored treasure in the house, it can become a cautionary tale.
Conclusion
Cleaning silver with baking soda and aluminum can safely reverse ordinary tarnish on many plain, structurally sound pieces. The best results come from careful identification, gentle prewashing, direct foil contact, a moderate baking soda solution, short treatment times, thorough rinsing, and immediate drying.
The safest cleaner is not always the strongest one. Examine the object first, preserve intentional patina, protect vulnerable stones and attachments, and seek professional help when age, value, or construction makes the decision uncertain. Your silver should leave the cleaning bowl looking refreshednot like it has survived an unsupervised science fair.