Table of Contents >> Show >> Hide
- Start With a Theme (So Your Decor Looks Curated, Not… Collected)
- Party Layout: Build a “Wow Path” From Door to Snack Table
- DIY Decoration Projects With Big Payoff
- 1) The Bat Swarm Wall (Cheap, Fast, Ridiculously Effective)
- 2) Floating Witch Hat Canopy (Instant “How Did You Do That?”)
- 3) Cheesecloth Ghosts (Spooky, Lightweight, and Weirdly Elegant)
- 4) Glowing “Ghost Lanterns” (Spooky-Cute Light That Photographs Well)
- 5) Potion Bottle Bar (Because Drinks Should Look Slightly Suspicious)
- 6) Monster or Mummy Door (A One-Hour Entry Transformation)
- 7) DIY Foam Tombstones (Lightweight Graveyard Vibes)
- 8) No-Carve Pumpkins (Party-Safe, Kid-Safe, and Still Cool)
- 9) Spiderweb Ceiling Corner (The “Easy Atmosphere” Button)
- 10) A Coffin Centerpiece (Dramatic, Reusable, Surprisingly Versatile)
- Lighting: The Secret Ingredient That Makes DIY Decor Look Expensive
- Table Styling: Make the Food Look Like Part of the Decor
- Budget Plans: $20, $50, and $100 Party-Ready Setups
- The 60-Minute Sprint: Last-Minute DIY Halloween Decorations
- What Actually Works at Halloween Parties (Experience Notes, ~)
- Conclusion
If Halloween parties had a love language, it would be dramatic lighting and things hanging from the ceiling.
The good news: you don’t need a warehouse of animatronics (or a second mortgage) to make your place feel like a haunted hotspot.
With a little craftiness, a smart layout, and a willingness to accept that fake spiderweb will somehow end up in your hair,
you can create DIY Halloween decorations that look intentional, photogenic, and party-proof.
This guide focuses on decorations that punch above their weight: easy builds, big visual payoff, and flexible stylesfrom “spooky-chic”
to “family-friendly cute” to “I swear this house is not actually haunted.”
You’ll get specific projects, setup strategy (because placement is half the magic), and a final section of real-world party lessons to help everything hold up once guests arrive.
Start With a Theme (So Your Decor Looks Curated, Not… Collected)
Before you glue a single googly eye onto anything, pick one theme and a tight color palette. It’s the fastest way to make DIY décor look
like a styled Halloween party set instead of a clearance-aisle reunion.
Three easy theme formulas
- Classic Spooky: black + orange + warm candlelight (great for pumpkins, bats, skeleton accents).
- Haunted Manor: black + aged gold + deep burgundy with “old library” textures (cheesecloth, faux florals, vintage frames).
- Spooky-Cute: black + white + a pop color (purple, neon green, or pastel) with friendly ghosts and playful monsters.
Once your theme is set, every DIY project becomes easier: you already know what colors to paint, what materials to buy, and what to skip.
(Skipping is underrated. Your time is valuable. So is your sanity.)
Party Layout: Build a “Wow Path” From Door to Snack Table
The best Halloween party décor isn’t just decorit’s a mini experience. Think of your space like a movie set:
guests enter, get a “whoa” moment, then flow naturally toward the food and drinks.
Quick layout map
- Entry moment: one big visual hit (door, porch, or hallway).
- Ceiling + walls: light, high-impact elements (bats, hats, dangling ghosts).
- Tabletop zone: centerpieces and “close-up” details (place cards, potion labels, little surprises).
- Photo corner: a simple backdrop and good lighting (your guests will do the marketing for you).
DIY Decoration Projects With Big Payoff
1) The Bat Swarm Wall (Cheap, Fast, Ridiculously Effective)
Paper bats are the MVP of Halloween parties: low cost, easy to scale, and they instantly create motion on blank walls.
Cut bats from black cardstock (or matte black paper), fold wings slightly, and attach with removable putty so they look like they’re flying.
- Where it shines: behind the snack table, around a doorway, or spiraling up a staircase wall.
- Pro trick: vary sizes (small/medium/large) and angle wings differently so the swarm looks “alive.”
- Upgrade option: add a bat garland across a mantel or bar area for layered depth.
2) Floating Witch Hat Canopy (Instant “How Did You Do That?”)
This is one of those DIY Halloween decorations that looks like you hired a prop department. Hang witch hats from the ceiling using clear fishing line.
Add tiny battery fairy lights or small glow elements above them for a hovering, magical vibe.
- Best placement: over the entry, in a hallway, above the drink station, or above a dance area.
- Safety note: use hooks rated for ceilings or removable hooks designed for your surface; avoid anything that can drop mid-party.
- Style tip: keep hats uniform for a sleek look, or mix in a few patterned ribbons for playful chaos.
3) Cheesecloth Ghosts (Spooky, Lightweight, and Weirdly Elegant)
Cheesecloth is basically “haunted fabric” straight from the package. Make simple ghosts by draping cheesecloth over a foam ball or mannequin head form,
stiffening it (with fabric stiffener or diluted craft glue), and letting it dry into shape.
Once it holds, remove the form and you’ve got a ghost that can hang, float, or perch.
- Where it shines: porch corners, above door frames, or clustered in a window for a layered “spirits gathering” effect.
- Make it party-friendly: keep ghosts high enough that guests won’t walk face-first into the afterlife.
- Glow upgrade: hide a small battery light inside or under the ghost for an eerie, soft shine.
4) Glowing “Ghost Lanterns” (Spooky-Cute Light That Photographs Well)
Want lighting that looks great on camera and also helps people find the bathroom? Wrap cheesecloth around a small battery light or LED jar light,
shaping a little ghost form (foam ball head optional). Add simple eyes with black felt or marker.
The result is “adorable haunted,” which is a valid aesthetic and I will not be taking questions.
- Where it shines: steps, side tables, buffet edges, or along a hallway.
- Bonus: battery lighting keeps things safer than open flames, especially with fabric décor nearby.
5) Potion Bottle Bar (Because Drinks Should Look Slightly Suspicious)
Upcycle empty glass bottles and jars into “potion” décor for your drink station. Remove labels, tint water with food coloring (or use colored tissue inside),
and add handwritten labels like “Witch’s Brew,” “Spider Venom,” or “Definitely Not Poison.”
- Where it shines: drink table backdrop, shelf display, or as a centerpiece cluster.
- Pro trick: add battery tea lights behind bottles for a glow-through effect.
- Keep it tidy: use a tray so the whole setup can move if you need to reclaim table space.
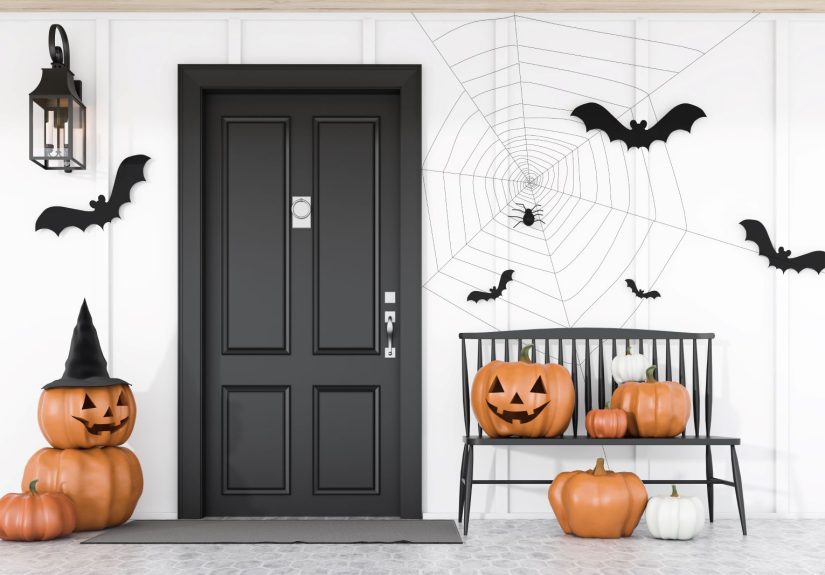
6) Monster or Mummy Door (A One-Hour Entry Transformation)
Your front door is prime Halloween real estate. For a mummy door, wrap it in white streamers or crepe paper like bandages,
and add two oversized “eyes” near the top. For a monster door, use colored paper strips (fur or scales),
a big mouth, and mismatched eyes. Either way, guests know the party starts before they ring the bell.
- Where it shines: front door, garage door, or the doorway into your main party room.
- Use removable tape: painter’s tape underneath can help protect surfaces.
7) DIY Foam Tombstones (Lightweight Graveyard Vibes)
Foam board or insulation foam makes surprisingly convincing tombstones with the right paint technique.
Cut classic shapes, add “cracks” with a pencil or blunt tool, then paint gray and dry-brush lighter highlights for stone texture.
Write punny epitaphs (because fear is temporary, but dad jokes are forever).
- Where it shines: entry walkway, yard corner, or indoors along a wall for a “graveyard gallery.”
- Pro trick: angle a light from below to cast dramatic shadows.
8) No-Carve Pumpkins (Party-Safe, Kid-Safe, and Still Cool)
Carving is iconic, but no-carve pumpkins are cleaner and easier for parties.
Paint geometric patterns, drip-paint neon “slime,” wrap pumpkins in black lace, or use vinyl decals for crisp designs.
They last longer, they’re less messy, and nobody has to handle sharp tools while wearing a costume with foggy vision.
- Where it shines: steps, mantel, buffet corners, centerpieces.
- Style tip: group pumpkins in threes with varied heights for a designer-looking cluster.
9) Spiderweb Ceiling Corner (The “Easy Atmosphere” Button)
Stretch faux spiderweb across corners and along ceiling edges to make a space feel instantly haunted.
Keep it intentional: concentrate webbing in a few zones rather than covering every square inch like you’re trying to summon an eight-legged landlord.
Add a few spiders (big + small) for depth.
- Where it shines: corners near a photo backdrop, above a snack table, or framing a doorway.
- Cleanup tip: test a small patch first; some webbing clings to textured walls with passion.
10) A Coffin Centerpiece (Dramatic, Reusable, Surprisingly Versatile)
A tabletop coffin centerpiece anchors your party table like a Halloween “statement necklace.”
Build a simple coffin shape from craft wood, cardboard, or foam board, then paint it matte black or weathered gray.
Fill it with faux moss, plastic bones, battery candles, or wrapped candy (“treats from beyond”).
- Where it shines: buffet center, dessert table, or as the base for a themed snack display.
- Bonus: it doubles as a serving tray if you line it with parchment paper.
Lighting: The Secret Ingredient That Makes DIY Decor Look Expensive
Lighting is what turns “I made this with paper and hope” into “wow, this party has a vibe.”
Choose warm or colored battery lighting, then highlight a few focal points instead of blasting every corner with overhead lights.
- Use battery candles: safer around fabric, paper, and crowded tables.
- Pick two lighting layers: ambient (string lights/lanterns) + accent (spotlight a tombstone cluster or bat swarm).
- Color rule: one spooky color (purple/green) plus warm white keeps things dramatic but not nightclub-confusing.
Table Styling: Make the Food Look Like Part of the Decor
The snack table is the party’s gravitational field. If you dress it well, guests will orbit happily.
Start with a base tablecloth (black, white, or burlap for rustic), then add one “runner” element like cheesecloth or gauzy fabric.
Easy DIY table upgrades
- Printable labels: “Brew,” “Elixir,” “Monster Munch.” Matching labels instantly unify mismatched bowls.
- Height hacks: use upside-down bowls or boxes under the cloth to create tiers (more visual drama, less table crowding).
- Mini décor clusters: three small items together (pumpkin + candle + tiny skull) looks styled, not random.
- Confetti, but smarter: use paper bats or tiny pumpkin cutouts instead of glitter (glitter is forever and not in a cute way).
Budget Plans: $20, $50, and $100 Party-Ready Setups
$20 “Small Space, Big Mood”
- Paper bat swarm on one wall
- Two no-carve pumpkins
- One strand of battery lights for the snack table
- DIY potion labels for jars you already own
$50 “Full Entry + Table Moment”
- Mummy/monster door
- Cheesecloth ghosts (2–4) or ghost lanterns
- Spiderweb corner framing a photo area
- Battery candles and a simple centerpiece cluster
$100 “Wow Path + Photo Corner”
- Floating witch hat canopy
- Foam tombstones (a small graveyard line)
- Upgraded lighting: string lights + accent spotlight
- Coffin centerpiece + tiered snack table styling
The 60-Minute Sprint: Last-Minute DIY Halloween Decorations
If your party is tonight and your décor situation is… emotionally complicated, here’s the speed run.
Choose two fast visuals and one lighting trick:
- Pick a wall: add a bat swarm (cut + stick) or a quick banner.
- Pick the door: mummy wrap + big eyes.
- Pick the table: black cloth + cheesecloth runner + battery candles + a pumpkin trio.
- Kill overhead lights: swap to warm lamps, fairy lights, or lantern-style LEDs.
Your guests won’t remember what you didn’t do. They’ll remember that the party felt intentionaland that the snacks were plentiful.
(Feed the monsters, and they will be kind.)
What Actually Works at Halloween Parties (Experience Notes, ~)
In real homes with real guests, décor success comes down to a few unglamorous truths. First: traffic wins.
The coolest hanging ghost in the world loses its charm if it repeatedly attacks people’s faces on the way to the chips.
Decorations that live high (ceiling, upper wall, door frame) or tight to corners are the most party-proof.
If you love a floor proplike tombstones, a cauldron, or a skeleton lounging in a chairgive it a clear “stage”
(a porch corner, a roped-off spot, or the far edge of a room) so it reads as intentional instead of “oops, obstacle.”
Second: lighting is the great equalizer. DIY projects look ten times better when you’re not blasting them with overhead
lights that scream “office break room.” A simple mix of warm lamps and a few battery candles makes cheap materials look richer.
Even paper bats feel cinematic when they cast soft shadows. If you want one “premium” effect, aim a light upward at a wall feature
(bat swarm, spiderweb corner, or tombstone cluster). That single decision can make the room feel designed rather than decorated.
Third: the snack table is secretly your centerpiece. Guests spend more time near it than any other zone, so it’s the best place
for detail-level DIY: potion labels, themed name cards, a coffin tray, or a small ghost lantern. Here’s the pattern that consistently works:
one big focal item (coffin centerpiece or pumpkin trio), one repeating element (bats or tiny pumpkins), and one light source (battery candles).
When people take photos of drinks and desserts, your décor becomes the backdrop automatically. That’s free ambienceno extra square footage required.
Fourth: build in “reset” moments. Parties get messy. It’s normal. Choose décor that can survive a guest bump and still look okay.
Banners, garlands, bats, and witch hats are great because they’re lightweight and forgiving. For tabletop setups, use trays so you can slide a whole
vignette aside when you need more space. And if you’re using faux spiderweb, keep it away from food and drinks unless you want your guests to wonder
whether the crunchy texture in the dip is… artisanal.
Fifth: consider the comfort-to-spooky ratio. If your party is for adults, you can go darkerlower lighting, eerie silhouettes,
a few surprise “jump” details. If kids are coming, lean into cute ghosts, friendly monsters, and bright accents.
A simple rule: make the entry dramatic, keep the main party room readable. People like spooky. They also like seeing where they’re walking.
Finally: the best DIY Halloween decorations feel cohesive. That doesn’t mean matching everything; it means repeating a few signals:
the same two or three colors, the same style of labels, and a consistent “texture story” (cheesecloth + paper + candlelight, for example).
When those repeat, even budget materials look elevated. Your guests won’t be thinking about cardstock and tape.
They’ll be thinking, “This party has a vibe,” and immediately taking a selfie with your bat wall like it’s a celebrity.
Conclusion
The secret to memorable DIY Halloween decorations for Halloween parties isn’t complicated: pick a theme, design a simple “wow path,”
and let lighting do the heavy lifting. Start with high-impact basics like bat swarms, ghost draping, or floating witch hats,
then add table details (labels, lanterns, a centerpiece) where guests naturally gather. Keep it safe, keep it walkable,
and keep it funbecause the only thing that should be truly terrifying is running out of snacks.