Table of Contents >> Show >> Hide
- Quick Specs (So You Can Decide If This Is Your Vibe)
- The Modular Plan (Build Once, Repeat Forever)
- Materials List (Per Seat Module)
- Building Plan: Measurements + Cut List
- Step-by-Step Tutorial (The Fun Part Where Wood Becomes Furniture)
- Step 1: Choose Straight Lumber (Future You Will Thank You)
- Step 2: Cut Everything and Label It
- Step 3: Build the Base Rectangle
- Step 4: Add Interior Supports
- Step 5: Make and Attach the Legs
- Step 6: Install Seat Slats (Drainage Is Your Friend)
- Step 7: Build the Back Panel
- Step 8: Add Arms for End Pieces
- Step 9: Sand and Ease the Edges
- Step 10: Finish for Weather, Not Wishes
- Cushions, Comfort, and the “Don’t Slide Apart” Problem
- Budget + Time Reality Check
- Maintenance Tips (So Your Sofa Doesn’t Age in Dog Years)
- Conclusion
- Experiences & Lessons Learned (The Extra You’ll Be Glad You Read)
Outdoor sectionals are amazing… right up until you see the price tag and realize you could either buy a sofa
or pay your electric bill and still eat food. The good news: a clean-lined, modular DIY outdoor sectional sofa
is one of those “weekend warrior” builds that looks expensive, feels sturdy, and can be customized to fit your patio
like it was born there.
This guide gives you a practical building plan, a repeatable module design, and step-by-step instructions. You’ll end up
with a sectional that can grow over timeadd a corner, swap an end piece, build an ottoman laterbecause your outdoor
space should be flexible, not emotionally controlling.
Quick Specs (So You Can Decide If This Is Your Vibe)
| Feature | Recommended Target | Why It Works |
|---|---|---|
| Seat cushion size | 24" x 24" (common patio size) | Easy to shop, easy to replace |
| Module footprint (outside) | 28" W x 30" D | Fits 24" cushions + frame thickness |
| Seat height (frame only) | ~12" | With a 4–6" cushion, lands near chair height |
| Total height (with back) | ~26–28" | Comfortable lean-back without blocking views |
| Best wood choices | Cedar, redwood, or dry pressure-treated lumber | Outdoor-friendly and accessible |
The Modular Plan (Build Once, Repeat Forever)
The simplest way to build an outdoor sectional is to design one “seat box” module and then dress it up:
add arms to make end pieces, add an L-back to make a corner, and build an ottoman that matches the seat height.
This keeps your measurements consistent and your sanity intact.
Suggested 5-Piece Layouts
- Small L-shape: 1 corner + 2 armless seats + 2 end/arm seats
- Deep lounge: 1 corner + 3 armless seats + 1 end/arm seat + 1 ottoman
- Apartment patio: 2 end/arm seats + 1 armless seat (a compact 3-seat sofa)
Materials List (Per Seat Module)
Multiply by the number of sections you want.
- Lumber: 2x4s (frame + back), 1x4s (seat and back slats)
- Fasteners: exterior-rated screws (2-1/2" and 1-5/8" are common sizes)
- Optional joinery: pocket-hole screws for a cleaner build (especially for the base frame)
- Glue: waterproof exterior wood glue (optional but helpful for stiffness)
- Finish: exterior stain + exterior topcoat, or exterior paint + protective topcoat
- Cushions: 24" x 24" seat cushions (and back pillows if you like the “sink-in” feel)
Tools You’ll Want Nearby
- Miter saw or circular saw with a straightedge guide
- Drill/driver + bits (and a countersink bit if you love yourself)
- Measuring tape, square, clamps
- Sander (or sanding block) + 80/120/180 grit
- Optional: pocket-hole jig
Building Plan: Measurements + Cut List
This plan is designed around a 28" W x 30" D module footprint. The inside “cushion bay”
lands around 24–25" depending on how you space your slats and how thick your boards actually measure.
(Real lumber sizes are “nominal.” Translation: 2x4s are not actually 2 inches by 4 inches. Lumber math is a lifestyle.)
Module A: Armless Seat (Build This One First)
Outside size: 28" W x 30" D x ~26" H (with back)
| Part | Material | Qty | Cut Length | Notes |
|---|---|---|---|---|
| Front/Back rails | 2×4 | 2 | 28" | Base rectangle |
| Side rails | 2×4 | 2 | 30" | Base rectangle |
| Interior supports | 2×4 | 2 | 25" | Space evenly; supports slats |
| Leg laminations | 2×4 | 8 | 11" | Glue/screw pairs to make 4 chunky legs |
| Seat slats | 1×4 | 7 | 28" | Leave small gaps for drainage |
| Back uprights | 2×4 | 2 | 14" | Back panel sides |
| Back top/bottom rails | 2×4 | 2 | 28" | Back panel frame |
| Back slats | 1×4 | 4 | 28" | Adjust count for style |
Module B: End/Arm Seat (One Arm = One End)
Build the armless seat, then add an arm on the left or right.
Tip: make two mirror-image end pieces so your sectional has “bookends.”
| Part | Material | Qty | Cut Length | Notes |
|---|---|---|---|---|
| Arm uprights | 2×4 | 2 | 14" | Match back height above seat |
| Arm cap | 2×4 | 1 | 30" | Runs front-to-back |
| Arm infill (optional) | 1×4 | 2 | 14" | Slats or panel look |
Module C: Corner Seat (The L-Shape MVP)
Build the armless seat, then add a second back panel on the side where the “corner” lives.
Keep the second back panel aligned with the outside edge so cushions meet cleanly.
- Add a second back panel frame (same cuts as the first back panel).
- Optional: add an arm cap on the “open” corner edge if you want symmetry.
Module D: Ottoman / Coffee Table
Use the same base footprint (28" x 30") but skip the back. If you want a coffee table,
top it with tighter slat spacing or a solid panel.
Step-by-Step Tutorial (The Fun Part Where Wood Becomes Furniture)
Step 1: Choose Straight Lumber (Future You Will Thank You)
At the store, sight down each board like you’re judging a runway model. Reject twists, bows, and
boards that look like they’ve lived a dramatic life. Straighter boards mean easier assembly,
tighter joints, and fewer “why is this corner floating?” moments.
Step 2: Cut Everything and Label It
Cut all parts for one module first. Stack them by type and label with painter’s tape:
“Front rail,” “Side rail,” “Slat,” etc. This turns your build from chaos into a calm, well-managed cooking show.
Step 3: Build the Base Rectangle
Create a 28" x 30" rectangle using the front/back rails and side rails. Check for square by measuring diagonals.
If the diagonals match, you’re square. If they don’t, gently persuade the frame until they do.
- Fastening option A (simple): predrill and drive exterior screws through the side rails into the ends of the front/back rails.
- Fastening option B (clean): use pocket holes so screw heads disappear inside the frame.
Step 4: Add Interior Supports
Install two 2×4 interior supports across the width (25" pieces), spaced evenly. These keep the seat from sagging,
especially once the sectional becomes your patio’s unofficial nap headquarters.
Step 5: Make and Attach the Legs
For sturdy legs without buying 4×4 posts, laminate pairs of 11" 2×4 blocks into four chunky legs.
Clamp, glue (optional), and screw each pair together. Then attach one leg at each corner inside the frame.
Pro comfort tip: if your patio surface slopes, consider adjustable leveling feet so your sectional
doesn’t slowly migrate downhill like it’s trying to escape.
Step 6: Install Seat Slats (Drainage Is Your Friend)
Add 1×4 slats across the top of the base. Leave small gaps (about 1/4"–3/8") so water can drain and wood can breathe.
Fasten each slat into the front/back rails and the interior supports.
Step 7: Build the Back Panel
Assemble a simple back panel frame with two uprights and a top and bottom rail (all 2×4).
Attach 1×4 back slats across it. Then fasten the back panel to the rear of the seat base.
- Want a more relaxed feel? Tilt the back slightly by spacing the bottom away from the seat frame with small blocks.
- Want “upright conversation” posture? Keep the back closer to vertical.
Step 8: Add Arms for End Pieces
For an end/arm seat, build a mini “arm frame” and attach it to one side of the base and the back panel.
Cap the arm with a 2×4 for a finished look (and a place to set a drink like you’re starring in a patio catalog).
Step 9: Sand and Ease the Edges
Sand all surfaces. Break (round over) sharp edges, especially arm caps and front edges where legs brush past.
This reduces splinters and makes the piece feel “finished” instead of “construction site chic.”
Step 10: Finish for Weather, Not Wishes
Outdoor furniture lasts longer when you treat it like it lives outdoors (because it does).
Pick one finishing approach and commit:
- Stain + protective clear coat: highlights wood grain and adds a weather barrier.
- Paint + protective topcoat: best for bold color and maximum UV blocking.
- Penetrating oil: easy maintenance, more frequent reapplication.
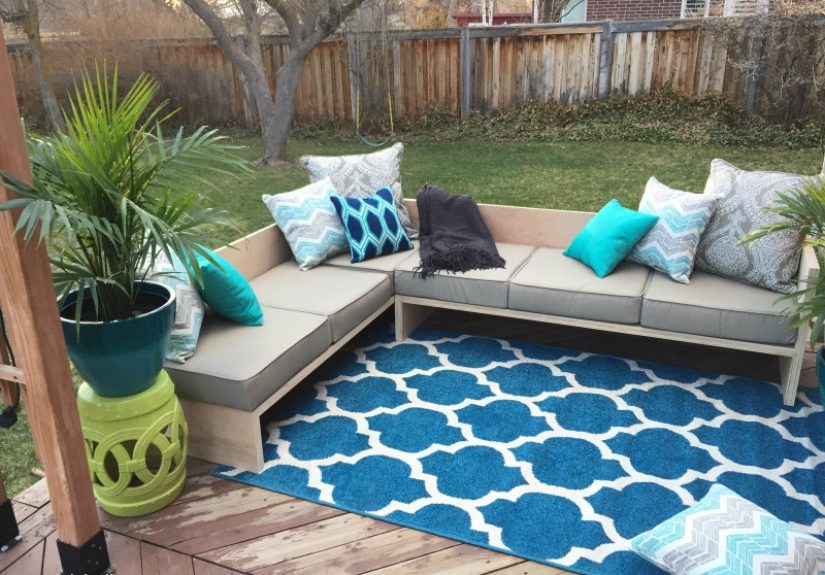
Cushions, Comfort, and the “Don’t Slide Apart” Problem
Picking Cushions
Most DIY outdoor sectional sofa plans work best when you choose cushions first. If you already have cushions,
measure them and tweak your module width slightly so they fit without looking cramped. If you’re buying new,
24" x 24" is a common size that won’t trap you in a single brand forever.
Keeping Modules Together
- Simple fix: add non-slip outdoor rug pads under each module.
- Hardware fix: use sectional connectors or small mending plates between frames.
- Furniture hack: build one shared “platform base” and set modules on top (great for decks).
Budget + Time Reality Check
Your total cost depends heavily on wood choice and cushions. Lumber can be modest, but cushions often become the “surprise
main character” of the budget. The upside: cushions are replaceable and let you refresh the look without rebuilding the frame.
- Build time: 1 weekend for 1–2 modules if you batch cuts and pre-sand boards.
- Finishing time: often 1–3 extra days because coats need drying time.
- Cost strategy: build the frame now, add pieces over time, upgrade cushions later.
Maintenance Tips (So Your Sofa Doesn’t Age in Dog Years)
- Keep cushions stored or covered during heavy rain seasons.
- Recoat high-touch arm caps sooner than the rest (they take the most sun and wear).
- Once per season, check screws for loosenesswood expands/contracts with weather.
- If you used pressure-treated lumber, make sure it’s dry before applying finishes so coatings bond well.
Conclusion
A DIY outdoor sectional sofa isn’t just a money-saverit’s a “make it fit your life” project. You can start with
two end pieces and an armless seat, then expand to a full L-shape as your patio evolves. Build one solid module,
repeat the process, and you’ll end up with outdoor seating that looks custom because it is custombuilt for
your space, your budget, and your very real need to sit outside and do absolutely nothing.
Experiences & Lessons Learned (The Extra You’ll Be Glad You Read)
People who build a DIY outdoor sectional sofa almost always agree on two things: (1) it’s surprisingly doable, and
(2) the tiny details matter way more than expected. The most common “I wish I knew this earlier” moment? Lumber selection.
It’s tempting to grab the first stack of 2x4s and sprint to the checkout like you’re on a game show. But outdoor seating
is basically a long-term relationship with your boards. Twisted lumber doesn’t just look weirdit quietly forces your frame
out of square, makes slats fight each other, and creates gaps that look like your sofa is raising an eyebrow at you.
Another real-world discovery: cushions can make or break the comfort. Builders who start with whatever cushions are on sale
sometimes end up with a sectional that looks great but feels like sitting on a polite stack of hardcover books. On the flip side,
people who choose a thicker seat cushion (or add a simple layer of outdoor foam under a thinner cushion) often say it transforms the build
from “nice patio bench” into “why would I ever go back inside?” comfort. If you’re unsure, aim for a seat cushion in the 4–6" thickness
range, then add back pillows for that loungey, sink-in effect.
Fasteners are another sneaky lesson. Outdoor builds live in a world of moisture, heat, and expansion. The folks who use random indoor screws
sometimes notice rust stains or loosening over time, especially in wetter climates. Meanwhile, people who go with exterior-rated, corrosion-resistant screws
(and predrill near board ends) usually report a sturdier feel and fewer seasonal squeaks. If you’re using cedar, many DIYers specifically prefer fasteners
that resist corrosion to avoid black staining around screw heads. It’s not glamorous, but neither is a sofa that looks like it got into a fight with a weather app.
Finishing is where patience pays rent. A common pattern: someone builds the whole sectional in a weekend, then tries to stain and seal in one afternoon,
only to discover that “dry to the touch” and “ready for cushions and humans” are not the same thing. Builders who follow a realistic finish schedulesand, clean,
apply stain or paint, then allow proper drying before topcoatstend to get a smoother finish that doesn’t turn tacky in humid weather. And if the build uses
pressure-treated wood, experienced DIYers often wait until the boards are dry enough to absorb and hold a finish well. That waiting period feels annoying,
but it can be the difference between a finish that lasts and a finish that peels like a sunburn.
Finally: modular sectionals “walk” unless you stop them. People often notice the pieces sliding apart after a few sit-downs, especially on smooth concrete or tile.
The easy fix that gets mentioned again and again is using rug grip or non-slip pads under each module. The more permanent fix is adding connectors between sections
(or even simple metal plates) so the sofa stays aligned when someone plops down dramatically with a snack. Because it will happen. Someone will plop.
Plan accordingly, and your DIY patio sectional will feel like a single, intentional piecenot a friendly group of chairs having trust issues.