Table of Contents >> Show >> Hide
- Why a DIY house number sign with a flower box is a game changer
- Planning your DIY house number sign with planter box
- Step-by-step: How we built our DIY house number sign and flower box
- Step 1: Cut the backer board and box pieces
- Step 2: Build the flower box
- Step 3: Attach the flower box to the backer board
- Step 4: Sand, fill, and prep for paint or stain
- Step 5: Paint or stain your sign
- Step 6: Attach the house numbers
- Step 7: Add drainage and a liner to the box
- Step 8: Mount the sign in place
- Step 9: Plant (or style) your flower box
- Styling and seasonal ideas for your house number flower box
- Maintenance tips to keep your sign looking fresh
- Our experience: How this DIY idea came together (and what we’d do again)
You know that moment when the delivery driver calls from your driveway asking,
“Are you sure this is your house?” Yep, that was us. Our old house numbers
were tiny, faded, and hiding in the shadows. So my husband and I decided to fix it
the fun way: with a bold DIY house number sign that includes a flower box.
The result? A custom address sign that boosts curb appeal, makes it easier for
friends (and emergency services) to find us, and gives me a little flower box to
fuss over every season. In this guide, I’ll walk you through exactly how we built
our DIY house number sign with a planter box, plus share tips on sizing, placement,
materials, and styling so you can make one that fits your own home perfectly.
Why a DIY house number sign with a flower box is a game changer
A house number sign sounds basic, but it does a lot of heavy lifting:
- Safety: Clear house numbers help first responders find your home quickly.
- Convenience: No more lost delivery drivers or confused guests circling the block.
- Curb appeal: A pretty flower box and modern numbers can totally change your entry.
- Customization: You control the style, colors, and plants, so it suits your house.
Combining a house number plaque with a flower box gives you the best of both worlds:
practical visibility plus a mini garden. It looks like something from a
magazine spread, but you can build it over a weekend with basic tools.
Planning your DIY house number sign with planter box
1. Choose the perfect location
Start by deciding where the sign will live. Popular options include:
- At the end of the driveway: Mounted on a post where visitors first pull in.
- Near the front door: On the wall or siding next to your entry.
- On a porch column or fence: Great if your house sits back from the road.
For best visibility, aim to place the numbers roughly at eye level, usually
about 4–5 feet from the ground, and make sure they’re not hidden by shrubs,
railings, or seasonal décor. High contrast is key: dark numbers on a light
background or light numbers on a dark background are much easier to read from
the street.
2. Decide on size and style
Your design should fit your home’s look:
- Number height: In many neighborhoods, 4–6 inch tall numbers are recommended.
If your home is far from the street, go larger so they’re easy to spot. - Font style: Clean, simple fonts are the easiest to read. Think modern sans-serif
or classic block numerals. - Sign shape: We went with a vertical board and a flower box at the base, but you
can do horizontal, square, or even double-sided if it’s on a post.
3. Materials and tools
Here’s a basic materials list similar to what we used. Feel free to adjust
dimensions to fit your space and your address length.
- 1×6 or 1×8 cedar or pine board for the back (around 24–36 inches long)
- Additional 1×6 pieces for the flower box (front, sides, bottom)
- Exterior wood screws or brad nails
- Exterior wood glue
- Sandpaper (150–220 grit) or a palm sander
- Exterior paint or stain and a clear sealer
- Metal house numbers (4–6 inches tall)
- Mounting hardware (sawtooth hangers, masonry anchors, or post brackets)
- Plastic nursery pots or a liner for inside the flower box
- Potting mix and plants (or faux greenery and flowers)
Tools you’ll appreciate having:
- Miter saw or circular saw
- Drill and drill bits
- Nail gun (optional but handy)
- Measuring tape and pencil
- Level (to keep things straightunlike my bangs in high school)
Step-by-step: How we built our DIY house number sign and flower box
Step 1: Cut the backer board and box pieces
First, measure how wide your numbers are together and add at least 2–3 inches
of margin on each side so the sign doesn’t look cramped. We cut our backer
board to about 30 inches tall so there was room above for the numbers and
space below for the flower box.
For the flower box, you’ll need:
- 1 piece for the bottom, same width as the backer board
- 2 side pieces, the height you want your box (we did around 5 inches)
- 1 front piece, same width as the bottom
Step 2: Build the flower box
Assemble the box like a simple rectangle:
- Attach the side pieces to the ends of the bottom board using wood glue and nails or screws.
- Attach the front piece across the sides to close the box.
- Wipe off any glue squeeze-out, then set the box aside to dry. This doesn’t
have to be perfect cabinetrythis is a planter, not a grand piano.
Step 3: Attach the flower box to the backer board
Decide how far up from the bottom of the backer board you want the box. We left
a small margin at the bottom so the board wouldn’t sit directly in soil or snow.
Center the box horizontally, clamp it if you can, and then screw it from the
backer board into the box. You can also drive a few screws through the sides of
the box into the backer if you want extra strength.
Step 4: Sand, fill, and prep for paint or stain
Once everything is attached, give the entire piece a sanding to smooth rough
edges and corners. If you used nails or have gaps, fill them with exterior wood
filler, let it dry, and sand again.
This step turns “random scrap wood” into “actual décor.” Don’t skip it.
Step 5: Paint or stain your sign
Now comes the fun part: color. You can:
- Stain the wood in a warm cedar or walnut tone for a modern, natural look.
- Paint it black or charcoal for a bold, modern statement.
- Use a soft white or gray to keep things light and cottage-y.
Use exterior-grade paint or stain and add a clear outdoor sealer if needed.
Make sure you coat the inside of the flower box too, or use a plastic liner to
help the wood last longer.
Step 6: Attach the house numbers
After the finish is dry, add your metal house numbers:
- Lightly mark the layout with a pencil and a level so everything lines up.
- Pre-drill holes where the screws will go to prevent the wood from splitting.
- Attach the numbers using the hardware provided, tightening them snugly but not too hard.
Stand back and check: if the numbers look crooked, this is the time to fix it
before you mount the entire sign.
Step 7: Add drainage and a liner to the box
Plants love water, but your sign doesn’t love rot. Drill a few small drainage
holes in the bottom of the flower box. Then:
- Drop in a plastic window-box liner, or
- Use individual potted plants set inside the box instead of filling it with loose soil.
Using pots makes it super easy to swap plants out with the seasons and protects
the wood from staying constantly damp.
Step 8: Mount the sign in place
How you mount your sign depends on the surface:
- On a post: Use exterior screws or metal brackets to attach the sign to a sturdy 4×4 post.
- On siding or wood: Screw through the backer board into studs or use heavy-duty anchors.
- On brick or masonry: Use masonry anchors or brick clips designed for décor.
Double-check that the entire sign is level before tightening screws. It’s amazing
how much one tilted planter can bug you every time you pull into the driveway.
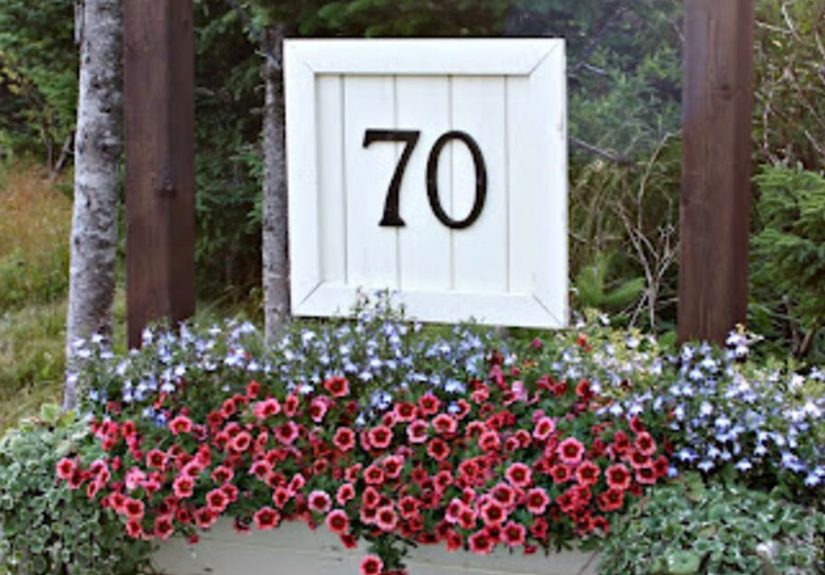
Step 9: Plant (or style) your flower box
Finally, the top layer of the sundae: the flowers. A few ideas:
- Sun-loving annuals: Petunias, calibrachoa, or geraniums for bright color.
- Shade-friendly plants: Ferns, impatiens, or coleus if your sign is under a porch roof.
- Low-maintenance greens: Small evergreens or boxwoods in pots.
- Faux plants: Zero watering, always perfectespecially in extreme climates.
Add a bit of mulch or moss on top of the soil to keep things tidy, and your
DIY house number planter is officially ready for its close-up.
Styling and seasonal ideas for your house number flower box
One of the best parts of this project is how easily you can change the look
without rebuilding anything. Some seasonal swap ideas:
- Spring: Daffodils, pansies, or tulips in cheerful colors.
- Summer: Trailing vines and bright annuals spilling over the edge.
- Fall: Mini pumpkins, ornamental cabbage, and mums.
- Winter: Evergreen clippings, pinecones, and battery-powered fairy lights.
You can also layer in décor like a small welcome sign, a tiny lantern, or a
decorative stakejust don’t block the view of the house numbers. Those still
need to do their job.
Maintenance tips to keep your sign looking fresh
To help your new DIY house number sign and flower box last:
- Check the finish yearly: Touch up paint or stain if it looks dull or weathered.
- Watch for water damage: Make sure drainage holes stay clear and the box doesn’t stay soggy.
- Clean the numbers: Give metal house numbers a quick wipe now and then so they stay legible.
- Trim plants: Keep flowers from flopping over the numbers or blocking visibility from the street.
A little maintenance goes a long way, and your DIY sign will keep boosting
your curb appeal year after year.
Our experience: How this DIY idea came together (and what we’d do again)
When we first decided to build a house number sign with a flower box, it started
as one of those, “How hard could it be?” conversations. My husband was thinking
about lumber sizes and structural support. I was thinking about flower colors
and the perfect Instagram angle. Somewhere in the middle of those two brains,
this project was born.
We knew we wanted the sign at the end of our driveway where visitors first pull
in. Our house sits a bit back from the street, and the original numbers were
tiny and near the doorbasically invisible until you were already parked in
the wrong spot. A free-standing sign with a flower box felt like the perfect
way to say, “Yes, this is the right house, and also we like hydrangeas.”
The first big decision was height and size. We walked out to the street and
did the very scientific test of “Can we read this from the curb?” using printed
paper numbers taped to a board. It looked ridiculous, but it helped us choose
larger metal numbers and a taller backer board. If you’re unsure what size to
buy, I highly recommend this extremely professional tape-and-walk-away test.
Building the box itself went fairly smoothlymostly because my husband is
patient and owns a level. We did make one small mistake at first: we attached
the box a little too low on the board. When we stood the whole thing up, it
looked bottom-heavy, and the plants would have hidden part of the numbers.
Thankfully, we caught it before everything was painted and simply moved the
box up a few inches. That tiny tweak made the proportions feel much more
balanced.
Choosing the finish was my favorite part. We ended up staining the wood in a
warm medium tone and pairing it with matte black numbers and hardware. The
stain ties in with our porch furniture, and the black numbers pop enough to be
easily visible from the street. If you’re stuck on colors, look at what you
already have on your porchdoor color, light fixtures, mailboxesand pull from
that palette so everything feels intentional.
For the actual planting, we went with potted flowers tucked inside the box
rather than filling it with loose soil. That has been a huge time-saver. When
the seasons changeor when I inevitably fall in love with different plants at
the garden centerwe just lift the pots out and drop new ones in. No digging,
no mess, minimal drama.
The funniest part of the whole project was watching how quickly people noticed.
Our neighbors commented almost immediately. The delivery driver who used to
call us from the street now pulls in confidently and heads straight to the
front door. Friends have texted asking, “Did you make that yourself?” which
is basically the DIY equivalent of a standing ovation.
We also realized how much peace of mind comes from having visible, attractive
house numbers. It’s not just about pretty décoralthough that’s a big perk.
Clear numbers help emergency services and visitors find you faster, especially
at night or in bad weather. The flower box is the “fun” part that makes it
feel like décor instead of just a requirement.
If we were to build another one (and honestly, we’re tempted to make a mini
version for the backyard gate), here’s what we’d repeat:
- Use a good-quality exterior finish from the beginning so it weathers well.
- Oversize the numbers slightly rather than going too small.
- Rely on potted plants inside the box for easy seasonal swaps.
- Test visibility from the street before permanently mounting anything.
In the end, this DIY house number sign with a flower box feels like the
perfect blend of both our personalities: a little bit practical, a little bit
decorative, totally custom, and something we’re proud to say we built
together. If you’re looking for a weekend project that genuinely upgrades
your home’s curb appealand gives you an excuse to buy more plantsthis is a
fantastic place to start.