Table of Contents >> Show >> Hide
- Why Turquoise Works (and When It Doesn’t)
- Quick Checklist Before You Start
- Tools and Materials
- Step-by-Step: How to Paint a Turquoise Front Door
- 1) Decide: Off the Hinges or On the Hinges?
- 2) Remove Hardware (and Anything You Don’t Want Turquoise Forever)
- 3) Clean Like You Mean It
- 4) Scuff Sand (Don’t Sand Through Your Soul)
- 5) Patch Dings and Imperfections
- 6) Prime Smart (This Is Where a Great Door Is Born)
- 7) Choose the Right Turquoise (Color Testing That Saves Marriages)
- 8) Paint in the Right Order (So the Panels Don’t Mock You)
- 9) Respect the Weather (Because Paint Has Feelings)
- 10) Let It Cure (Not Just Dry)
- 11) Reinstall Hardware (or Upgrade It for Instant “Designer” Energy)
- Pick a Finish That Can Handle Real Life
- Turquoise Color Ideas That Actually Work
- Common Mistakes (and How to Avoid Them)
- What It Costs and How Long It Takes
- Important Safety Note for Older Homes (Built Before 1978)
- Final Thoughts: The Door That Does the Most With the Least
- Extra: Experiences From the Turquoise Front Door Universe (500+ Words)
Your front door has one job: say “welcome” without yelling “we haven’t dusted since the last solar eclipse.”
Painting it turquoise is the easiest way to make your entry feel fresh, cheerful, and intentionally styledeven if
your porch light is held together by hope and a single screw.
This guide walks you through a durable, pro-looking DIY turquoise front door, from prep to the final “wow” moment.
We’ll cover smart paint choices, weather timing, material-specific tips (wood, fiberglass, steel), and the little
tricks that keep your new color from sticking to weatherstripping like a tongue on a frozen flagpole.
Why Turquoise Works (and When It Doesn’t)
Turquoise sits in that sweet spot between blue and greenbright enough to feel fun, calm enough to feel classic.
It pairs beautifully with white trim, warm brick, soft grays, sandy beiges, and even modern black accents. It also
photographs well, which matters more than we’d like to admit in the age of “quick porch pic” listings and
neighborhood group posts.
One reality check: bold front-door colors can influence buyer impressions. Some research suggests certain saturated
blues can be polarizing, depending on shade and contextmeaning your turquoise should feel intentional with your
home’s exterior palette, not like the door lost a bet. If you’re painting for resale, consider a slightly muted,
sophisticated turquoise (think “sea glass” or “vintage teal”) rather than a neon pool-float vibe.
Quick Checklist Before You Start
- Know your door material: wood, fiberglass, or steel. Your primer choice depends on it.
- Pick your finish: satin/soft gloss or semi-gloss usually performs best on doors (durable, wipeable).
- Watch the weather: avoid rain, heavy humidity, and extreme heat/cold for best leveling and adhesion.
- Plan for cure time: “dry” is not the same as “ready to slam 42 times a day.”
- Protect your space: drop cloths, painter’s tape, and a strategy to keep pets/kids from “helping.”
Tools and Materials
You don’t need a sprayer or a full workshop. You need the right basics and a tiny bit of patience.
- Degreasing cleaner (or mild detergent solution) + sponge/cloth
- Painter’s tape, drop cloths, and a screwdriver
- Sanding sponge or sandpaper (often 180–220 grit is a great all-around range)
- Tack cloth or lint-free cloth
- Primer suited to your door (bonding primer for slick/glossy surfaces is a common winner)
- Exterior paint in your chosen turquoise (quality matters here)
- Angled sash brush (for corners/profiles) and a small foam or low-nap roller (for flat areas)
- Optional but helpful: wood filler (for dings), putty knife, new weatherstripping, and a new doorknob set
Step-by-Step: How to Paint a Turquoise Front Door
1) Decide: Off the Hinges or On the Hinges?
Painting the door laid flat on sawhorses typically produces the smoothest finish because gravity is not actively
trying to sabotage you. Many pros recommend removing the door if possible and taking off hardware and even
weatherstripping to avoid messy edges and sticking. If removing the door sounds like a two-person circus act, you
can paint it while it hangsjust plan carefully to prevent drips and sticking.
If you’re going for a super sleek, furniture-like result (especially with higher sheen), removing the door is
worth it. If you’re doing a simple refresh, painting in place can still look fantastic with good prep.
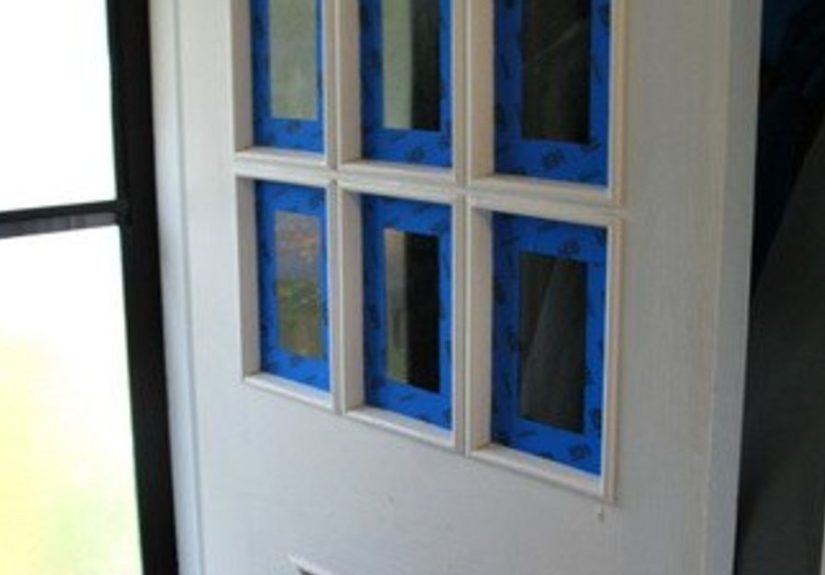
2) Remove Hardware (and Anything You Don’t Want Turquoise Forever)
Take off the knob, deadbolt, kick plate, door knocker, and any decorative pieces. If you can remove
weatherstripping, do itpaint loves to glue doors shut in the exact places you least want it to. Put screws in a
labeled bag, because “mystery screw” is not a fun game on reassembly day.
3) Clean Like You Mean It
Doors collect oils, sunscreen fingerprints, pollen, and “no idea what that is.” Clean the entire surface with a
degreasing cleaner (or a mild detergent mix), rinse if needed, and let it dry fully. This step is boring, which is
why people skip itthen wonder why the paint peels like a sunburn.
4) Scuff Sand (Don’t Sand Through Your Soul)
You’re not trying to remove every molecule of the old finish. You’re creating tooth so primer and paint can grip.
Lightly sand glossy areas and smooth out rough patches. Wipe away dust thoroughly with a tack cloth or lint-free
cloth. Dust left behind turns into texture, and texture turns into regret.
5) Patch Dings and Imperfections
Fill cracks, chips, or little dents with wood filler (for wood doors) or an appropriate patching compound for your
door type. Let it dry completely, then sand smooth. Turquoise is a “look at me” colorso it will highlight flaws
you didn’t notice when the door was beige and emotionally invisible.
6) Prime Smart (This Is Where a Great Door Is Born)
Primer is your insurance policy. Choose based on material and existing finish:
- Wood doors: prime bare spots and repairs; consider stain-blocking primer if tannins or stains bleed through.
- Fiberglass or steel doors: bonding primers help paint stick to slick surfaces and can reduce sanding needs.
- Previously painted doors in good shape: you may only need spot priming, but full priming improves uniform color.
Apply primer with a brush for corners and profiles, then roll flat sections for an even coat. Let it dry according
to the label. Once dry, a light sanding can help create a smoother final finishespecially if you’re using a
satin or semi-gloss topcoat.
7) Choose the Right Turquoise (Color Testing That Saves Marriages)
Turquoise is a shape-shifter. In shade it can read green; in bright sun it can turn bluer; against warm brick it
can look punchy; against cool gray siding it can look calm and coastal. Before you commit:
- Paint sample swatches on poster board (or sample boards), not directly on the door.
- View morning, noon, and eveningoutdoors lighting is dramatic.
- Check it against your trim, roof color, stone/brick, and any permanent elements.
A good rule: if you want “happy and welcoming,” pick a medium turquoise with a soft gray undertone. If you want
“bold statement,” go brighter and cleaner. If you want “classic,” choose a deeper teal-leaning turquoise.
8) Paint in the Right Order (So the Panels Don’t Mock You)
Use an angled brush for recessed areas and profiles first, then roll the larger flat areas while the brushed paint
is still wet to help everything blend. Work in manageable sections. For paneled doors, many DIYers prefer:
- Panels (recessed sections)
- Horizontal rails
- Vertical stiles
- Edges last
Apply thin, even coats. Thick coats are where drips are born. Two coats are common for solid, even color. If
switching from a dark color to a lighter turquoise, or vice versa, primer plus two topcoats is usually the sweet
spot for coverage.
9) Respect the Weather (Because Paint Has Feelings)
Exterior paint performance depends on temperature, humidity, and dew. Many experts recommend aiming for moderate
temps and avoiding extremely humid conditions. Some modern exterior products can be applied in cooler temps than
older formulas, but always follow the can’s guidance. Also, avoid painting in direct blazing sunthe surface can
get too hot and cause the paint to dry too fast, leading to lap marks and poor leveling.
10) Let It Cure (Not Just Dry)
Dry-to-touch can happen fast. Full cure takes longer. During that window, the paint is more likely to scuff,
stick, or imprint (hello, weatherstripping). Keep the door slightly open if possible (without letting bugs host a
convention inside your house) and avoid heavy use until the finish is tougher.
11) Reinstall Hardware (or Upgrade It for Instant “Designer” Energy)
Once cured enough to handle gently, reinstall your hardware. Consider upgrading knobs/locks if they’re worn.
Turquoise pairs especially well with matte black, aged brass, or brushed nickel. This is the easiest “before and
after” boost for curb appeal without repainting a single wall.
Pick a Finish That Can Handle Real Life
Front doors live a rough life: sun, rain, fingerprints, and the occasional dramatic entrance. A satin/soft gloss or
semi-gloss finish is popular because it’s easier to clean and tends to resist moisture better than flatter
finishes. Higher gloss can look stunning, but it also highlights imperfectionsso prep matters even more.
Turquoise Color Ideas That Actually Work
Here are a few foolproof approaches that keep turquoise from feeling random:
- White house + turquoise door: classic, crisp, coastal. Add natural fiber doormat and a simple wreath.
- Red brick + muted turquoise: pick a turquoise with a touch of gray so it complements warm brick instead of fighting it.
- Gray siding + deeper teal-turquoise: looks modern and grounded, especially with black hardware.
- Tan/beige exterior + bright turquoise: instant “happy vacation house” vibe without being loud everywhere else.
- Black/charcoal accents: turquoise pops beautifully against dark trim or modern lighting.
Common Mistakes (and How to Avoid Them)
- Skipping cleaning: paint won’t bond to grime. Clean first, always.
- Painting over weatherstripping: your door may stick and peel. Remove or mask it.
- Too much paint at once: thin coats reduce drips and improve leveling.
- Not sanding between coats (when needed): a light sand can make the final coat look smoother.
- Ignoring cure time: “dry” isn’t “durable.” Give it time before heavy use.
- Testing color only once: turquoise shifts in sunlight. Check it at different times of day.
What It Costs and How Long It Takes
A DIY turquoise front door is one of the best bang-for-your-buck upgrades:
- Typical materials cost: roughly $50–$150 depending on paint/primer quality and whether you replace hardware.
- Time: a weekend is realisticprep and first coat day one, second coat day two, plus cure time.
Important Safety Note for Older Homes (Built Before 1978)
If your home is older, your existing paint could contain lead. Disturbing old paint by sanding or scraping can
create hazardous dust. If you suspect lead-based paint, use lead-safe practices and consider professional helpespecially
if the project will create dust or chips. When in doubt, prioritize safety over speed (and definitely over saving
twenty bucks on “just winging it”).
Final Thoughts: The Door That Does the Most With the Least
A turquoise front door is a small project with a big visual payoff. It makes your entry feel brighter, friendlier,
and more “done,” even if the rest of your to-do list is doing cartwheels in the background. Clean, scuff, prime,
paint thin coats, and let it curethose are the unglamorous steps that produce the glamorous result.
And when someone compliments your door (they will), you can casually say, “Oh, that? Just a little DIY,” as if you
didn’t spend 20 minutes staring at paint chips like you were decoding an ancient prophecy.
Extra: Experiences From the Turquoise Front Door Universe (500+ Words)
Let’s talk about the part no paint can mentions: the experience. Because painting a turquoise front door is rarely
a straight line from “idea” to “ta-da.” It’s more like a mini sitcom where you are the lead actor, the director,
and the person who has to clean the brush.
Experience #1: The Shade That Looked Perfect… Until Noon.
A very common turquoise-door story starts with a sample that looks dreamy in the hardware store and even better at
9 a.m. on your porch. Then midday sun arrives and suddenly your “coastal jewel tone” reads “sports drink.” The fix
is almost always undertone-related: if the color turns too bright, choose a turquoise with a touch of gray (muted);
if it turns too green, shift slightly bluer; if it turns too blue, nudge it warmer/greener. Testing boards viewed
at different times of day is the boring step that saves you from repainting out of spite.
Experience #2: The Door That Stuck Like It Was Possessed.
People don’t expect a freshly painted door to behave like it’s trying to become one with the frame. But it happens,
usually because paint built up on the edges, weatherstripping got painted over, or the door was closed before the
finish had enough cure time. The lesson: paint the edges lightly, keep the door cracked open while it dries if
possible, and don’t reinstall squishy weatherstripping until the paint is tougher. When someone says, “It’s dry to
the touch,” the door replies, “Cute. I’m still fragile.”
Experience #3: The Roller Texture Surprise.
Turquoise is a color that shows texture. A super fluffy roller can leave stipple that looks fine on a wall but
oddly bumpy on a front door. Many DIYers have learned to use a small foam roller or a low-nap roller for the flat
areas and an angled brush for the details. The upgrade moment comes when the second coat goes on smoother and you
realize you accidentally leveled up your entire skill set in one afternoon.
Experience #4: The “While I’m At It” Spiral.
This is the classic: you start with “just paint the door,” and suddenly you’re polishing the house numbers,
replacing the doormat, and Googling “modern black sconces that won’t bankrupt me.” Turquoise has that effect. It
makes everything around it look slightly more tired by comparisonso you end up doing a mini porch refresh. The
good news: swapping hardware and adding one clean accessory (like a simple wreath) can make the whole entry feel
intentional without turning your weekend into a month-long saga.
Experience #5: The Compliment Economy.
One underrated perk of a turquoise front door is how often people comment on it. Delivery drivers notice. Neighbors
notice. Friends walk up and say, “Okay, this is cute.” It’s a small, daily mood boostlike your house is wearing a
good outfit. And if you ever get tired of it, you’re not stuck forever. That’s the beauty of paint: it’s the most
reversible form of boldness.
Experience #6: The Quiet Pride of Doing It Right.
The best stories aren’t about perfectionthey’re about the moment you step back and realize it looks professionally
done because you respected the process. You cleaned first. You scuffed. You primed. You didn’t rush the cure. That’s
when the turquoise door stops being “a color” and becomes “a project you nailed.” And honestly, that feeling lasts
longer than the paint smell.