Table of Contents >> Show >> Hide
- Step 1: Decide What You’re Protecting (and From What)
- Step 2: Learn the Ratings (So You Don’t Buy a “Pretty Box”)
- Step 3: Choose the Right Safe Type for Your Home
- Step 4: Size, Capacity, and the “Will It Fit?” Reality Check
- Step 5: Placement and Installation (Where Most People Lose the Plot)
- Step 6: Choosing a Lock You Won’t Regret
- Step 7: BudgetingWhat You Get at Different Price Points
- Step 8: Maintenance and Ownership (Because Safes Are Not “Set and Forget”)
- Quick “Smart Buyer” Checklist
- 10 Common Mistakes (So You Can Avoid Becoming a Cautionary Tale)
- Real-World Experiences: What People Learn After Buying a Safe (Extra )
Buying a safe is one of those “adulting” purchases that feels boring right up until the moment you
really need it. Then it becomes the most satisfying metal box you’ve ever owned. The trick is choosing the
right safe for your risks (fire? theft? water? nosy relatives?), your space, and your daily lifewithout
falling for marketing buzzwords like “military-grade” (which usually means “someone once watched a military movie”).
This guide breaks down safe types, real-world ratings, lock options, installation tips, and common mistakesplus a
“been-there-bought-that” experience section at the end so you can skip the expensive lessons.
Step 1: Decide What You’re Protecting (and From What)
A safe is only “safe” if it’s built to handle the threat you actually have. Start by naming the danger, then pick the
box.
Fire, water, theft, or “all of the above”
- Fire: Protects paper, passports, deeds, and sentimental items that become instant heartbreak in a house fire.
- Water: Flooding, sprinkler discharge, broken pipes, storm surge, and the classic “upstairs bathtub got rebellious.”
- Theft: Opportunistic smash-and-grab or more determined attacks.
- Privacy: Keeps documents and valuables out of sight (and out of hands) without turning your home into a spy movie.
Make a “what goes in the safe” list before you shop
Write down what you’ll store and how often you need it. A safe for rarely accessed originals can be heavier,
more secure, and more tucked away. A safe for weekly access needs conveniencebecause a safe you hate using
becomes a fancy end table.
Also decide whether some items belong off-site. Many people pair a home safe (for access) with a bank safe deposit box
(for long-term storage), especially for irreplaceable originals.
Step 2: Learn the Ratings (So You Don’t Buy a “Pretty Box”)
Safes are one of the most misunderstood products on the planet because the industry uses specific testing terms, while
advertising uses… vibes. The goal is to recognize independent testing and understand what the labels
actually promise.
Fire ratings: time matters, but temperature matters more
Fire protection is usually described in minutes (30, 60, 120), but the real question is: How hot does the inside get?
Paper, photos, and digital media all have different heat tolerances. That’s why recognized fire standards use “classes”
tied to internal temperature limits.
- Class 350: Designed to protect paper documents (internal temp stays below 350°F).
- Class 150: Designed for magnetic media (lower internal temperature).
- Class 125: Designed for certain digital media (even lower internal temperature).
Practical takeaway: if you’re storing paper only, a Class 350-style rating may fit your needs. If
you’re storing digital backups (USB drives, external SSDs, etc.), look for a safe designed and tested
for data mediabecause electronics can be damaged at temperatures well below what paper can tolerate.
Water resistance: look for verified claims, not “kinda splashy”
Water claims should be specific: how deep, how long, and what test standard. Many consumer safes advertise water
protection that’s been verified by a recognized testing organization. Treat “waterproof” as a claim you want
documentedespecially if you live in a flood-prone area or keep the safe in a basement.
Burglary ratings: “RSC” vs. true burglary-rated safes
Here’s the blunt truth: many home “gun safes” and big-box store safes are actually classified as
Residential Security Containers (RSC). RSC testing is meant to represent limited tool resistance and
is a different category from higher burglary ratings. If your risk includes determined attacksor you’re storing
high-value itemslook for higher burglary classifications like TL-15 or TL-30
(and higher) that indicate a safe has passed more demanding tool-attack testing.
You don’t need to memorize every acronym, but you should recognize the ladder:
basic consumer container → RSC → TL ratings → heavier commercial categories.
In general, moving up the ladder means a safer that’s harder to break into, heavier to move, and (yes) pricier.
Lock ratings: yes, locks have grades too
Locks are not all equal. Some are designed to resist manipulation better than others, and recognized standards group
combination locks into categories (often referenced as Group 2, Group 2M, Group 1, and Group 1R). You don’t need to
become a lock engineer, but you should know this:
- Mechanical dial locks: No batteries, long lifespan, slower access, very reliable when high quality.
- Electronic keypad locks: Fast access, easier code changes, depends on battery and electronics.
- Biometric locks: Convenient, but quality varies widely; always keep a backup access method.
The best lock is the one you’ll use consistently and can maintain. The “coolest” lock is the one you’ll forget the
code for at 2 a.m. when you’re trying to find your passport. (Ask me how I knowkidding, we’ll save the buyer stories
for later.)
Step 3: Choose the Right Safe Type for Your Home
1) Fire chests and document boxes
These are the smaller, usually portable options intended for documents and small valuables. They often provide
excellent fire and water protection at a lower cost than full-size safes. Downsides: portability can also mean
“easier to carry away,” so theft protection is usually limited unless the unit can be secured.
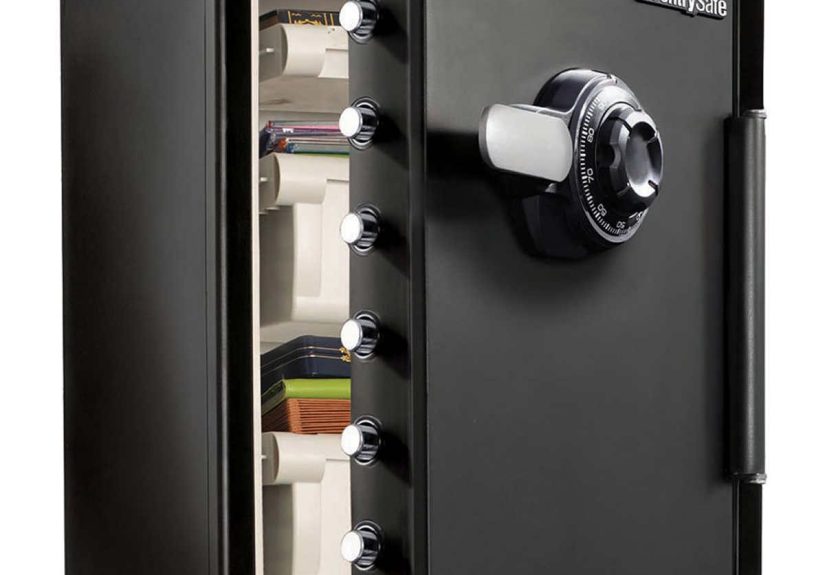
2) Home safes (freestanding)
The classic tall safe or medium cabinet. Great for mixed storage: documents, jewelry, small electronics, and
sentimental items. These can range from lightweight consumer models to heavy, burglary-rated units.
3) Wall safes
Convenient and discreet, but there’s a catch: wall safes are limited by stud spacing and depth, and their fire
protection depends heavily on construction and location. They can be a good choice for everyday items, but don’t
assume they offer the same fire resistance as a dedicated fire safe.
4) Floor safes
Floor safes can be very discreet and hard to remove when installed properly. But they require careful planning:
moisture control, professional installation, and awareness of plumbing/electrical routing. They’re also not “quick
access” unless you enjoy crawling like you’re in an action movie.
5) Specialty storage (including firearm storage)
If you need a safe for regulated or high-risk items, your priorities should be preventing unauthorized access and
meeting any applicable laws or insurance requirements. Choose a model with an appropriate security rating, consider
professional installation, and focus on responsible access controlespecially in homes with kids or teens.
Step 4: Size, Capacity, and the “Will It Fit?” Reality Check
Safe shopping has a classic trap: you picture a tidy stack of documents, but you forget that life comes with folders,
envelopes, bulky jewelry boxes, backup drives, and the occasional “why do we still have this?” keepsake.
Measure twice: interior space is what matters
- Compare interior dimensions, not just exterior size.
- Check shelf adjustability and whether the door has pockets that steal interior volume.
- Account for binders, hanging files, and media cases if you use them.
Weight is a feature (until you have stairs)
Heavier safes are harder to remove and often more robust. But they can also be a moving nightmare. Before buying, ask:
- Can it be delivered to the room where it will live?
- Do you have stairs, narrow hallways, or tight turns?
- Will the floor support the weight in that spot?
Pro tip: “I’ll just move it myself” is the first sentence in many stories that end with a sore back and a scratched
floor.
Step 5: Placement and Installation (Where Most People Lose the Plot)
Pick a location based on threats
- Fire: Interior locations often fare better than exterior walls where heat exposure can be worse.
- Flooding: Avoid basements if you have water risk; elevate slightly off the floor when practical.
- Theft: Discreet placement matters. A safe in plain sight is basically a challenge coin for burglars.
Anchoring: the not-so-secret weapon
If your safe can be lifted and carried out, it’s not “secure,” it’s “portable storage.” Anchoring a safe to the floor
or wall (when the model is designed for it) makes removal far harder. Follow the manufacturer’s instructions, and for
heavy safes or tricky surfaces, consider professional installation.
Don’t forget the door swing and daily access
Make sure the door can open fully. Check for obstructions like baseboards, closet trim, and nearby furniture. If using
the safe feels like doing yoga in a phone booth, you will stop using it. That’s just science.
Step 6: Choosing a Lock You Won’t Regret
Mechanical dial locks
These are the “old reliable” option: no batteries, fewer electronics, and long service life. They’re slower to open,
and you must be comfortable using the dial accurately. Good choice if you value durability and don’t need rapid access.
Electronic keypad locks
Fast, user-friendly, and easy to reprogram. Great for households where multiple trusted adults need access. Maintain it
by replacing batteries on a schedule (don’t wait for the low-battery beep of doom).
Biometric locks
Convenient when well-made, inconsistent when cheap. If you choose biometric, insist on a reliable backup method (key
override or code) and test it regularly. The worst time to learn your fingerprint reader hates dry winter skin is when
you’re already late.
Key overrides: helpful, but treat keys like a separate security problem
If your safe has an override key, store that key securely and separately. A key taped to the side of the safe is not a
“backup plan,” it’s a comedy sketch.
Step 7: BudgetingWhat You Get at Different Price Points
Safe pricing ranges from “I found it online for the price of two pizzas” to “this weighs more than my car.” Here’s a
realistic way to think about it:
Entry level (often under $200–$300)
- Good for: basic document storage, modest fire/water protection, light privacy needs.
- Watch for: vague claims, no independent verification, thin construction for theft resistance.
Mid-range (roughly $300–$1,000)
- Good for: home organization plus meaningful fire protection and improved security.
- Look for: clearer fire/water testing language and better build quality.
Security-forward (often $1,000+)
- Good for: higher-value contents, stronger burglary resistance, heavier construction.
- Look for: recognized burglary ratings (like TL levels) and reputable lock hardware.
Rule of thumb: match your safe to the replacement cost of what’s inside (including the pain of replacing documents).
If you’re protecting items you truly can’t replace, spending more on verified protection usually makes sense.
Step 8: Maintenance and Ownership (Because Safes Are Not “Set and Forget”)
Control humidity
Sealed metal boxes can trap moisture. Add a small dehumidifier rod (if the safe supports it) or use desiccant packs.
Check periodicallyespecially if the safe is in a basement, garage, or humid climate.
Update your contents list and backups
Keep a simple inventory: what’s inside, when it was last updated, and where the backup copies live. If you store digital
backups, test the drive occasionally. Data storage is not a “set it and pray” hobby.
Save your records
Write down the model, serial number, and proof of purchase, and store that information somewhere safe (ironically, not
only inside the safe). This helps with insurance, warranty claims, and locksmith support.
Quick “Smart Buyer” Checklist
- What threats am I prioritizing: fire, water, theft, privacy?
- What exactly will I store (paper, jewelry, digital media, mixed items)?
- Do I need verified fire/water ratings? If yes, which ones?
- Is this a basic container, an RSC, or a burglary-rated safe (TL level)?
- Which lock type fits my household and access needs?
- Where will it go, and can it be anchored?
- How will I control humidity inside?
- Do I need off-site storage (bank box) for certain originals?
10 Common Mistakes (So You Can Avoid Becoming a Cautionary Tale)
- Buying based on exterior size: interior space disappears fast.
- Ignoring verified testing: “fireproof” without specifics is marketing, not protection.
- Choosing the wrong fire class: paper vs. digital media needs different protection.
- Placing it where water will win: basements and garages can be risky.
- Skipping anchoring when theft is a concern: portability helps burglars more than you.
- Picking a lock you hate using: inconvenience is the enemy of consistency.
- Forgetting battery maintenance: replace batteries proactively, not during a panic.
- Storing the override key badly: don’t turn your “backup” into a “front door.”
- Overstuffing: crushed papers and bent folders are not the vibe.
- Assuming a safe replaces insurance: they work best together, not as substitutes.
Real-World Experiences: What People Learn After Buying a Safe (Extra )
The internet is full of confident safe advice from people who have never tried to live with a safe day-to-day. Here’s
what many buyers discover after the honeymoon phasewhen the safe stops being a “project” and starts being part of life.
The “I’ll remember the code” era ends quickly
People often start with a code that feels unforgettablebirthdays, anniversaries, the dog’s adoption day. Then they
responsibly change it to something less predictable… and immediately forget it because their brain filed it under
“future me’s problem.” The fix isn’t complicated: keep the code in a secure password manager (not on a sticky note),
and test access every so often so muscle memory stays fresh.
Batteries don’t die when it’s convenient
Electronic locks are fantastic until the battery warning chirps like a tiny angry bird. Many owners learn to schedule
battery changes the way you schedule smoke alarm batteries: regularly and proactively. The lesson is less about
electronics being “bad” and more about you being busy (and your safe being petty).
“Fireproof” doesn’t automatically mean “keeps everything perfect”
A safe can protect documents from burning while still leaving them warm, warped, or slightly discolored after a major
event. People who store rare photos, heirlooms, or delicate media sometimes upgrade after realizing that the cheapest
fire protection is designed for survivalnot museum-level preservation. If you’re protecting items that are emotionally
priceless, it can be worth buying the best verified rating you can reasonably afford.
Moisture is the surprise villain
Owners frequently discover that a safe is great at keeping water out, but also great at keeping humidity
in. Basements, coastal climates, and garages make this worse. The common “why didn’t anyone tell me” moment is
opening the safe and noticing papers feel slightly damp or metal items show early corrosion. A simple dehumidifier rod
or desiccant routine often solves it, but you have to remember to do it.
The delivery day is when reality arrives
Heavy safes are a security advantageright up until you need to get one into a hallway with a tight turn. Buyers often
learn to plan the route first: measure doorways, remove doors if needed, protect floors, and consider professional
delivery. The best safe in the world does not help you if it lives in your garage forever because it’s too heavy to move.
Anchoring regret is real
Many people skip anchoring because it feels like “extra work,” then later realize that the safe’s biggest weakness is
being removable. The most common upgrade story goes like this: “I bought a decent safe… then bolted it down… then
slept better.” If theft is one of your concerns, anchoring often provides a huge boost in practical security.
In short: buying the safe is only half the win. The other half is choosing a safe you’ll actually use, maintaining it
like any other safety device, and installing it so it protects your stuff in the real worldnot just in the product
photos.