Table of Contents >> Show >> Hide
- Why Confetti Drapes Are So Popular
- Supplies You’ll Need
- Plan Your Confetti Design
- Step-by-Step Confetti Drapes Tutorial
- Design Ideas and Variations
- Common Mistakes and How to Avoid Them
- Care and Maintenance for Confetti Drapes
- Other Projects That Use the Confetti Technique
- Real-Life Experiences with Confetti Drapes
- Experience 1: The Playroom That Went from Chaos to “Curated Chaos”
- Experience 2: When “Random” Was Harder Than Expected
- Experience 3: Testing Different Tools for Dots
- Experience 4: Managing Dry Time with Limited Space
- Experience 5: Growing with the Room
- Experience 6: Matching Confetti Drapes to Other Decor
- Experience 7: The “I’m Not Artistic” Success Story
- Wrapping It Up
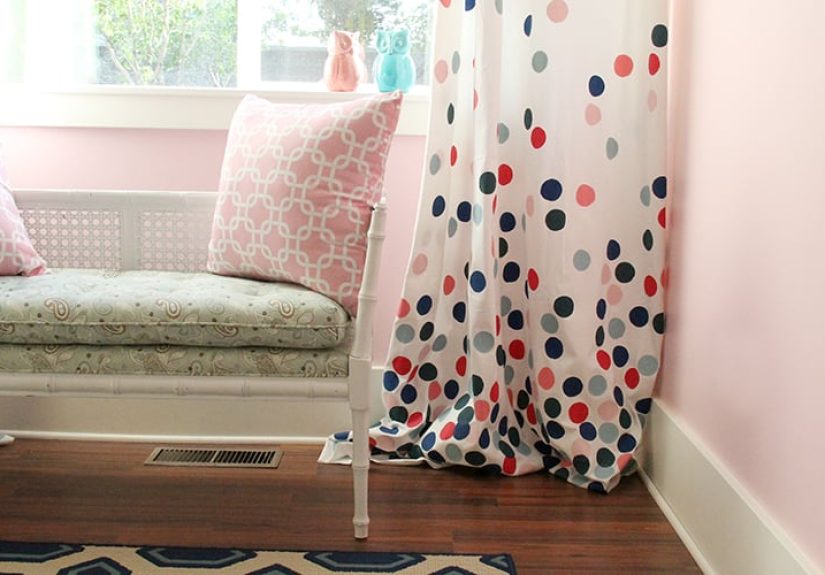
If your windows are looking a little blah and your room feels more “doctor’s office” than “party in here,” it might be time for confetti drapes.
Think of them as a celebration you can hang on a curtain rod: playful dots, customizable colors, and just enough DIY flair to impress your friends
(and Instagram followers) without requiring art school credentials.
This confetti drapes tutorial, inspired by the playful painted-curtain projects you’ll find on popular home blogs like Remodelaholic and other DIY
window treatment roundups, shows you how to turn simple white panels into colorful, custom window coverings.
We’ll cover the supplies, step-by-step instructions, design tips, and even some real-life lessons learned so you can avoid the “oops, I just painted
my floor” moment.
Why Confetti Drapes Are So Popular
Confetti drapes are basically polka dots with zero pressure to be perfect. The loose, scattered pattern looks deliberate even when your dots aren’t
perfectly spaced or round, which makes this project beginner-friendly and forgiving.
Benefits of DIY Confetti Curtains
- Budget-friendly: Plain white curtains are often much cheaper than patterned panels, especially for large windows.
- Custom colors: Match your decor exactlynursery pastels, bold jewel tones, or soft neutrals.
- One-of-a-kind: No one else will have the same pattern, layout, or color mix.
- Kid- and teen-approved: Perfect for playrooms, kids’ bedrooms, craft rooms, and dorms.
- Versatile pattern: The same confetti technique works on pillow covers, tablecloths, rugs, and more.
In other words, you get high impact for low cost and effort. That’s basically the DIY dream.
Supplies You’ll Need
Exact products are flexible, but here’s a good starting list for making your own confetti drapes at home:
- 1–2 sets of plain white curtain panels (cotton or cotton-blend works best)
- Fabric paint or multi-surface craft paint in several colors
- Small cups, lids, or round sponges for stamping dots
- Foam brushes or small craft brushes
- Painter’s tape (optional, for marking borders or keeping hems paint-free)
- Cardboard or plastic drop cloth to protect the floor or table
- Paper towels or an old rag for drips and cleanup
- Iron (for heat-setting if required by your paint instructions)
Many DIYers like to use affordable white curtains from big-box stores or Ikea because they’re lightweight and take paint well.
Choose a tightly woven fabric so paint doesn’t bleed wildly through the fibers.
Plan Your Confetti Design
Before you crack open the paint, spend a few minutes planning your look. A little strategy up front saves you from repainting later.
Choose Your Color Palette
Confetti looks best when the colors feel intentional. Try one of these easy palettes:
- Sweet & playful: Blush pink, mint, sunshine yellow, lavender
- Bold & modern: Navy, hot pink, teal, mustard
- Minimal & chic: Black, gray, camel, soft white
- Theme-based: School colors, holiday colors, or rainbow ombré
Limit yourself to 3–6 colors for a cohesive look. Too many shades can make your curtains feel less “confetti party” and more “craft stash exploded.”
Decide on Dot Density and Placement
There are three popular layout styles for confetti drapes:
- All-over scatter: Dots are randomly sprinkled from top to bottomperfect for a playful, energetic space.
- Bottom-weighted gradient: Dots cluster at the bottom hem and thin out as they rise, like confetti falling to the floor.
- Side or corner feature: Concentrate the dots on the outer edges or in a band across the middle for a subtle pattern.
If you’re nervous about committing, lay paper circles (or sticky notes) on the curtain first to visualize the layout before adding paint.
Step-by-Step Confetti Drapes Tutorial
Ready to paint? Here’s the process broken down into simple, manageable steps.
Step 1: Prep Your Workspace
- Spread out a plastic drop cloth or old sheet on a flat surface.
- Lay your curtain panel flat and smooth out wrinkles.
- Slide cardboard or an extra cloth underneath to prevent paint bleed-through.
If you’re working on a hard surface you don’t mind painting (like an unfinished basement floor), you can skip the drop clothbut most of us
prefer not to add permanent polka dots to our flooring.
Step 2: Mark Your “No-Paint” Zones
Use painter’s tape to protect areas like:
- The top rod pocket or grommet band (if you want it clean and solid white)
- The side edges and bottom hem for a border effect
This is optional, but a crisp border can make your confetti pattern look more polished.
Step 3: Mix and Test Your Paint
Pour a small amount of each color into separate cups or onto a palette.
Test your dot technique on a scrap of fabric or paper:
- Dip the rim of a plastic cup, lid, or round sponge into the paint.
- Stamp onto the test fabric to see how much pressure and paint you need.
- Adjust if the dots look too faint (add more paint) or too blobby (use less paint and a lighter touch).
Once you’re happy with the test dots, you’re ready to move to the real curtain.
Step 4: Add the First Color of Confetti Dots
Start with one color at a time to avoid muddying your palette:
- Stamp dots across the curtain, spacing them out so they feel random but balanced.
- Rotate your stamping tool a bit each time so the dots don’t look mechanically identical.
- Vary the densitysome areas can have clusters of 3–4 dots, others just one.
Step back occasionally and look at the panel from a distance. This is how you’ll actually see it hanging in the room, so it’s the best way to check
your overall pattern.
Step 5: Layer in Additional Colors
Once the first color is dry to the touch, add your second, third, and fourth colors in the same way. Overlapping a few dots creates dimension and
helps tie the palette together.
- Tip: If you make a weird mark or a smudge, turn it into a larger dot or overlap it with a darker color. Confetti is very forgiving.
- Tip: Use different circle sizesone large, one medium, one smallfor a more dynamic look.
Step 6: Let the Paint Cure and Heat-Set
Follow the instructions on your paint bottle. Most fabric paints recommend:
- Letting the paint air-dry for 24 hours.
- Then heat-setting with an iron on the reverse side (no steam) for a few minutes per section.
This step helps your confetti drapes survive gentle washing and daily use without the design disappearing after one laundry day.
Step 7: Hang and Style Your Confetti Drapes
Once the panels are fully dry and set:
- Press out any remaining wrinkles.
- Hang them on your rod, then gently tug and adjust the folds so the dots are visible even when the curtains are stacked.
- Step back and enjoy the instant mood boost. Your windows are now officially ready to party.
Design Ideas and Variations
One of the best things about this project is how easily you can adapt it to your style and room type.
For Kids’ Rooms and Nurseries
- Use bold primary colors for a playroom filled with toys and energy.
- Choose soft pastels for a nurserypale mint, blush, butter yellow, and sky blue.
- Coordinate with wall art, bedding, or a favorite stuffed animal for a pulled-together look.
For Teen Bedrooms or Craft Rooms
- Mix saturated jewel tones like teal, fuchsia, and deep purple.
- Add metallic gold or silver dots for a glam, sparkly touch.
- Try a diagonal confetti “swoosh” across the panel for a more graphic vibe.
For Neutral or Minimal Spaces
- Stick to just two colors: one mid-tone and one accent.
- Use soft grays and warm taupes for a subtle, textured effect.
- Space the dots more sparsely so you get interest without visual clutter.
Common Mistakes and How to Avoid Them
DIY projects are always a little unpredictable, but these tips help prevent the most common confetti-drape mishaps.
Mistake 1: Paint Bleeding or Fuzzy Edges
If your dots look more like tiny amoebas than circles, your fabric might be too thin or your paint too watery. Use thicker fabric paint, apply less
paint per stamp, or place cardboard under the fabric so it doesn’t stretch while you’re working.
Mistake 2: Dots That Look Too Regular
Perfect rows and columns defeat the whole “confetti” look. To keep things organic:
- Stagger your dots diagonally.
- Cluster a few in one area and leave more negative space in another.
- Occasionally switch dot size or color sequence.
Mistake 3: Overcrowding the Pattern
It’s tempting to keep adding dots “just over here… and maybe another one there…” until your drapes look like solid polka-dot wallpaper.
When you think you’re finished, stop and walk away for a few minutes. Come back with fresh eyes and only add more if there are obvious gaps.
Mistake 4: Skipping the Curing Time
Washing or hanging the curtains before the paint cures can lead to smearing, cracking, or flakes. This isn’t the fun kind of confetti.
Follow the product instructions, even if it means waiting an extra day before you show off your masterpiece.
Care and Maintenance for Confetti Drapes
Once you’ve invested time into your DIY curtains, you’ll want them to last.
- Washing: Turn panels inside out and wash on a gentle cycle in cold water.
- Drying: Line-dry when possible, or tumble dry on low heat.
- Ironing: Iron on the back side only, avoiding direct, high heat on the painted dots.
- Sun exposure: In very sunny rooms, consider lining panels to reduce fading over time.
With basic care, your confetti curtains should keep their color and charm for years.
Other Projects That Use the Confetti Technique
Once you’ve mastered confetti drapes, you can use the same dot-painting method on lots of other home decor items:
- Pillow covers: Coordinate throw pillows with your new curtains by adding matching dots in the same colors.
- Table runners or tablecloths: Sprinkle confetti dots down the center for festive dining decor.
- Rugs or door mats: Use outdoor-safe paint for a cheerful entryway.
- Planters and pots: Paint confetti dots on terra cotta pots for a cohesive room theme.
You’ll start looking at every white or neutral surface in your home and wondering, “Should I put confetti on that?”
(The answer is not always yesbut it’s tempting.)
Real-Life Experiences with Confetti Drapes
Tutorials are great, but the real learning happens when you’re the one holding the paint cup. Here are some lived-in, trial-and-error experiences
that can help you get even better results with your own confetti drapes.
Experience 1: The Playroom That Went from Chaos to “Curated Chaos”
One of the most common places for confetti drapes is a kids’ playroom. Toys, books, and art supplies already bring a lot of color, and plain white
curtains can feel out of place. Painting confetti drapes in colors pulled from the toyslike bright red, royal blue, and sunny yellowhelps tie the
whole room together. Suddenly, the visual chaos looks intentional.
A practical discovery from playroom experiments: heavy, dark colors at the bottom of the curtains help hide small scuffs from little hands and toy
collisions. Putting more dots toward the lower half of the panels doesn’t just look stylishit’s sneakily functional.
Experience 2: When “Random” Was Harder Than Expected
Many DIYers are surprised to learn that making something look random is actually harder than it sounds. The instinct is to line dots up or space
them evenly, which can lead to an overly structured pattern.
A good workaround is to work in loose triangles or clusters. Instead of placing each dot alone, think in groups of three. Place one dot, then a
second dot a little higher and to the right, and a third dot somewhere between them. Repeat this kind of grouping across the fabric. The result
feels organic but still balancedlike confetti that just landed where it wanted to.
Experience 3: Testing Different Tools for Dots
Not all circular tools are created equal. Some DIYers start with the rim of a disposable cup and quickly realize it leaves a thin outline rather than
a filled-in circle. That can look cool if you want a ring-style dot, but most confetti drapes look best with solid rounds.
Foam pouncers, round makeup sponges, or the flat end of a dense foam brush tend to give more consistent, filled-in dots. If you do like the crisp
ring effect from a cup, you can always fill the center with a brush for more saturation. The key is to test tools on scrap fabric first so you’re
not learning on your final panels.
Experience 4: Managing Dry Time with Limited Space
If you don’t have a large floor or table to spread out your curtains, drying can be a logistical puzzle. One smart solution is to work in sections.
Lay out just the bottom half of the curtain, paint your dots, let that section dry, then shift the panel upward and repeat.
Another trick is to use a clothes-drying rack or shower rod once the surface is mostly dry. You can gently drape the curtain over the rod, keeping
painted sides from touching each other. Just be sure the paint is dry to the touch before hanging so it doesn’t transfer.
Experience 5: Growing with the Room
Confetti drapes can grow up with a space. In a nursery, you might start with very soft pastel dots. As the child gets older, you can layer in a new
color or twoadding slightly brighter shades over the existing confetti. Because the pattern is naturally scattered, the new dots blend in without
looking like an obvious “Phase 2” makeover.
Some families even turn the curtains into an ongoing tradition: every birthday, the child chooses a new color to add a handful of dots. Over time,
the drapes become a visual timeline of their growing personality and favorite colors.
Experience 6: Matching Confetti Drapes to Other Decor
In open-concept spaces, confetti drapes work especially well when they tie into one or two repeating colors used throughout the room.
Maybe your kitchen has navy barstools and a navy runner; adding navy dots to white curtains in the attached dining area creates a subtle,
cohesive theme without going full “matching set.”
Similarly, in a bedroom, echo a color from your headboard, throw blanket, or artwork. This keeps the playful confetti pattern from feeling like
a random add-on. Instead, it becomes part of the overall design story.
Experience 7: The “I’m Not Artistic” Success Story
Perhaps the best thing about confetti drapes is hearing from people who swear they aren’t artistic but still end up with gorgeous curtains.
Because the layout is loose and the circles don’t have to be perfect, this project gently nudges you out of perfectionism.
A slightly wonky dot doesn’t ruin anythingin fact, those little imperfections are what make your curtains look handmade and charming.
If you’re feeling unsure, start with just one panel as a test. Once you see it hanging and realize, “Oh, this actually looks great,”
painting the second panel feels fun instead of intimidating.
Wrapping It Up
Confetti drapes are a simple, creative way to bring personality into a room without a major renovation or a massive budget.
With basic supplies, a free afternoon, and a willingness to embrace imperfect dots, you can transform plain white panels into a custom window
treatment that feels playful, modern, and totally you.
Whether you’re decorating a nursery, updating a teen bedroom, brightening a craft room, or just giving your living room a little extra joy,
this confetti drapes tutorial gives you everything you need to get started. Once you hang them up, don’t be surprised if your guests ask where
you bought themand then look a little shocked when you say, “Oh these? I made them.”