Table of Contents >> Show >> Hide
- What Custom Brushes in Photoshop Elements Actually Do
- Why Designers and Hobbyists Love Custom Brush Presets
- How to Create a Custom Brush in Photoshop Elements
- Best Practices for Better Brush Design
- Customizing Brush Behavior After You Create It
- How to Install Downloaded ABR Brushes in Photoshop Elements
- Using the Preset Manager Like a Sane Person
- Practical Ways to Use Custom Brushes in Real Projects
- Common Problems and How to Fix Them
- Experience: What It Feels Like to Really Work With Custom Brushes
- Conclusion
- SEO Tags
If you have ever opened Photoshop Elements and thought, “These default brushes are nice, but my project needs more personality,” welcome to the club. Custom brushes are one of the easiest ways to make your work look less like a software demo and more like your design. Whether you are adding a signature watermark, building scrapbook accents, painting texture onto a photo, or creating a grungy edge that looks delightfully imperfect, custom brushes in Photoshop Elements can save time and add style in a hurry.
The beauty of this feature is that it sits right in the sweet spot between practical and playful. You can create a brush from a leaf, a logo, handwritten text, a splatter shape, or a simple texture you photographed with your phone. Then you can reuse it again and again without rebuilding the same effect from scratch. In other words, Photoshop Elements lets you stop doing repetitive work and get back to the fun part: making cool stuff.
What Custom Brushes in Photoshop Elements Actually Do
A custom brush is a reusable brush tip made from artwork, a selection, or a full layer. Once it is saved, you can stamp it with one click or paint with it repeatedly like any other brush. That means your brush can behave like a soft texture, a crisp logo, a distressed edge, a hand-drawn flourish, or even a cluster of shapes that instantly fills empty space in a design.
Photoshop Elements reads the brush shape in grayscale. In simple terms, dark areas become the visible part of the brush, white areas become transparent, and gray values create softer or more transparent parts of the stroke. That is why custom brushes work best when the original art has clear contrast. Think black ink on a white background, not “mystery smudge photographed in low light at 2 a.m.”
This makes custom brushes surprisingly versatile. You can use them for digital art, card design, photo embellishment, journaling pages, classroom handouts, event invitations, and branding touches. A good brush preset can turn a tedious task into a one-click trick, and frankly, that is the kind of efficiency everyone deserves.
Why Designers and Hobbyists Love Custom Brush Presets
There are two big reasons custom brushes are so useful in Photoshop Elements: speed and consistency. If you often apply the same decorative mark, texture, or stamp to your projects, a saved brush preset keeps that look consistent. Instead of resizing, reimporting, and repositioning separate graphics every time, you just select the brush and click.
They also help you build a personal visual style. Maybe you love rough ink edges, watercolor-style textures, stitched borders, vintage flourishes, or handwritten branding marks. Saving those as brush presets means your projects start to share a recognizable creative fingerprint. That is helpful whether you are running a small business, making printables, or just want your scrapbook pages to look like they came from the same cheerful planet.
How to Create a Custom Brush in Photoshop Elements
The core workflow is refreshingly straightforward. In Photoshop Elements, you can create a custom brush from a selected part of an image or from an entire layer. The key is to start with artwork that has a clean shape and strong contrast.
Step 1: Create or Open the Artwork
Start with a new blank file or open an existing image. If you are making a brush from scratch, create your art on a white background. You might draw a shape with the Brush tool, make a symbol with the Shape tool, or place handwritten text and rasterize or simplify it so it becomes editable artwork instead of a live shape or text object.
Good custom brush material includes splatters, leaves, stars, signatures, grunge marks, clouds, stamps, snowflakes, or subtle texture fragments. Keep the artwork as clean as possible. If the source is messy, your brush will faithfully preserve that mess like a loyal but slightly chaotic friend.
Step 2: Make the Selection
Use a selection tool to choose the part you want to turn into a brush. If you want to use the entire layer, leave nothing selected and use the whole layer. If you only want a small part of a photo or drawing, select just that portion. This is useful when you want one leaf from a tree photo, one ink mark from a larger scan, or one logo element from a layout.
Step 3: Turn It Into a Brush
Go to Edit > Brush From Selection. Photoshop Elements will prompt you to name the brush. Give it a name that makes sense later, not something like “new brush 7 final final really final.” A descriptive name such as “Soft Grunge Edge,” “Leaf Stamp Large,” or “Signature Brush Black” will save you future frustration.
Step 4: Test the Brush
Select the Brush tool, choose your new brush from the brush picker, and click on a blank layer. Adjust the size and color as needed. Because the brush uses the foreground color, you can instantly repaint the same shape in black, white, gold, navy, or whatever your project needs. That makes custom brushes much more flexible than flattened graphic files.
Best Practices for Better Brush Design
A decent custom brush is easy to make. A great custom brush takes a little planning. First, build the brush at a size larger than you think you need. Photoshop Elements supports custom brush shapes up to 2500 by 2500 pixels, which gives you room for sharper results when scaling down. Scaling a large brush smaller usually looks better than scaling a tiny brush up and watching it turn into pixel soup.
Second, pay attention to edges. Hard-edged art creates a crisp stamp, while soft edges and partial opacity create a gentler effect. If you want a dreamy texture or faded brush look, use soft strokes or grays in your source artwork. If you want a sharp emblem or logo-style mark, keep it solid and clean.
Third, design with the final use in mind. A watermark brush should be simple and readable. A texture brush should have variation and irregularity. A decorative brush should be balanced enough to look intentional, not like your mouse slipped during a caffeine emergency.
Customizing Brush Behavior After You Create It
Creating the brush shape is only half the magic trick. Photoshop Elements also lets you modify brush behavior through brush settings. Depending on the tool, you can adjust dynamics such as size variation, scattering, fade, and color behavior. These options are what turn a plain brush tip into something expressive.
For example, a single leaf brush can become a natural-looking border if you increase scattering and vary the size. A splatter brush can become a subtle grunge texture if you lower opacity and increase spacing. A star brush can go from cheesy to charming by reducing the size, softening the edges, and staggering the placement.
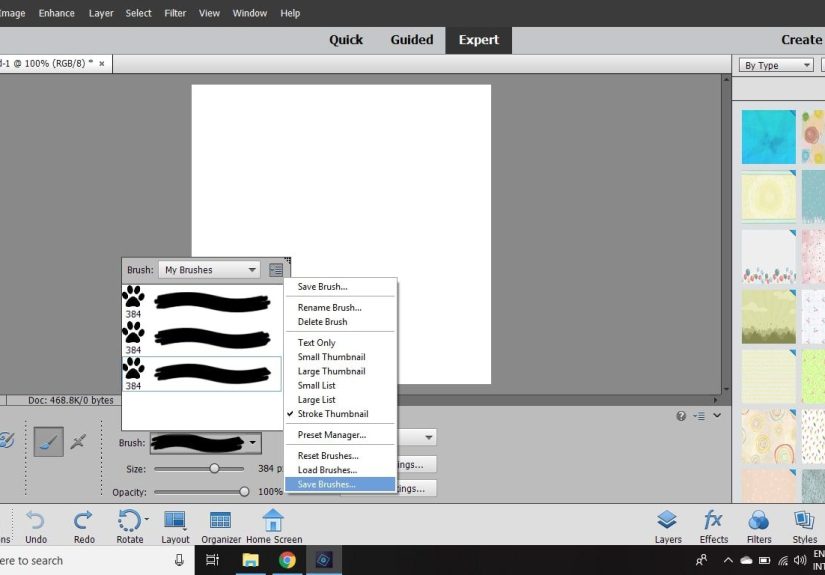
Once you like how the brush behaves, save that modified version. In the brush pop-up menu, choose Save Brush and give the preset a clear name. This is incredibly helpful when you develop brush variants for different tasks, such as “Snow Soft Scatter,” “Snow Dense Stamp,” and “Snow Tiny Flurry.” Same family, different mood.
How to Install Downloaded ABR Brushes in Photoshop Elements
Not every custom brush has to be homemade. Photoshop Elements also lets you work with downloaded brush libraries, often in ABR format. If you find a brush pack you love, open Edit > Preset Manager, choose Brushes from the preset type list, and add the library. Once it is loaded, the brushes become available in your collection.
This is especially useful if you want specialty sets like watercolor edges, ink splatters, vintage ornaments, chalk marks, or seasonal shapes. The trick is not to download fifty-seven brush packs in one sitting and then forget what any of them are called. Curate the collection. Keep what you truly use. Your future self will appreciate a tidy brush library.
Using the Preset Manager Like a Sane Person
The Preset Manager in Expert mode is the unsung hero of brush organization. It helps you manage libraries of brushes, save subsets, rename presets, and restore defaults if things get messy. This matters more than people realize. The moment your brush library grows beyond “three brushes and a dream,” organization becomes the difference between a smooth workflow and a treasure hunt.
A smart approach is to group brushes by purpose. Create sets for textures, stamps, holiday designs, branding marks, or mixed-media effects. You can also save a subset of favorite brushes into a smaller library. That way, when you are working on a specific project, you are not scrolling through a never-ending list that includes snowflakes, lace borders, ink drips, and one mysterious dog-shaped brush you made last year.
Practical Ways to Use Custom Brushes in Real Projects
One of the most popular uses for custom brushes in Photoshop Elements is watermarking. A signature or copyright mark can be turned into a brush, then stamped onto finished images quickly and consistently. That is faster than placing a separate file on every image, and it keeps branding simple.
Custom brushes are also fantastic for textures. If you photograph paper fibers, concrete, fabric, paint, or natural surfaces, you can turn those details into texture brushes and paint them onto masks, backgrounds, or overlays. This creates more organic-looking work than relying only on perfectly clean digital effects.
Scrapbookers and crafters love custom brushes because they make it easy to add themed embellishments. Teachers and small business owners can create brushes from icons, logos, stars, arrows, or labels. Photographers can use them for artistic borders, dreamy overlays, and subtle atmospheric effects. Digital artists can build a whole toolkit of recurring textures and shapes.
And yes, you can absolutely use custom brushes for seasonal designs. Snowflakes, autumn leaves, hearts, confetti, fireworks, and floral details all become much easier to apply when you can brush them in instead of placing each one manually like a very patient medieval scribe.
Common Problems and How to Fix Them
If your custom brush looks fuzzy, the source artwork may have been too small or too low contrast. Rebuild it at a larger size with cleaner edges. If the brush looks too harsh, soften the original art or reduce opacity in the brush settings.
If a saved brush seems to disappear, check where it was saved. Photoshop Elements expects saved brushes to live in the proper Presets/Brushes location, and some versions may require a relaunch before the updated brush set appears correctly. Also, remember that a new brush is often added to whatever brush set is active at the time you create it, so it may not be where you first expect to find it.
If an imported brush pack is not showing up, confirm that the file format is supported and that you actually loaded the brush library through the Preset Manager. If needed, reset the view, reopen the brush picker, or relaunch the program. Sometimes software needs a tiny dramatic pause before it cooperates.
Experience: What It Feels Like to Really Work With Custom Brushes
The first time you create a custom brush in Photoshop Elements, it feels oddly satisfying. You start with a simple shape, maybe a rough ink mark or a small leaf from a photo, and then suddenly it becomes a reusable tool. That moment changes how you think about the program. Instead of seeing Elements as a place where you only edit images, you begin to see it as a place where you build your own creative shortcuts.
In real projects, custom brushes quickly become less of a novelty and more of a quiet superpower. A handmade texture brush can rescue a background that feels too flat. A signature brush can save an enormous amount of time when exporting finished images. A custom scatter brush can add motion and interest to a design that looked a little too tidy and polite. There is something wonderfully practical about turning your own artwork into a tool you can reuse over and over again.
One of the most useful lessons people learn from this process is that the source artwork matters more than fancy settings. If the original shape is strong, the brush almost always feels useful. If the source is muddy, the brush usually stays muddy no matter how much you tweak it. That experience teaches a good design habit: simplify first, decorate second. It is not glamorous advice, but it works.
Another common experience is realizing how much better projects feel when your brushes reflect your personal style. Store-bought brush packs can be excellent, but they do not always match your exact taste. When you build your own set from your handwriting, your favorite textures, your own doodles, or scanned paint marks, your work begins to look more original. It stops feeling like you borrowed a style from a giant download folder and starts feeling more intentional.
There is also a practical confidence boost that comes from learning the Preset Manager and organizing your brush library. At first, it can seem like a small housekeeping task. Later, it becomes one of the reasons your workflow feels smoother. You know where your favorite texture brush is. You know which watermark preset to use. You know how to load a seasonal set without digging through a digital junk drawer. That sort of familiarity makes creative work more enjoyable because you spend less time hunting and more time making.
Perhaps the best part is that custom brushes reward experimentation. You can photograph a wall texture, scan a pencil scribble, paint a rough shape, or make a clean icon and ask, “What happens if I turn this into a brush?” Sometimes the result is just okay. Sometimes it is unexpectedly brilliant. Either way, you learn something. And that is why custom brushes are so appealing in Photoshop Elements: they make the software feel less like a toolbox handed to you by someone else and more like a studio you are gradually shaping for yourself.
Conclusion
Creating and using custom brushes in Photoshop Elements is one of the most practical ways to work faster while making your projects look more personal. You can build brushes from selections, textures, shapes, handwriting, logos, and image fragments. Then you can refine them with brush settings, organize them in the Preset Manager, and reuse them whenever the same creative need pops up again.
That combination of speed, flexibility, and originality is hard to beat. Whether you are designing scrapbook pages, branding photos, adding hand-made texture, or simply trying to avoid repetitive work, custom brushes are worth learning. Once you start building your own brush library, you may wonder how you ever lived without it. Or at the very least, how you survived so long clicking the same decorative element into place one painful copy-paste at a time.