Table of Contents >> Show >> Hide
- The Clue: Why a Vintage Dispenser Works So Well at the Sink
- What to Look For: Your Vintage Soap Dispenser “Case File” Checklist
- Cleaning & Prep: How to Make a Vintage Dispenser Kitchen-Ready
- Filling It Like a Pro: Dish Soap, Dilution, and Pump Harmony
- Styling the Sink: How Designers Make This Look Effortless
- Design Sleuth Troubleshooting: Common Problems and Quick Fixes
- Why This Tiny Swap Feels So Big
- Field Notes: of Sink-Side “Experience” (a.k.a. What It’s Like to Live With This Idea)
- Conclusion: The Case Closed (and the Sink Looks Better)
Every good kitchen has a few “quiet flex” moments: a knife that actually slices tomatoes, a cutting board that doesn’t skateboard across the counter,
and a sink area that looks pulled-together even when dinner was… emotionally complicated.
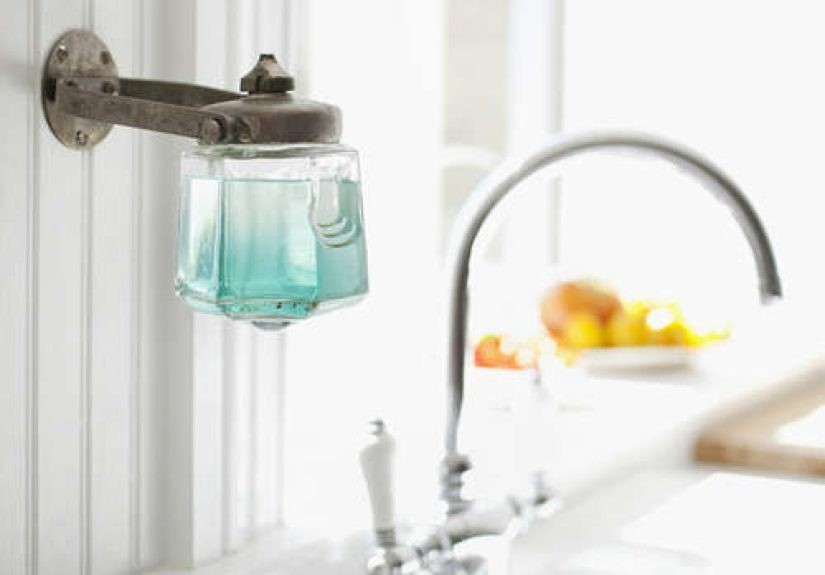
Enter today’s case: the vintage soap dispenseroriginally meant for bathroom dutynow living its best life as a dish soap holder.
The idea popped up in the design world years ago as a blink-and-you’ll-miss-it detail in a beautifully lived-in Brooklyn homean old dispenser, repurposed,
standing by the sink like it always belonged there. The charm is immediate: less plastic clutter, more personality, and a tiny daily ritual that feels oddly luxurious.
It’s not just “decanting soap.” It’s setting a scene where your sink stops looking like a shipping dock for neon bottles.
The Clue: Why a Vintage Dispenser Works So Well at the Sink
1) It upgrades the whole “sink vignette” without remodeling anything
A sink is basically a stage where your hands perform the world’s most frequent encore. A vintage dispenser adds textureglass, ceramic, patina, old-school typography,
that satisfying weightso the area feels intentional, not accidental.
2) It’s the easiest way to reduce visual (and literal) plastic
Many people want to buy refills or larger-format soap and pour from those instead of displaying a parade of disposable bottles. One good dispenser can keep the counter calm
while the refills stay under the sink (where chaos belongs).
3) It’s function-forward… if you pick the right suspect
The best vintage dispensers aren’t just pretty. They pump smoothly, sit stable, and don’t dribble down their own chin like a toddler with a juice box.
Your mission is to choose a dispenser that’s as hardworking as it is photogenic.
What to Look For: Your Vintage Soap Dispenser “Case File” Checklist
Material matters
- Glass: Usually the easiest to clean, least risky, and looks great with amber/clear soap tones.
- Stainless steel: Durable and modernless “vintage treasure,” more “sleek side character.”
- Ceramic: Gorgeous, but proceed thoughtfully if it’s older, chipped, or the glaze is questionable.
Stability and footprint
You want a base that won’t tip when you’re mid-scrub and feeling dramatic. Wider bases are typically more stable. If you’ve got a narrow ledge behind the sink,
look for a slimmer silhouettebut don’t sacrifice balance.
Pump quality (the make-or-break detail)
- Smooth action: A pump shouldn’t feel like it’s negotiating each squirt.
- Replaceable top: Many dispensers can accept a standard replacement pump if the original is worn out.
- Long enough straw: The tube should reach near the bottom so you’re not “air pumping” with half a bottle left.
A note on vintage ceramics and safety
Even though dish soap isn’t a food, it’s used on items that touch food. If your dispenser is ceramic and truly old (or imported, handmade, or heavily painted),
consider a simple lead screening test kit, avoid anything chipped or cracked, and treat “unknown glaze” like “unknown leftovers”:
if you wouldn’t eat it, don’t put it near your plates.
Cleaning & Prep: How to Make a Vintage Dispenser Kitchen-Ready
Vintage finds are like thrift-store jeans: they can be perfect, but they should be washed before they meet your daily life.
The goal is to remove old residue, loosen clogs, and start freshwithout damaging finishes.
Step-by-step deep clean (simple, effective, not fussy)
- Disassemble: Remove the pump, straw, and any gasket pieces if they’re easy to take apart.
- Warm rinse: Flush the bottle with warm water to loosen old soap film.
- Soak the pump: Let the pump/straw sit in warm, soapy water. Pump it a few times while submerged to move water through the mechanism.
- Target buildup: For cloudy film or stubborn gunk, a brief vinegar-and-water soak can help. Rinse thoroughly afterward.
- Detail scrub: Use a bottle brush for the inside and a small brush (or old toothbrush) for threads and crevices.
- Dry completely: Let parts air-dry fully before refilling to keep things fresher longer.
If the pump is clogged
- Pump warm water through the mechanism repeatedly.
- Soak longer in warm soapy water, then rinse and pump again.
- If it still struggles, swap the pump (often the easiest, most sanity-preserving fix).
Finish care (especially for metal tops)
Treat metal pumps like you’d treat nice faucet hardware: gentle cleaning, soft cloths, and no harsh abrasives. A dispenser can look “vintage-chic”,
but “vintage-crusty” is a different genre.
Filling It Like a Pro: Dish Soap, Dilution, and Pump Harmony
Do you need to dilute dish soap?
Sometimes. Many dish soaps are thick, and some pumps handle that beautifullyothers act like they’re trying to sip a milkshake through a coffee stirrer.
If your pump drags, start by adding a small splash of warm water, then gently swirl (don’t shake like a science fair volcano unless you enjoy foam explosions).
Foaming pumps vs. regular pumps
- Regular pump: Works with standard dish soap; dilution is optional and depends on thickness.
- Foaming pump: Requires a much thinner mixture to create foam. If you want foam for dish soap, you’ll need a properly diluted blend.
Quick “no-drama” filling routine
- Place a small funnel in the bottle (or use a measuring cup with a spout).
- Pour in soap, leaving a little space at the top.
- Add a small amount of warm water if needed for pump flow.
- Prime the pump a few times and wipe any drips.
Labeling (because future-you deserves kindness)
If you use multiple dispensershand soap, dish soap, maybe lotionadd a subtle label. It can be as simple as a tiny waterproof sticker or a tasteful tag.
The goal is to prevent the classic mistake: washing your hands with dish soap and wondering why you suddenly smell like “Lemon Industrial.”
Styling the Sink: How Designers Make This Look Effortless
A vintage dispenser shines when it’s part of a small, purposeful sink setup. The trick is to keep it curated, not cluttered.
Think “well-edited countertop,” not “garage sale, but wet.”
The 3-item sink lineup
- Dish soap dispenser: Your vintage star.
- Scrub tool: A brush or sponge that can dry properly.
- Catch-all: A small tray, saucer, or caddy to corral drips.
Matching without being matchy
You don’t need everything to be identical. Instead, repeat one element:
a shared metal finish (brass with brass), a shared color family (amber + wood), or a shared vibe (midcentury shapes).
That’s how you get “styled” without slipping into “catalog set.”
Drainage is the secret sauce
Soap and water love to travel. Give them a predictable destination. A small dish or sink caddy with drainage helps prevent the sticky ring that
forms when soap slowly migrates across your counter like it’s looking for a new home.
Design Sleuth Troubleshooting: Common Problems and Quick Fixes
Problem: The pump dribbles down the spout
- Wipe the nozzle after use (simple, but oddly effective).
- Check for soap buildup around the pump head; clean and reassemble.
- Try a slightly thicker soap mix (too thin can drip more easily).
Problem: The pump sticks or feels gritty
- Soak the pump in warm soapy water and pump through it while submerged.
- Rinse thoroughly, then test with plain water before refilling.
- Replace the pump if it’s corroded or wornno shame in giving your vintage bottle a modern heart.
Problem: The bottle gets cloudy or filmy
- Rinse with warm water regularly.
- Occasionally deep clean to remove soap film buildup.
- Let the bottle dry fully before refilling if you’re switching products.
Problem: You thrifted a beauty, but you’re worried about old finishes
If the dispenser is ceramic and you see chips, cracks, or heavy wear, consider using it for something that won’t touch disheslike hand soap,
or even as a decorative bottle for a brush. You can still enjoy the charm without putting it in the dishwashing “front lines.”
Why This Tiny Swap Feels So Big
The kitchen sink is where daily life stacks upliterally. A vintage dish soap dispenser is a small, repeating moment of order:
you reach for it dozens of times a week. When that object is sturdy, beautiful, and personal, the whole routine feels smoother.
It’s the design equivalent of putting on real shoes to work from home: not required, but suspiciously motivating.
It also encourages better habitslike buying refills, keeping backup soap under the sink, and maintaining a cleaner sink area overall.
One thoughtful bottle can trigger a chain reaction that ends with you owning fewer half-empty bottles and feeling oddly proud of your sponge situation.
Field Notes: of Sink-Side “Experience” (a.k.a. What It’s Like to Live With This Idea)
The funny thing about sink upgrades is that they rarely announce themselves. No one walks into your kitchen and gasps, “Is that… a thoughtfully decanted dish soap situation?”
(If they do, you should probably offer them sparkling water and ask what happened in their childhood.)
But you notice itconstantlybecause you’re the one standing there, mid-rinse, in the glow of overhead lighting that makes everything look a little more serious than it is.
Here’s how it typically goes in real life: you spot a dispenser at a thrift store or antique booth and tell yourself you’re “just looking.”
Ten minutes later, you’re holding a heavy glass bottle with a slightly tarnished pump, imagining it on your counter like you’re casting a home decor movie.
At home, you clean it with the dedication of someone preparing an artifact for a museum exhibit, then you fill it with dish soap.
The first pump is either magicalsmooth, perfect, satisfyingor it’s a reminder that vintage items sometimes need a little mechanical therapy.
Once it’s working, the change is subtle but persistent. You stop wrestling with a flimsy plastic bottle that skitters away when your hands are wet.
You stop getting that mystery goo on the counter because the new dispenser is paired with a small tray or saucer (your future self will thank you).
You also become weirdly aware of soap texture: thick soaps feel luxurious but can make a stiff pump feel like an upper-body workout.
So you find your sweet spotmaybe a tiny splash of warm water, maybe a different soapuntil the pump hits that “just right” rhythm.
The best part? The dispenser becomes an anchor for the whole sink setup. Suddenly you care that your brush can dry properly, that your sponge isn’t permanently damp,
that your counter doesn’t look like a splash zone. You might even graduate to a sink caddy that drains neatly, because once you’ve chosen a charming dispenser,
it feels wrong to park it next to a soggy pile of chaos. It’s not about being perfect. It’s about making the everyday moments slightly less annoying.
And if you share your home with other people, there’s an adjustment periodsomeone will pump too much soap, someone will ask “Which one is hand soap?”
and someone will absolutely refill it with the wrong product at least once. That’s why a tiny label is the unsung hero of this whole setup.
But when the system settles in, it feels like it’s always been there: a small design decision that pays rent every single day.
Conclusion: The Case Closed (and the Sink Looks Better)
A vintage soap dispenser as a dish soap holder is a classic design sleuth move: it’s part upcycling, part styling, and part quality-of-life upgrade.
Choose a stable bottle, make sure the pump works (or replace it), clean it well, and pair it with a simple tray or caddy for drip control.
The result is a sink area that feels calmer, looks sharper, and turns a routine chore into a tiny moment of “yes, I do have my life together.”
Or at least… my dish soap does.