Table of Contents >> Show >> Hide
- Start Smart: Pallet Safety Comes First
- Plan the Perfect Fit (Because Dogs Don’t Read Size Charts)
- Materials and Tools Checklist
- Step-by-Step: Build a Simple Pallet Dog Bed
- Step 1: Decide your size (cushion-first is the easiest)
- Step 2: Break down the pallet safely
- Step 3: Build the base frame
- Step 4: Add the deck (the surface the cushion sits on)
- Step 5: Add rails (optional, but it looks finished)
- Step 6: Sand like your dog’s comfort depends on it (because it does)
- Step 7: Clean the wood
- Step 8: Finish and seal with pet-friendly common sense
- Step 9: Add feet (or casters) and non-slip protection
- Step 10: Cushion setup (the comfort layer)
- Design Upgrades That Make It Look Store-Bought
- Cost and Time Breakdown
- Maintenance and Cleaning
- Common Mistakes (and How to Avoid Them)
- FAQ
- Final Thoughts
- Real-World Experiences: What DIYers Commonly Learn (About )
Your dog deserves a bed that’s comfortable, easy to clean, and sturdy enough to survive the ancient canine ritual known as
“three circles, one dramatic flop.” A DIY dog pallet bed checks all the boxes: it’s budget-friendly, customizable,
and it upcycles wood that might otherwise end up as scrap. Done right, it can look like a piece of rustic pet furniture you’d
happily show offrather than something that screams “I built this at 2 a.m. with optimism and one dull screwdriver.”
This guide walks you through choosing safe pallet wood, planning the right size, building a solid frame, sanding it smooth
(splinter-free, please), and finishing it with pet-friendly choices. You’ll also get upgrade ideas and real-world lessons from
DIYers so your first build feels less like guesswork and more like “nailed it.”
Start Smart: Pallet Safety Comes First
How to pick a safe pallet for indoor pet projects
Pallets are used in shipping, which means they can be exposed to dirt, spills, and (sometimes) chemical treatments. For a dog bed,
you want wood that’s clean, structurally sound, and treated in a way that doesn’t introduce unnecessary risk.
-
Look for an IPPC/ISPM 15 stamp. A stamped pallet is easier to “decode” because it typically indicates how the wood
was treated for pest control. - Choose “HT” (heat-treated) when possible. Heat-treated pallets are heated to meet an international standard for pest reduction.
- Avoid “MB” (methyl bromide). MB indicates fumigation with a pesticide gasno thanks for a pet bed.
- Skip painted or heavily stained pallets. Paint can hide damage, and you often can’t confirm what the coating is.
- Pass on anything with oily spots, odd smells, or mystery residue. If you wouldn’t want it on your couch, don’t put it near your dog.
When in doubt, buy new, untreated boards (or clean, kiln-dried lumber) and build the same design. “Free” isn’t a bargain if you spend
the whole time wondering what your dog is sleeping on.
Shop safety: protect you, then protect the pup
Pallet projects involve nails, splinters, sawdust, and finishes. Wear work gloves, eye protection, and a dust mask or respirator when cutting
and sanding. Sanding creates fine wood dust that’s irritating to breathe, and it’s one of those hazards that sneaks up on you because it looks
like “just dust.”
Also plan for good ventilationespecially if you stain or seal the wood. If you’re building indoors, keep your dog away from the workspace
and away from curing finishes. The bed should be fully dry and cured before it becomes your dog’s new favorite throne.
Plan the Perfect Fit (Because Dogs Don’t Read Size Charts)
Measure your dog the practical way
A DIY pallet dog bed is easiest when you size it around the cushion you plan to use. Start by measuring your dog in their most common sleeping pose:
stretched out like a superhero or curled like a cinnamon roll.
- Length: Measure from nose to the base of the tail while your dog is lying down, then add 6–12 inches for wiggle room.
- Width: Measure shoulder-to-shoulder while lying down, then add 6–10 inches.
- Entry height: If your dog is older or has joint issues, keep the bed low and easy to step into.
If your dog uses a crate, you can also build a pallet bed frame that fits inside. Just measure the crate’s interior footprint and ensure the bed frame
leaves room for airflow and a washable cushion.
Pick the right bed style for your dog’s comfort
Dogs have opinions. Strong ones. Choose a style that matches how your dog sleeps and moves:
- Flat platform: Great for stretchers and warm climates; easiest to clean and vacuum around.
- Bolstered sides: Nice for “curl-and-rest-my-head” dogs, but make at least one low entry side.
- Recessed mattress area: Helps keep the cushion from sliding and looks more “finished.”
- Orthopedic-friendly build: Low step-in height plus a supportive foam cushion can be especially helpful for senior dogs.
Materials and Tools Checklist
Materials
- 1–2 heat-treated pallets (or equivalent reclaimed boards)
- 1×3 or 1×4 boards for rails (optional, for a cleaner edge)
- Wood screws (1¼” and 2″)
- Wood glue (optional but helpful)
- Sandpaper (60/80 grit, 120 grit, 180–220 grit)
- Wood filler (optional, for nail holes and rough knots)
- Non-slip feet, felt pads, or rubber furniture grips
- Dog cushion or orthopedic foam insert + washable cover
- Pet-safe finish option (see finishing section)
Tools
- Pry bar or pallet buster tool
- Hammer and nail puller/pliers
- Drill/driver + bits
- Circular saw, jigsaw, or miter saw
- Orbital sander (highly recommended)
- Measuring tape, square, pencil
- Clamps (nice to have)
Step-by-Step: Build a Simple Pallet Dog Bed
Step 1: Decide your size (cushion-first is the easiest)
Pick your cushion dimensions first. Common dog bed inserts are sized roughly like small/medium/large rectangles, and orthopedic foam inserts are widely
available. Once you have the cushion measurements, plan your frame so the cushion fits with a little breathing roomabout ½” to 1″ on each side.
Example: If your cushion is 36″ x 24″, aim for an inner frame opening around 37″ x 25″ so the cover isn’t pinched and you can remove it easily.
Step 2: Break down the pallet safely
Pallets are basically nail sculptures pretending to be lumber. Take your time here. Use a pry bar or pallet buster to lift boards gradually and reduce splitting.
Remove all nails and staples. Run a gloved hand (carefully) over each board and inspect for hidden metalyour saw blade will not appreciate surprise nails.
If dismantling feels like a battle, you can also cut the pallet into sections and use the boards you get cleanly. The goal is usable, solid boardsnot a pile
of cracked slats and regret.
Step 3: Build the base frame
Create a sturdy rectangle using thicker pallet runners or reinforced boards. Pre-drill holes to prevent splitting, then screw the corners together.
If your dog is large, add a center support beam so the bed doesn’t sag over time.
- Cut two long frame boards and two short frame boards to your planned dimensions.
- Assemble into a rectangle with 2″ screws (and wood glue if desired).
- Add a center support (long direction) for medium-to-large dogs or thicker foam mattresses.
Step 4: Add the deck (the surface the cushion sits on)
Lay pallet slats across the frame with small gaps (⅛”–¼”) for airflow. Pre-drill and screw each slat down.
For a smoother look, you can use a plywood panel as a basejust remember airflow matters if your dog runs warm.
If you’re making a recessed bed, keep the deck slightly lower than the top edge rails so the cushion sits “inside” the frame.
Step 5: Add rails (optional, but it looks finished)
Side rails keep the cushion from sliding and give the bed a clean furniture-style edge. Use 1×3 or 1×4 boards to create low walls on 2–3 sides.
Keep one side lower as an “easy entry,” especially for older dogs.
- Low entry idea: Make the front rail 2–3″ tall, while the sides/back are 4–6″ tall.
- Chewer-friendly idea: Round over corners and avoid decorative trim that becomes a chew toy.
Step 6: Sand like your dog’s comfort depends on it (because it does)
Start with coarse grit to remove rough spots and splinters, then work up to finer grit for a smooth surface. Pay extra attention to edges, corners, and anywhere
your dog’s paws might scrape during the “nesting routine.”
- 60/80 grit to knock down roughness and old stamps/ink
- 120 grit to smooth and refine
- 180–220 grit for a soft, touchable finish
Wipe away dust between grits. If you use wood filler, let it dry fully and re-sand until smooth.
Step 7: Clean the wood
Before finishing, clean the frame. A simple approach is vacuuming thoroughly, wiping with a damp cloth, and letting it dry completely.
Avoid soaking pallet woodit can warp or raise the grain dramatically.
Step 8: Finish and seal with pet-friendly common sense
You have two goals: protect the wood from drool, dirt, and “mystery paw prints,” and avoid finishes that leave strong odors or residues.
In general, low-VOC, water-based finishes tend to be more comfortable for indoor air than strong solvent-heavy coatings.
- Option A (easy + durable): Water-based polyurethane (low odor, clear finish). Let it cure fully.
- Option B (natural look): A hardwax oil designed for furniture (follow curing instructions carefully).
- Option C (minimalist): Skip stain, seal lightly, and rely on a washable cover to do the dirty work.
Whatever you choose, apply thin coats, allow proper dry time, and give it extra curing time before your dog uses it. If you can still smell the finish up close,
it’s not ready for nap duty.
Step 9: Add feet (or casters) and non-slip protection
For indoor floors, add rubber feet or furniture grips so the bed doesn’t skate across the room when your dog launches into it like a furry torpedo.
If you want a mobile bed, casters can work welljust choose locking casters and make sure the bed remains low enough for easy entry.
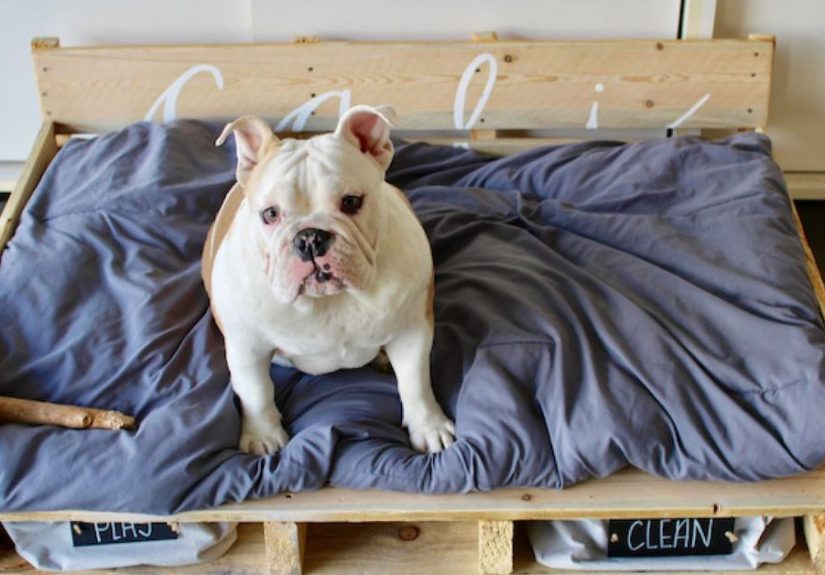
Step 10: Cushion setup (the comfort layer)
Put the cushion inside and check the fit. You want snug, not stuffed. Prioritize a washable cover. If your dog is older, a supportive foam insert can help with
pressure relief and joint comfort. If your dog runs hot, consider a breathable cover fabric and avoid overly fluffy materials.
Design Upgrades That Make It Look Store-Bought
Add a nameplate (because your dog is the CEO)
A small engraved wood tag or metal plate adds charm. Mount it to the front rail and suddenly your DIY dog bed frame has “boutique” energy.
Build a 3-sided bolster with a low front entry
This gives head support without forcing a stiff step-over. It’s especially useful for senior dogs that still love a cozy nest but don’t love acrobatics.
Create a removable inner tray
If you build the deck as a removable panel, you can clean under the cushion more easily. It’s also helpful if you ever need to replace the cushion insert.
Make it match your home
Keep the wood natural for a rustic look, stain it to match furniture, or paint it a soft neutral. Just keep paint choices low-odor and fully cured before use.
And remember: your dog will still prefer the bed even if it doesn’t match the throw pillows. (Dogs are refreshingly humble like that.)
Cost and Time Breakdown
- Typical build time: 2–4 hours for construction + sanding time + finish curing
- Budget range: Low if pallets are free; moderate if you buy foam and a quality washable cover
- Where the money matters: Spend on the cushion. The frame is the outfit; the cushion is the comfort.
Maintenance and Cleaning
- Vacuum the bed frame edges weekly (crumbs and fur love corners).
- Wash the cover regularlymore often during shedding season or rainy weather.
- Wipe the sealed wood with a damp cloth; avoid harsh cleaners that leave residues.
- Check screws every few months, especially for large dogs or enthusiastic “diggers.”
Common Mistakes (and How to Avoid Them)
- Using questionable pallets: If you can’t verify the pallet is clean and safe, don’t use it.
- Not removing all nails: Hidden metal can snag paws and destroy tools.
- Skipping progressive sanding: Coarse-to-fine sanding is what turns “rough wood” into “pet furniture.”
- Finishing too fast: Dry-to-touch isn’t the same as fully cured. Give it time.
- Building too tall: A dog bed should be easy to step into, not a bouldering problem.
FAQ
Can I use a pallet bed outdoors?
Yes, but use an outdoor-rated sealant and choose a cushion designed for outdoor use. Keep it under cover so it isn’t constantly exposed to rain.
For dogs that spend time outside, shade and airflow matter as much as the bed frame.
What if my dog chews wood?
Keep rails lower and simpler, avoid decorative edges, and consider adding a metal corner guard on the most tempting corners.
If chewing is persistent, a fully upholstered dog bed may be a safer choice than wood.
Is a raised pallet bed better than a floor bed?
It depends. Slight elevation can help keep the cushion off cold floors and improve airflow, but for dogs with mobility issues,
low entry height is a priority. You can keep it low and still get the “frame” look by using short rubber feet rather than tall legs.
Final Thoughts
A DIY dog pallet bed is one of those projects that’s satisfying because it’s practical, personal, and surprisingly stylish when you take the time to sand and finish it well.
The secret sauce is simple: pick safe wood, build a sturdy frame, keep the entry easy, and invest in a cushion your dog actually loves.
Then step back and admire your workwhile your dog immediately drags a toy onto it and claims it as their new headquarters.
Real-World Experiences: What DIYers Commonly Learn (About )
Most people start this project thinking the hard part is building the frame. In reality, the “character-building” portion is usually the pallet itself.
DIYers often report that dismantling pallets is either (1) weirdly therapeutic, or (2) an emotional journey that includes bargaining, dramatic sighing,
and a brief online search for “pallet buster tool near me.” The best tip from experienced builders is to choose pallets that look clean and intact
because cracked, over-nailed pallets cost you time twice: once during dismantling and again when you’re trying to sand out splinters the size of toothpicks.
Another common lesson: sanding is not optionalat least not if you want your dog to actually enjoy the bed. People who rush sanding often end up doing it again
after the first “paw test,” when they notice snags on blankets or tiny splinters around the edges. The DIYers who feel happiest with the final result usually follow
a simple routine: rough sanding to remove splinters, careful edge sanding (corners matter), and then a final smoothing pass that makes the wood feel like real furniture.
It’s not glamorous, but it’s the difference between “rustic” and “ow.”
Comfort is the next big aha moment. A gorgeous wooden dog bed frame won’t win your dog’s loyalty if the cushion is too thin, too hot, or slides around.
Builders who nail it often choose the cushion first and design the frame around itespecially if they’re using an orthopedic foam insert for an older dog.
Many people also discover that a low front entry is worth its weight in gold, particularly for senior dogs or big breeds that don’t love stepping over rails.
The “three-sided bolster with a dip in the front” becomes a popular compromise: cozy on the sides, easy on the joints.
Finishes are another area where DIYers get smarter the second time around. Strong-smelling stains or sealers can linger longer than expected, and the people who
feel most confident about the final bed tend to give finishes extra curing timesometimes a few daysbefore bringing it inside. They also learn to keep the dog
out of the workshop during finishing, because one curious nose-print in fresh topcoat is a memory you will keep forever (whether you want to or not).
Finally, there’s the “lifestyle” factor: dogs treat new beds like a stage. DIYers often joke that the bed is instantly upgraded with dog hair, toys, and a slightly
crooked blanketlike a home that’s officially lived in. And that’s kind of the point. If your dog chooses the bed on day one, stretches out, and sighs like they’ve
just returned from a long day at the office, you built it right.