Table of Contents >> Show >> Hide
- Why bother updating mirrored closet doors?
- Step 1: Plan your mirrored closet door makeover
- Step 2: Gather tools and materials
- Step 3: Classic trim-and-grid mirrored door makeover
- Other stylish mirrored closet door makeover ideas
- Safety tips when working with mirrors
- Maintaining your new mirrored closet doors
- Real-life experiences and extra tips from DIYers
- Conclusion: A simple project with a big payoff
If your mirrored closet doors are giving more “’90s motel” than “modern retreat,” you are absolutely not alone. The good news? You don’t have to rip them out, order custom doors, or sell a kidney to pay for a carpenter. A simple DIY mirrored closet door makeover can totally transform your bedroom, add style, and still keep the handy full-length mirror you use every morning.
Inspired by the classic Remodelaholic-style approach of turning basic, dated doors into custom-looking features, this guide walks you through how to update mirrored closet doors with trim, overlays, paint, wallpaper, and more. We’ll go over tools, step-by-step instructions, smart safety tips, and real-life lessons from DIYers who’ve already conquered those shiny beasts.
Whether you have sliding mirrored doors, bifold mirrored doors, or old louvered doors you’d love to convert into mirror panels, this DIY mirrored closet door makeover plan will help you get a high-end look on a realistic budget.
Why bother updating mirrored closet doors?
Mirrored closet doors actually have a lot going for them: they bounce light around, make small rooms feel bigger, and save space by combining door and full-length mirror in one. The problem is usually the style: thin gold or silver frames, giant unbroken mirror slabs, and a general “builder-basic” vibe.
A DIY mirrored closet door makeover gives you the best of both worlds:
- Keep the function of a full-length mirror where you need it.
- Upgrade the style with trim, grids, overlays, or color to match your decor.
- Save money versus replacing the entire track and door system.
- Add personality that makes your bedroom feel finished instead of “temporary apartment.”
Plus, mirrored doors are surprisingly flexible. You can turn them into faux French doors, paneled doors, soft frosted doors, or even camouflaged “almost wall” doors with the right technique.
Step 1: Plan your mirrored closet door makeover
Check the type and condition of your doors
Before you start shopping for trim or wallpaper, take a close look at what you’re working with:
- Type: sliding mirrored closet doors, bifold mirrored doors, or solid doors you want to add mirrors to.
- Frame material: usually aluminum, vinyl, or steel around the mirror.
- Condition: any chips, cracks, warped frames, or broken tracks?
- Mirror style: one large mirror, multiple panels, or added mirror tiles.
If your mirrors are cracked, or the tracks are seriously bent, you may want to repair or replace those parts first. Cosmetic upgrades can only do so much if the door won’t roll or close properly.
Choose a makeover style that fits your room
Here are a few popular mirrored closet door ideas that work well in real bedrooms:
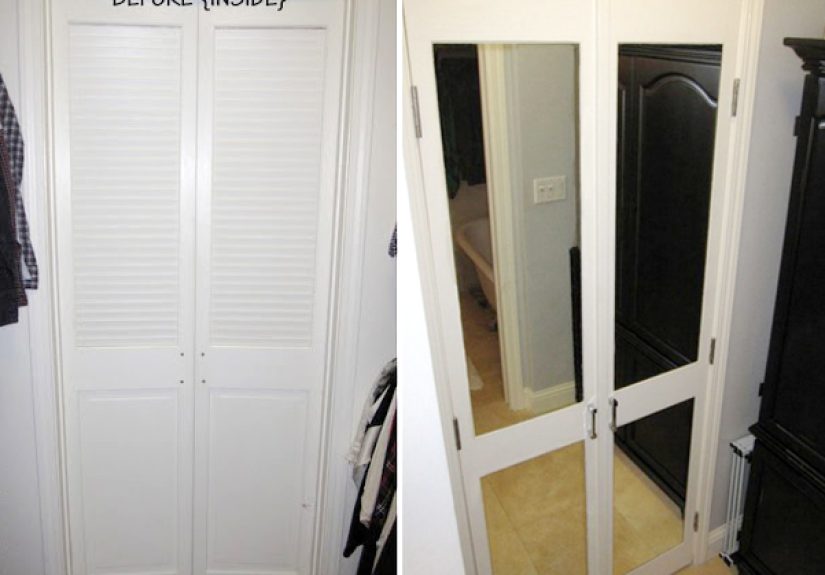
- Grid or French-door look: Add slim wood trim to create vertical and horizontal lines over the mirror. This turns one big mirror into multiple “panes” and instantly feels more custom and high-end.
- Overlay panels: Lightweight decorative fretwork panels or overlays glued to the mirror add pattern and texture without hiding all the reflectivity.
- Board-and-batten or box trim: Thicker trim set into rectangles gives you a paneled door look while still letting mirror peek through in sections.
- Wallpaper or peel-and-stick film: Perfect if you’re a renter or tired of seeing your reflection. You can cover all or part of the mirror with removable wallpaper, frosted film, or tinted film.
- Painted frame and accents: Sometimes just painting the metal frame and adding a new handle is enough to bring your mirrored doors into this decade.
Think about your bedroom style: farmhouse, modern, boho, traditional, or coastal. Choose a mirrored closet door makeover that fits with the rest of your space instead of fighting it.
Step 2: Gather tools and materials
Your exact shopping list will depend on the look you choose, but for a classic “Remodelaholic-inspired” DIY mirrored closet door makeover with added trim, you’ll likely need:
- Measuring tape and pencil
- Miter saw or miter box with hand saw (for angled cuts)
- Painter’s tape or masking tape
- Safety glasses and work gloves
- Slim wood or MDF trim (screen molding or lattice works well)
- Construction adhesive safe for mirrors and glass
- High-adhesion primer (especially if painting metal or slick surfaces)
- Paint (trim enamel, interior latex, or specialty door paint)
- Fine-grit sandpaper or sanding sponge
- Caulk for tiny gaps between trim pieces
- New hardware (optional) for a more finished look
If you’re going with overlays, wallpaper, or film, you’ll swap some of those items for:
- Decorative overlays or fretwork panels
- Removable wallpaper or peel-and-stick vinyl
- Wallpaper smoothing tool and utility knife
- Frosted or tinted window film
- Plastic scraper for bubbles
Step 3: Classic trim-and-grid mirrored door makeover
This method is one of the most popular ways to update mirrored closet doors because it keeps most of the mirror, adds style, and works on both sliding and bifold doors.
1. Remove and clean the doors
Lift each mirrored door off the track according to the manufacturer’s instructions and lay it flat on a pair of sawhorses or a padded surface. Clean the mirror thoroughly with glass cleaner, then go over it with rubbing alcohol so your adhesive can grip properly.
2. Measure and mark your grid
Decide how many “panes” you want. A simple starting point is:
- Two or three vertical sections per door for a modern, minimal look.
- Vertical and horizontal lines to create 6–8 smaller rectangles for a French-door style.
Measure the full width and height of the mirror surface. Subtract the combined width of your trim strips, then divide by the number of sections. Lightly mark your layout on the mirror with a dry-erase marker or painter’s tape so you can visualize the final look.
3. Cut and dry-fit the trim
Use a miter saw or miter box to cut your trim to size. For a clean, picture-frame look, cut 45-degree angles at the corners; for a modern grid, you can butt the ends together at 90 degrees.
Dry-fit the trim pieces right on the mirror to make sure everything lines up. Don’t glue anything yetthis is where you adjust lengths and angles.
4. Attach the trim to the mirror
Once you’re happy with the layout, apply construction adhesive rated for glass to the back of each trim piece in a thin zigzag. Press the trim onto the mirror and hold firmly for a few seconds. Use painter’s tape across the trim pieces like “straps” to keep them from sliding while the adhesive cures.
Work from one side of the door to the other so you’re not leaning over wet adhesive. Check that vertical pieces are straight with a level as you go.
5. Caulk, prime, and paint
After the adhesive has dried (follow the product’s instructions), run a small bead of caulk along any visible gaps where trim pieces meet each other or the frame. Smooth with a damp finger or caulk tool.
Prime the trim and any metal frame you plan to paint with a high-adhesion primer. When the primer is dry, apply two coats of your chosen paint, letting each coat dry thoroughly. Soft white, warm greige, black, and deep navy are popular choices that make mirrored closet doors look custom instead of basic.
6. Rehang and admire
Once everything is dry to the touch and no longer tacky, carefully rehang the mirrored doors. Step back and enjoy how much more finished and intentional your bedroom feels with your new custom-look closet doors.
Other stylish mirrored closet door makeover ideas
Create a French-door effect with black trim
For a dramatic, modern look, paint the existing metal frame black and use slim black trim to create a grid over the mirror. This gives the illusion of steel French doors and pairs beautifully with neutral walls, linen bedding, and natural wood furniture.
If you already have black window frames or black interior hardware, this is a great way to tie everything together and make your mirrored closet doors look like they were part of the design from day one.
Use decorative overlays or fretwork panels
Decorative fretwork overlays are lightweight panels that you can glue directly onto the mirror. They come in patterns like Greek key, quatrefoil, lattice, and more. Once painted, they look like custom millwork. This option is especially handy if you want pattern but don’t want to design it from scratch with individual trim pieces.
Because overlays usually leave parts of the mirror exposed, you keep the light and function while adding personality and texture.
Try peel-and-stick wallpaper or vinyl
If you’re a renter or commitment-phobic, removable wallpaper and peel-and-stick vinyl are your best friends. You can:
- Cover the entire mirror with a subtle textured pattern for a softer look.
- Apply wallpaper to just the top or bottom half of the mirror to create a “paneled” look.
- Use wood-look vinyl for a faux wood door effect while still keeping the mirror behind it if you ever want to remove the covering.
Just be sure to use a smoothing tool to remove bubbles, and trim carefully along the frame with a sharp utility knife for crisp edges.
Add frosted or patterned window film
Window film is a clever solution if you like the light but don’t love seeing your reflection all the time. Frosted film, geometric patterns, and even “etched glass” looks are available and easy to apply.
Film also adds privacy if your mirrored closet doors reflect your bed or bathroom, and it can help visually tone down clutter inside the closet that might be visible in the reflection.
Refresh just the frame and hardware
On some mirrored doors, the biggest offender is the shiny brass or dull silver frame. In that case, a quick sand, prime, and paint job on the frame plus a new pull can work wonders.
Choose hardware that matches the rest of your room: modern black pulls, brass knobs, or even leather tabs if you’re going for a Scandinavian vibe. Small details add up.
Safety tips when working with mirrors
Any DIY mirrored closet door makeover comes with one non-negotiable: safety.
- Wear gloves and safety glasses. Even tempered glass can chip, and metal frames can have sharp edges.
- Lay doors flat when possible. Working horizontally reduces the risk of a door tipping or the mirror flexing and cracking.
- Don’t drill into mirror glass. Drilling into glass is a specialized task and can cause shattered mirrors if done incorrectly. Instead, attach trim with adhesive.
- Use adhesives intended for glass and mirrors. Regular construction adhesive can sometimes damage mirror backing; choose a product labeled safe for mirrors.
- Ask for help when lifting. Mirrored doors are heavier than they look. Get a friend to help move and rehang them.
Maintaining your new mirrored closet doors
Once your mirrored closet door makeover is complete, a few small habits will keep everything looking fresh:
- Clean mirrors with a non-ammonia glass cleaner or a vinegar-and-water mix to protect paint and adhesive.
- Wipe down trim regularly to prevent dust buildup along edges and in grooves.
- Slide doors gently to protect tracks and keep the trim from getting banged.
- Touch up paint chips quickly so they don’t grow into noticeable scuffs.
With basic care, a DIY mirrored closet door makeover can hold up for years and keep your bedroom feeling like a thoughtfully designed space instead of an afterthought.
Real-life experiences and extra tips from DIYers
To round things out, let’s talk about what actually happens when real people tackle their mirrored closet doorsbeyond the perfectly staged “after” photos.
1. The “I used the wrong adhesive” lesson. One common story: someone excitedly glues trim or overlays to their mirrored doors with whatever construction adhesive they already have in the garage. It looks amazing on day one. But a few weeks later, the pieces start sliding, or worse, the adhesive reacts with the mirror backing and leaves cloudy spots.
The takeaway? Always double-check the label. Look for an adhesive that specifically says it’s safe for mirrors and glass. If you’re not sure, test a tiny area on a scrap mirror or a small piece in a corner where it won’t show. That extra 10 minutes of testing can save your whole project.
2. Wallpaper on mirrors is easy… until you rush it. Peel-and-stick wallpaper sounds simpleand it is, if you take your time. People who get great results usually:
- Start from the top and work down slowly.
- Use a smoothing tool and work from the center outward to push out air bubbles.
- Overlap seams slightly or carefully line up the pattern so seams disappear.
- Use a fresh, sharp blade when trimming along the frame.
DIYers who rush tend to end up with bubbles, crooked patterns, or edges that start to peel after a few weeks. If this happens, don’t panicyou can usually peel back and re-smooth sections or even remove the wallpaper entirely and try again with a new roll.
3. High-adhesion primer is not optional. Several people who painted their mirrored closet door frames or added wood trim report the same thing: the projects that held up the best started with a good bonding or adhesion primer, not just plain paint.
Metal frames and slick trim can be stubborn. Primer made for glossy or hard-to-paint surfaces gives your paint something to grip. Without it, you may notice chipping where doors slide past each other or where you grab the edge to close them. With it, doors can look freshly painted for years instead of months.
4. Overlays and grids hide a lotbut not everything. One of the underrated perks of adding trim or overlays is that they help disguise small flaws: a scratch on the mirror, a bit of wear on the frame, or uneven reflections from a wavy wall. But they won’t fix major structural problems.
If the doors don’t sit square on the track, or if one is noticeably warped, the grid pattern can actually draw more attention to the misalignment. In those cases, it’s worth adjusting the rollers, replacing worn hardware, or shimming the track so everything lines up before you glue on your pretty new trim.
5. Budget makeovers can still look high-end. Many DIYers have pulled off mirrored closet door transformations for under $50 using:
- Inexpensive lattice or screen molding for trim.
- A quart of good paint instead of a gallon.
- Remnant or on-sale wallpaper for a single set of doors.
- Simple black or brushed nickel pulls from the hardware store.
Because mirrored doors take up such a large visual area, a relatively small investment goes a long way. A bit of trim and paint can make your bedroom feel like it belongs in a design magazineeven if the rest of the room is still a work in progress.
6. The confidence boost is real. One of the best “side effects” of a DIY mirrored closet door makeover is how it makes people feel about tackling other home projects. If you can transform a huge, intimidating shiny surface into something stylish and personal, suddenly painting a dresser or adding a feature wall feels totally doable.
Many DIYers start with their mirrored closet doors because they’re sick of looking at them every morning. They finish with a more beautiful bedroom, plus the confidence and skills to keep improving the rest of their homeone weekend project at a time.
Conclusion: A simple project with a big payoff
Mirrored closet doors don’t have to be the awkward, outdated feature you apologize for when people see your room. With a bit of planning, some trim or overlays, the right adhesive, and a weekend’s worth of effort, you can turn them into a custom detail that fits your style and actually makes your bedroom look bigger, brighter, and more intentional.
Whether you go full Remodelaholic with a dramatic grid makeover, keep it simple with a frame refresh, or choose a renter-friendly wallpaper or film, the key is the same: respect the mirror’s function, upgrade the style, and let the doors earn their place in your room. Your future selfgetting dressed in front of a beautiful, personalized set of mirrored closet doorswill be very grateful.