Table of Contents >> Show >> Hide
- What Are Umbra Wallflowers, Exactly?
- Before You Start: Pick Your Wall (and Your Vibe)
- Tools & Supplies We Used
- Step 1: Do the Layout First (Not on the Wall)
- Step 2: Choose Your Mounting Method
- Step 3: Transfer the Layout to the Wall Without Losing Your Mind
- How to Pair Wallflowers with Other Wall Decor
- Troubleshooting: What If Something Goes Wrong?
- Removal & Wall Repair (Because Future You Deserves Nice Things)
- Why This Project Works (Even If You’re Not “A Decor Person”)
- 500-Word Experience Add-On: What It Felt Like to Actually Hang Them
- Conclusion
There are two kinds of blank walls: the ones that look “calm and minimalist” and the ones that look like you moved in yesterday and forgot to unpack your personality.
Umbra’s Wallflowers fall squarely into the “instant personality” categorylightweight, 3D, and easy to arrange into anything from a subtle little cluster to a full-on botanical takeover.
And because they’re modular, you can play with placement without committing to a single framed print for the next decade.
In this guide, we’ll walk through a real-world style install: how we planned the layout, how we mounted them, what we’d do differently next time, and how to avoid the classic
“why is my wall art slowly migrating toward the baseboard?” situation.
What Are Umbra Wallflowers, Exactly?
Umbra Wallflowers are decorative, molded 3D flowers designed to mount individually so you can build your own arrangement. Sets are commonly sold in a pack (often 25 pieces),
in multiple sizes, and made from lightweight molded plastic (often polypropylene). Depending on the version, they can mount using included adhesives, snap-in tacks, or a
magnet-and-pin approach that makes rearranging incredibly satisfying.
Translation: you’re not hanging “a thing.” You’re hanging a bunch of things, which is way more fun and only slightly more likely to send you down a design rabbit hole at 11:47 p.m.
Before You Start: Pick Your Wall (and Your Vibe)
Wallflowers look best when they’re doing one of these jobs:
- Filling an awkward blank zone (above a dresser, next to a mirror, over a crib, or along a staircase).
- Balancing something visually heavy (like a large mirror or headboard) with lighter, textured interest.
- Creating a soft “gallery wall” alternative when you want dimension without frames.
- Adding a playful accent in nurseries, guest rooms, powder rooms, or anywhere your wall needs a wink.
Design rule that saved us from chaos
If your Wallflowers are going above furniture (a bed, console, credenza), aim for the overall arrangement to feel proportionalbig enough to look intentional, not so big that it
looks like your wall is sprouting.
A simple way to sanity-check scale is to measure the furniture width and plan your cluster so it visually occupies about two-thirds of that width.
It’s a great guardrail when you’re tempted to keep adding “just one more flower” until you’ve created a floral weather system.
Tools & Supplies We Used
Your exact setup depends on which mounting method your Wallflowers use (adhesive, tack, magnet + pin). Here’s what covered our bases:
- Measuring tape
- Pencil (or painter’s tape, if you’re commitment-shy)
- Small level (or a level app in a pinch)
- Hammer (for pins/tacks)
- Rubbing alcohol + a clean cloth (for adhesive installs)
- Step stool (because gravity is undefeated)
- Spackle + touch-up paint (optional, for later “oops” repairs)
Step 1: Do the Layout First (Not on the Wall)
The best way to get a layout you love is to plan it on a high-contrast surface firstyour bedspread, a rug, a sheet on the floor, or even a big piece of cardboard.
We spread the flowers out, mixed sizes, and moved them around until the cluster felt organic. Think “blooming,” not “marching band formation.”
Two layout styles that work almost every time
- The “swoosh”: a diagonal or gently curving shape that can climb along stairs or frame a doorway.
- The “cluster”: a tighter arrangement with consistent spacing that reads as one statement moment.
Pro tip: snap a quick photo of your favorite layout. That picture becomes your blueprint when you’re on the ladder trying to remember if the tiny flower was on the left or right.
Spacing: the easiest way to make it look expensive
Consistent spacing is the secret sauce. You don’t need to be robotic about it, but aim for a steady “breathing room” between pieces so it looks curated rather than accidental.
Painter’s tape can act as a quick spacer template if you want repeatable gaps without constant measuring.
Step 2: Choose Your Mounting Method
Umbra Wallflowers have shown up with a few mounting approaches. Check your packaging or product listing to confirm which one you have. Here are the common options and how to use them.
Option A: Magnet + Push Pin (the “rearrange forever” method)
This is the method we loved most because it makes micro-adjustments ridiculously easy. The basic idea:
you place a push pin in the wall, then the flower’s magnet grabs onto the pin and “sticks” in place.
That means you can rotate the flower, swap sizes, and tweak spacing without removing hardware every time.
How we did it
- Mark the rough boundary of the arrangement on the wall with small pencil dots (top, bottom, left, right).
- Start at the bottom of your layout and work upward. It’s easier to maintain a pleasing shape as you build.
- Place a push pin where the center of the flower will sit. Press it in, then gently tap with a hammer if needed.
- Attach the flower by letting the magnet find the pin head. It should “snap” into place in a satisfying way.
- Step back every few flowers to check balance, height, and overall silhouette.
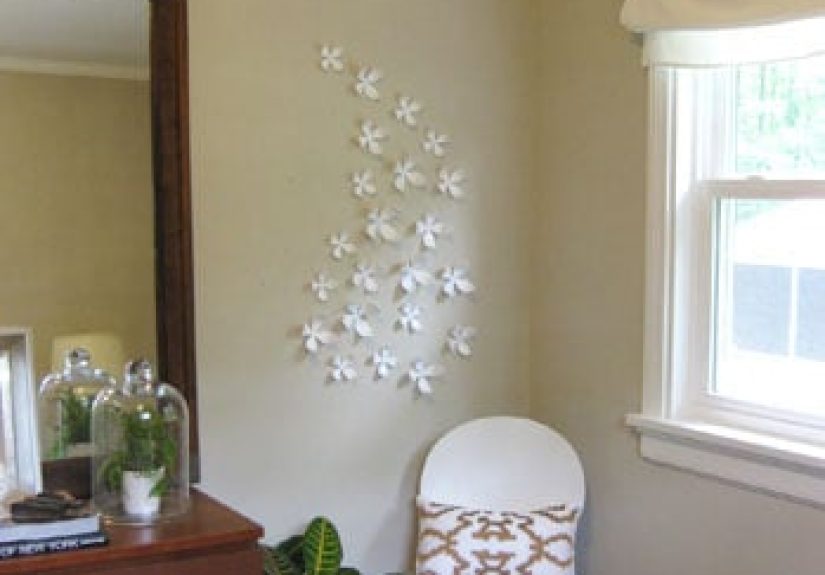
If you’re mounting near a mirror (like we did), pay attention to visual balance. We avoided making the flowers taller than the mirror because it felt top-heavy.
Instead, we thickened the upper area and kept the overall height in check so the wall didn’t look lopsided.
Option B: Adhesive Mounting (rental-friendly… if you do it correctly)
Adhesive is great for lightweight decor, but it’s only as reliable as your prep. The biggest mistake people make is sticking anything to a dusty wall and hoping for the best.
Dust and oils break adhesion faster than you can say, “Why is that flower on the floor?”
How to make adhesive actually work
- Clean the wall with rubbing alcohol and let it dry completely.
- Avoid fresh paintif your wall was recently painted, give it time to cure before sticking anything on it.
- Press firmly and hold for the recommended time (varies by adhesive type).
- Mind the environment: humidity and temperature swings can reduce holding power over time.
Use adhesive only for genuinely lightweight pieces (Wallflowers qualify; stone planters and mirrors do not).
If you’re ever unsure, choose pins/tacks or wall anchors for heavier decor and save adhesive for the light stuff.
Option C: Snap-in Tack Systems
Some versions use a tack that snaps into the back of the flower. The tack goes into the wall first, then the flower attaches.
This approach still allows repositioning, but not quite as effortlessly as the magnet method.
Step 3: Transfer the Layout to the Wall Without Losing Your Mind
Here’s what helped us keep the arrangement true to the plan:
- Work from one anchor point (we started bottom-center and expanded outward).
- Use “placeholder paper” markers if you remove a flower temporarily, so you don’t forget where it lived.
- Rotate flowers slightly as you go. A small change in angle adds movement and avoids a too-uniform look.
- Mix sizes like you’re plating food: distribute the “big shapes” so they don’t clump together.
Once the general shape was on the wall, we swapped sizes around until it felt right. This is where the Wallflowers really shine:
you can keep rearranging until the whole thing looks intentional, not “I panicked and stuck them wherever.”
How to Pair Wallflowers with Other Wall Decor
Wallflowers are great solo, but they also play well with others. A few combos that look especially polished:
Wallflowers + a mirror
Frame the mirror loosely, like blossoms drifting into the space. Keep the highest flowers below (or roughly level with) the mirror’s top edge if the mirror is a visual center point.
Wallflowers + a gallery wall
Add a few flowers as “texture accents” around frames. Keep spacing consistent and let the frames stay the main structure.
If you’re hanging heavier frames, use proper hardware (anchors, picture hangers, or studs) so you’re not relying on drywall alone.
Wallflowers + a staircase
Use the “swoosh” layout and let the arrangement rise with the stairs. It adds movement and makes a transitional space feel designed on purpose.
Troubleshooting: What If Something Goes Wrong?
If your flowers look “blob-ish” (and not in the cute way)
- Extend the shape slightly in one direction to create a clearer silhouette.
- Reduce a few flowers at the top if it feels too tall or pokey.
- Spread out the largest flowers so they’re not forming one big “clump.”
If adhesive pieces won’t stay up
- Clean the wall again (seriously).
- Swap to a stronger adhesive rated for the weight and wall type.
- Move away from humid zones (steamy bathrooms can be tough on adhesives).
If you’re mounting into drywall and need more strength
For Wallflowers alone, you typically don’t need anchors. But if you’re combining them with shelves, mirrors, or heavy frames nearby,
use the right hardware: self-drilling anchors, toggle bolts, or other anchors rated for your load.
Removal & Wall Repair (Because Future You Deserves Nice Things)
One underrated benefit of lightweight wall decor: removal is usually painless.
- For pins/tacks: pull gently (pliers help), then fill tiny holes with a dab of spackle. Sand lightly and touch up paint if needed.
- For adhesive: remove slowly according to the adhesive’s instructions. Rushing it can peel paint like a sunburn. Nobody wants that.
Why This Project Works (Even If You’re Not “A Decor Person”)
Wallflowers are forgiving. They don’t demand perfect symmetry. They don’t require advanced tool skills. And they give you a high-impact result with low commitment.
If your design confidence is currently “I once matched socks on purpose,” this is a safe place to start.
500-Word Experience Add-On: What It Felt Like to Actually Hang Them
Here’s the honest part: hanging Umbra Wallflowers is the kind of project that starts as “a quick little thing” and ends with you standing in the hallway,
squinting at the wall like a museum curator deciding if the exhibit properly expresses the human condition.
Not because it’s hardbecause it’s weirdly fun.
The unboxing alone is a mood. You get a stack of flowers in different sizes and immediately start doing what every responsible adult does:
placing them on random surfaces to see where they look cool. We tried a dresser top. We tried a shelf. We tried holding one up near a lamp like it was a tiny floral audition.
At one point, we were one step away from sticking a flower on the dog (we did not; the dog did not apply for the role).
Planning the layout was the part we thought we’d breeze through. Instead, it turned into a full creative session.
On the floor, the arrangement looked perfect. On the wall, it suddenly looked… different. Not badjust “not the same vibe.”
That’s when we learned the biggest truth in wall decor: your brain understands a flat layout differently than it understands a vertical one.
So we did what any sensible person does: we adjusted. Then adjusted again. Then adjusted once more because the top felt too tall.
The best moment was realizing the flowers could rotate and swap places easily. That changed everything.
Instead of treating the wall like a one-shot decision, we treated it like a living layout. We’d step back, move one flower slightly,
step back again, and suddenly the whole arrangement looked more intentional. Small changes had big impact.
That’s also when we discovered that “consistent spacing” is basically the difference between “designer accent wall” and “I dropped a bouquet and it stuck.”
We also noticed how lighting mattered. With overhead lights on, the flowers cast soft shadows that made the wall look textured and layered.
In natural daylight, the effect felt calmer and more sculptural. That’s a sneaky perk of 3D wall decor: it changes throughout the day without you touching a thing.
(Finally, a home upgrade that works while you sit.)
By the end, we had a finished arrangement that felt balanced near the mirror, didn’t overpower the room, and added that “something” the wall was missing.
The unexpected bonus? It made the rest of the space feel more styled, even though we didn’t change anything else.
That’s the magic of a strong focal point: it convinces your room to get its life together.
And if you ever get bored, you can rearrange the flowers and pretend you renovated. Cheap thrills, high reward.
Conclusion
Hanging Umbra Wallflowers is one of those rare DIY projects that’s low-stress, high-impact, and genuinely entertaining.
Plan your layout first, choose the right mounting method for your walls, keep spacing consistent, and don’t be afraid to tweak.
The goal isn’t perfectionit’s a wall that looks like you meant it.