Table of Contents >> Show >> Hide
- Start With a Game Plan (Because “Winging It” Is How You End Up With Three Types of White Paint)
- The High-Impact, Low-Drama Upgrades (A.K.A. The “Instant Glow-Up” List)
- Room-by-Room Makeover Moves
- Smart, Healthy, and Efficient Upgrades (The “Future You” Section)
- DIY vs. Pro: When to Call Reinforcements
- Common Makeover Mistakes (So You Don’t Become a Cautionary Tale)
- A Practical 30-Day Makeover Challenge (Realistic, Not Magical)
- Experience-Based Lessons: What Home Makeovers Actually Feel Like ()
- Conclusion: The Best Home Makeover Is the One You’ll Feel Every Day
- SEO Tags
A home makeover is basically a personality upgrade for your house. Same address, better vibes. And the best part?
You don’t need a wrecking ball, a celebrity designer, or an emotional-support sledgehammer to make your place look
and feel dramatically better.
Whether you’re trying to modernize a “why is everything beige?” era home, make a small space feel bigger, or stop
apologizing when guests come over (“Ignore the… everything”), a smart makeover is equal parts strategy and style.
This guide walks you through what to fix first, what moves the needle most, and how to avoid the classic renovation
trap: spending a lot and somehow ending up with less storage.
Start With a Game Plan (Because “Winging It” Is How You End Up With Three Types of White Paint)
1) Decide what “better” actually means for you
Before you shop, demo, or fall in love with a faucet that costs as much as a used car, get specific. A great home
makeover isn’t just “prettier”it solves a problem:
- Function problems: No storage, awkward layout, dark rooms, clutter magnets.
- Comfort problems: Drafty windows, noisy rooms, uneven temperatures.
- Life problems: Work-from-home corner that looks like a hostage situation.
- Safety problems: Slippery bathroom, poor lighting, loose railings, ancient wiring (yikes).
Write down your top three pain points per room. Not “a new vibe,” but “a place to put backpacks,” “better task
lighting,” or “a kitchen layout that doesn’t require Olympic-level pivoting.”
2) Budget like an optimist with a seatbelt
If you’re doing a light refresh, you can often keep costs controlled with a simple rule:
change surfaces and fixtures, not the footprint. Moving plumbing, changing wall locations, and
relocating electrical is where budgets go to do magic tricks and disappear.
Build a “real life” budget by splitting your spending into four buckets:
- Must-fix: leaks, mold, damaged flooring, unsafe electrical, failing appliances.
- High-impact: paint, lighting, hardware, window treatments, rugs, trim.
- Nice-to-have: decor upgrades, built-ins, specialty finishes.
- Contingency: your “surprise, the wall is weird” fund.
If you’ve never remodeled before, assume something will be strange behind a wall. Homes are like onions:
they have layers, and sometimes they make you cry.
3) Fix the “bones” before the lipstick
A makeover that lasts starts with boring-but-important basics: water management, structure, electrical, and
ventilation. Glamour comes later. The goal is to avoid putting designer wallpaper over a moisture problembecause
moisture always wins.
The High-Impact, Low-Drama Upgrades (A.K.A. The “Instant Glow-Up” List)
Paint: the cheapest way to time travel your home into the present
Fresh paint can change a room faster than rearranging furnitureplus you get that “new house” feeling without
buying a new house. For a whole-home refresh, choose one main wall color and one trim color to keep the look cohesive.
Consistency makes a home feel intentionally designed instead of “collected during a series of weekends.”
Practical paint tips that actually matter:
- Sample first: lighting changes color more than your opinions do.
- Pick sheen intentionally: matte hides flaws; satin is easier to clean; semi-gloss is for trim.
- Use paint to cheat space: lighter colors lift; deeper tones create cozy “wrap-around” comfort.
Lighting: the Beyoncé of makeovers (it runs the show)
Most “this room feels off” problems are lighting problems. Aim for three layers:
ambient (overall), task (work zones), and accent (mood).
Then add dimmers so your house can handle both “Tuesday laundry” and “friends coming over.”
Easy wins:
- Swap old fixtures (especially dated flush mounts) for something with presence.
- Use warm, consistent bulb color temperature across a room for a calmer look.
- Add under-cabinet kitchen lighting for instant “expensive remodel” energy.
Hardware + fixtures: jewelry for your cabinets (and yes, it matters)
Replacing knobs, pulls, faucets, towel bars, and switch plates is a small move with outsized payoff. It’s also a
forgiving DIY projectno one needs to know you watched three tutorials and still held the drill like a microphone.
Floors + rugs: unify the space, soften the echo, save your sanity
Flooring is visual real estate. If your home has multiple flooring types, consider where you can reduce transitions.
Sometimes the “makeover” is simply adding the right large rug so furniture sits together instead of looking like it’s
waiting for a bus.
Rule of thumb: if your rug is too small, the room will look like it’s wearing shoes two sizes down. Go bigger.
Declutter and create “landing zones”
You can’t decorate your way out of a lack of systems. If clutter is the main issue, build micro-solutions:
- Entry drop zone: hooks, bench, a tray for keys, and a basket for mail.
- Kitchen counter reset: hide small appliances, group daily items on one tray.
- Bathroom calm: closed storage for backups, one small caddy for daily items.
Design secret: a room feels more “curated” when you leave some space empty on purpose. Your home needs breathing
roomnot just for you, but for your eyes.
Room-by-Room Makeover Moves
Kitchen makeover: make it work before you make it wow
Kitchens are expensive to fully remodel, so smart makeovers focus on what you touch every day:
- Cabinet refresh: paint or refinish, add new hardware, upgrade hinges if they’re fighting you.
- Lighting upgrade: pendants over an island, under-cabinet strips, and better task lights.
- Backsplash swap: tile, slab, or even a temporary peel-and-stick option for renters.
- Faucet + sink: a modern faucet can make a “fine” kitchen feel new.
- Organizers: pull-out shelves, trash pull-outs, drawer dividers. Boring? Yes. Life-changing? Also yes.
Layout matters more than finishes. If your kitchen workflow is a daily obstacle course, use classic planning logic:
keep major work zones (cook, clean/prep, refrigeration) in a sensible relationship, and avoid placing tall obstacles
where they break flow. If the layout is truly broken, that’s when you consider bigger moves (and possibly a pro).
Bathroom refresh: spa vibes on a normal-person budget
Bathrooms respond beautifully to targeted upgrades:
- New vanity lights (goodbye, haunted-hotel sconce).
- Mirror upgrade to something larger or framed.
- Fixtures in a consistent finish (faucet + shower trim + hardware).
- Paint + accessories to soften tile that’s… doing its best.
- Comfort upgrades: better ventilation, warmer lighting, storage that hides the chaos.
If you’re touching the shower or moving plumbing, costs climb quickly. But if the tub and tile are sound, you can
create a “new bathroom” feel without a full bathroom renovation.
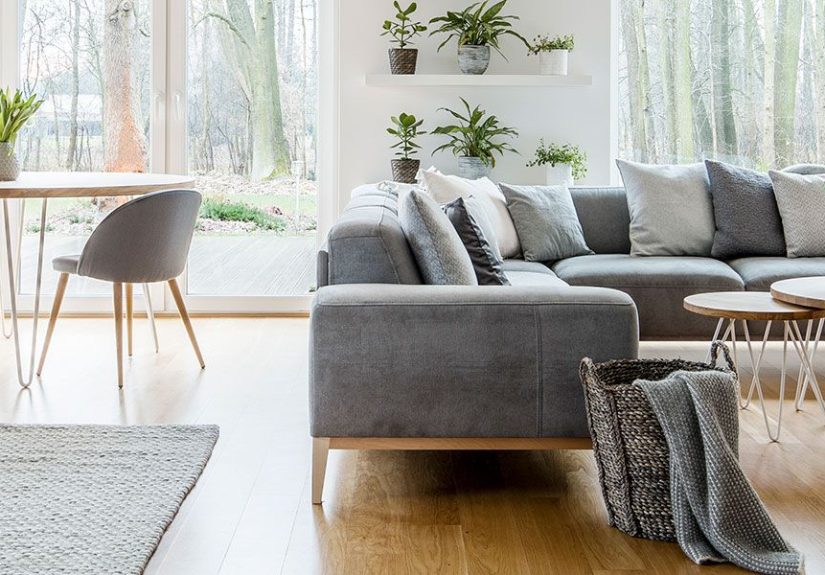
Living room makeover: the layout is the makeover
The living room becomes instantly better when furniture is sized correctly and grouped for conversation.
Try this:
- Pull furniture off the walls. Yes, even a little.
- Anchor the seating on a rug that fits the group.
- Use one “hero” piece (art, sofa, or big chair) and keep the rest supportive.
- Layer textures: a throw, mixed pillows, a natural material (wood, rattan, linen) to add depth.
If you’re craving a bigger change, update window treatments (hang them higher than you think) and add one statement
light fixture. Your ceiling is a giant design opportunitystop ignoring it like it’s a pop quiz.
Bedroom makeover: hotel calm, minus the tiny shampoo
Bedrooms should be restful, not a storage unit with a mattress. Focus on:
- Layered bedding: duvet/comforter, throw, and matching pillow shams for structure.
- Better lighting: bedside lamps or sconces so overhead lighting isn’t your only mood.
- Closet improvements: shelf systems, bins, and a place for “in-between” clothes.
- Sound + darkening: rugs, curtains, and soft materials help sleep quality.
Entry + curb appeal: the makeover that pays you back in “Wow”
If you want the biggest perceived change for effort, start where people enter. The entry sets the tone, and curb
appeal is your house’s handshake.
High-return curb appeal moves often include:
- Fresh front door paint (or replacing the door if it’s damaged).
- Updated exterior lights and visible house numbers.
- Simple landscaping: trimmed edges, tidy beds, and a clear path.
- A clean porch moment: doormat, a planter, maybe a chair if there’s room.
Smart, Healthy, and Efficient Upgrades (The “Future You” Section)
Energy-efficient upgrades that improve comfort
The best efficiency upgrades don’t just lower billsthey make the home feel better. Think: fewer drafts, more stable
temperatures, quieter rooms. Common priority order:
- Air sealing + insulation (especially attics).
- Heating/cooling improvements when equipment is aging or oversized/undersized.
- Windows when yours are truly drafty or failing (not just “a little old”).
- Smart controls like thermostats and targeted ventilation.
Pro tip: spend money where it solves comfort problems. A prettier kitchen is delightful, but a bedroom that stays
15 degrees colder than the rest of the house is a daily grievance.
Indoor air quality: don’t trap yesterday’s cooking smells forever
Modern homes are tighter (which is good for energy), but that makes ventilation more important. If you’re remodeling
a kitchen or bath, prioritize:
- Quiet, effective bathroom exhaust fans vented properly outside.
- Kitchen ventilation that actually vents outdoors when possible.
- Low-odor materials and paints when practical.
- Humidity control to prevent mold (especially in bathrooms and basements).
Safety note: older homes require extra care
If your home was built before 1978, treat paint disturbance seriously. Sanding, scraping, and demolition can create
lead dust. Even if you’re DIY-ing, use best practices: contain the work area, protect floors, clean thoroughly, and
consider certified professionals when the job is big or involves multiple rooms.
DIY vs. Pro: When to Call Reinforcements
DIY-friendly projects
- Painting walls and trim (with decent prep).
- Swapping light fixtures (if you’re comfortable and local rules allow).
- Replacing cabinet hardware and faucets (basic plumbing skills required).
- Installing shelves, closet systems, and simple storage solutions.
- Decor and layout changes (the safest “big change” you can make).
Projects that usually deserve a pro
- Structural changes, load-bearing work, or anything involving beams.
- Major electrical upgrades, panel work, rewiring.
- Plumbing relocation (moving sinks, tubs, toilets).
- Complex tile waterproofing (showers are unforgiving).
- Roofing and major exterior envelope work.
A good rule: if a mistake can cause water damage, fire risk, or “we can’t use the bathroom for a week,” it’s pro time.
Common Makeover Mistakes (So You Don’t Become a Cautionary Tale)
- Starting with the fun stuff and ignoring the problems you can’t see.
- Choosing trendy finishes without considering your home’s architecture and style.
- Underestimating timelines (delays happen; plan for them emotionally and logistically).
- Buying big-ticket items too early before final measurements and decisions are locked.
- Skipping mockups for paint, tile, and hardware (test now, regret less later).
- Forgetting storage and then wondering why the counters are always messy.
A Practical 30-Day Makeover Challenge (Realistic, Not Magical)
Week 1: Reset + plan
- Declutter one “hot spot” per day (entry, kitchen counter, bathroom vanity, nightstand).
- Measure rooms and key furniture so you stop guessing.
- Choose a simple color palette for walls, trim, and metals/finishes.
Week 2: Paint + lighting
- Paint one to two rooms or a main hallway.
- Swap old bulbs for consistent lighting, add dimmers where appropriate.
- Upgrade one standout light fixture (entry, dining, or living room).
Week 3: Hardware + textiles
- Replace cabinet pulls/knobs and switch plates for a cleaner look.
- Add a properly sized rug to anchor your main seating area.
- Upgrade window treatments (even simple panels make a difference).
Week 4: One “signature” upgrade
Pick one feature that changes how the home lives: a closet system, pantry reorganization, built-in shelves, a
bathroom mirror + lighting refresh, or a mini kitchen upgrade (like a new faucet and under-cabinet lighting).
Finish strong. Celebrate. Take “before” photos now so you can feel like a wizard later.
Experience-Based Lessons: What Home Makeovers Actually Feel Like ()
Let’s talk about the part no one puts in the glossy “after” photos: the emotional roller coaster of making your
home better. Home makeovers are excitinguntil your living room turns into a staging area for boxes labeled
“MISC,” “MISC 2,” and “WHY DO WE OWN THIS.” A very normal experience is starting with pure optimism (“We’ll repaint
the room this weekend!”) and ending with a new personality trait (“I now have strong feelings about painter’s tape.”)
The first lesson most homeowners learn is that prep work is the makeover. Painting isn’t hard;
prepping is hard. Cleaning walls, patching holes, sanding trim, taping edgesthis is the part where you question
your life choices. But it’s also where the quality comes from. People who skip prep often end up repainting sooner,
which is like doing laundry twice because you didn’t sort the first time. (Ask your future self how that feels.)
The second lesson: your home will look worse before it looks better. This is not a moral failure.
It’s a phase. A common pattern is: remove the old thing → see the damage it was hiding → panic slightly → fix it →
feel like a competent adult again. The trick is to expect that “messy middle” so you don’t quit at the exact moment
you’re closest to the glow-up.
Third: decision fatigue is real. Even a modest home renovation can require a surprising number of
choices: paint undertones, hardware sizes, bulb temperatures, rug dimensions, finishes that don’t fight each other,
and whether “greige” is a color or a cry for help. The people who enjoy makeovers the most usually set
constraintsone metal finish per room, one wall color for connected spaces, and a short “approved list” of materials.
Constraints sound boring, but they’re actually freedom. They keep you from standing in a store aisle staring at 47
nearly identical whites until time stops.
Fourth: the biggest wins are often the least glamorous. Homeowners frequently report that the changes
they love most aren’t the fancy tilethey’re the new lighting that makes evenings cozy, the storage that clears
countertops, the drawer dividers that stop the utensil rebellion, and the entry hooks that end the daily “where is my
bag?” scavenger hunt. Those upgrades quietly improve life every single day.
Finally: your home should reflect you, not the internet. Trends can inspire, but the happiest
makeovers tend to be personal: a gallery wall of family photos, a reading chair by the window, a kitchen color that
makes you smile, or a mudroom setup that fits your actual habits. The goal isn’t to create a showroom. It’s to build
a home that supports your real lifemess, joy, and all.
Conclusion: The Best Home Makeover Is the One You’ll Feel Every Day
Home makeovers work when they combine three things: a clear plan, a few high-impact upgrades, and choices that match
your lifestyle. Start with function and comfort, then layer in style. Upgrade lighting before you blame the furniture.
Use paint like a superpower. Add systems so clutter doesn’t win. And remember: a home doesn’t have to be perfect to
be beautifulit just has to feel like it belongs to you.