Table of Contents >> Show >> Hide
- The Big Idea: Fresh Pumpkin Pie That Actually Tastes Like Pumpkin
- Quick Recipe Card
- Ingredients
- Step 1: Make Homemade Pumpkin Purée (The Flavor Foundation)
- Step 2: Make the Flaky Pie Crust (Or Use a Shortcut With Confidence)
- Step 3: Mix the Filling (Silky, Spiced, and Not Grainy)
- Step 4: Bake Like a Pro (And Avoid Pumpkin Pie Cracks)
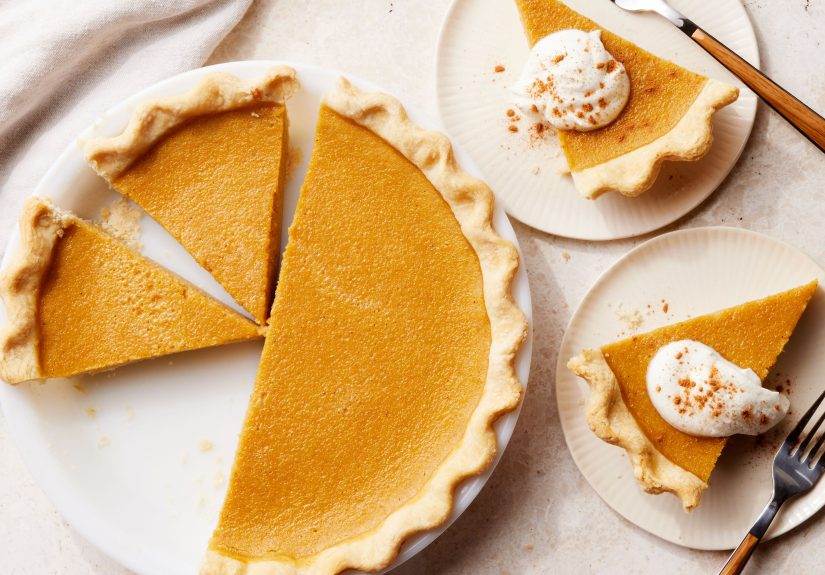
- Step 5: Cool, Chill, Serve
- Make-Ahead and Storage Tips
- Flavor Variations (Because You’re Allowed to Have Fun)
- Troubleshooting: Common Pumpkin Pie Problems (And Fixes)
- Frequently Asked Questions
- Real-Life Experiences With Homemade Fresh Pumpkin Pie (Wins, Oops, and Lessons Learned)
- Conclusion
Pumpkin pie is basically fall in a slice: cozy spices, silky custard, and a flaky crust that shatters just enough to make you feel like a pastry genius.
And yesthis is the homemade fresh pumpkin pie recipe where you start with a real pumpkin (not a can), because sometimes we choose
“extra” as a lifestyle.
Don’t worry: making pumpkin pie from scratch is more “weekend project with delicious payoff” than “culinary suffering.” I’ll walk you through
how to make homemade pumpkin purée, build a smooth pumpkin pie filling, bake it without cracks, and serve a pie that tastes like
Thanksgiving decided to show off.
The Big Idea: Fresh Pumpkin Pie That Actually Tastes Like Pumpkin
Fresh pumpkin can be amazing in piedeeper, more roasty, and less “generic orange squash.” But it can also be watery, which is the number-one reason
some fresh pumpkin pies turn out bland or soupy. The solution is simple: roast the pumpkin (don’t boil it), then drain or dry it out
until it’s thick like Greek yogurt. That’s the secret handshake for a fresh pumpkin pie with real flavor.
Quick Recipe Card
- Yield: 1 (9-inch) pie (8–10 slices)
- Prep time: ~45 minutes (plus chilling)
- Bake time: 55–70 minutes (including crust protection)
- Total time: ~3–5 hours (mostly cooling and chillingaka “the hardest part”)
Ingredients
For the fresh pumpkin purée
- 1 small sugar pumpkin (also called pie pumpkin), about 2 1/2 to 4 pounds
- 1–2 teaspoons neutral oil (optional, for roasting)
- Pinch of salt (optional)
For the pie crust (homemade, flaky, and proud)
- 1 1/4 cups all-purpose flour
- 1 tablespoon sugar (optional, but helpful for browning)
- 1/2 teaspoon fine salt
- 1/2 cup (1 stick) cold unsalted butter, cut into cubes
- 3–5 tablespoons ice water
Shortcut: A quality store-bought 9-inch pie crust works fine if you’d rather spend your energy on the filling (no judgment).
For the pumpkin pie filling (silky custard style)
- 2 cups thick homemade pumpkin purée (see steps below)
- 2 large eggs + 1 egg yolk (for richness and better set)
- 3/4 cup packed brown sugar (or 1/2 cup brown sugar + 1/4 cup granulated sugar)
- 1 1/4 cups evaporated milk (or half-and-half for a richer pie)
- 2 tablespoons heavy cream (optional, for extra silk)
- 1 tablespoon cornstarch (optional but great insurance for clean slices)
- 1 teaspoon vanilla extract
- 1 1/2 teaspoons ground cinnamon
- 1 teaspoon ground ginger
- 1/4 teaspoon ground cloves
- 1/4 teaspoon ground nutmeg
- 1/2 teaspoon fine salt
Optional finishing touches
- Whipped cream (classic)
- Toasted pecans or pepitas (for crunch)
- A sprinkle of flaky salt (tiny amount, huge upgrade)
Step 1: Make Homemade Pumpkin Purée (The Flavor Foundation)
- Pick the right pumpkin. Look for a pie pumpkin or sugar pumpkin.
The big carving pumpkins are watery and stringygreat for spooky faces, not so great for fresh pumpkin pie. - Roast it. Heat oven to 350°F. Cut pumpkin in half. Scoop out seeds (save them for roasting if you’re feeling ambitious).
Place halves cut-side down on a lined baking sheet. Roast 45–70 minutes, until the flesh is very tender when pierced. - Cool and scoop. Let pumpkin cool until comfortable to handle. Scoop out the soft flesh.
- Blend until smooth. Purée in a food processor or blender until velvety.
- Remove excess moisture (do not skip). Spoon purée into a fine-mesh strainer or cheesecloth over a bowl. Let drain 20–60 minutes,
stirring occasionally. You want purée that’s thick and moundablenot runny. This is the key to a concentrated, not-watery pumpkin pie filling.
Make-ahead tip: Homemade pumpkin purée can be refrigerated for 3–4 days or frozen for up to 3 months. Freeze in 2-cup portions
so you can make another pie later and feel like a time-traveling genius.
Step 2: Make the Flaky Pie Crust (Or Use a Shortcut With Confidence)
A good flaky pie crust is mostly about temperature. If the butter stays cold, it creates steam pockets in the oven, and that steam makes flakes.
If the butter melts early, you get “meh crust.” So: keep things cold, like your ex’s texts.
Homemade crust method
- In a bowl, whisk flour, sugar (if using), and salt.
- Add cold butter cubes. Cut in with a pastry cutter or fingertips until you have pea-size pieces plus some flatter flakes (flakes are good).
- Drizzle in ice water 1 tablespoon at a time, tossing with a fork, just until the dough holds together when squeezed.
(It should look a little shaggy, not like a smooth ball of perfection.) - Form into a disk, wrap, and chill for at least 1 hour (up to 3 days).
- Roll dough into a 12-inch circle, fit into a 9-inch pie dish, and crimp edges. Chill the shaped crust for 15–30 minutes before filling.
Do you need to blind-bake?
Not always. Many classic pumpkin pies bake the filling in an unbaked crust using a hot start. However, if you are haunted by soggy bottoms,
you can par-bake the crust: line with parchment, fill with pie weights, bake at 375°F for 15 minutes, remove weights,
then bake 5 minutes more. Cool slightly before filling.
Step 3: Mix the Filling (Silky, Spiced, and Not Grainy)
Pumpkin pie is a custard. Custards are basically a polite agreement between eggs and heat: “Set gently and nobody gets hurt.”
Overheat it, and you get cracks, bubbles, or a weird texture. Treat it kindly and it turns smooth and sliceable.
- In a small bowl, mix cinnamon, ginger, cloves, nutmeg, salt, and cornstarch (if using). This prevents spice clumps.
- In a large bowl, whisk eggs and yolk until smooth (about 20 seconds).
- Whisk in brown sugar and vanilla until glossy.
- Add pumpkin purée and whisk until fully combined.
- Slowly whisk in evaporated milk (and cream if using). Mix until smooth.
- Optional pro move: Let filling rest 10–20 minutes. This reduces air bubbles and gives the spices time to “wake up.”
Texture upgrade (optional): For the smoothest possible custard, blend the filling briefly in a blender or food processor, then strain it through
a fine-mesh sieve. This can make a fresh pumpkin pie feel bakery-level.
Step 4: Bake Like a Pro (And Avoid Pumpkin Pie Cracks)
The classic method is a hot start to help set the crust, then a lower temperature to gently cook the custard.
Your goal: edges set, center still a little wobbly. The pie finishes setting as it cools.
- Place oven rack in the lower third. Preheat to 425°F.
- Set the pie dish on a rimmed baking sheet (insurance against drips).
- Pour filling into chilled crust.
- Bake at 425°F for 15 minutes.
- Without opening the oven too much, reduce to 350°F and bake 40–55 minutes, depending on your pie dish and oven.
- If crust edges brown too fast, cover them with foil or a pie shield around minute 25–30.
How to tell when pumpkin pie is done
- Jiggle test: The edges should be set; the center should wobble like gelatin, not slosh like soup (usually a 2–4 inch gentle wobble zone).
- Thermometer test: Aim for about 175–180°F in the center for a custard that sets cleanly.
- Knife test: A knife inserted near (not dead-center) should come out mostly clean. Overusing this can cause cracks, so be gentle.
Crack prevention (aka “How to keep your pie from looking like a tiny canyon”)
- Don’t overbake. Pull it when the center still has a wobble.
- Avoid sudden temperature changes. Cool on a rack at room temp; don’t blast it with cold air right away.
- Mix gently. Too much whisking adds air, which can bubble and crack.
- Use the lower oven rack. Helps prevent over-browning and aggressive top heat.
Step 5: Cool, Chill, Serve
- Cool pie on a wire rack for at least 2 hours (it continues to set as it cools).
- Refrigerate for at least 2 hours for the cleanest slices (overnight is even better).
- Serve with whipped cream, toasted nuts, or a tiny sprinkle of flaky salt.
Food safety note: Because this is an egg-and-dairy custard, refrigerate within 2 hours of baking. Pumpkin pie is cozy, but it’s not
“leave me on the counter all day” cozy.
Make-Ahead and Storage Tips
- Make the purée ahead: Refrigerate 3–4 days or freeze up to 3 months.
- Make the crust dough ahead: Refrigerate up to 3 days or freeze up to 2 months.
- Bake the pie ahead: Pumpkin pie tastes even better the next day. Bake 1 day ahead, chill, and serve.
- Storage: Keep covered in the fridge for up to 4 days.
- Freezing baked pie: Wrap well and freeze up to 1 month for best texture. Thaw overnight in the fridge.
Flavor Variations (Because You’re Allowed to Have Fun)
Maple-brown sugar
Swap 2–3 tablespoons of sugar for pure maple syrup. Reduce milk by 1–2 tablespoons to keep the filling thick.
Bourbon or rum (grown-up cozy)
Add 1–2 tablespoons bourbon or dark rum to the filling. It boosts aroma without screaming “I’m a cocktail.”
Extra-spice “pumpkin spice latte, but edible”
Add a pinch of allspice and a tiny pinch of black pepper. Pepper sounds odd, but it makes spices pop.
Dairy swap
Half-and-half gives a richer pie. Evaporated milk gives classic texture and clean slices. A mix of evaporated milk plus a splash of cream is the sweet spot.
Troubleshooting: Common Pumpkin Pie Problems (And Fixes)
My pie is watery
- Your purée was too wet. Drain it longer next time, or spread it on a baking sheet and dry at 300°F for 10–15 minutes, stirring once.
- Make sure you used a pie pumpkin, not a carving pumpkin.
My pie cracked
- Classic sign of overbaking. Next time, pull the pie earlierwobble is good.
- Let it cool gradually; avoid moving it to a cold place immediately.
My crust is soggy
- Chill the crust before filling and baking.
- Par-bake the crust for a head start, or bake the pie on a preheated metal sheet pan.
My pie tastes bland
- Fresh pumpkin can be subtleroasting and draining concentrates flavor.
- Use enough salt. A small amount makes sweetness and spice taste bigger.
Frequently Asked Questions
Can I use canned pumpkin instead of fresh?
Absolutely. Canned pumpkin is consistent and convenient. But if you’re here for a homemade fresh pumpkin pie recipe, the roasted-and-drained purée
is what gets you that deeper, “real pumpkin” character.
What’s the best pan for pumpkin pie?
Metal conducts heat quickly and helps crust crisp. Glass lets you see browning but can bake slower. Ceramic is pretty but sometimes needs extra time.
If you switch pans, keep an eye on doneness rather than the clock.
Why does the center look underbaked when I pull it out?
Because pumpkin pie is a custard. The center should still jiggle slightly; it finishes setting as it cools. If you bake until it’s totally firm in the oven,
it often ends up dry or cracked.
Real-Life Experiences With Homemade Fresh Pumpkin Pie (Wins, Oops, and Lessons Learned)
The first time you make pumpkin pie from a real pumpkin, it feels a little like adopting a pet: exciting, wholesome, and suddenly you’re cleaning up
unexpected messes. Not dramatic messesmore like “Why is my purée the consistency of a smoothie?” messes. And that’s the moment you learn the most
important fresh pumpkin rule: water is the enemy of flavor.
One year, I roasted a gorgeous little sugar pumpkin and confidently blended it into a bright orange purée that looked like it belonged on a magazine cover.
I dumped it straight into the filling, baked the pie, and proudly served it. The texture was fine… but the flavor was suspiciously shy, like the pumpkin had
stage fright. The spices did all the talking. The fix the next time was shockingly simple: I drained the purée in a strainer for about 45 minutes, stirred it
twice, and watched a whole lot of liquid collect underneath. That second pie tasted like pumpkin actually showed up to the party.
Another classic learning moment: the crack. If you’ve never cracked a pumpkin pie, congratulations on being a wizard (or on never making one).
My first crack happened because I treated the bake time like a contract instead of a suggestion. I kept it in “just five more minutes” until the center stopped
wobbling. It looked perfect in the oven. Then it cooled and split right down the middle like it had a dramatic announcement to make. The next time, I pulled it
when the edges were set and the center still had a gentle jiggle, and the top stayed smooth. That little wobble is not a flawit’s a promise.
Crust adventures are a whole separate sitcom. I’ve had the “butter got warm, crust turned tough” episode and the “rolled it too thin, it tore, panic ensued”
episode. The most helpful habit I picked up was chilling the shaped crust before filling. Even 20 minutes in the fridge makes the dough behave better, shrink less,
and bake up flakier. Also: foil shields are not optional when your oven runs hot. I used to think they were fussy. Now I think they’re the heroes keeping my
crust edges from turning into edible charcoal.
The funniest part is how pumpkin pie gets better with practice in tiny ways: you start noticing how different pumpkins vary in sweetness and moisture; you learn
your oven’s personality (mine is enthusiastic and needs supervision); and you get comfortable adjusting. If the purée seems wet, you drain longer. If the pie is
browning too fast, you shield earlier. If the spice blend tastes flat, you add a pinch more salt or ginger. Eventually, you stop feeling like you’re “following
a recipe” and start feeling like you’re making your pumpkin piethe one your friends request and your family quietly compares to everyone else’s.
And if something goes sideways? Whipped cream is basically a delicious reset button. A cracked pie topped with clouds of whipped cream still tastes like the
holidays. The goal isn’t perfectionit’s a slice that makes people pause mid-bite and go, “Wait… you made this?”
Conclusion
This homemade fresh pumpkin pie recipe is all about real pumpkin flavor, a smooth custard set, and a crust that stays crisp and flaky.
Roast and drain the purée, bake gently, trust the wobble, and chill before slicing. Do that, and you’ll end up with a pumpkin pie from scratch
that’s worth the effortand still friendly enough for normal humans with normal kitchens.