Table of Contents >> Show >> Hide
- Why I Painted My Bathroom Cabinets Instead of Replacing Them
- Supplies I Used
- Step 1: Remove the Doors, Drawers, and Hardware
- Step 2: Clean the Cabinets Like They Owe You Money
- Step 3: Sand for Adhesion, Not for Drama
- Step 4: Patch, Fill, and Fix the Little Flaws
- Step 5: Tape Off the Room and Protect Everything Nearby
- Step 6: Prime First, Thank Yourself Later
- Step 7: Paint with Thin, Even Coats
- Step 8: Let the Paint Dry, Then Let It Cure
- Video Tutorial: The Exact Order I Followed
- Mistakes I’d Avoid Next Time
- Was Painting My Bathroom Cabinets Worth It?
- Extra Experience Notes: What the Project Really Felt Like
There are two kinds of bathroom upgrades: the kind that quietly improve your morning routine, and the kind that make you stand in the doorway whispering, “Wait… I did that?” Painting my bathroom cabinets was very much the second kind. What started as a budget-friendly refresh turned into one of the highest-impact DIY projects I’ve done. No demolition. No plumbing drama. No mysterious contractor invoice that reads like ancient poetry. Just prep, primer, paint, patience, and a bathroom vanity that finally stopped looking like it had given up on life in 2007.
If your bathroom cabinets are solid but outdated, painting them can be a smart alternative to replacing the whole vanity. A good cabinet paint job can make a builder-grade bathroom look custom, brighten a dark room, and help you stretch your remodel budget without stretching your sanity. The secret is not “just slap on some paint and hope for the best.” The secret is prep. Glamorous? No. Effective? Absolutely.
In this guide, I’m walking through exactly how I painted my bathroom cabinets, what I used, what I would do differently next time, and how to get a smooth, durable finish that can handle humidity, toothpaste splatter, and everyday bathroom chaos. I’m also including a simple video tutorial outline you can follow if you want to turn your project into a quick before-and-after reel for your blog or website.
Why I Painted My Bathroom Cabinets Instead of Replacing Them
Before I touched a brush, I asked the same question most people ask: should I just replace the vanity? In my case, the cabinet boxes were still sturdy, the drawers worked, and the layout made sense. The problem was the finish. It looked dull, dated, and slightly offended by modern design trends. Replacing the entire vanity would have cost significantly more and created a ripple effect: countertop decisions, plumbing adjustments, wall touch-ups, and probably a mild identity crisis in the tile aisle.
Painting gave me the biggest visual change for the least amount of money. It also let me choose the exact color and finish I wanted. That matters in bathrooms, where lighting can be weird, square footage is often limited, and one wrong beige can make the whole room feel sleepy. A fresh coat of cabinet paint made the space feel cleaner, brighter, and more intentional almost immediately.
Supplies I Used
Here’s the short list of what made this bathroom cabinet painting project work:
- Painter’s tape
- Drop cloths or protective paper
- Screwdriver
- Zip-top bags for hardware
- Degreaser or TSP substitute
- Microfiber cloths
- Wood filler
- Medium- and fine-grit sandpaper or sanding sponges
- Tack cloth or vacuum with brush attachment
- Bonding or stain-blocking primer
- Cabinet paint or trim enamel
- Small roller and angled brush
- Optional: liquid deglosser, new knobs or pulls
If you’re painting in an older home, pause here and check whether the bathroom was built before 1978. If it was, you need to think about lead-safe renovation practices before sanding or disturbing old paint. That is not the kind of surprise you want halfway through a “fun weekend project.”
Step 1: Remove the Doors, Drawers, and Hardware
I know it is tempting to paint around hinges and handles and tell yourself you are “saving time.” You are not saving time. You are scheduling regret.
I removed the cabinet doors, drawer fronts, knobs, pulls, and hinges first. Then I labeled everything. Not in a vague, optimistic way. In a specific, future-me-will-be-grateful way. I used painter’s tape on the back of each door and numbered each matching location inside the vanity. Hardware went into labeled bags.
This step makes painting easier, keeps the finish cleaner, and helps everything go back where it belongs. It also gives you the chance to replace outdated hardware, which is the home-improvement equivalent of changing your shoes before a photo shoot. Same person, better energy.
Step 2: Clean the Cabinets Like They Owe You Money
Bathroom cabinets collect more grime than they get credit for. Hairspray residue, hand lotion, dust, mystery drips, and whatever escaped from the toothpaste tube all like to settle there. Paint does not bond well to any of that.
I scrubbed every paintable surface with a strong cleaner, then wiped it down with clean water and let it dry completely. This part is not exciting, but it matters. A surface can look clean and still have enough residue to mess with primer adhesion. If your vanity lives in a high-traffic family bathroom, clean twice and feel no shame about it.
Step 3: Sand for Adhesion, Not for Drama
Once the cabinets were dry, I sanded the existing finish to remove gloss and give the primer something to grip. I did not sand aggressively enough to destroy the surface or take everything to raw wood. This was a scuff-sand situation, not a “let me accidentally refinish an entire piece of furniture from scratch” situation.
I focused on smoothing rough spots, dulling shiny areas, and feathering any chipped paint. After sanding, I vacuumed the dust, wiped everything down, and then wiped it again because sanding dust has the survival skills of a movie villain. If you skip dust removal, your finish can end up gritty, streaky, or uneven.
What If Your Cabinets Are Laminate or Thermofoil?
You can still paint many non-solid-wood surfaces, but you need the right prep and the right primer. Adhesion becomes even more important. If the surface is peeling, bubbling, or failing structurally, paint is not a miracle worker. In that case, repairing or replacing may make more sense than forcing a makeover onto a surface that has emotionally checked out.
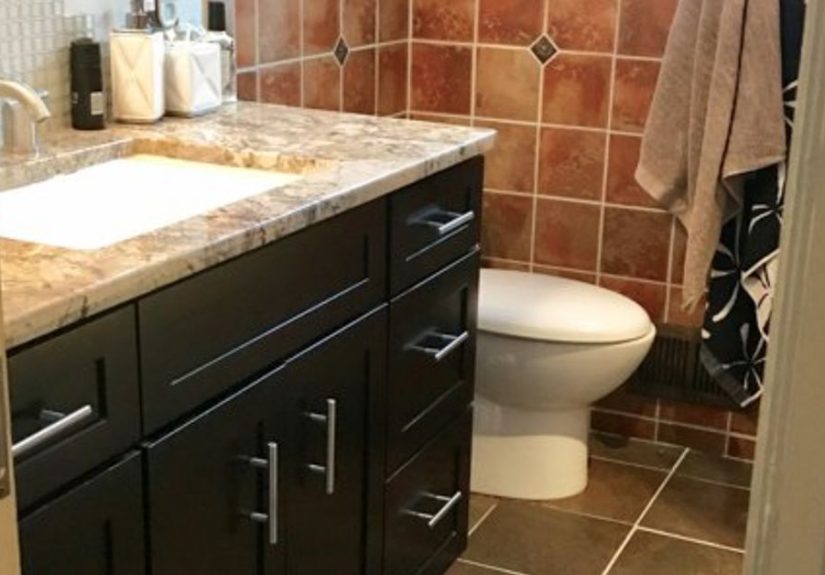
Step 4: Patch, Fill, and Fix the Little Flaws
Before priming, I filled old hardware holes and a few small dings with wood filler. Once it dried, I sanded those spots smooth so they disappeared into the cabinet face. This is a tiny step with a surprisingly big payoff. Painted cabinets highlight shape and texture, so even small imperfections can stand out more after color goes on.
If you’re changing from old knobs to modern pulls, this is the time to plan your hole placement. Measure twice. Then measure one more time because cabinet hardware has a special talent for exposing overconfidence.
Step 5: Tape Off the Room and Protect Everything Nearby
Next, I taped the underside of the countertop, the wall edges, and the floor area around the vanity. I also used drop cloths and protective paper. This served two purposes: it kept the room cleaner, and it helped me paint faster without feeling like every roller stroke might become a design choice on the baseboards.
Ventilation matters too. I opened windows, turned on the exhaust fan, and kept airflow moving through the room. Bathrooms are small spaces, and paint fumes do not become charming just because the project is affordable.
Step 6: Prime First, Thank Yourself Later
This is the step that separates a cabinet makeover from a cabinet mood swing. I used a quality primer designed for adhesion and bathroom-friendly durability. On cabinet projects, primer is not filler content. It is the insurance policy.
I rolled the flat surfaces and used an angled brush for corners, grooves, and detailed areas. I let the primer dry fully before deciding whether it needed a second coat. If you are going from dark brown or espresso cabinets to white, soft gray, or another lighter shade, a second coat of primer can save you from frustration later.
At this stage, the cabinets already looked more uniform, which is always a morale boost. Ugly but organized is still progress.
My Best Priming Tip
Paint the doors and drawer fronts while they’re lying flat. This helps reduce drips and sagging and makes the finish look smoother. Vertical painting is possible, of course, but horizontal painting is kinder to beginners and to people who do not want to spend their evening staring at a drip line in existential disappointment.
Step 7: Paint with Thin, Even Coats
Once the primer was dry, I applied the first coat of cabinet paint. I used a durable enamel-style paint made for cabinets, doors, or trim rather than standard wall paint. That matters in a bathroom, where surfaces deal with humidity, splashes, cleaning, and repeated touch points.
I used a small roller for larger flat areas and a brush for detailed edges. The goal was not to flood the surface with paint. The goal was thin, even coats that leveled nicely. Thick coats might feel satisfying in the moment, but they are the fast lane to drips, tacky corners, and texture you did not order.
After the first coat dried, I lightly checked the surface, cleaned off any dust nibs, and added another coat. For most bathroom cabinet painting projects, two coats will do the job. Sometimes a third coat helps if you are covering a deep color or want a more polished finish.
Best Finish for Bathroom Cabinets
I prefer satin or semi-gloss for bathroom cabinets because they strike a nice balance: easier to wipe down than flat paint, but not so shiny that every fingerprint introduces itself. If your bathroom gets a lot of steam, a slightly more moisture-resistant finish is usually the smarter choice.
Step 8: Let the Paint Dry, Then Let It Cure
This is where impatience tries to ruin everything.
Dry and cured are not the same thing. A cabinet door can feel dry to the touch and still be soft enough to nick, stick, or dent when you reinstall hardware too soon. I let the painted pieces dry thoroughly before reassembly, and I treated them gently for the first several days. No slamming drawers. No aggressive scrubbing. No acting like the project had been complete for three weeks when it had been complete for three hours.
If you want your painted bathroom vanity to last, honor the cure time on your paint label. That one act of self-control does more for durability than almost any “hack” on the internet.
Video Tutorial: The Exact Order I Followed
Use this simple structure for your video tutorial or blog embed:
- Show the before shots of the bathroom vanity and cabinet finish.
- Remove doors, drawers, knobs, and hinges on camera.
- Label each piece so viewers can see the organization step.
- Clean all surfaces thoroughly and explain why prep matters.
- Sand the glossy finish and wipe away dust.
- Patch old holes or surface dents, then sand smooth.
- Prime the cabinet boxes, doors, and drawer fronts.
- Apply the first coat of cabinet paint using a brush and roller.
- Show the second coat and close-up shots of the finish.
- Reinstall hardware, reveal the finished vanity, and add before-and-after comparisons.
You do not need fancy editing to make this useful. A clear phone video, decent lighting, and honest commentary about what worked and what didn’t will outperform a heavily edited clip that somehow skips the sanding and pretends paint magically appears on clean wood surfaces by the power of positive thinking.
Mistakes I’d Avoid Next Time
- Rushing prep: The finish is only as good as the surface underneath it.
- Skipping labels: Reassembly becomes a puzzle no one asked for.
- Using wall paint: Bathroom cabinets need a tougher finish.
- Painting heavy coats: Thin and even wins every time.
- Ignoring cure time: Fresh paint is more delicate than it looks.
- Forgetting ventilation: Open windows and move air through the room.
- Skipping old-home caution: If the home is older, check for lead-safe concerns before sanding.
Was Painting My Bathroom Cabinets Worth It?
Absolutely. It changed the whole look of the bathroom without the cost and mess of a full remodel. The vanity looked cleaner, newer, and more custom. The room felt brighter. And because I kept the existing cabinet structure, I got the visual payoff of a remodel without opening the door to plumbing surprises and countertop decisions that would have somehow consumed three weekends and half my personality.
If your bathroom vanity is structurally sound, painting the cabinets is one of the most cost-effective upgrades you can make. It works especially well when paired with new hardware, fresh caulk, better lighting, or a mirror swap. In other words, if your bathroom is begging for a glow-up but your budget prefers emotional support over financial strain, painted cabinets are a very strong move.
Extra Experience Notes: What the Project Really Felt Like
I think one reason bathroom cabinet painting gets underestimated is that it looks deceptively simple on social media. You see a dramatic before-and-after, a quick roller shot, a happy reveal, and suddenly your brain starts whispering, “I could do that in one afternoon.” Respectfully, your brain is a liar. You can do it, yes, but the part nobody glamorizes is how much of the success comes from the quiet, repetitive, deeply uncinematic tasks.
For me, the biggest mental shift was realizing that this project was less about painting and more about preparation. Once I accepted that, everything got easier. I stopped treating cleaning, sanding, and labeling like annoying delays and started treating them like the actual job. The paint was just the victory lap.
I also learned that bathroom lighting is rude. Colors looked different in the morning, in the evening, with the vanity light on, and with the door open. If you are choosing a new cabinet color, sample it first. Don’t rely on a tiny swatch and blind confidence. Bathrooms are moody little boxes, and your paint color will absolutely behave differently there than it does in a giant hardware store aisle under stadium-level lighting.
Another thing I noticed was how much hardware mattered. The new paint helped, of course, but once I changed the old knobs, the vanity finally looked intentional instead of simply repainted. It was like giving the cabinets a haircut and then remembering to also buy them a decent outfit. Small change, big improvement.
There was also a moment, somewhere between the first coat drying and the second coat going on, when the project looked worse before it looked better. I mention that because a lot of DIY frustration comes from assuming something is wrong when it is actually just unfinished. The primer stage can look patchy. The first coat can look uneven. Your confidence may briefly leave your body. That does not automatically mean the project is failing. It may just mean you are in the awkward middle, which is honestly true of most worthwhile things.
By the end, what surprised me most was not just the visual transformation but the feeling of using the room afterward. The bathroom felt fresher and more cared for. I noticed the vanity every day, but in a good way. Instead of mentally apologizing for it every time someone visited, I got to enjoy it. That is the sneaky magic of a strong DIY project: it changes the room, yes, but it also changes your relationship with the room. You stop seeing what annoys you and start seeing what you created.
So if you are standing in your bathroom right now staring at tired cabinets and wondering whether painting them is worth the trouble, my answer is yes, with one condition: do it properly. Clean them well. Prep them patiently. Prime them like you mean it. Paint in thin coats. Let them cure. Then step back and enjoy the fact that you just gave your bathroom a major update without tearing out a single sink.