Table of Contents >> Show >> Hide
- Plan First: The Three Questions That Save You Hours
- Pick a Build Style That Matches Your Tools (and Your Patience)
- Materials and Tools
- A Proven Weekend Build: 48" Storage Chest (Plywood + Trim)
- Example cut list (adjust to fit your design)
- Step 1: Build a base (optional, but makes it feel like furniture)
- Step 2: Cut and prep your plywood panels
- Step 3: Choose your joinery (and don’t overcomplicate it)
- Step 4: Assemble the box (square is the whole game)
- Step 5: Install the bottom (stronger than you think, if supported well)
- Step 6: Build the lid (simple or fancyboth can be excellent)
- Step 7: Attach the lid (hinge alignment is where weekends go to disappear)
- Step 8: Add lid supports (for safety and sanity)
- Step 9: Trim, handles, and “furniture vibes”
- Step 10: Sand and finish (this is where it becomes a “real piece”)
- Design Upgrades That Make Your Chest Smarter
- Common Mistakes (and How to Avoid Them)
- Cost and Time Reality Check
- Builder Experiences and Lessons Learned (The Stuff You Don’t See in Cut Lists)
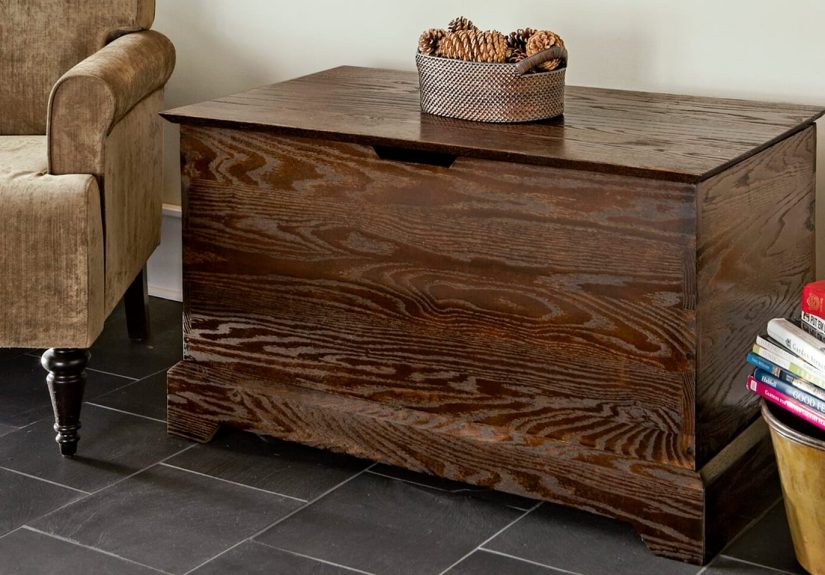
A storage chest is one of those rare DIY projects that’s equal parts useful, good-looking, and emotionally satisfying.
(Because nothing says “I have my life together” like hiding blankets, toys, board games, or mystery cables in a handsome wooden box.)
Build it right and you’ll get a piece that can live at the foot of a bed, under a window, or double as extra seating in a pinch.
This guide walks you through planning, material choices, joinery options, a proven weekend build, and finishing touches that make the chest feel “store-bought”
(without the “why did I pay $400 for this?” part). Along the way, we’ll talk about lid safety, wood movement, and the sneaky little mistakes
that turn “heirloom” into “garage storage for regret.”
Plan First: The Three Questions That Save You Hours
1) What’s it storing?
A chest for blankets and pillows can be deeper and taller; a toy chest needs safer hardware; a tool chest benefits from trays and dividers.
Be specific. “Stuff” is not a measurement (I learned this from every closet I’ve ever owned).
2) Where will it live?
Measure the space and the path to get it there. A 48-inch chest may fit your bedroom perfectly… until you realize it has to
take a hard left past the staircase banister like it’s trying to parallel park.
3) Is the lid going to be heavy?
Lid weight drives your hinge choice, lid support choice, and whether your project is “a charming chest” or “a wooden finger trap.”
If kids will use it, prioritize pinch protection and controlled closing. If adults will use it, still prioritize pinch protectionadults are just
children with bills and better vocabulary.
Pick a Build Style That Matches Your Tools (and Your Patience)
Option A: Plywood Box + Trim (Fast, Strong, Beginner-Friendly)
This is the go-to weekend build: 3/4-inch plywood panels, simple joinery (rabbets or pocket screws), and solid wood trim to cover edges.
It’s stable, square-able, and forgiving if your “perfect” cuts are more “close enough.”
Option B: Solid-Wood Panels (Prettier, Trickier)
Solid wood expands and contracts with humidity. That’s not a flawit’s wood being wood. But it means you need construction that accounts for movement
(frame-and-panel, floating panels, or traditional joinery). Gorgeous results, higher skill requirement.
Option C: Traditional Blanket Chest / Hope Chest (Heirloom Mode)
Think dovetails, frame-and-panel lids, and furniture-grade details. This path is rewarding, but it’s also where “I’ll just wing it” goes to get humbled.
If you want heirloom, plan for more time and more dry fitting.
Materials and Tools
Lumber and sheet goods
- 3/4-inch plywood for the box (cabinet-grade or hardwood plywood for best appearance)
- 1/4-inch plywood for the bottom (or 1/2-inch if you plan to store heavy items)
- Solid wood (poplar, pine, oak, maple) for trim, lid edging, feet, cleats, or a face frame
- Optional: cedar lining for blankets/linens
Hardware
- Hinge: piano hinge (continuous), strap hinges, or standard butt hinges
- Lid support: lid stays, torsion hinges, or soft-close supports (highly recommended for safety)
- Optional: handles, hasp/lock, decorative corner straps, casters, chain stop
Tools (choose what you have)
- Measuring tape, square, pencil, clamps
- Table saw or circular saw with a straightedge guide
- Drill/driver, bits, countersink
- Sander (random orbit is your friend) + sandpaper (80/120/180/220)
- Optional: pocket-hole jig, router (for rabbets), brad nailer
A Proven Weekend Build: 48" Storage Chest (Plywood + Trim)
This example build creates a chest that’s roughly 48" wide x 18" tall x 18" deep.
Adjust dimensions as neededjust keep your cut list consistent and your lid sized to overhang slightly.
Example cut list (adjust to fit your design)
| Part | Qty | Material | Size (inches) | Notes |
|---|---|---|---|---|
| Front/Back Panels | 2 | 3/4" plywood | 45 x 18 | Box sides attach to ends |
| Side Panels | 2 | 3/4" plywood | 15 x 18 | Depth of chest |
| Bottom | 1 | 1/4" plywood | Fit-to-opening | Let it sit in a groove or on cleats |
| Lid | 1 | 3/4" plywood | 48 x 16.5 | Overhangs the box slightly |
| Base Frame | 4 | 2×4 | 2 @ 48, 2 @ 18 | Miter or butt joints |
Step 1: Build a base (optional, but makes it feel like furniture)
- Cut 2x4s for a rectangular base frame. If you miter corners, it looks cleaner; if you butt-joint them, it’s simpler.
- Assemble with screws (or pocket screws) and glue. Check for square by measuring diagonalsequal diagonals means square.
- Optional: add feet, bun feet, or a recessed toe-kick for a more finished look.
Step 2: Cut and prep your plywood panels
- Use a track saw or a circular saw with a straightedge guide for clean cuts. Support the sheet fully so it doesn’t pinch or splinter.
- Label each panel as you cut it (Front, Back, Side A, Side B). You will forget. You will swear you won’t. You will.
- Decide how you’ll handle exposed plywood edges: edge banding, solid wood trim, or a face frame.
Step 3: Choose your joinery (and don’t overcomplicate it)
For a sturdy chest, you have a few reliable options:
- Rabbets/dados: strong and self-aligning (best if you have a router or table saw setup)
- Pocket screws: fast and strong for plywood builds, especially with glue
- Butt joints + screws: simplest, but use glue and pre-drill/countersink to avoid splitting and “screw bulges”
Step 4: Assemble the box (square is the whole game)
- Dry fit the panels on a flat surface. Confirm everything lines up before glue enters the chat.
- Apply wood glue on mating edges, clamp, and fasten (pocket screws, brad nails, or countersunk screws).
- Check square again. If it’s out, adjust clamps before the glue sets.
- Add interior cleats (simple 1×2 strips) around the inside bottom perimeter if you want the bottom panel to sit on a ledge.
Step 5: Install the bottom (stronger than you think, if supported well)
- If using cleats, cut the bottom panel to fit inside the box and rest on the cleats.
- If you routed a groove, slide the bottom into place before fully closing the box (plan this early).
- For heavy storage (books, tools), upgrade to 1/2-inch bottom and/or add a center support strip underneath.
Step 6: Build the lid (simple or fancyboth can be excellent)
The simplest lid is a plywood panel with solid wood edging (to stiffen it and hide the ply edge). A fancier lid is a frame-and-panel assembly.
If you’re building your first chest, simple is a smart flex.
- Cut lid panel to size and test the overhang (1/2" to 3/4" overhang looks intentional).
- Glue and clamp solid wood edging around the lid. Flush-trim or sand it smooth.
- Ease sharp edges with sandpaper or a small round-over to make it feel “finished” (and less shin-bashing).
Step 7: Attach the lid (hinge alignment is where weekends go to disappear)
- A piano hinge is forgiving because it spreads load across the full width. Mark your hinge line carefully.
- Pre-drill holes to avoid snapping tiny hinge screws (tiny screws are brave, but not strong).
- Test the open/close motion before installing lid supports. If the lid binds, fix hinge alignment now.
Step 8: Add lid supports (for safety and sanity)
Lid supports keep the lid from slamming shut and protect fingers. There are multiple approaches:
- Lid stays (mechanical arms): affordable and effective
- Torsion hinges: can hold position and slow movement
- Soft-close supports: best for toy chests and everyday use
Match the support rating to lid weight. If you’re unsure, choose supports that are slightly over-rated and install according to the manufacturer’s template.
For kid-focused builds, use hardware specifically intended for toy boxes so the lid can’t “guillotine” small hands.
Step 9: Trim, handles, and “furniture vibes”
- Add trim around the top edge (a simple 1×2 frame) to hide plywood edges and give a clean shadow line.
- Install handles at a comfortable height. Back them with washers inside if the chest will get yanked around.
- Consider corner protectors or straps if you want a trunk-style look.
Step 10: Sand and finish (this is where it becomes a “real piece”)
- Fill visible screw holes (or embrace them if you’re going industrial).
- Sand 80 → 120 → 180 → 220. Don’t skip grits unless you enjoy swirl marks that show up only after staining
(like a surprise party you didn’t want). - Choose a finish:
- Paint: best for budget plywood and bold décor
- Stain + topcoat: highlights wood grain (test on scraps first)
- Clear coat: simple and durable (water-based poly stays clearer; oil-based ambers)
- Let the interior cure fully before loading blanketsfresh finish smell + fabric = “why does everything smell like a hardware aisle?”
Design Upgrades That Make Your Chest Smarter
1) Add a tray or divider system
Tool chests and toy chests benefit from organization. Add cleats to support a sliding tray, or install a fixed divider to keep items from becoming one big pile.
(A pile is a lifestyle choice. A divider is a boundary.)
2) Cedar lining for linens
If you’re storing bedding, cedar lining can help keep things fresh. Use thin cedar boards inside the chest, leaving small gaps for seasonal movement.
Add a light vent gap near the back if you live in a humid climate.
3) Soft-close + pinch protection for kid use
If this chest is effectively a toy box, build for safety: soft-close hardware, rounded corners, and no slam potential.
Also: avoid hardware that’s explicitly “not approved” for toy boxes. In this category, details matter.
4) Better joinery for heirloom builds
If you want traditional craftsmanship, consider dovetails (strong and classic) or mortise-and-tenon for framed panels.
The payoff is a chest that looks like it belongs in a family photo… and also survives a move without becoming “modern art.”
Common Mistakes (and How to Avoid Them)
- Out-of-square box: measure diagonals during assembly and clamp until they match.
- Tear-out on plywood cuts: use a sharp blade and cut with the good face up for circular saws (or down for some table saw setups).
- Lid rubs or binds: test hinge placement with a few screws first; don’t fully commit until it swings cleanly.
- Finish blotches: pre-condition soft woods or use a gel stain; always test on scraps.
- Pinch hazards: lid supports are not optional if kids use itand still highly recommended for adults.
Cost and Time Reality Check
A plywood-based storage chest is typically a one-weekend build once you have materials. Costs vary widely by plywood quality and hardware:
budget materials can land under $100, while hardwood plywood + premium hinges/supports can push higher.
The best “value upgrade” is usually better hardware (smooth lid action makes the whole piece feel expensive).
Builder Experiences and Lessons Learned (The Stuff You Don’t See in Cut Lists)
Here’s the funny thing about building a storage chest: it looks like “just a box,” right up until you realize boxes are basically
a personality test disguised as furniture. In real builds, the first lesson most DIYers learn is that
square is not a vibeit’s a requirement. If the box is even slightly out of square, the lid will tell on you immediately.
It’ll twist, bind, or sit with an uneven gap that stares at you like a judgmental eyebrow.
Another common “experience moment” is the Great Measurement Amnesia. You measure the space, you feel responsible, you write it down…
then you get excited and build the chest three inches taller because it “looked right.” Now it blocks a drawer, hits a windowsill, or
makes your bed look like it’s wearing a wooden backpack. The fix is simple: mock up the size with painter’s tape on the floor,
or stack scrap wood into a quick outline. It feels silly for five minutes and saves you from re-building for five hours.
Then there’s the glue stage, also known as “Why are there suddenly four hands missing from my body?” In the real world,
glue makes everything slippery, clamps slide at the worst time, and you discover you don’t own enough clamps.
(No one owns enough clamps. That’s not a woodworking problem; it’s a woodworking tradition.)
A practical trick is to do a full dry fit, set your clamps where you’ll need them, and keep a damp rag ready for squeeze-out.
Cleanup is easier now than laterlater is just you sanding dried glue while whispering apologies to your sander.
Hardware installation is where confidence goes to get resized. Hinges look straightforward until you’re trying to align a lid perfectly,
hold it in place, and drive tiny screws that want to snap if you breathe too strongly. Many builders “learn the hard way” that
pre-drilling is not optional. A self-centering hinge bit is a small tool that feels like cheatingin the best way.
And once the lid is on, the next lesson appears: a lid without support hardware is a trap.
Even if the lid isn’t heavy, gravity is extremely consistent about doing gravity things. Lid supports turn the chest from “dangerous”
to “pleasant,” especially when you’re grabbing items with one hand and holding the lid with the other like you’re doing a circus act.
Finishing is its own lived experience. Stain looks different on every piece of wood, and plywood can surprise you with patches that drink stain
like it’s dehydrated. That’s why experienced builders test finishes on scraps and sometimes choose paint for beginner builds:
paint is forgiving, consistent, and lets you stop obsessing over whether that one panel has “character” or “a problem.”
The final emotional moment is the first time you load the chest. Suddenly, your room looks cleaner, your clutter disappears,
and you feel like the kind of person who alphabetizes spices. You probably won’t alphabetize spices. But you could. And that’s the power of a storage chest.