Table of Contents >> Show >> Hide
- Before You Build: Pick the Right Wall Planter Style
- Planning Like a Pro (So Your Wall Planter Doesn’t Become a Physics Lesson)
- Tools and Materials
- Step-by-Step: Build a Modular Wood Wall Planter Board (Beginner-Friendly)
- Step 1: Choose Your Size and Layout
- Step 2: Cut and Prep the Backboard
- Step 3: Add a Moisture Strategy (Yes, Even If You’re “Careful”)
- Step 4: Build or Attach Pot Holders
- Step 5: Make a French Cleat (The “Sleep Better at Night” Hanging System)
- Step 6: Install the Wall Cleat Securely
- Step 7: Hang the Planter Board and Add a Bottom Stop
- Step 8: Plant, Arrange, and Water Like a Responsible Plant Parent
- Optional Upgrade: Turn Your Wall Planter Into a Mini Living Wall
- Indoor vs. Outdoor Wall Planters: What Changes?
- Plant Ideas That Make Wall Planters Look Amazing (Without Being High Maintenance)
- Maintenance Checklist (So It Stays Cute)
- Troubleshooting
- 10-Minute Safety Check Before You Call It “Done”
- Real-World Experiences: What People Learn After Building a Wall Planter (Extra )
- Conclusion
Want to add greenery without sacrificing floor space? A wall planter is basically your plants’ way of saying,
“We’ve upgraded to vertical.” It can be as simple as a board that holds a few pots, or as extra as a mini living
wall that makes your hallway feel like a boutique hotel lobby (minus the suspiciously fancy soap).
This guide walks you through planning, building, mounting, and planting a wall planter that looks great and
doesn’t slowly turn your wall into a moisture experiment. You’ll also get design options for indoor vs. outdoor use,
plus real-world lessons DIYers learn the hard wayso you don’t have to.
Before You Build: Pick the Right Wall Planter Style
“Wall planter” can mean three different projects, and choosing the right one is half the win.
Here’s a quick, practical breakdown:
Option A: Board + Pots (Best for Beginners)
- What it is: A backboard mounted to the wall with shelves, straps, rings, or hooks that hold potted plants.
- Why it’s great: You can remove pots for watering, rotate plants, and replace casualties (we don’t judge).
- Where it shines: Indoors, covered porches, patios, balconies.
Option B: Wall-Mounted Planter Boxes (Great for Herbs)
- What it is: One or more shallow wooden boxes mounted to a wall or fence.
- Why it’s great: Looks custom, holds more soil volume, can grow herbs and small annuals.
- Watch-outs: Weight adds up fast when wet; drainage must be handled carefully.
Option C: Pocket Living Wall (Best for Plant Nerds)
- What it is: Fabric pockets or modular panels that create a vertical garden.
- Why it’s great: Maximum plants per square footyour wall becomes a jungle.
- Watch-outs: You must manage water and protect the wall behind it.
In this article, the main build is Option A (Board + Pots) because it’s the most flexible, easiest to maintain,
and easiest to scale. Then you’ll see upgrade paths for planter boxes and living walls.
Planning Like a Pro (So Your Wall Planter Doesn’t Become a Physics Lesson)
1) Indoor or Outdoor?
- Indoor: You need a moisture strategy (liners, drip control, airflow). Light is often the limiting factor.
- Outdoor: You need weather resistance (rot-resistant wood, exterior fasteners, finish), plus secure mounting for wind.
2) Sunlight and Placement
Plants don’t care that the planter matches your aesthetic. They care about light.
Observe the wall for a day:
- Bright indirect light: Great for pothos, philodendrons, snake plants, peace lilies.
- Direct sun (4–6+ hours): Better for many herbs, succulents, and flowering plants.
- Low light: You can still do it, but choose tolerant plants or add a grow light.
3) Weight: The Silent Wall Planter Villain
Dry soil is manageable. Wet soil is heavy. A few medium pots can easily become “surprisingly stout.”
That’s why the safest approach is to mount into studs (or use proper masonry hardware), and to choose a hanging system
that spreads load welllike a French cleat.
Rule of thumb: If you’re hanging more than two small pots, plan for “wet weight,” mount into structure,
and use hardware meant for heavy loads.
Tools and Materials
Tools (choose based on what you have)
- Measuring tape, pencil
- Stud finder (or strong magnet + patience)
- Level
- Drill/driver and drill bits
- Sandpaper or sander
- Saw (hand saw, circular saw, or miter saw)
- Clamps (helpful but not mandatory)
- Safety glasses and gloves (seriously)
Materials (for the main Board + Pots build)
- Backboard: 3/4-inch plywood, or a solid wood panel (example: 24 in. x 48 in.)
- Frame (optional): 1×2 or 1×3 boards to make it look finished
- Hanging system: French cleat (wood cleat or metal Z-clips)
- Fasteners: Exterior-grade screws for the build; appropriate wall fasteners for installation
- Spacers: Small wood blocks or rubber bumpers (keeps airflow behind the board)
- Pot holders: Small shelves, metal straps, pipe clamps, hose clamps, or sturdy hooks
- Finish: Outdoor paint/stain + sealer for exterior; interior-safe finish for indoors
- Plants + pots: Choose pots that fit your holders; consider lightweight plastic for big walls
- Moisture management: Saucers, drip trays, or waterproof mat (especially indoors)
Safety note for younger DIYers: If you’re using power tools or mounting heavy items, get an adult to help.
It’s not about skillit’s about keeping all your fingers and your drywall intact.
Step-by-Step: Build a Modular Wood Wall Planter Board (Beginner-Friendly)
This is a clean, flexible design: a backboard with removable potted plants. You can scale it up or down,
rearrange plants seasonally, and take pots off the wall for easy watering.
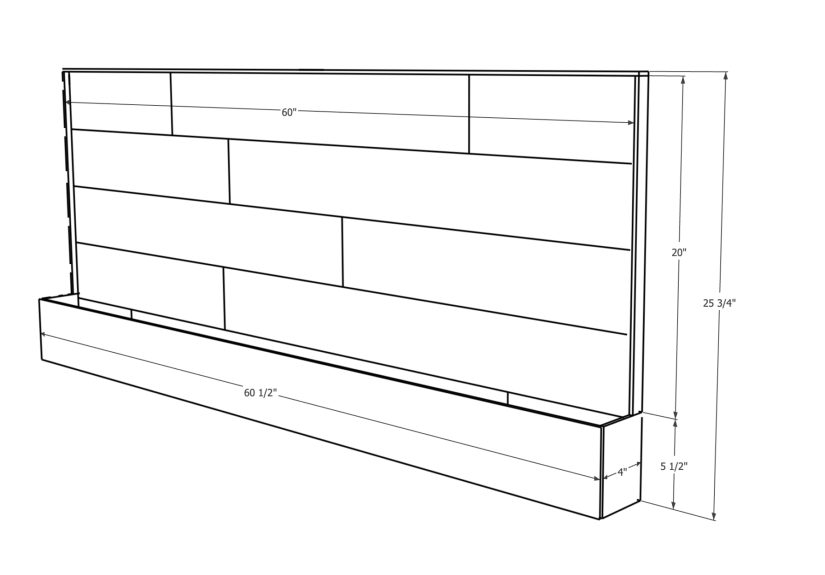
Step 1: Choose Your Size and Layout
A great starter size is 24 in. x 48 in. because it fits common plywood cuts and holds several plants
without looking like you tried to install a rainforest exhibit in your living room.
- Lay out your pots on the floor first.
- Leave at least 3–5 inches between pots for airflow and growth.
- Plan a “watering gap” so you can pour water without hitting the wall or the frame.
Step 2: Cut and Prep the Backboard
- Cut your panel to size (or ask the store to cut it if that’s easier).
- Sand the front and edges so it’s smooth to the touch.
- Optional: Add a simple frame (1×2 boards around the edges) for a finished look.
Pro tip: If this will live outdoors, pick rot-resistant materials (like cedar) where you can,
and use exterior-rated screws and finishes.
Step 3: Add a Moisture Strategy (Yes, Even If You’re “Careful”)
Water is sneaky. If you’re building an indoor wall planter, assume you will eventually overwater
something at least once. The goal is: when that happens, your wall doesn’t pay the price.
- Best indoor approach: Use pots with saucers or a drip tray system built into the design.
- Simple hack: Mount the backboard with small spacers so air can move behind it.
- Outdoor approach: Use finishes that handle weather and let water drain away freely.
Step 4: Build or Attach Pot Holders
Your holders determine how “modular” your planter is. Here are three proven methods:
Method A: Small Shelves (most stable)
- Cut short shelf boards (example: 6–8 inches deep, depending on pot size).
- Attach each shelf to the backboard with screws from the back (or use small brackets).
- Add a small lip (a thin strip) on the front edge so pots don’t slide.
Method B: Straps or Clamps (great for mason jars or small pots)
- Use metal straps/clamps sized to your container.
- Screw them into the backboard (pre-drill to avoid splitting).
- Test-fit each pot so it can be removed without a wrestling match.
Method C: Hook-and-Hang (fastest)
- Install sturdy hooks into the backboard.
- Use pots with hangers or add handles to containers.
- Keep it light and don’t overdo the number of hooks per row.
Specific example layout: On a 24×48 board, you can do 2 columns x 3 rows of small pots,
or 3 columns x 2 rows if pots are wider. Keep heavier pots lower for better stability.
Step 5: Make a French Cleat (The “Sleep Better at Night” Hanging System)
A French cleat is two matching angled strips: one goes on the wall, one goes on the planter board. They lock together
and spread weight across a wider area than a couple of picture hooks ever could.
- Rip a board (or plywood strip) lengthwise at a 45-degree angle to make two mating cleats.
- Attach one cleat to the back of your planter board, angled so it “hooks” onto the wall cleat.
- Attach the matching cleat to the wall, anchored into studs (or masonry, if applicable).
Why it’s great: It’s strong, levelable, and removable. Also, it makes you feel like a professional,
which is half the fun of DIY.
Step 6: Install the Wall Cleat Securely
This is the part where you slow down and act like a person who respects gravity.
- Find studs and mark them.
- Hold the wall cleat level and mark screw locations aligned with studs.
- Pre-drill, then fasten the cleat firmly into studs.
- For masonry walls, use masonry anchors rated for the load and follow the anchor instructions carefully.
Step 7: Hang the Planter Board and Add a Bottom Stop
- Hook the board cleat onto the wall cleat.
- Check level; adjust if needed.
- Add a small “bottom stop” (a spacer strip) near the bottom of the board so it sits flush and doesn’t tilt.
Once it’s stable, do a gentle test: push slightly side-to-side. If anything moves in a scary way, fix it nownot after you’ve added wet soil.
Step 8: Plant, Arrange, and Water Like a Responsible Plant Parent
- Use potting mix designed for containers (garden soil compacts and drains poorly in pots).
- Choose plants with similar needs if they share the same wall and watering schedule.
- Water check: Stick a finger 1–2 inches into the soil. If it’s dry, water thoroughly.
- Don’t “rock layer” the bottom thinking it improves drainage; it usually doesn’t help in modern potting mixes.
Optional Upgrade: Turn Your Wall Planter Into a Mini Living Wall
If you want a denser look than individual pots, a “living wall” approach uses pockets or modular panels.
The tradeoff is more attention to moisture and irrigation.
Living Wall Basics That Actually Matter
- Waterproof barrier: Add a moisture barrier behind the system (especially indoors).
- Air gap: Keep the system slightly off the wall to allow airflow and reduce moisture buildup.
- Water method: Hand watering can work for small systems; drip irrigation is more consistent for bigger ones.
- Plant selection: Choose hardy, forgiving plants unless you enjoy stress.
Simple “Living Wall Lite” Build
- Use a framed panel as your base.
- Attach pocket panels or modular planters.
- Add a catch tray or drainage plan so runoff doesn’t stain your floor or siding.
- Group plants by water needs (top dries faster; bottom gets more runoff).
Indoor vs. Outdoor Wall Planters: What Changes?
Indoor: Control Moisture and Humidity
- Use saucers or internal drip trays, and protect floors as well as walls.
- Keep airflow behind the planter board.
- If your home is humid already, avoid creating a constant damp zone.
Outdoor: Control Weather and Sun
- Choose rot-resistant materials and finishes.
- Use corrosion-resistant fasteners.
- Mount securely for wind and stormsespecially on fences.
Plant Ideas That Make Wall Planters Look Amazing (Without Being High Maintenance)
Great indoor picks
- Pothos (forgiving, trails nicely)
- Snake plant (tolerates lower light)
- Philodendron (easy and lush)
- Peace lily (likes consistent moisture, not soggy soil)
- Spider plant (hard to mess up and looks great)
Great outdoor picks (depending on sun)
- Herbs: basil, thyme, oregano, mint (mint: keep it contained unless you want mint everywhere forever)
- Trailing flowers: petunias, calibrachoa
- Succulents (in bright sun, with very sharp drainage)
- Strawberries (fun, productive, and surprisingly decorative)
Maintenance Checklist (So It Stays Cute)
- Weekly: Check soil moisture, wipe spills, rotate plants for even growth.
- Monthly: Inspect mounting hardware, tighten anything that loosens, clean drip trays.
- Seasonally: Refresh potting mix top layer, prune, swap plants as light changes.
Troubleshooting
Problem: Water stains or damp smell
- Add saucers/drip trays or upgrade to a better runoff capture method.
- Increase airflow behind the planter (spacers help).
- Water less frequently but more thoroughly; avoid constant “tiny sips” that keep things damp.
Problem: Plants dry out fast
- Top row often dries fastestmove thirstier plants higher.
- Use a potting mix with good moisture retention (without turning into mud).
- Consider self-watering pots for indoor walls.
Problem: Wall planter feels wobbly
- Stop and fix it before adding more plants.
- Confirm you’re anchored to studs (or correct masonry anchors).
- Add a bottom spacer strip to stabilize the board against the wall.
10-Minute Safety Check Before You Call It “Done”
- Is the wall cleat anchored into studs (or properly anchored into masonry)?
- Is the planter board level and stable?
- Are heavier pots placed lower?
- Do pots have drip control (indoors) or safe drainage (outdoors)?
- Are there spacers for airflow behind the board?
- Did you use the right fasteners for the environment (indoor vs outdoor)?
- Is there a plan for watering that won’t soak the wall?
- Can you remove pots easily for maintenance?
- Are plants matched to the light conditions?
- Is it installed away from high-traffic bump zones (doors, kids, pets, chair backs)?
Real-World Experiences: What People Learn After Building a Wall Planter (Extra )
The first time most people build a wall planter, they expect the woodworking to be the hard part. Then watering happens.
The “experience” arc usually goes like this: you mount the board, it looks incredible, you add plants, you take photos,
and you feel like you should start charging admission. Then, sometime between Day 3 and Day 14, reality taps you on the shoulder
and says, “Hey… where exactly is the extra water going?”
One of the most common lessons is that maintenance matters more than perfection. A wall planter that’s easy to remove,
replant, and clean will stay alive and attractive longer than a fancy, complicated build that makes you dread watering day.
That’s why people who start with removable pots usually stick with the hobby longerbecause it doesn’t feel like a chore.
They can take a pot down, water it in the sink, let it drain, and put it back. No guessing. No dripping. No “please don’t stain the wall.”
Another frequent “aha” moment: the top dries out faster. Heat rises, airflow is higher, and top-row plants get less runoff.
People often rearrange plants after a couple of weeks: drought-tolerant plants go higher; thirstier ones go lower.
It’s not failureit’s just your wall planter teaching you its personality. (Yes, your planter has a personality now. Congratulations.)
Lighting surprises a lot of folks, too. A wall that looks bright to your eyes can still be dim to a plant, especially indoors.
Many DIYers end up adding a small grow light or moving the whole planter to a brighter wall. The happy twist is that once lighting is fixed,
plant growth becomes faster and more satisfyinglike your wall finally “turns on” and starts looking lush instead of politely surviving.
Outdoors, experience teaches a different lesson: wind and weather don’t care about your screws. A planter that feels solid on a calm day
can rattle during storms, especially on fences. People who build outdoor wall planters often end up upgrading their mounting,
spreading the load over more attachment points, and choosing hardware designed for exterior use. That upgrade isn’t overkillit’s peace of mind.
Finally, there’s the emotional part: wall planters become a small daily ritual. People notice new leaves, tiny blooms, and fresh herb growth
because it’s literally at eye level. It’s harder to ignore than a pot in the corner. Over time, many DIYers say a wall planter makes them better
at plant carenot because it’s “easier,” but because it’s visible, interactive, and rewarding. And if a plant doesn’t make it?
The best thing about a modular wall planter is that you can swap it out without rebuilding the whole system. In the world of plants,
that’s basically a superpower.
Conclusion
Building a wall planter is a smart way to add greenery, grow herbs, and make a blank wall look intentionalwithout giving up precious floor space.
Start with a modular board-and-pots design so you can remove plants for easy watering and maintenance. Use a strong hanging system (like a French cleat),
plan for wet weight, and treat moisture management like part of the designnot an afterthought.
Build it once, mount it safely, and your wall planter can be the kind of project that keeps paying you backone new leaf at a time.