Table of Contents >> Show >> Hide
- What Is an HTML Signature in Gmail?
- Why Use an HTML Signature in Gmail?
- What to Prepare Before You Add an HTML Signature
- How to Create + Add an HTML Signature in Gmail: Quick Steps
- Step 1: Draft a clean signature layout
- Step 2: Build the signature in an HTML-friendly editor or generator
- Step 3: Open Gmail settings
- Step 4: Create a new signature
- Step 5: Paste the rendered signature into Gmail
- Step 6: Add images, logos, and links carefully
- Step 7: Set signature defaults
- Step 8: Save changes
- Step 9: Send a test email
- Best Practices for a Professional Gmail HTML Signature
- Common Problems When Adding an HTML Signature in Gmail
- Should You Use Multiple Signatures in Gmail?
- A Simple Example of a Strong Gmail HTML Signature
- Practical Experiences and Real-World Lessons From Setting Up HTML Signatures in Gmail
- Final Thoughts
- SEO Tags
If your emails still end with nothing but your name and a vague sense of professionalism, it may be time for an upgrade. A polished HTML signature in Gmail can turn every message into a tidy little business card. It can show your name, title, company, phone number, website, social icons, logo, and even a subtle call to action without looking like a neon billboard from 2007.
The good news is that creating an HTML signature in Gmail is not nearly as complicated as it sounds. You do not need to be a full-time coder, and you do not need to whisper sweet nothings to a block of mysterious HTML. You just need the right structure, a clean design, and a few quick steps to get everything into Gmail without breaking the formatting.
In this guide, you will learn how to create an HTML signature, add it to Gmail, avoid the most common formatting disasters, and make it look sharp on both desktop and mobile. You will also get practical advice on what to include, what to skip, and how to keep your signature from becoming a tiny, overachieving carnival at the bottom of every email.
What Is an HTML Signature in Gmail?
An HTML signature is an email signature built with formatted text and design elements rather than plain text alone. That means you can use bold text, spacing, clickable links, images, brand colors, icons, and structured layouts. In Gmail, you do not usually paste raw HTML code directly into a code editor. Instead, you create the signature in a rendered format and paste the finished visual version into Gmail’s signature box.
This matters because a basic text signature can do the job, but an HTML signature looks more polished and more useful. It helps recipients quickly find your contact details, recognize your company, and trust that they are communicating with an actual human rather than a mysterious inbox floating through cyberspace.
Why Use an HTML Signature in Gmail?
A good Gmail HTML signature does more than decorate the bottom of your emails. It can support branding, improve clarity, and make your messages easier to act on. When someone receives your email, they should not need to hunt for your title, phone number, or website like they are solving a puzzle.
Top benefits of a Gmail HTML signature
- Professional appearance: Your emails look more credible and consistent.
- Better contact visibility: Readers can quickly find your role, phone number, and links.
- Brand consistency: Logos, colors, and fonts help align your email with your business identity.
- Clickable actions: You can link to your website, booking page, portfolio, or social profiles.
- Marketing value: A small banner or CTA can promote a new product, webinar, or lead magnet.
That said, “professional” does not mean “cram every known contact channel into one signature.” A smart signature is useful, not noisy.
What to Prepare Before You Add an HTML Signature
Before you jump into Gmail settings, gather the ingredients. This part is not glamorous, but it saves time later.
- Your full name
- Your job title or role
- Company name
- Primary phone number
- Website or booking link
- Professional social links, if relevant
- A logo or headshot, if you want one
- Your preferred brand colors and fonts
Also decide whether your signature is for personal use, freelance work, client outreach, or a company account. A sales consultant, a designer, and a legal team member should not all be using the exact same style. One size does not fit all, especially in email where context matters.
How to Create + Add an HTML Signature in Gmail: Quick Steps
Step 1: Draft a clean signature layout
Start with the essentials. A solid signature usually includes your name, title, company, and one or two best contact methods. You can add a website link and one or two social icons if they are genuinely useful. Resist the urge to add five phone numbers, three slogans, two motivational quotes, and a legal disclaimer longer than the email itself.
A simple structure might look like this:
Jordan Lee
Marketing Director | Bright Harbor Studio
555-123-4567 | brightharborstudio.com
LinkedIn | Instagram
Step 2: Build the signature in an HTML-friendly editor or generator
You have two practical options. First, create the signature in a signature generator or design tool that outputs clean formatting. Second, build it manually in a document or browser-based editor, then copy the rendered signature. The key is to copy the final visual version, not a block of raw HTML code. Gmail’s signature area works best when you paste formatted content, not source code that looks like it escaped from a developer’s basement.
If you build manually, keep the layout simple. Tables are often used behind the scenes for email formatting, but visually, the signature should feel light and readable.
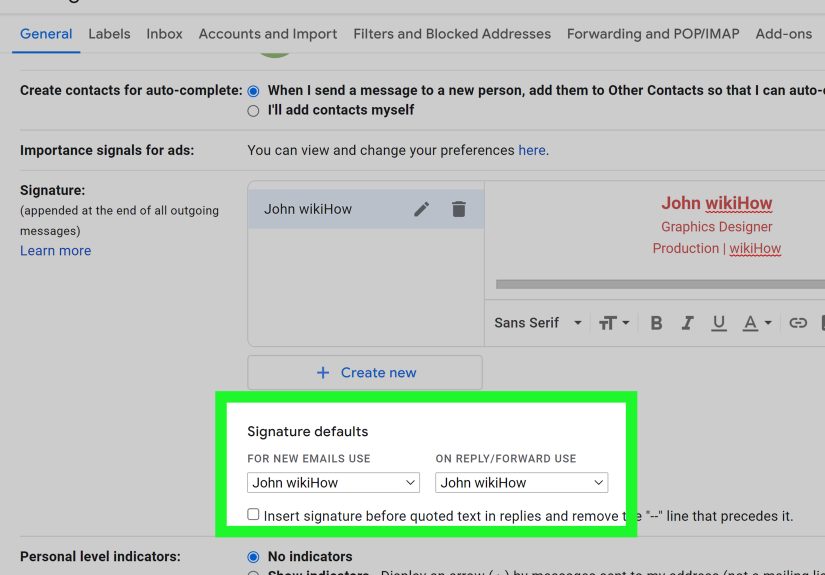
Step 3: Open Gmail settings
Sign in to Gmail on desktop. In the top-right corner, click the gear icon, then click See all settings. Under the General tab, scroll down to the Signature section.
Step 4: Create a new signature
Click Create new, give your signature a name, and open the signature editor. This is where you will paste your rendered HTML signature. If you already have one and just need an update, you can edit the existing version instead.
Step 5: Paste the rendered signature into Gmail
Copy the completed signature from your editor, browser preview, or signature tool and paste it directly into Gmail’s signature box. If the formatting comes through cleanly, you are on the right track. If you paste actual raw HTML code and Gmail displays angle brackets everywhere, congratulations, you copied the wrong thing.
Step 6: Add images, logos, and links carefully
If your signature includes a headshot or logo, keep it small and optimized. Huge images make signatures look clunky and can cause saving or display issues. Hyperlink only what matters, such as your website, portfolio, scheduling page, or LinkedIn profile. This is a signature, not a theme park map.
Step 7: Set signature defaults
In the same Gmail settings area, choose which signature should appear for new emails and which should appear for replies and forwards. This is one of the most commonly missed steps. People create a signature, admire it for three seconds, then forget to assign it as the default. The result is silence at the bottom of every email.
Step 8: Save changes
Scroll to the bottom of the page and click Save Changes. Gmail will not save your brilliant signature just because you had good intentions.
Step 9: Send a test email
Compose a new message and send it to yourself. Then open that email on desktop and mobile. Check spacing, line breaks, image loading, and link behavior. A signature that looks stunning on your large monitor can look like a crowded sandwich on a phone screen.
Best Practices for a Professional Gmail HTML Signature
Keep it short and readable
The best signatures are compact. Think four to six clean lines, plus optional icons or a small image. Your reader should understand who you are in about two seconds.
Use a simple visual hierarchy
Your name should stand out first. Your title and company should follow. Contact details come after that. This creates a natural reading order and keeps the signature from looking like a ransom note assembled by a committee.
Limit colors and fonts
Stick to one or two fonts and use minimal color. A dark neutral text color with one brand accent usually works best. Too many colors make the signature look busy and less trustworthy.
Choose one clear call to action
If you want to promote something, keep it subtle. A single CTA such as Book a consultation, View portfolio, or Download the guide is enough. Too many calls to action make your email feel like a mini billboard.
Design for mobile
Many recipients open emails on their phones. Narrow layouts, smaller images, and clear spacing help your signature stay readable on smaller screens. If your signature only looks good on desktop, it is only doing half the job.
Common Problems When Adding an HTML Signature in Gmail
The signature looks like plain text
This often happens when Plain text mode is enabled in the Gmail compose window. Turn it off before testing your signature. If plain text mode is active, rich formatting, images, and certain layout elements may not display properly.
The signature will not save
One common cause is a signature that is too large. Oversized images, hidden formatting, and bloated copied content can push the signature beyond Gmail’s limit. If that happens, shrink images, remove unnecessary styling, and simplify the structure.
The formatting breaks after pasting
Some editors add messy hidden code. If your spacing goes wild or columns collapse, recreate the signature in a cleaner tool or paste from a browser-rendered preview rather than from a heavily formatted document.
Images do not display correctly
Use smaller images and test them in a live email. If the image looks blurry, resize it before inserting it. If it looks gigantic, that is not confidence-building. That is intimidation by logo.
The mobile Gmail app does not match the desktop version
Desktop Gmail signatures and mobile app signatures are not exactly the same experience. In the Gmail app, mobile signatures are separate and much more limited. If you need a polished HTML signature, set it up on desktop first and test how it behaves across devices.
Should You Use Multiple Signatures in Gmail?
Yes, especially if you wear different hats. Gmail allows multiple signatures, which is handy for people who switch between outreach, support, sales, recruiting, or personal correspondence. For example, a freelancer might use one signature for client proposals and another for casual networking. A team lead might keep a full signature for new contacts and a shorter version for replies.
This flexibility is especially useful if you use aliases or the Send mail as feature. Different email addresses can have different signatures, which helps keep communication tidy and relevant.
A Simple Example of a Strong Gmail HTML Signature
Here is what a clean, effective signature might include in practice:
Olivia Carter
Senior Account Manager | Northfield Creative
northfieldcreative.com | 212-555-0182
LinkedIn | Schedule a Call
Notice what is missing: no giant image stack, no ten social platforms, no inspirational quote about eagles, and no five-line disclaimer that scares the recipient before they even reply.
Practical Experiences and Real-World Lessons From Setting Up HTML Signatures in Gmail
One of the most common experiences people have when creating an HTML signature in Gmail is realizing that the “easy” part is not the design. It is the testing. On paper, or rather on screen, the signature looks perfect. The name is bold, the logo is crisp, the links are lined up neatly, and everything feels very executive. Then the first test email goes out, and suddenly the spacing looks weird on mobile, the image is too large, or the links are stacked in a way that makes the whole signature feel awkward. That is normal. Almost everyone tweaks a Gmail signature more than once before it feels finished.
Another real-world lesson is that less usually performs better. A lot of people start with the idea that their signature should do everything. They want a photo, a logo, a tagline, a phone number, a website, four social icons, a legal disclaimer, a scheduling link, and maybe a seasonal banner for good measure. Then they see it all together and realize the signature is now longer than the actual email. In practice, the strongest Gmail signatures are usually the simplest. A clean name, title, company, and one or two contact paths often feel more trustworthy and more polished than a signature that is trying very hard to become a homepage.
Many users also learn the hard way that copying from the wrong place can create chaos. If you copy raw code instead of the rendered design, Gmail will not magically convert it into a pretty signature. It will often paste as visible code or broken formatting. The better experience is to preview the signature in a browser or an email-signature tool, then copy the finished visual version into Gmail settings. That single detail saves an incredible amount of frustration.
There is also the mobile surprise. People create a great signature on desktop and assume it will work the exact same way everywhere. Then they send an email from the Gmail app and wonder why it looks different or why the richer formatting is missing. This happens all the time. The lesson is simple: test on both desktop and phone before calling the job done. Email is one of those annoying corners of the internet where “looks good on my screen” means almost nothing.
Finally, one of the best experiences people report is how much a strong signature improves everyday communication. It makes emails feel more complete. It reduces back-and-forth because recipients can instantly find a phone number, website, or booking link. It also creates a more memorable impression, especially for freelancers, consultants, job seekers, and client-facing teams. A small upgrade at the bottom of an email can quietly make every message work harder. That is the beauty of a good HTML signature in Gmail. It is not flashy. It is just smart.
Final Thoughts
Creating and adding an HTML signature in Gmail is one of those small upgrades that pays off every day. Once it is set up properly, every email looks cleaner, more professional, and easier to respond to. The trick is to keep it useful, not overdesigned. Start with the essentials, paste the rendered signature into Gmail, assign the defaults, save your changes, and test everything before you trust it in the wild.
If your signature looks polished, loads cleanly, and helps people reach you faster, you have succeeded. If it contains seven icons, a giant logo, a quote about success, and enough formatting to frighten a printer, maybe circle back and simplify. Gmail will thank you. Your recipients probably will too.