Table of Contents >> Show >> Hide
- Why Butternut Squash Feels So Risky (It’s Not Just You)
- What You Need (Minimal Tools, Maximum Control)
- Safety Setup: Your Hands Will Thank You
- The Classic Method: Peel, Seed, and Cube Like a Calm Person
- The Microwave Hack: Make It Safer Before You Slice
- The No-Peel Method: Roast First, Deal With It Later
- Common Mistakes That Lead to Injuries (And How to Avoid Them)
- Bonus: Don’t Throw Away the Seeds (They’re Snacks)
- Storage and Meal Prep Tips
- Quick Cutting Cheatsheet
- Real-Life Kitchen Experiences (An Extra of Squash Wisdom)
- Conclusion: Your New Rule Is Control, Not Courage
Butternut squash is delicious. It’s sweet, cozy, and basically the edible version of a chunky sweater.
Unfortunately, it also has the personality of a bowling ball coated in armor. If you’ve ever tried to cut one
and thought, “So this is how kitchen injuries happen,” you’re not alone.
The good news: you don’t need superhero strength, a fancy cleaver, or a life alert button. You just need the
right setup, a smart sequence, and a couple of small “chef tricks” that make the squash behave. Let’s turn
this intimidating gourd into tidy cubeswithout sacrificing a finger to the fall gods.
Why Butternut Squash Feels So Risky (It’s Not Just You)
Butternut squash is dense, round, and tough-skinned. That combination can make your knife slip if you rush,
if your cutting board slides, or if you try to cut it while it’s wobbling like a sleepy penguin.
Most “butternut squash accidents” come from one of three things:
- An unstable base (the squash rolling or the board moving)
- A dull knife (you push harder, then it suddenly gives way)
- The wrong order of cuts (trying to power through curves and stem ends)
Fix those, and cutting butternut squash safely goes from scary to “annoying but manageable,” which is honestly
a victory in adult life.
What You Need (Minimal Tools, Maximum Control)
- A sharp chef’s knife (8–10 inches is ideal). Sharp beats strong every time.
- A sturdy cutting board (big enough that you’re not playing “knife Jenga”).
- A damp paper towel or thin kitchen towel (for board traction).
- A Y-peeler or sturdy vegetable peeler (peeling is easier than trimming the skin with a knife).
- A spoon (or ice-cream scoop) for removing seeds.
- Optional: cut-resistant glove for your non-knife hand, especially if you’re nervous.
Safety Setup: Your Hands Will Thank You
1) Lock down your cutting board
Place a damp towel (wrung out) under the cutting board so it doesn’t slide. This is one of the simplest ways
to prevent accidents because it removes the “moving target” problem.
2) Dry the squash
Rinse off dirt, then dry the squash thoroughly. Wet squash + sharp knife is not the kind of “thriller” anyone wants.
3) Slow is smooth, smooth is fast
Use controlled pressure. If you’re white-knuckling the handle, pause and reset. A safe cut is one where the squash
is stable and your blade is moving with intentionnot panic.
The Classic Method: Peel, Seed, and Cube Like a Calm Person
This is the best method when your recipe needs peeled butternut squash cubes (soups, roasting, risotto, curries,
sheet-pan dinners, meal prep, etc.).
Step 1: Trim the ends (make it stop rolling)
Set the squash on its side. Slice off the stem end and the bottom end (about 1/4 inch each). These cuts create flat
surfaces and remove the toughest bits.
Step 2: Separate the “neck” and the “bulb”
Look at your squash: the long top section (the neck) is solid flesh. The round bottom (the bulb) holds the seeds.
Cut the squash crosswise where the neck meets the bulb. Now you’re working with two smaller, less awkward pieces.
This is a big safety upgrade.
Step 3: Peel (the easy way, not the dramatic way)
Stand one piece upright on a flat end. Using a Y-peeler, peel downward in long strokes. Rotate and repeat.
Keep peeling until you see bright orange flesh all over (sometimes it takes a couple passes).
If your peeler is struggling, that’s usually a sign it’s dull, your squash is extra tough, or you’re trying to peel
too shallowly. Apply steady pressure, keep strokes smooth, and don’t be afraid to peel “one more layer” if the skin
still looks pale and leathery.
Step 4: Halve and deseed the bulb
Take the peeled bulb section and cut it in half lengthwise. Scoop out the seeds and stringy bits with a spoon.
(An ice-cream scoop works ridiculously well here, if you have one.)
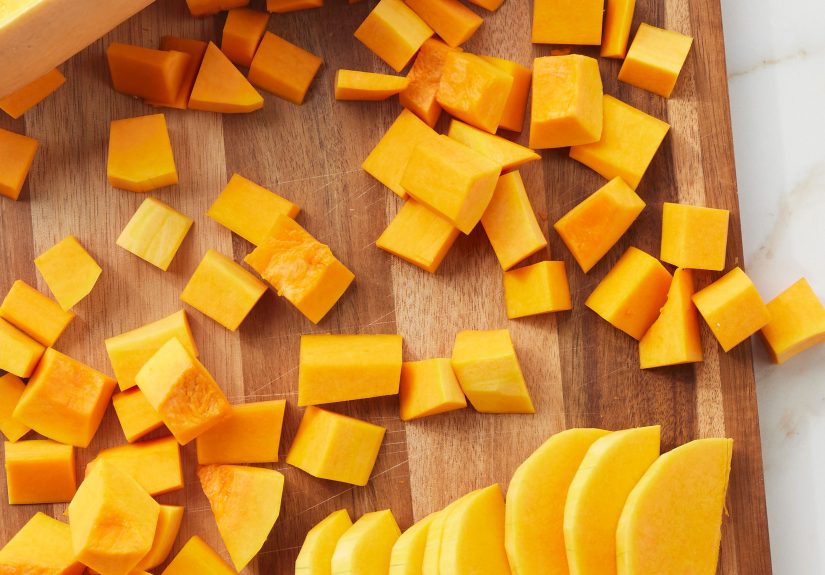
Step 5: Make planks, then sticks, then cubes
Here’s the trick to tidy, safe butternut squash cubes: always keep a flat side on the cutting board.
-
Neck: Slice it lengthwise into planks (about 3/4–1 inch thick), stack planks, cut into sticks,
then crosswise into cubes. - Bulb halves: Place each half cut-side down. Slice into planks, then sticks, then cubes.
For most recipes, aim for 3/4-inch to 1-inch cubes. They roast evenly and don’t turn into mush.
For soups, smaller dice cooks faster; for roasting, larger cubes hold their shape better.
The Microwave Hack: Make It Safer Before You Slice
If your squash feels like a rock (or you’re working with a peeler that’s seen better decades), microwaving can
soften the skin just enough to make cutting and peeling easier.
How to do it safely
- Pierce the squash skin all over with a fork (so steam can escape).
- Optional but helpful: lightly score a shallow line where you plan to cut.
- Microwave the whole squash for 2–5 minutes, depending on size.
- Let it rest until cool enough to handle. Then proceed with trimming, peeling, and cutting.
You’re not trying to cook itjust taking the edge off the toughness. Think “slightly more cooperative,” not “baby food.”
The No-Peel Method: Roast First, Deal With It Later
If your end goal is mashed squash, purée, soup base, or any dish where you’ll scoop the flesh, you can skip peeling
and chopping entirely.
Two easy options
-
Roast halved squash: Cut the squash lengthwise, scoop seeds, roast cut-side down until tender,
then scoop out the flesh. - Roast whole squash: Roast until very tender, then peel and scoop once it’s cool enough to handle.
This approach is slower in the oven, but faster on your nerves. It also reduces knife workone of the safest upgrades
you can make if you’re anxious about cutting winter squash.
Common Mistakes That Lead to Injuries (And How to Avoid Them)
1) “My board is fine.” (It is not fine.)
A sliding cutting board turns a careful slice into a surprise event. Use that damp towel underneath. Every time.
2) Using a dull knife “because it feels safer”
Dull knives force you to push harder, which increases the chance of slipping. A sharp knife bites predictably.
If you don’t remember the last time your knife was sharpened… that’s your answer.
3) Trying to cut the whole squash in half first
It’s tempting, but the shape works against you. Breaking it into neck and bulb first gives you smaller pieces with
better stability.
4) Cutting through the stem end like it owes you money
That stem end can be woody and stubborn. Trim it off, create flat surfaces, and choose calm, controlled cuts.
If you feel yourself forcing it, stop and switch tactics (microwave briefly, or roast first).
Bonus: Don’t Throw Away the Seeds (They’re Snacks)
Scoop out the seeds, rinse off the stringy bits, pat dry, toss with a little oil and seasoning, and roast until crisp.
They’re like pumpkin seeds’ slightly sweeter cousin.
Storage and Meal Prep Tips
- Fridge: Store peeled cubes in an airtight container for 3–5 days.
- Freeze: Freeze cubes on a tray first (so they don’t clump), then transfer to a bag for longer storage.
- Roast-and-scoop: Roasted flesh can be refrigerated and used for soup, baking, or quick sides.
Quick Cutting Cheatsheet
- Stabilize board with a damp towel.
- Trim ends to create flat surfaces.
- Separate neck and bulb.
- Peel with a Y-peeler (multiple passes if needed).
- Cut bulb lengthwise, scoop seeds.
- Keep flat side down; cut planks → sticks → cubes.
- Microwave 2–5 minutes if it’s dangerously tough.
- Roast first if you only need the flesh.
Real-Life Kitchen Experiences (An Extra of Squash Wisdom)
The first time I cut a butternut squash, I treated it like an oversized carrot. I set it on a flimsy board, grabbed a
“pretty sharp” knife (translation: not sharp), and attempted to slice straight down the middle. The squash rolled,
the board slid, and my confidence evaporated faster than boiling pasta water. I didn’t get hurt, but I did gain a new
respect for vegetables with a defensive strategy.
The next attempt went bettermostly because I changed my mindset. Instead of trying to “defeat” the squash, I started
trying to control it. That’s the whole game. Flat surfaces are everything. Once you trim the ends and give the
squash a stable base, it stops acting like it’s training for an escape room.
My favorite lesson came from the peeler. I used to think peeling was optional, or worse, a punishment. Then I tried a
Y-peeler on a freshly trimmed squash and realized: peeling isn’t the hard partpeeling a round, wobbly squash is.
Standing the squash upright on a flat end turned peeling from an upper-body workout into something closer to normal
human behavior. I also learned you often need more than one pass. If you stop at “tan with greenish streaks,” you
haven’t peeled; you’ve just annoyed the squash.
Another time, I was cooking for friends and bought the biggest butternut squash I could find because I was feeling
ambitious (and apparently wanted to host a small agricultural festival). That squash was so firm it felt like it had a
gym membership. I did the smart thing: I microwaved it for a few minutes after poking holes in the skin. The change
wasn’t dramaticno collapse, no steam explosion, nothing scarybut it made the skin just pliable enough that my knife
didn’t skid. That was the moment I became a “microwave hack” believer.
Finally, there’s the “roast first” revelation. When I’m making soup or purée, I don’t cube at all. I cut the squash in
half, scoop out the seeds, roast it, and then scoop the flesh like it’s a baked sweet potato. It feels almost like
cheating. And honestly? In the kitchen, safe cheating is the best kind. The goal isn’t to prove you can wrestle a
winter squash into submission. The goal is to get dinner on the table with all ten fingers still invited.
Conclusion: Your New Rule Is Control, Not Courage
Cutting butternut squash safely is less about being fearless and more about being strategic. Stabilize everything,
use a sharp knife, break the squash into manageable pieces, and choose shortcuts (microwave or roast-first) when it
makes sense. With the right approach, you’ll spend less time wrestling and more time eating.