Table of Contents >> Show >> Hide
- What “Group Worksheets” Means (And What It Doesn’t)
- When Grouping Worksheets Is the Smart Move
- How to Group Worksheets in Excel
- What You Can Do While Sheets Are Grouped
- Step-by-Step Example: Add the Same Formula Across Multiple Worksheets
- How to Ungroup Worksheets in Excel (Do This Before You Forget)
- Common Mistakes (And How to Avoid Excel Regret)
- Quick Cheat Sheet: Grouping vs. Selecting vs. Printing
- Tips for Cleaner, Safer Grouping
- Grouping Worksheets on a Mac (Quick Note)
- Conclusion: Make Excel Do the Repetitive Work for You
- Real-World Experiences: What Actually Happens When People Use Sheet Grouping (500+ Words)
If you’ve ever found yourself repeating the same formatting, formulas, or print settings across multiple Excel sheets, congratulations: you’ve discovered the ancient Excel curse known as “copy/paste until your soul leaves your body.” The cure is simpler than you thinkgrouping worksheets.
Grouping lets you select multiple worksheet tabs so that changes you make on one sheet happen on all the grouped sheets in the exact same location. It’s a huge time-saveras long as you remember to ungroup when you’re done, because the “Oops, I just edited 12 sheets at once” story is a classic. When sheets are grouped, Excel shows [Group] in the title bar to warn you.
What “Group Worksheets” Means (And What It Doesn’t)
Grouping worksheets = selecting multiple sheet tabs
When you group worksheets, you’re not merging data or combining sheets. You’re simply selecting multiple worksheet tabs so Excel treats your actions (typing, formatting, adjusting column widths, setting page layout, etc.) as a “do this everywhere” command across the selected sheets.
Not the same as “Group” in the Data tab (outlines)
Excel also has a totally different “Group” feature under the Data tab that collapses/expands rows and columns (outline grouping). That’s about structuring data within a sheet, not managing multiple worksheets.
When Grouping Worksheets Is the Smart Move
- Standardizing templates (headers, fonts, number formats) across monthly or department sheets.
- Entering the same formula into the same cell across many sheets (like putting totals in cell B7 everywhere).
- Applying print/page setup settings to multiple sheets at once (margins, orientation, scaling).
- Bulk cleanup: deleting the same row/column, adjusting column widths, freezing panes, etc.
Grouping works best when the worksheets already share the same general layout and structurethink “January, February, March…” sheets that look identical except for the data.
How to Group Worksheets in Excel
Method 1: Group adjacent worksheets (the Shift-click method)
- Click the first worksheet tab you want in the group.
- Hold Shift.
- Click the last worksheet tab you want. Everything in between is selected.
This is perfect for grouping a consecutive run of sheetslike Q1 (Jan–Mar) or a set of regional tabs that sit next to each other.
Method 2: Group non-adjacent worksheets (the Ctrl-click method)
- Click the first worksheet tab you want.
- Hold Ctrl (Windows).
- Click each additional worksheet tab you want to add.
This is great when you want “only these specific sheets,” like grouping just the city tabs that are missing the same formula.
Method 3: Group all worksheets (Select All Sheets)
- Right-click any worksheet tab.
- Choose Select All Sheets.
This is the nuclear option (in a good way): format or adjust settings once, and every sheet gets the same treatment. Excel also notes that when you group all worksheets, clicking around the tabs can end the groupingso watch the [Group] indicator like it’s a “check engine” light.
How do you know worksheets are grouped?
- [Group] appears in the workbook title bar.
- Grouped sheet tabs often look visually distinct (many guides note they appear “white” compared with others).
- Edits you make on one sheet instantly appear on the other grouped sheets in the same cell locations.
What You Can Do While Sheets Are Grouped
Think of grouping as a “broadcast mode” for your actions. Many common tasks apply cleanly across grouped worksheets:
- Enter data in the same cell across sheets (e.g., type “Sales” in A1 everywhere).
- Add formulas that match the same layout (e.g., put a SUM in B7 across multiple tabs).
- Format: fonts, borders, number formats, alignment, column widths.
- Page setup: margins, orientation, scalinghelpful before printing multiple sheets.
Excel’s own guidance explicitly calls out using grouped selection to enter/edit on several worksheets at once, and to format or print a selection of sheets together.
Step-by-Step Example: Add the Same Formula Across Multiple Worksheets
Let’s say your workbook has sheets for cities (London, Paris, Berlin), all with the same layout. You want a consistent total formula in cell B7 on each sheet.
- Group the city sheets (Ctrl-click each tab, or Shift-click a range).
- Click into B7 on one of the grouped sheets.
- Enter your formula (example:
=SUM(B2:B6)). - Press Enter.
- Check another grouped sheetB7 should match.
This is essentially the same “single edit, multiple sheets” workflow Microsoft demonstrates: when sheets are grouped, a formula change on one sheet is applied to the others in that group in the same location.
How to Ungroup Worksheets in Excel (Do This Before You Forget)
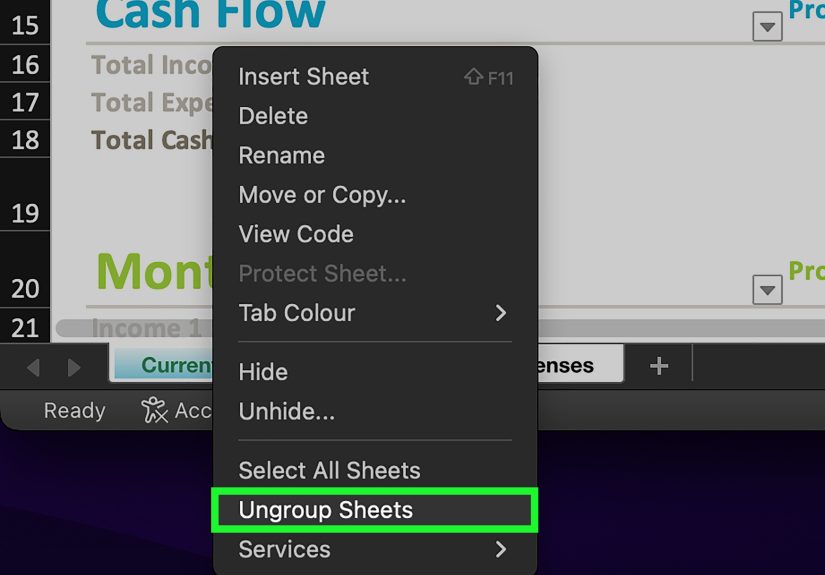
Option 1: Right-click a grouped tab → Ungroup Sheets
- Right-click any worksheet tab in the group.
- Select Ungroup Sheets.
This is the most direct method and is explicitly recommended in Microsoft’s instructions.
Option 2: Click a sheet tab outside the group
If you grouped only some worksheets (not all), you can simply click a worksheet tab that wasn’t included to cancel the grouped selection.
Option 3: “I only want to remove one sheet from the group”
If you grouped multiple non-adjacent sheets and want to remove just one, hold Ctrl and click that sheet tab again to toggle it off the selection (i.e., ungroup that sheet from the group).
Common Mistakes (And How to Avoid Excel Regret)
Mistake #1: Forgetting you’re in Group mode
This is the #1 way people “mysteriously” mess up multiple sheets at once. If you see [Group] in the title bar, pause. Take a breath. Then decide if you actually meant to be in bulk-edit mode.
Mistake #2: Grouping sheets that don’t share the same layout
Grouping is most powerful when sheet structures match. If one sheet has a different header row, missing columns, or a different table placement, you can end up applying changes in the wrong spots. If your worksheets aren’t aligned, consider standardizing layout first (or fix them one by one).
Mistake #3: “Why did my print settings change on every sheet?”
Page setup and print settings are a sneaky one: if you adjust margins or scaling while sheets are grouped/selected, those settings can apply across the selected worksheets. That’s great when intentionalconfusing when accidental. The fix is simple: ungroup, then apply unique settings only where needed.
Quick Cheat Sheet: Grouping vs. Selecting vs. Printing
| Goal | Best Move | Why It Works |
|---|---|---|
| Same formatting across 12 monthly tabs | Right-click tab → Select All Sheets | One set of changes applies to every sheet |
| Same formula in the same cell across 3 specific sheets | Ctrl-click those sheet tabs | Edits apply across grouped worksheets in the same location |
| Print a subset of sheets together | Select/group the sheets, then print | Excel supports printing a selection of sheets |
| Stop bulk edits before you accidentally “fix” everything | Right-click a grouped tab → Ungroup Sheets | Ends grouped selection instantly |
Tips for Cleaner, Safer Grouping
- Start from a template sheet: Copy a “master” worksheet first, then group to apply final polish.
- Keep an eye on the title bar: [Group] is Excel’s way of saying, “Are you sure about that?”
- Use grouping for structure, then ungroup for details: Standardize the layout together; customize numbers separately.
- Do a quick spot-check: After a bulk change, click through a couple sheets to confirm everything landed where you expected.
Grouping Worksheets on a Mac (Quick Note)
Many Excel concepts are the same on macOS, but key modifiers may differ. Some training resources note using the Command (⌘) key on a Mac for selecting non-adjacent sheet tabs (similar to Ctrl on Windows), and the same idea applies: select multiple tabs, look for the grouped state, then ungroup when done.
Conclusion: Make Excel Do the Repetitive Work for You
Grouping and ungrouping worksheets is one of those “small skill, huge payoff” Excel tricks. Use it to apply consistent formatting, formulas, and print settings across multiple sheetsespecially when those sheets share the same structure. Just remember the golden rule: if you see [Group], you’re in bulk-edit mode. Un-group as soon as you’re done so your future self doesn’t open the file and whisper, “Why is everything changed?”
Real-World Experiences: What Actually Happens When People Use Sheet Grouping (500+ Words)
In real workplaces, grouping worksheets usually shows up in one of two moments: (1) when someone is trying to be efficient, or (2) when someone is panicking because something “mysteriously” changed across multiple tabs. Both are normal. The difference is whether you recognize the signs and use grouping intentionally.
A common scenario looks like this: a finance team has a workbook with 12 monthly sheets. Each month follows the same layoutrevenue lines, expense categories, totals at the bottom. Someone updates the brand font, adds a new header row, or adjusts column widths to fit longer vendor names. Doing that 12 times is slow and error-prone, so the person selects all sheets, makes the changes once, and suddenly the workbook looks consistent again. This is the “grouping success story,” and it’s exactly why Excel supports working on multiple sheets at once.
Another everyday experience: printing. People often want each monthly sheet to print with the same margins and scaling, especially for packets that go to leadership or clients. The fastest approach is selecting the relevant sheet tabs first, then applying Page Setup changes one time so the selected sheets share settings. The catch is that page layout changes can “leak” across multiple tabs if sheets remain grouped after you finish. Users frequently report confusion like “Why did every tab switch to landscape?”and the fix is almost always: ungroup, then set unique layouts only on the sheets that truly need them.
The most relatable (and slightly funny) experience is the accidental group edit. It usually starts innocently: you meant to click a different sheet tab, but you Ctrl-clicked instead. Now multiple tabs are selected, and Excel quietly adds [Group] to the title bar. If you don’t notice, you might apply a border to a table, delete a row, or type a value into a header cellthen later wonder why several sheets “copied” your action. People discover the pattern when they flip tabs and see the same change repeated like Excel is mocking them. The title bar indicator exists for a reason: it’s a bright, simple warning that your actions will affect more than one worksheet.
More advanced teams use grouping as part of a “template discipline.” They maintain one pristine template sheet with locked formatting and consistent formulas. Every month (or every project), they duplicate that sheet, rename it, and then use grouping only for final alignmentlike adjusting print areas, confirming column widths, or applying a new conditional formatting rule that should exist everywhere. This reduces drift (the slow slide where each tab becomes slightly different over time). It also makes workbooks easier to audit because the structure stays consistent from tab to tab.
The biggest “pro move” experience is knowing when not to group. If your sheets don’t share the same structuremaybe one month has extra rows for a special campaign, or one department tracks additional categoriesgrouping can create mismatched edits that land in the wrong places. In those situations, people often group only the truly identical tabs (e.g., standard months), and leave the outliers ungrouped. The point isn’t to group everything; it’s to group the right things so Excel amplifies your intent instead of amplifying your mistakes.
If there’s one takeaway from how people actually use this feature, it’s this: grouping worksheets is like giving Excel a megaphone. When you’re delivering the right message (“make these sheets match”), it’s amazing. When you’re muttering to yourself (“why isn’t this working”), that megaphone can get you into trouble fast. Watch for [Group], use grouping on purpose, and ungroup as soon as you’ve finished the bulk changes.