Table of Contents >> Show >> Hide
- Why Moss Is Worth Growing
- How to Grow Moss in 13 Steps
- Step 1: Start with the right location
- Step 2: Decide whether moss actually fits the site
- Step 3: Match the moss to the conditions you have
- Step 4: Test the soil and check the surface
- Step 5: Remove competition
- Step 6: Fix only the problems that matter
- Step 7: Prepare the planting surface
- Step 8: Choose your planting method
- Step 9: Transplant the moss carefully
- Step 10: Press it firmly into place
- Step 11: Water with a mist, not a flood
- Step 12: Be patient for four to six weeks
- Step 13: Maintain it lightly and consistently
- Common Mistakes That Make Moss Fail
- Where Moss Looks Best in the Landscape
- Real-World Moss-Growing Experiences: What Gardeners Usually Learn the Hard Way
- Final Thoughts
If grass is the high-maintenance roommate of the garden world, moss is the calm friend who shows up in a soft green sweater, asks for a little shade, and somehow makes everything look expensive. A moss garden can turn a gloomy corner, a path between pavers, or a patch where turf keeps failing into something lush, textured, and quietly dramatic. It is not a miracle plant, though. Moss has opinions. It likes certain conditions, ignores others, and absolutely refuses to become a sunny backyard football field.
The good news is that once you understand what moss wants, growing it is much easier than most people think. The trick is not forcing moss to behave like grass. Moss is its own tiny kingdom, and it thrives when you stop fighting the site and start working with it. Below is a practical, step-by-step guide to growing moss successfully, whether you want a velvety carpet under trees, a dreamy moss pathway, or a soft green accent between stones.
Why Moss Is Worth Growing
Moss is more than pretty filler. It creates a low, dense carpet that feels calm and established, even in spaces where other plants sulk. It can grow on soil, rocks, wood, and old concrete. It does not need mowing, rarely asks for fertilizer, and brings a woodland look that can make an ordinary backyard feel like it belongs in a fantasy novel with better landscaping.
It is also a smart choice for places where lawn grass struggles. If you have shade, moisture, compacted soil, or awkward spaces between stepping stones, moss may be a better match than constantly trying to revive turf that clearly wants a different career.
How to Grow Moss in 13 Steps
Step 1: Start with the right location
Moss usually grows best in shade or filtered light, especially in spots that stay damp without becoming swampy. Begin by studying the area you want to plant. Does it get morning sun and afternoon shade? Is it tucked under trees? Does it stay cool and moist longer than the rest of the yard? If the answer is yes, you are off to a strong start.
Most mosses dislike hot, blazing sun. That does not mean every species needs deep darkness, but it does mean you should not expect a lush moss carpet in the same spot where tomatoes are living their best life.
Step 2: Decide whether moss actually fits the site
This sounds obvious, but it saves a lot of frustration. Moss is ideal for low-traffic areas, shady pathways, courtyard edges, woodland gardens, and spaces between pavers. It is not the best choice for a play area, a dog racetrack, or any spot that gets stomped daily by humans wearing enthusiasm and heavy shoes.
If you want something soft and green where grass keeps failing, moss can be brilliant. If you need a surface that survives constant foot traffic, moss will file a formal complaint and leave.
Step 3: Match the moss to the conditions you have
This is one of the biggest secrets to success. Do not just grab any moss and hope for the best. Try to use moss that already thrives in conditions similar to your target area. If your planting space is shaded and moist, source moss from a shaded and moist area. If it is growing on stone, use moss that already likes stone. Moss is very much a “same vibe only” kind of plant.
You can collect moss from your own property, get permission to transplant it from someone else’s land, or buy it from a nursery or garden supplier. Ethically sourced local moss is usually the easiest to establish because it is already adapted to your climate.
Step 4: Test the soil and check the surface
Moss often prefers acidic conditions, and many successful moss gardens do best around the moderately acidic range. If your site is very alkaline, moss may still survive depending on the species, but growth is often easier when the conditions lean acidic. This matters most when planting on soil rather than rock or wood.
Also look at the surface itself. Moss does not need deep, fluffy soil. In fact, it is often happier on firm, stable ground where it can make good contact. Loose, rich garden soil designed for perennials is not necessarily moss paradise.
Step 5: Remove competition
Before planting, clear out grass, weeds, leaf litter, pine needles, and any loose debris. Moss hates being smothered by a daily blanket of yard clutter. If roots from weeds or turf remain, they will try to reclaim the space and bully your new moss garden before it gets settled.
This is the least glamorous part of the job, but it matters. Think of it as preparing the stage before the star arrives. Moss may be chill, but it does not enjoy sharing.
Step 6: Fix only the problems that matter
If the area turns into a puddle for days, improve drainage a bit. If thick shrub branches are trapping so much debris that the site stays buried, prune lightly. If the spot gets more direct sun than you realized, add shade with nearby plantings or rethink the location.
What you do not need to do is turn the site into an ideal flower bed. Moss is not asking for compost tea, luxury amendments, and a motivational speech. It just wants a reasonably suitable place with the right light and moisture.
Step 7: Prepare the planting surface
Rake the soil lightly or roughen the surface just enough to help the moss grip. Then firm it back down. On stone or wood, scrub away loose dirt, algae, or decaying debris so the moss can sit directly on the surface. Good contact is crucial. If the moss is floating above the site like a tiny green throw rug, it will dry out faster and establish more slowly.
For pathways or spaces between pavers, loosen the thin layer of soil where the moss will sit, then press it back so it is even and stable.
Step 8: Choose your planting method
There are three common ways to plant moss: sheets, plugs, and slurry. Sheets are pieces of living moss you lay over the surface like a green patchwork quilt. Plugs are small clumps spaced apart and allowed to fill in over time. Slurry is the famous blender method, usually a mix of moss with water and sometimes buttermilk or another liquid, brushed or poured onto rough surfaces.
For most gardeners, sheets and plugs are the most predictable. Slurry can work, especially on rock or uneven surfaces, but it is not instant magic. If you try it, think of it as a side experiment, not a guarantee from the gardening universe.
Step 9: Transplant the moss carefully
Lay sheets or place plugs directly onto the prepared surface. Keep the green side up, the brown side down, and fit the pieces closely together if you want faster coverage. Small gaps are fine; moss can spread, but patience helps. And by patience, I mean actual patience, not the kind where you check every eight minutes and whisper, “Are you growing yet?”
If you are working between stones, tuck the moss neatly into the gaps and edges. If you are planting on soil, do not bury it. Moss should sit on the surface, not disappear under it.
Step 10: Press it firmly into place
After placing the moss, press it down so it makes solid contact with the soil, rock, or wood. You can use your hands, a flat board, or even gently walk over a protected board laid on top of the moss to tamp it evenly. This step helps prevent air pockets and keeps the moss from drying around the edges.
If the site is sloped, consider using small twigs, floral pins, or light netting temporarily to stop pieces from sliding while they establish.
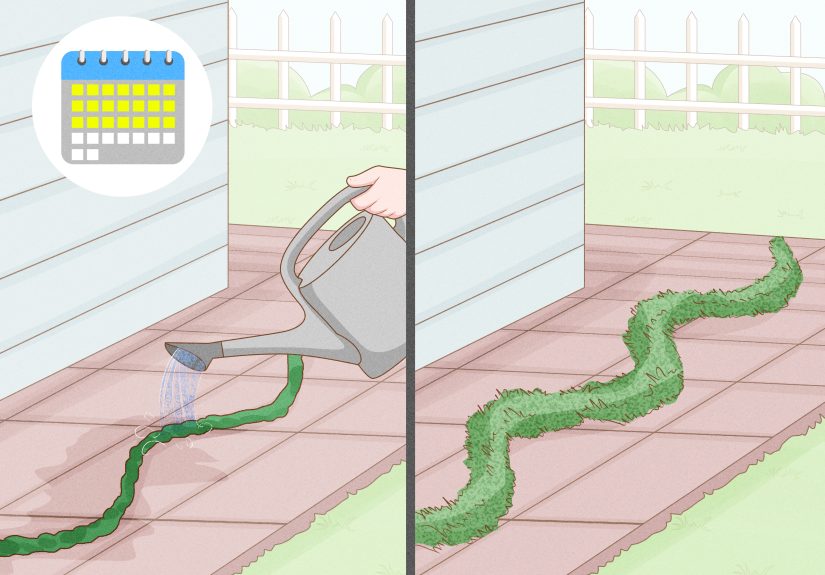
Step 11: Water with a mist, not a flood
Freshly transplanted moss needs regular moisture while it settles in. Mist it gently so the surface stays evenly damp. Avoid blasting it with a strong hose stream unless your goal is to send your beautiful new moss patch on a surprise road trip.
During the establishment period, check it often, especially in warm weather. Moss can survive dry spells once established, but new transplants need consistent moisture to knit themselves to the surface.
Step 12: Be patient for four to six weeks
Moss is not dramatic, but it is slow. In many cases, you will start to see it settle and look more anchored within several weeks. Full coverage or that rich, velvet look can take longer depending on the species, the season, and how ideal the site really is.
This is the part where many gardeners get nervous and overhelp. Resist the urge to fertilize, dig around, or constantly relocate pieces. Moss does not want a personal trainer. It wants time.
Step 13: Maintain it lightly and consistently
Once established, moss care is refreshingly simple. Remove fallen leaves and twigs before they pile up. Pull weeds while they are small. Avoid lime if you want moss to keep thriving, and skip heavy fertilizer applications that favor grass and other plants instead. If the area gets drier than expected, water during long hot spells. If traffic increases, add stepping stones so the moss is not crushed repeatedly.
In other words, maintenance is less about doing more and more about not sabotaging the conditions that made moss happy in the first place.
Common Mistakes That Make Moss Fail
The most common mistake is trying to grow moss where the site is simply too sunny and dry. Close behind that is poor surface contact. Gardeners sometimes lay moss down, admire it, water it once, and assume nature will take it from there. Nature, meanwhile, is busy and would like clearer instructions.
Another mistake is treating moss like a typical ground cover that wants rich soil and regular feeding. Moss does not have true roots like most plants, and it does not respond the way turf or flowering perennials do. Too much interference can work against you.
Finally, do not ignore debris. A beautiful moss patch can vanish under leaves surprisingly fast. A quick clean-up after storms or in fall makes a huge difference.
Where Moss Looks Best in the Landscape
Moss is especially effective between stepping stones, around birdbaths, beneath Japanese maples, along shaded garden paths, and in woodland-style plantings. It can soften hard edges and make rock gardens look older and more natural. It also works well in tiny spaces where traditional planting feels crowded or fussy.
If you want a simple design trick, pair moss with stone, weathered wood, and a limited color palette. Moss already brings plenty of texture. Let it be the star instead of surrounding it with twelve other plants competing for attention like a botanical reality show.
Real-World Moss-Growing Experiences: What Gardeners Usually Learn the Hard Way
Ask people who have actually tried growing moss, and you will hear a pattern. First comes optimism. Then comes confusion. Then, if they stick with it, comes the moment they realize moss was right all along. The site matters more than the gardener’s wishes.
One common experience is discovering that the “problem area” in the yard was never really a problem. It was a moss garden waiting for permission. The place where grass was patchy, tree roots were bossy, and sprinklers never seemed to fix anything often turns out to be perfect for moss. Gardeners stop fighting the shade and start using it, and suddenly the whole space looks intentional instead of unlucky.
Another experience people report is how different moss looks up close. From a distance, it reads as one soft green carpet. Kneel down, though, and it becomes a miniature landscape full of textures, shades, and forms. Some patches look feathery, some look dense and plush, and some resemble tiny forests designed for beetles with very ambitious real-estate plans. That close-up magic is part of why moss gardens feel so calming. They reward slow looking.
There is also the lesson of restraint. New moss growers tend to fuss. They water too hard, move pieces around too often, or try to improve the site with extra products. Experienced gardeners eventually realize that moss likes a gentle hand. Press it in well, keep it damp, remove debris, and then back away with dignity. The less you panic, the better it usually does.
Many gardeners are surprised by how seasonal moss can feel. In cool, moist weather, it often looks vivid and plush. In hotter, drier periods, it may look duller, tighter, or temporarily tired. That does not always mean it is dead. Moss has a talent for looking unimpressed by summer and then bouncing back when moisture returns. The first time that happens, people usually learn an important lesson: ugly for a week is not the same as gone forever.
Then there is the leaf issue. Nearly everyone underestimates it at first. A gorgeous moss patch under trees sounds poetic until fall drops an entire novel’s worth of leaves on top of it. Moss gardeners quickly learn the value of light, regular clean-up. Not a full weekend of raking drama, just a gentle sweep now and then. Five minutes here and there can protect months of progress.
Perhaps the most satisfying experience is watching a space become more interesting with less effort. A shady side yard that once looked flat and forgotten starts to look settled, layered, and serene. Stones seem older. Water features look cooler. Even a plain path gains a quiet kind of charm. Moss does not scream for attention, but it changes the mood of a garden in a big way.
That is why people who successfully grow moss tend to become a little evangelical about it. Not in an annoying way. More in a “please stop trying to grow miserable grass under that giant oak” way. Once they see how well moss fits the right site, it becomes obvious that the smartest garden choices are often the ones that cooperate with the landscape instead of arguing with it.
Final Thoughts
Growing moss is less about forcing life into a space and more about recognizing where it already wants to happen. Give it shade, moisture, good contact, low competition, and a little patience, and moss can transform difficult corners into the most beautiful parts of the yard. It is soft, low-key, and surprisingly elegant. Basically, it is the introvert of the plant world, and that is exactly its charm.
If your yard has a cool, damp area where grass keeps disappointing you, stop taking it personally. That patch may not want a lawn. It may want moss.