Table of Contents >> Show >> Hide
- Before You Start: A Quick Reality Check for Beginners
- How to Hold a Straight Razor: 10 Steps
- Step 1: Learn the parts you’ll actually touch
- Step 2: Start with your dominant hand and a dry run
- Step 3: Open the razor to a stable position
- Step 4: Build a beginner grip on the tang (not the scales)
- Step 5: Grip firmlybut not like you’re wrestling a crocodile
- Step 6: Set the blade angle (about 20–30 degrees, usually near 30)
- Step 7: Use your free hand to flatten the skin (gently)
- Step 8: Start on the sideburns or upper cheek
- Step 9: Shift grips for curves and direction changes
- Step 10: Finish safely, then close and store the razor properly
- Common Straight Razor Holding Mistakes (and How to Fix Them)
- Safety and Skin Tips That Make Holding Easier
- Quick FAQ
- Conclusion
- 500+ Words of Related Experience and Practical Insights
Learning how to hold a straight razor can feel a little dramatic at first. One minute you’re standing at the sink like a normal person, and the next you’re holding a gleaming blade thinking, “I suddenly understand why barbers look so calm and mysterious.” The good news: straight razor control is a skill, not magic. And once you learn the right grip, angle, and hand position, shaving gets safer, smoother, and a whole lot less nerve-racking.
This guide breaks the process into 10 beginner-friendly steps focused on how to hold a straight razor properlynot just during the first grip, but while moving across different parts of the face. You’ll also learn how to avoid common mistakes like gripping the scales, using too much pressure, and turning a simple shave into an accidental exfoliation session. (Your skin did not ask for that.)
Before You Start: A Quick Reality Check for Beginners
A straight razor can give an incredibly close shave, but it rewards patience and punishes rushing. If this is your first time, practice your grip with the razor closed or with a non-sharp training setup before you put blade to skin. Build muscle memory first. Shaving second.
Also, “holding” a straight razor isn’t one fixed position forever. Experienced shavers often shift grips depending on whether they’re shaving the cheeks, jawline, upper lip, or neck. That’s normal. The goal is not to memorize one perfect poseit’s to learn safe control, then adapt as needed.
How to Hold a Straight Razor: 10 Steps
Step 1: Learn the parts you’ll actually touch
Before you grip anything, learn the anatomy: the blade, spine (the thick back edge), shank/tang (the narrow metal section near the pivot), and scales (the handle). Why this matters: your fingers should control the razor from the tang/shank and spine areanot by clutching the scales like a TV remote.
Think of the scales as support, not your main steering wheel. Your control comes from stable finger placement near the metal, where small movements translate into precise blade control.
Step 2: Start with your dominant hand and a dry run
Use your dominant hand first. Yes, some people switch hands mid-shave. No, you do not need to do that on day one to earn a medal. Start where your coordination is strongest.
Do a few dry runs in front of the mirror. Practice moving the razor near your cheek (without touching skin) and rehearse how your wrist and elbow move together. The goal is to make the motion feel smooth and deliberate before adding lather, whiskers, and adrenaline.
Step 3: Open the razor to a stable position
Open the razor so the blade and scales form a wide anglemany beginners do well with a broad, stable opening (often around a “mostly open” position). A wider opening gives better balance and helps prevent awkward finger crowding near the pivot.
If the razor is too closed, your fingers can fight for space and your grip gets cramped. If it feels too wide to manage, slightly adjust until your hand feels balanced. Comfort matters because shaky hands don’t make clean lines.
Step 4: Build a beginner grip on the tang (not the scales)
A classic beginner grip puts your fingers around the tang/shank area for control. A common setup looks like this:
- Thumb supporting from underneath or along the side of the shank/tang
- Index and middle finger guiding on top/side for control
- Ring finger helping stabilize near the tang
- Pinky resting on or near the tang tail for balance (if comfortable)
Don’t worry if your exact finger placement looks slightly different from someone else’s diagram. The important part is control, balance, and keeping fingers off the edge. Straight razor shaving has fundamentals, but hand size and razor shape change the details.
Step 5: Grip firmlybut not like you’re wrestling a crocodile
The best straight razor grip is secure and relaxed. If you white-knuckle the razor, your hand tenses up, your wrist gets stiff, and your movements turn jerky. That’s how tiny nicks happen.
Aim for “firm handshake” pressure. Keep the wrist mostly straight and let larger arm/shoulder motion guide the stroke instead of over-flicking with your fingers. A controlled grip gives you precision; a death grip gives you drama.
Step 6: Set the blade angle (about 20–30 degrees, usually near 30)
Grip and angle work together. Once the blade touches the skin, keep it at a shallow angleroughly 20 to 30 degrees, with many beginner guides recommending about 30 degrees. Too steep, and the razor scrapes or cuts. Too flat, and it won’t cut hair efficiently.
A simple way to think about it: let the spine guide you. Start shallow, then adjust slightly until the blade glides and cuts cleanly. This is where slow practice pays off.
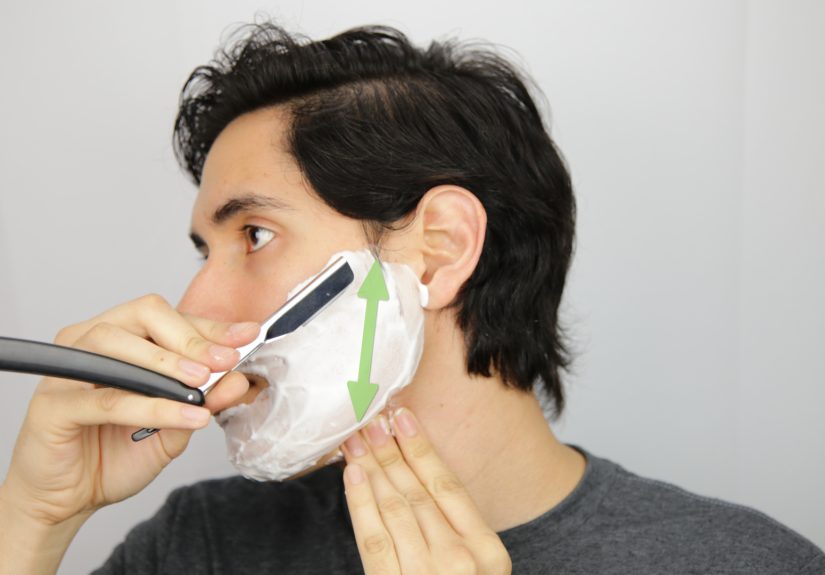
Step 7: Use your free hand to flatten the skin (gently)
Your non-dominant hand is not just hanging around for moral support. Use it to flatten and steady the skin so the blade meets a smoother surface. This is especially helpful on cheeks, jawline curves, and neck areas.
Important nuance: flattening skin is good; aggressively yanking or over-stretching is not. You want a smoother surface, not a trampoline. Gentle tension improves control and helps reduce skipping, especially when learning.
Step 8: Start on the sideburns or upper cheek
Beginners should practice on a flatter area firstusually the sideburns or upper cheek. These areas are easier to see, easier to angle, and less tricky than the chin or upper lip.
Use short, slow strokes with the grain. Keep the blade angle steady and pressure light. If a stroke doesn’t feel right, stop, reset your grip, and try again. The sink is not a racetrack, and your first shave shouldn’t be a speedrun.
Step 9: Shift grips for curves and direction changes
As you move to the jawline, neck, or upper lip, your beginner grip may need small adjustments. That’s normal. Many shavers rotate into a pinch-style grip for better control on upward strokes, or experiment with reverse/push grips once they gain experience.
The rule stays the same: each grip should keep the blade stable, your wrist controlled, and the edge moving in a predictable path. If you feel awkward, don’t force the stroke. Reposition your fingers, re-lather if needed, and take a cleaner angle.
Step 10: Finish safely, then close and store the razor properly
When you’re done, rinse the razor carefully, dry it thoroughly, and close it before setting it down. An open straight razor on the counter is a bad surprise waiting to happenfor you, your towel, or anyone else near the sink.
Rinse your skin, apply a soothing aftershave balm or moisturizer, and give your face a moment to calm down. If you feel irritation, stop additional passes and let your skin recover. A smooth shave tomorrow is better than a heroic over-shave today.
Common Straight Razor Holding Mistakes (and How to Fix Them)
1) Holding the scales instead of the tang/shank
This reduces control and can make the razor feel wobbly. Fix it by moving your fingers closer to the metal where the blade pivots and where the razor is designed to be guided.
2) Using a steep angle
A steep blade angle is one of the fastest ways to get scraping and cuts. Lower the angle and use shorter strokes until your hand learns what “glide” feels like.
3) Pressing like a cartridge razor
Cartridge razors often train people to add pressure. Straight razors are the opposite. Let the sharp edge and proper angle do the cutting.
4) Skipping skin prep
Dry hair fights back. Warm water, a damp towel, and shaving cream/gel help soften hair and reduce irritation.
5) Chasing perfection on pass one
Beginners often try for baby-smooth skin immediately. Start with a safe, comfortable shave first. Closeness improves as your grip improves.
Safety and Skin Tips That Make Holding Easier
Good skin prep makes blade control easier because the razor glides better. Wash first, shave on softened hair (often after a warm shower or warm compress), and use a lubricating shaving cream or gel. Shaving with the grain and rinsing after strokes can help reduce irritation and razor bumps.
If you develop razor burn, a cool washcloth and a gentle moisturizer can help soothe the skin. If irritation is severe, doesn’t improve, or keeps happening, take a break from shaving and consider talking with a healthcare professional. Technique matters, but skin type matters too.
Quick FAQ
Is there one “correct” straight razor grip?
Not exactly. There are standard beginner grips and common variations, but hand size, razor shape, and the area you’re shaving all affect what feels most controllable.
Should beginners switch hands?
Not required. Many beginners use one hand and adjust angle/position. Hand-switching can come later if it feels helpful.
What’s the best area to practice first?
Sideburns and upper cheeks. They’re flatter, easier to see, and less likely to punish sloppy angles than the chin or neck.
Conclusion
Learning how to hold a straight razor is really about building control in layers: grip, wrist position, blade angle, skin tension, and patience. Start with a stable beginner grip on the tang/shank, keep the angle shallow, use light pressure, and practice on easy areas first. As your confidence grows, your grip will naturally evolve for different strokes and facial contours.
The secret is not having fearless hands. It’s having trained hands. And once you do, a straight razor shave stops feeling intimidating and starts feeling like a skill you actually own.
500+ Words of Related Experience and Practical Insights
Below are composite, real-world style experiences and beginner patterns commonly reported by straight-razor learners (and frequently echoed by barbers and grooming guides). They’re included to give you a more practical sense of what “holding the razor correctly” feels like in everyday use.
One of the most common beginner experiences is realizing that the hardest part is not braveryit’s coordination. A new shaver often starts with a decent grip, but the moment the blade touches the face, the hand tightens. The razor is technically “held correctly,” but the grip becomes so tense that the stroke turns choppy. The fix is usually simple: pause, reset the fingers, loosen the hand, and shorten the stroke. Many people improve immediately when they stop trying to shave a whole cheek in one motion and instead work in tiny, controlled sections.
Another frequent experience is angle confusion. Beginners often think they’re shaving at 30 degrees, but they’re either too flat (nothing happens) or too steep (hello, irritation). A practical trick is to start with the spine closer to the skin than you think you need, then make micro-adjustments until the blade starts cutting cleanly. Once a person feels that “sweet spot” a few times, muscle memory develops fast. After that, holding the razor feels less like guesswork and more like steering.
Many first-timers also discover that grip changes are normalnot a sign they’re doing it wrong. A grip that feels perfect on the right cheek can suddenly feel clumsy near the jawline. That’s why experienced shavers talk about “grips” (plural). You might start with a standard beginner grip, then slightly roll your fingers for a better view or a safer approach to a curve. The important thing is not copying a photo exactly; it’s keeping the blade stable and predictable.
There’s also the “upper lip humbling moment.” Plenty of people feel confident after the cheeks, then reach the mustache area and instantly lose all swagger. That area has tighter space, stronger hair, and less room for awkward finger placement. A good response is to stop chasing a perfect pass, re-lather, reduce stroke length, and focus only on control. Even experienced shavers treat certain zones with extra patience.
Beginners who succeed long-term usually have one thing in common: they treat the first few shaves as practice sessions, not performance tests. They do fewer passes, skip hard areas if needed, and prioritize no cuts over maximum closeness. Ironically, this slower approach leads to better results sooner. The hands relax, angles improve, and the razor starts to feel like a tool instead of a tiny panic attack with a hinge.
In other words, if your first straight razor shave is a little awkward, congratulationsyou’re doing the same thing almost everyone does. Stay consistent, keep your grip controlled and relaxed, and the technique becomes smoother with every session.