Table of Contents >> Show >> Hide
- Why Landscape Timber Edging Is Worth the Effort
- Planning Your Landscape Timber Edging Project
- Tools and Materials You’ll Need
- Step-by-Step: How to Install Landscape Timber Edging
- Safety, Durability, and Maintenance Tips
- Design Ideas for Landscape Timber Edging
- Real-Life Experiences Installing Landscape Timber Edging
- Final Thoughts
If your flower beds are slowly creeping into the lawn and your mulch keeps
staging tiny escape missions every time it rains, it’s time for landscape
timber edging. The good news? Installing landscape timbers is a very doable
weekend DIY project. The better news? You can absolutely do it without
wrecking your back and your budgetif you plan it right.
In this guide, we’ll walk through how to install landscape timber edging
step by step: from planning and picking the right timbers to digging the
trench, setting a solid base, and securing everything with rebar or
landscape spikes. We’ll also talk about drainage, safety around
pressure-treated wood, and real-world lessons from people who’ve already
done this in their yards.
Why Landscape Timber Edging Is Worth the Effort
Landscape timber edging is one of the most practical and affordable ways to
define garden beds, walkways, playgrounds, and slopes. Compared with
plastic edging, timbers look more substantial and natural. Compared with
stone or concrete, they’re easier to cut, lighter to move, and typically
cheaper per foot.
Properly installed landscape timber edging:
- Keeps mulch, rocks, and soil from washing into the lawn.
- Creates a clean line between grass and planting beds.
- Helps control minor erosion on gentle slopes.
- Can double as a low retaining wall or raised-bed border.
- Gives your yard that “yes, someone actually cares here” look.
The key is not just dropping timbers on the ground and hoping for the best.
You need a stable base, good drainage, and solid anchors so those timbers
don’t twist, heave, or wander off over time.
Planning Your Landscape Timber Edging Project
Choose the Right Timbers
For edging, most homeowners use 4×4, 4×6, or 6×6 pressure-treated lumber
labeled for ground contact. “Above ground” treated wood
won’t hold up as well when it’s in constant contact with soil and moisture.
A few quick tips when choosing landscape timbers:
-
Look for straight pieces. Sight down the length of the
timber like you’re checking a pool cue. The straighter it is now, the
less you’ll fight it later. -
Check the treatment rating. For U.S. yards, look for
pressure-treated wood suitable for ground contact. Avoid creosote-treated
railroad ties near vegetable gardens, kids’ play areas, or where you’ll
sit or touch the wood frequently. -
Decide on height. One layer of 4×6 makes a nice,
low-profile border. Two or more layers of 6×6 can act like a short
retaining wall or raised bed.
Measure and Map the Layout
Grab a tape measure and walk the border you want to edge. Measure the full
perimeter and add at least 10–15 percent extra for cuts, corners, and “oops
moments.” Then mark the layout:
-
For straight lines, use stakes and mason’s line stretched tight for a
crisp edge. -
For curves, lay out a garden hose and adjust it until the line feels
natural and smooth.
Once you like the shape, mark along the string or hose with landscape paint
or sprinkle flour or sand to outline where your timber edging will go.
Check Slope, Drainage, and Utilities
Look at how water currently moves across your yard. If water tends to run
toward the area you’re edging, plan to use a gravel base and leave small
gaps or weep spaces so water can pass through instead of pooling.
Also, in the United States, remember to call 811 before you dig to have
underground utilities marked. You probably don’t want your edging project
to turn into a “hit the gas line” story.
Tools and Materials You’ll Need
Here’s a typical list for installing landscape timber edging around a bed
or path:
- Landscape timbers (4×4, 4×6, or 6×6, ground-contact rated)
- Shovel and spade or edging tool
- Wheelbarrow (for soil and gravel)
- Level (2-foot or 4-foot)
- Hammer or hand sledge
- Hand tamper or plate compactor (optional but very helpful)
- Gravel (typically 2–3 inches for a base)
- Landscape fabric (optional, for weed control)
- 12–24 inch rebar or landscape spikes
- Drill with long masonry or wood bits (3/8–1/2 inch)
- Deck screws or timber screws for stacking timbers
- Safety gear: gloves, eye protection, hearing protection
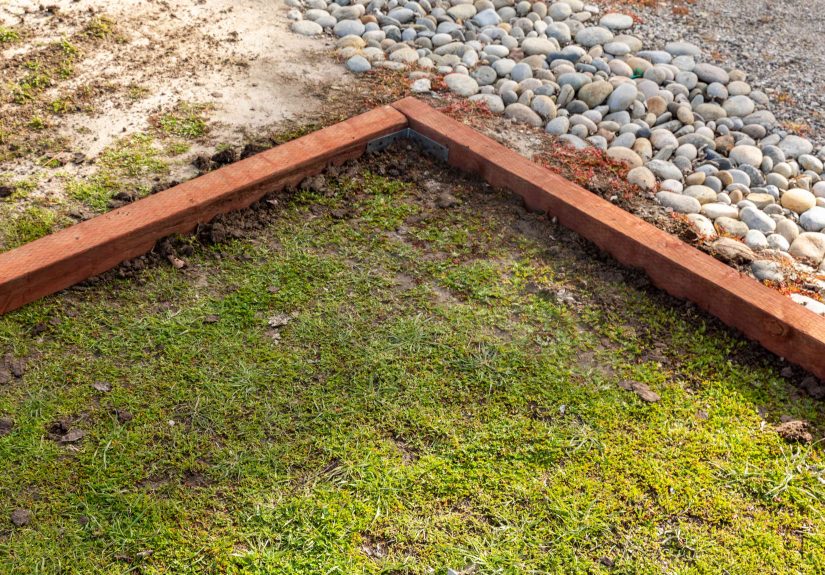
Step-by-Step: How to Install Landscape Timber Edging
1. Mark and Clear the Border
Use your stakes, string, or garden hose to mark the edge. Once the line is
set:
- Cut through the turf along the line with a spade or edging tool.
- Remove grass, weeds, and loose roots from the area where the timbers
will sit. - Clear rocks and debris so the trench can be smooth.
This prep work may not be glamorous, but skipping it is how you end up with
wobbly, uneven timber edging that annoys you every time you mow.
2. Dig and Prepare the Trench
Dig a trench along your marked line. For most landscape timber edging:
-
Make the trench about 6 inches deep and 2 inches wider than the width of
your timbers. -
Keep the bottom as flat as possible. Use a shovel, hoe, or rake to level
the soil. - Use a hand tamper to compact the soil so it doesn’t settle later.
If you’re edging a slope or building a low retaining wall, take your time
on this first course. A level, stable base layer makes everything else much
easier.
3. Add Gravel and Landscape Fabric
Add 2–3 inches of gravel to the bottom of the trench and rake it level.
Gravel improves drainage and helps keep your timbers from sitting in water,
which shortens their lifespan.
If you want to reduce weeds, roll out landscape fabric over the soil or
under the gravel (depending on your design). Cut slits where the rebar or
spikes will go. Secure the fabric with staples if needed.
4. Cut and Dry-Fit the Timbers
Before you commit to drilling and anchoring, dry-fit your timbers:
-
Lay out full-length timbers first, butted tightly end to end along the
trench. -
For corners, you can either butt them in a simple “L” or cut 45-degree
miters for a cleaner look. -
If the last piece would be very short (less than about 2 feet), adjust
your layout so both ends have similar length pieces. It looks better and
is more stable.
Use a level to check the tops of the timbers. Tap high spots down with a
mallet or add a little more gravel under low spots until everything is
straight and even.
5. Anchor the First Course with Rebar or Spikes
Once the first course of timbers looks good, it’s time to lock it in.
There are two main methods:
Using Rebar
-
Drill 3/8–1/2 inch holes through the timber and into the ground below,
spacing them about every 3–4 feet and near the corners. -
Drive 12–24 inch lengths of rebar through the holes with a sledgehammer
until the top of the rebar is slightly below the wood surface. - Use a short offcut of rebar as a punch if you need to sink it deeper.
Using Landscape Spikes
- Drill pilot holes slightly smaller than your spikes to reduce splitting.
-
Drive 10–12 inch landscape spikes through the timbers and into the soil,
again every 3–4 feet. - Countersink the heads slightly so they don’t snag mower wheels or feet.
Rebar is often more economical and very strong; spikes are convenient and
designed for this specific purpose. Either way, the goal is to make that
first course rock solid.
6. Stack and Fasten Additional Rows (If Needed)
If you’re building a taller border or low retaining wall with multiple
layers of landscape timbers:
-
Stagger joints so seams do not line up from one course to the next.
Think of how bricks are laidthat same idea helps your timbers resist
movement. -
Use long structural or timber screws to fasten the upper timbers to the
course below. Drive at least two screws at each overlap. -
For extra strength, you can drill and run rebar through multiple layers
at once in a few locations.
As you stack, keep checking for level and alignment. Small adjustments now
are much easier than trying to fix a crooked wall after it’s finished.
7. Backfill, Tidy Up, and Finish
With the timbers secured:
-
Backfill behind the edging with soil, gravel, or mulch, tamping lightly
as you go to remove voids. - Rake and smooth the lawn side so the grass can grow right up to the edge.
- Add your mulch, rock, or planting soil inside the bed.
If you like, you can stain or seal the exposed wood (using a product rated
for use on treated lumber) to help it last longer and better match other
features in your yard.
Safety, Durability, and Maintenance Tips
Pressure-Treated Wood Safety
Modern pressure-treated lumber in the U.S. typically uses copper-based
preservatives instead of older, more concerning chemicals, but it’s still
wise to be cautious:
- Wear gloves when handling and cutting.
- Wear a dust mask and eye protection when sawing.
-
Don’t burn leftover treated wood; dispose of it according to local
regulations. -
Avoid using heavily treated or creosote-soaked lumber around vegetable
beds, sandbox borders, or areas where kids will sit and play.
How to Keep Timbers Straight and Stable
Wood moves with moisture and temperature. To reduce twisting and bowing:
- Use ground-contact rated lumber and a gravel base so water can drain.
-
Anchor timbers with rebar or spikes instead of just laying them on the
soil. - Avoid super-long runs without anchors; fasten every few feet.
-
If timbers start to warp, tighten screws and replace badly twisted pieces
before they pull others out of alignment.
Long-Term Care for Landscape Timber Edging
Once installed, timber edging is low maintenance, but not completely
maintenance-free:
- Check annually for loose screws or spikes and tighten as needed.
-
Top off mulch to keep soil and organic matter from piling up against the
wood and trapping moisture. - Inspect for rot or insect damage, especially in shady, damp spots.
Design Ideas for Landscape Timber Edging
Once you know how to install landscape timber edging, you’ll start seeing
possibilities all over your yard:
-
Raised vegetable beds: Two or three courses of 6×6
timbers make sturdy raised beds that are easy to reach and maintain. -
Pathway edges: Single-course 4×6 timbers neatly frame
gravel or mulch paths and keep material from spilling into the lawn. -
Playground borders: Timbers create a defined edge for
wood chips or rubber mulch around swing sets and play structures. -
Terraced slopes: Short retaining runs of timbers help
break up a sloped yard into flatter planting areas.
Real-Life Experiences Installing Landscape Timber Edging
On paper, installing landscape timber edging sounds straightforward: dig,
drop in wood, hammer in some rebar, done. In real backyards, a few extra
realities show uptree roots, hidden rocks, surprise sprinkler lines, and
“this ground is absolutely not level” moments. Learning from other
homeowners’ experiences can save you time and frustration.
One common mistake people share is underestimating how important the first
course really is. Think of that bottom row of timbers as the foundation of
a house. If it’s wavy, every layer on top will also be wavy. DIYers who
rushed this step often ended up pulling everything apart later to re-level
the base. Taking an extra hour to compact the soil, adjust the gravel, and
double-check with a level is the difference between “that looks
professional” and “why does that corner dip like a roller coaster?”
Another frequent lesson is about fasteners. People who tried to skip rebar
or long spikes sometimes found their timbers slowly drifting out of line
over a couple of seasons, especially on slopes or high-traffic areas like
playsets. In contrast, those who drilled proper holes and drove 12–24 inch
rebar into the ground swear by how solid their edging feels years later.
It’s a bit more work up front, but it’s very satisfying to stand on the
timbers and feel zero wobble.
Curves are another place where experience helps. Many first-timers try to
bend timbers into tight arcs, only to discover that wood is not elastic.
The more realistic approach is to create gentle, faceted curves using
shorter pieces, each at a slight angle to the next. Homeowners who planned
curves with a garden hose first and then mimicked that shape with short
timber segments generally liked their results much more than those who
tried to force a straight 8-foot board into an “S” shape.
Drainage also comes up a lot in real-world stories. People who skipped
gravel and set timbers directly on dense clay often noticed rot and
shifting sooner than expected. In wetter climates, a few inches of gravel
under the timbers and at the back can make a huge difference. Some DIYers
even leave tiny gaps every few feet between timbers in long runs so water
can escape instead of pooling on one side of the edging.
Then there’s the “I bought the wrong wood” experience. More than a few
folks grabbed whatever looked like a deal, only to realize later that some
low-cost timbers weren’t rated for ground contact. These pieces can warp
faster and break down sooner. Those who spent a little more on higher-grade
timbers with ground-contact labels were happier with how their edging
performed over time. Lesson learned: read the stamp on the lumber, not just
the price tag.
Finally, many DIYers say that timber edging projects are surprisingly
satisfying. Once the trench is dug and the first timbers are locked in,
you can literally see your yard becoming more organized. Mowing along a
straight, sturdy wood border feels better than dodging ragged bed edges.
And there’s something especially rewarding about hearing friends say,
“Whoa, did you do that yourself?” and being able to casually reply, “Yeah,
just a weekend project.”
If you go in with realistic expectations, take your time on the base, and
use solid anchors, your own experience with installing landscape timber
edging is likely to be the same: a little sweat, a few sore muscles, and a
big, visible upgrade to your outdoor space that lasts for years.
Final Thoughts
Installing landscape timber edging is one of those rare projects that
delivers a big visual payoff without requiring exotic tools or contractor
skills. With clear planning, a stable gravel base, well-secured timbers,
and basic maintenance, you can create crisp, durable garden borders, tidy
pathways, and defined play areas that make your yard look pulled-together
and easy to care for.
Start with a small section if you’re nervous, learn how the wood behaves in
your soil, then expand. Before long, your “just a simple border” might
become a full backyard makeoverone timber at a time.