Table of Contents >> Show >> Hide
- What You’re Building (And Why It Works)
- Tools and Materials Checklist
- Step-by-Step: How To Lay a Paver Patio
- 1) Pick the Spot and Plan Drainage Like You Mean It
- 2) Lay Out the Patio and Set Your Finished Height
- 3) Calculate Excavation Depth (The “Dig Once, Cry Never” Step)
- 4) Shape and Compact the Subgrade
- 5) (Optional but Often Smart) Install Geotextile Fabric
- 6) Build the Gravel Base in Layers (Lifts) and Compact Each One
- 7) Add Edge Restraints (Before You Lock Everything In)
- 8) Screed the Bedding Sand (Yes, This Part Is Weirdly Satisfying)
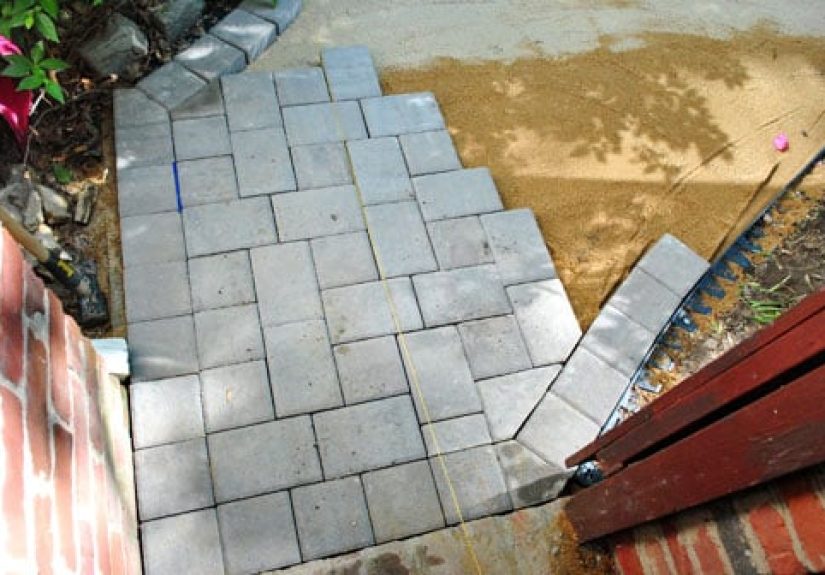
- 9) Lay the Pavers (Start Straight, Stay Sane)
- 10) Cut Pavers for Edges and Obstacles
- 11) Compact the Pavers (The “Lock It In” Moment)
- 12) Sweep in Joint Sand or Polymeric Sand
- Material Choices: Gravel, Sand, and Stones That Behave
- Drainage and Climate: How to Keep Your Patio From Becoming “Abstract Art”
- Common Mistakes (So You Can Avoid Patio Therapy)
- Maintenance: Keep It Looking Good With Minimal Fuss
- Conclusion: A Great Patio Is Built From the Bottom Up
- Experiences: What It’s Really Like to Build a Paver Patio (500+ Words of Real-World Lessons)
A paver patio is basically a fancy outdoor floor that says, “Yes, I do host,” even if your “hosting” is just you,
a chair, and a suspiciously large iced coffee. The secret to a patio that stays flat, drains well, and doesn’t turn into a
wobbly brick trampoline is the part nobody posts on social media: the base.
In this guide, you’ll learn how to build that base the right way using the classic layer cake of compacted gravel,
bedding sand, and stones/pavers. We’ll cover planning, materials, step-by-step installation, common
mistakes (so you can avoid crying into a bag of sand), and finishing touches like joint sand and edge restraints.
What You’re Building (And Why It Works)
A traditional paver patio is a “flexible pavement” system. Translation: it’s strong because it can move a tiny bit without cracking.
The stability comes from tightly packed layers:
- Subgrade: your native soil, shaped and compacted.
- Gravel base: crushed stone compacted in layers to create a sturdy, draining foundation.
- Bedding sand: a thin, screeded layer that lets you set pavers level (without using sand as a “fix everything” putty).
- Pavers/stones: the patio surface, locked together with joint sand and held by edge restraints.
Skip (or rush) one layer and the patio will eventually remind youusually right when you put out the table and it develops a dramatic lean.
Tools and Materials Checklist
Tools
- Tape measure, stakes, string line, and line level (or a long level)
- Marking paint (or flour if you enjoy living on the edge)
- Shovel, spade, rake, and wheelbarrow
- Hand tamper and/or a rented plate compactor (highly recommended)
- 2 straight screed rails (metal conduit, PVC, or straight 1-inch pipes) and a straight 2×4 for screeding
- Rubber mallet, push broom, leaf blower (optional but helpful)
- Masonry saw/wet saw or angle grinder with a diamond blade for cuts
Materials
- Pavers or patio stones (plus 5–10% extra for cuts and “whoops” moments)
- Crushed gravel base (often 3/4-inch minus/crusher runangular, compactable, not round pea gravel)
- Bedding sand (often called concrete sand)
- Jointing sand or polymeric sand (depending on your goals and joint width)
- Edge restraints (plastic/metal paver edging with spikes, or a concrete edge depending on design)
- Landscape fabric/geotextile (optional but helpful in many soils)
Step-by-Step: How To Lay a Paver Patio
1) Pick the Spot and Plan Drainage Like You Mean It
Your patio needs to shed wateraway from the house, away from the foundation, away from future-you’s regrets.
Plan for a gentle slope of about 1 inch of drop for every 4 feet (roughly a 2% grade). That’s enough to move water
without making your chair feel like it’s sliding into the yard.
Pro move: call your local utility-marking service before digging. It’s free in many areas and prevents you from discovering the “spicy hose”
(electric line) the hard way.
2) Lay Out the Patio and Set Your Finished Height
Mark the patio shape with paint and use stakes and string lines to outline straight edges. Decide where the finished surface should sit:
typically slightly above surrounding grade so water doesn’t run onto the patio and hang out like an unwanted guest.
If your patio will meet a door threshold, make sure you leave clearance so the door opens freelyand so rain doesn’t funnel into your living room.
3) Calculate Excavation Depth (The “Dig Once, Cry Never” Step)
Your excavation depth depends on the thickness of your pavers and the base layers. A common patio build-up looks like this:
- 4–6 inches of compacted gravel base (more in freeze/thaw regions or weak soils)
- 1 inch of bedding sand (screeded, not compacted first)
- Paver thickness (often 2 3/8 inches for standard concrete pavers, but check your product)
Example: If your pavers are 2 3/8 inches thick and you want 5 inches of compacted base plus 1 inch sand,
you’ll excavate about 8 3/8 inches below finished height (plus a little wiggle room for leveling).
Important: remove sod, roots, and organic material. They decompose, settle, and turn your patio into a geography lesson.
4) Shape and Compact the Subgrade
Rake the soil smooth, then compact it. This is where a plate compactor pays for itself (or, more realistically, pays for itself in reduced back pain).
Keep the slope consistent in the subgrade so your base layers follow the same drainage path.
If your soil is clay-heavy or holds water, consider adding drainage solutions like a perforated drain pipe under the base or improving grading around
the patio perimeter.
5) (Optional but Often Smart) Install Geotextile Fabric
In many yardsespecially with clay soil, silty soil, or areas prone to settlinggeotextile fabric helps separate the gravel base from native soil.
That reduces “base migration” (where the gravel slowly sinks into the soil) and helps the patio stay flatter longer.
Overlap seams by several inches and keep it smooth. Think of it like a barrier jacket for your base.
6) Build the Gravel Base in Layers (Lifts) and Compact Each One
This is the heart of the project. Dumping all the gravel at once and compacting the top is like pressing a sandwich and hoping the bottom bread
magically gets toasted. It won’t.
- Add gravel in 2–3 inch layers.
- Rake it roughly level, lightly wet it (not a swampjust damp helps compaction).
- Compact thoroughly with a plate compactor.
- Repeat until you reach your target base depth (often 4–6 inches for patios).
Check slope and height as you go using a long level, a string line, or both. Fix low spots with more gravel and compact again.
Don’t “fix” base dips with extra bedding sand latersand is for setting pavers, not patching structural problems.
7) Add Edge Restraints (Before You Lock Everything In)
Edge restraints keep pavers from drifting outward over time. Install edging along the perimeter, typically fastened with long spikes driven into the base.
Keep the restraint tight to the pavers once they’re placed, and follow manufacturer spacing recommendations for spikes.
If you’re using a concrete edge, that’s a different workflowbut the same goal: stop sideways movement.
8) Screed the Bedding Sand (Yes, This Part Is Weirdly Satisfying)
Spread bedding sand over the compacted base, then set screed rails (like conduit pipes) and pull a straight 2×4 across them to create a smooth, even bed.
Aim for about 1 inch thickness.
- Don’t use play sand (too fine and unstable).
- Don’t compact the bedding sand before laying paverspavers and final compaction will do that.
- Don’t walk all over the screeded sand. If you do, you’ll create footprints that live forever.
9) Lay the Pavers (Start Straight, Stay Sane)
Start from a straight edgelike the house, a snapped chalk line, or a string lineand work outward.
Place pavers gently onto the sand and slide them into position. Avoid twisting them down like you’re tightening a jar lid.
Keep joints consistent using built-in spacer lugs (if your pavers have them) or spacers. Check alignment every few rows with a straight board or string line.
If you’re doing a pattern (running bond, herringbone, basketweave), dry-lay a small test section first so you understand how it repeats.
10) Cut Pavers for Edges and Obstacles
Eventually you’ll meet curves, corners, or that one immovable object in your yard that you swear wasn’t there yesterday.
Use a wet saw or diamond blade to cut pavers cleanly.
Safety matters here: wear eye protection, hearing protection, and a dust mask/respiratorcutting masonry can release silica dust.
11) Compact the Pavers (The “Lock It In” Moment)
Once the pavers are down, run a plate compactor over the surface to seat them into the bedding sand.
Many rental shops offer a protective pad to reduce scuffingespecially useful for textured or tumbled pavers.
After compaction, re-check the surface. Minor height issues can sometimes be corrected by lifting a paver and adjusting sand beneath it,
but if you find a broad low spot, that’s often a base issuenot a sand issue.
12) Sweep in Joint Sand or Polymeric Sand
Joint sand fills the gaps and helps lock pavers together. You generally have two options:
- Regular jointing sand: simple, inexpensive, but may allow more weed seeds and can wash out over time.
- Polymeric sand: contains binders that harden when activated, helping resist weeds and insect tunneling and reducing washout.
Sweep sand into joints, compact again to settle it, then sweep more. For polymeric sand, many manufacturers recommend leaving the sand slightly below the top
of the paver (often around 1/8 inch, especially if there’s a bevel) so it doesn’t crust on the surface.
Blow off all excess dust carefully (a leaf blower on low can help) and follow the product instructions for watering/activation. Too much water too fast can
wash out the binder; too little can leave weak joints. Goldilocks rules apply.
Material Choices: Gravel, Sand, and Stones That Behave
Gravel Base: Use Angular, Compactable Stone
The best base is made from crushed, angular aggregate that locks together when compactedoften sold as “paver base,” “road base,” or “3/4-inch minus.”
Avoid round stone like pea gravel for the main base layer; it rolls instead of compacts.
Bedding Sand: Not All Sand Is Created Equal
Bedding sand is typically coarse, washed concrete sand. It screeds well and settles under compaction to cradle the pavers.
Beach sand and super-fine sand are poor substitutes because they can shift or hold water differently.
Stones/Pavers: Concrete vs. Natural Stone
Concrete pavers are consistent in size, easy to pattern, and widely available. Natural stone looks incredible but can vary in thickness.
If your stone varies a lot, you may need extra time to sort pieces and adjust beddingwithout turning the sand layer into a thick, uneven mess.
Drainage and Climate: How to Keep Your Patio From Becoming “Abstract Art”
Water management is the difference between a patio that lasts and a patio that develops mysterious dips after every winter.
Key tips:
- Maintain slope from start to finishsubgrade, base, sand bed, and pavers should all follow the same drainage plane.
- Increase base thickness in freeze/thaw climates or in soft, poorly draining soils.
- Control runoff around the patio perimeter with grading, gravel borders, or drains where needed.
- Use polymeric sand if washout and weed growth are frequent issues in your area (and apply it correctly).
Common Mistakes (So You Can Avoid Patio Therapy)
- Skipping compaction: the patio may look fine today and ripple like a potato chip later.
- Using sand to fix a bad base: bedding sand is not structural filler.
- Base too thin: especially in climates with frost heave or in clay soils.
- Wrong aggregate: round gravel won’t lock together.
- No edge restraints: pavers drift and joints open over time.
- Messy polymeric sand install: leftover haze and hardened dust can stain the surface.
Maintenance: Keep It Looking Good With Minimal Fuss
A well-built patio is low maintenance, not no maintenance. Here’s the easy routine:
- Sweep regularly so organic debris doesn’t break down into “tiny soil” in the joints.
- Top up joint sand as needed (especially after the first few rains).
- Spot-treat weeds if they appear (many are windblown seeds in debris, not “weeds growing through pavers”).
- In snowy areas, use plastic shovels and avoid metal blades that can chip edges. Use de-icers that are safe for concrete products if needed.
Conclusion: A Great Patio Is Built From the Bottom Up
Laying pavers is part design project, part fitness program, and part “why is this bag of gravel heavier than my future?”
But the payoff is huge: a patio that drains properly, stays level, and looks like you hired a prowithout actually hiring a pro.
If you remember only one thing, make it this: the base is the patio. The pavers are just the pretty hat.
Take your time with excavation, slope, and compaction, choose the right gravel and sand, lock it all in with edges and joint sand,
and you’ll have an outdoor space that’s ready for everything from cookouts to quiet coffee to dramatic staring-into-the-yard moments.
Experiences: What It’s Really Like to Build a Paver Patio (500+ Words of Real-World Lessons)
The internet makes paver patios look like a cheerful weekend craft: “Step 1: Place a few pavers. Step 2: Sip lemonade on your new patio.”
In reality, the experience tends to follow a more honest storyline: optimism → digging → questioning your life choices → triumph.
And while every yard is different, DIYers consistently report a handful of lessons that can save you time, money, and at least one minor existential crisis.
First, almost everyone underestimates excavation. Not because they’re bad at math (okay, sometimes it’s the math), but because grass and soil hide
how uneven the ground really is. Once you peel back sod, you often discover roots, rocks, and mysterious lumps of compacted clay that behave like
nature’s concrete. The best experiences come from treating digging as precision work, not a “close enough” situation. People who set string lines,
measure depth frequently, and maintain slope from the beginning usually finish with a patio that feels professional underfoot. Those who eyeball it?
They often end up redoing sectionsbecause pavers are honest. They will reveal every shortcut you tried to sneak past them.
Second, compaction is where the project becomes either satisfying or tragic. Many DIYers say the turning point was renting a plate compactor.
Hand tampers have a place (edges, small areas), but for a full patio, mechanical compaction is the difference between “solid” and “spongy.”
The common experience is that the base looks flat until you compact itthen you suddenly see low spots that weren’t obvious before. That’s a good thing.
It means the gravel is locking in, and you’re catching problems early. People who add gravel in thin layers, compact each lift, and adjust with
more gravel (not more sand) usually end up with pavers that don’t wobble, even after heavy rain.
Third, screeding sand is a strangely emotional moment. DIYers describe it as both relaxing and infuriatingrelaxing because you can finally see a smooth,
level surface forming, and infuriating because stepping on it ruins it instantly. A common trick is to work from outside the bed, kneeling on boards
placed over the base (not on the sand), so you don’t create dips. People who take their time here often find paver placement goes quickly, because the
pavers “sit right” immediately instead of needing constant adjustments.
Fourth, cutting pavers is where confidence meets reality. Many first-timers assume they’ll only need a few cuts, then discover edges and corners
require more trimming than expected. The best experiences come from planning a layout that minimizes tiny slivers at the edges. If your pattern leaves
you with 1-inch strips everywhere, it’s worth shifting the layout by a few inches before you cut anything. DIYers also report that renting the right saw
makes the day dramatically easierand cleanerthan trying to “make it work” with the wrong blade.
Finally, joint sand and finishing are where patience pays off. People who rush polymeric sand (or apply it on damp pavers, or leave dust on the surface)
often end up with haze that’s hard to remove. The smoother experiences come from waiting for a dry window, sweeping carefully, compacting, topping up,
blowing off excess, and then activating the sand exactly as the bag says (even if you’re tempted to freestyle it). When done right, the patio feels locked
togetherlike one continuous surfaceyet still drains properly. And that’s usually the moment DIYers report the best feeling: the shift from “project zone”
to “this is actually my patio now.” The chairs go out, the grill rolls over without bumping, and suddenly the yard feels like an extra roombuilt one layer at a time.