Table of Contents >> Show >> Hide
- Why Ceramic Tile Works So Well in Bathrooms
- Before You Start: Know What Makes Tile Fail
- Tools and Materials You’ll Likely Need
- Step 1: Remove Fixtures and Prep the Room
- Step 2: Install the Proper Tile Underlayment
- Step 3: Plan the Layout Like a Grown-Up
- Step 4: Dry-Fit and Measure Every Tricky Cut
- Step 5: Mix Thinset the Right Way
- Step 6: Spread Mortar and Check Coverage
- Step 7: Set the Tile Carefully
- Step 8: Cut and Install the Perimeter Pieces
- Step 9: Let the Tile Cure Before Grouting
- Step 10: Grout Without Making a Mud Festival
- Step 11: Seal and Reinstall Fixtures
- Common Bathroom Tile Mistakes to Avoid
- Is This a Good DIY Project for Beginners?
- Conclusion
- DIY Experiences: What People Usually Learn the Hard Way When Installing a Bathroom Tile Floor
If you have ever looked at an old bathroom floor and thought, “Wow, this vinyl has the charm of a damp cracker,” ceramic tile may be your glow-up. A tile floor looks sharp, handles moisture well, and can outlast plenty of decorating phases, bad paint colors, and at least a few questionable bath mats. Better yet, a careful DIYer can absolutely install a ceramic tile bathroom floor without summoning a contractor, a crystal ball, or three emergency pizzas.
That said, tile is not forgiving. It does not reward eyeballing. It does not respect impatience. It definitely notices when the floor underneath is uneven. The secret to a great-looking bathroom tile floor is not wizard-level hand skills. It is preparation, layout, and the discipline to slow down before every step that becomes expensive when rushed.
This guide walks you through how to lay tile in a bathroom the right way, from subfloor prep and dry layout to setting tile, grouting, and avoiding the classic DIY blunders that turn “weekend project” into “ongoing family story.”
Why Ceramic Tile Works So Well in Bathrooms
Ceramic tile is one of the best bathroom flooring materials for a simple reason: bathrooms are wet, messy, humid little laboratories, and tile handles that environment better than many other finishes. It is durable, easy to clean, and available in styles ranging from understated spa calm to “my floor has more personality than the vanity.”
For DIY projects, ceramic tile is also approachable. It is usually easier to cut than some dense porcelain products, and you can find plenty of budget-friendly options that still look polished. Small and medium-format tile is especially beginner-friendly in bathrooms because compact rooms often involve toilet flanges, vanity edges, and other obstacles where precise cuts matter.
Before You Start: Know What Makes Tile Fail
Most bad tile jobs do not fail because the grout color was ugly. They fail because the substrate was wrong, the layout was rushed, or the installer ignored movement, coverage, and curing time. In other words, the boring parts are the important parts.
Before laying tile, make sure the floor structure feels solid underfoot. A bathroom floor that flexes, squeaks, dips, or feels springy is not ready for ceramic tile. Remove the old flooring, inspect the subfloor, and fix loose panels, damaged areas, or uneven spots first. Tile likes flat, stable surfaces. It does not enjoy drama.
Tools and Materials You’ll Likely Need
Basic tools
- Tape measure
- Chalk line
- Framing square or laser level
- Level or straightedge
- Notched trowel
- Rubber mallet
- Tile spacers
- Bucket and mixing paddle
- Wet saw or tile cutter
- Tile nippers for odd cuts
- Grout float
- Sponges and clean water buckets
- Knee pads, because your knees did nothing wrong
Materials
- Ceramic floor tile
- Polymer-modified thinset mortar
- Cement backer board or an approved uncoupling membrane
- Backer board screws if using cement board
- Mesh tape for backer board seams
- Grout
- Flexible sealant or caulk for perimeter/change-of-plane joints
- Grout sealer if your grout product requires it
Step 1: Remove Fixtures and Prep the Room
For the cleanest result, remove the toilet before you start. Yes, this is the point where the project becomes real. Pull the baseboards or shoe molding too, if possible. You want room to work and a proper edge finish, not a tile job that looks like it was negotiated around obstacles.
Once the floor is exposed, remove debris, adhesive residue, and anything loose. Check that the subfloor is dry, clean, and structurally sound. Fill low spots, sand or grind down high spots, and tighten squeaky areas with the proper fasteners. If the surface is dirty or uneven, the tile installation is already losing the argument.
Step 2: Install the Proper Tile Underlayment
In bathrooms, tile typically goes over a tile-ready substrate, not directly onto a random wood floor and a prayer. Two common choices are cement backer board and approved uncoupling membranes. Cement backer board is a classic DIY option. It is bedded into thinset over the subfloor, then screwed down in place. That thinset underneath is not there to glue the board dramatically into eternal love; it fills voids so the panel is fully supported.
If you choose a membrane system, follow the manufacturer’s instructions closely. These products can provide crack isolation or waterproofing benefits, but they only help when installed correctly. Either way, the goal is the same: create a stable, tile-appropriate surface.
Do not skip seam treatment. Tape and mortar the seams as required for your underlayment system. Also think ahead about floor height. Tile, mortar, and underlayment raise the finished floor, which affects toilet flange height, transitions, and door clearance.
Step 3: Plan the Layout Like a Grown-Up
Layout is where average tile jobs become excellent tile jobs. Snap a chalk line between the center points of opposite walls, then create a second perpendicular line so the layout is square. Dry-fit tiles along these reference lines with spacers in place.
Here is the big trick: avoid ugly little slivers at the walls. If your dry layout leaves tiny cuts at one side of the room, shift the layout. In many cases, you want the edge cuts to be at least half a tile or, at the very least, not skinny enough to look accidental. This matters even more in a small bathroom, where every cut sits right in front of your face every single morning.
Also pay attention to what the eye sees first. If the tub, vanity, or doorway creates a focal point, adjust the layout so the most visible lines and cuts look intentional. A smart layout can make a modest tile look expensive. A bad one can make expensive tile look like a clearance mistake.
Step 4: Dry-Fit and Measure Every Tricky Cut
Before mixing mortar, lay out a reasonable section of tile dry. This lets you confirm spacing, pattern direction, and cut locations around the toilet flange, heat vents, and doorway. If the tile has arrows on the back, keep them oriented consistently so the surface pattern lines up correctly.
Measure cuts carefully. Straight cuts are usually easiest with a score-and-snap cutter or wet saw. Curves and notches often need a wet saw plus tile nippers. Cut edges near walls can usually hide under trim or baseboard, so place factory edges in the most visible locations whenever possible.
Step 5: Mix Thinset the Right Way
Mix thinset mortar according to the bag instructions, not according to your emotions. Many mortars need to be mixed, allowed to slake for several minutes, then remixed. Only mix as much as you can use within the product’s working time. New DIYers often mix a heroic bucket and then discover mortar can harden faster than confidence.
The consistency should be workable but not soupy. If it slides all over the place, that is not “helpful.” That is future regret.
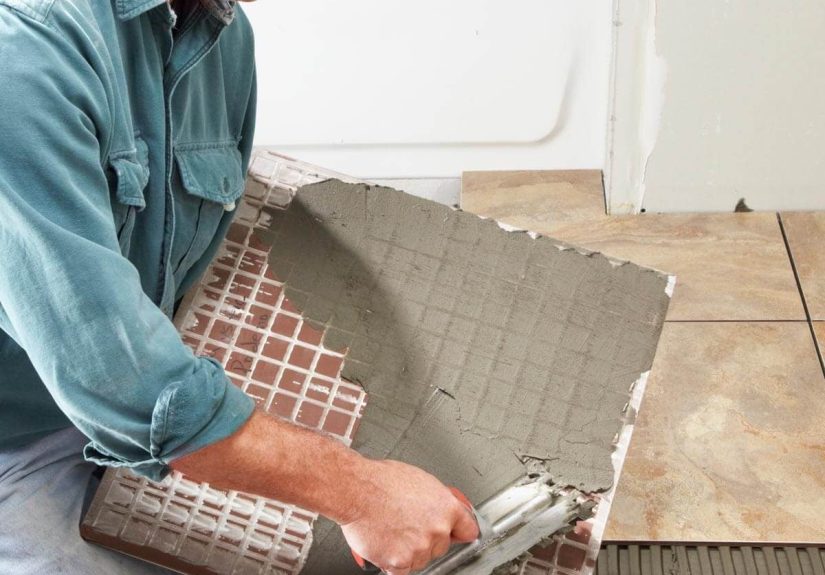
Step 6: Spread Mortar and Check Coverage
Use the trowel size recommended for your tile. Start by using the flat side of the trowel to key mortar into the substrate. Then comb it with the notched side at about a 45-degree angle. Comb the ridges in one direction rather than swirling them around like cake frosting. Straight ridges help air escape when the tile is pressed in.
Work in small sections so the mortar does not skin over before the tile goes down. After placing the first tile, lift it and check the back. You want strong mortar contact and full enough coverage for a floor installation, especially in a wet room. If coverage is poor, adjust your trowel size, technique, or mortar amount before you continue. This one test can save you from a whole floor of weak bonding.
Step 7: Set the Tile Carefully
Start at your layout intersection and work outward. Press each tile into the thinset with a slight twisting motion. Do not slide tiles around too much, which can collapse ridges unevenly and throw off spacing. Use spacers to maintain consistent grout joints, and check often with a straightedge or level to catch lippage before it becomes permanent modern art.
Leave about a 1/4-inch gap at the perimeter where tile meets the wall, tub, or other restraining surfaces. That space allows for movement and should not be packed with grout. In tile work, movement joints are not optional decoration. They help prevent cracked grout, tented tile, and other miserable surprises.
As you go, clean thinset from the tile faces and joints. Dried mortar in a grout joint is like chewing gum in the gears. Technically possible to deal with later, emotionally not recommended.
Step 8: Cut and Install the Perimeter Pieces
After the field tiles are in place, install the cut pieces around the perimeter. Take your time here. Bathrooms contain the most annoying geometry in the house, and this is where patience earns its paycheck.
For the toilet flange, you may need a series of curved cuts. Hide what you can beneath the toilet base, but do not assume the fixture will cover every mistake. Dry-fit tricky pieces before setting them in mortar. If a cut looks rough but will be covered by trim, relax. If it will be visible forever, cut it again.
Step 9: Let the Tile Cure Before Grouting
Once the tile is set, stay off it for the curing time recommended by the mortar manufacturer. A common waiting period is about 24 hours before grouting, but always check the product label. Heavy use usually needs more time. This is the stage where many DIYers become impatient and step on a tile “just for a second,” which is how alignment becomes a memory.
Step 10: Grout Without Making a Mud Festival
Remove spacers and vacuum the joints. Mix grout according to the instructions, then spread it diagonally across the tile with a rubber float, forcing it fully into the joints. Work in manageable sections. Scrape off excess grout with the float held at a sharp angle.
After the grout firms up slightly, wipe the tile with a damp sponge. The goal is to smooth the joints and clean the tile surface without flooding the joints with too much water. Rinse the sponge often and change water as needed. When haze appears, buff it off with a soft cloth once the grout is ready.
For perimeter joints and places where the floor meets walls or fixtures, use an appropriate flexible sealant rather than grout where required. Grout is hard. Movement is real. Those two facts do not negotiate.
Step 11: Seal and Reinstall Fixtures
Some grout products need sealing after cure time, while others do not. Read the label. Many cement-based grouts benefit from sealer, but some modern specialty grouts are designed to skip that step. If sealing is required, wait until the grout has cured as directed by the manufacturer.
Once the floor is fully cured, reinstall the toilet with a new wax ring or approved seal, reinstall trim, and clean the floor. Then stand in the doorway for a few seconds and admire your work like you are on a home-improvement show with a very realistic budget.
Common Bathroom Tile Mistakes to Avoid
Skipping floor prep
No tile, however beautiful, can overcome a bad substrate. Flat and solid beats fast and sloppy every time.
Ignoring layout
A centered, squared layout with balanced cuts usually looks better than starting at one wall and hoping for charisma.
Using the wrong mortar or trowel
Tile size, substrate, and environment matter. Match the materials to the application.
Mixing too much thinset
You are tiling a bathroom, not trying to impress a cement mixer. Smaller batches are smarter.
Walking on tile too soon
Curing time exists for a reason. Respect it.
Grouting movement joints
Perimeter and change-of-plane joints need flexibility, not stubbornness.
Is This a Good DIY Project for Beginners?
Yes, with one important condition: you must be the kind of beginner who enjoys measuring twice, reading the bag, and stopping to correct mistakes before they multiply. A small bathroom floor is often one of the more manageable tile projects because the square footage is limited. On the other hand, the room is full of awkward cuts and highly visible details. In other words, it is beginner-friendly in size but not in attitude.
If you work carefully, respect the prep, and do not rush curing times, a ceramic bathroom tile floor is a realistic DIY win. If you want instant gratification, tile may gently suggest another hobby.
Conclusion
Learning how to lay tile in a bathroom is really about learning how to build success in layers. First comes structure. Then underlayment. Then layout. Then mortar coverage. Then clean setting, patient grouting, and proper curing. Each step supports the next, and none of them are glamorous. But together, they create the kind of ceramic tile floor that looks clean, feels solid, and keeps performing long after the memory of grout dust fades.
The good news is that you do not need to be a master tile setter to get strong DIY results. You just need a flat floor, a smart plan, the right materials, and enough humility to let the mortar dry before you start victory-laps in socks.
DIY Experiences: What People Usually Learn the Hard Way When Installing a Bathroom Tile Floor
One of the most common experiences DIYers talk about after installing a ceramic tile bathroom floor is how much the project changes once the first tile actually goes down. Before that moment, everything feels theoretical. You have boxes of tile, a shiny trowel, and a level of confidence that may or may not be legally justified. Then the mortar hits the floor, and suddenly every decision matters: the trowel angle, the pressure, the spacing, the speed, and whether that cut near the tub is really straight or just emotionally straight.
A lot of people also discover that layout is the part they underestimated most. It is easy to assume tile setting is the star of the show, but the dry layout usually decides whether the floor ends up looking polished or patched together. Many DIYers say the best decision they made was taking an extra hour to shift the center lines and avoid skinny edge cuts. It feels fussy at first, but it pays off every time you walk into the room and the floor looks balanced instead of accidental.
Another common experience is realizing that bathrooms are small but not simple. A tiny floor can still involve a toilet flange, a vanity toe kick, a doorway transition, and walls that are not quite square because houses enjoy surprises. That is why even confident DIYers often say the most stressful part was not the main field tile. It was the weird cuts. The good news is that the fear usually fades after the first few pieces. By the third or fourth cut, many people settle into a rhythm and start thinking, “Okay, this is annoying, but not impossible.” That is a major DIY milestone.
There is also the universal lesson of thinset management. Nearly everyone who does this project for the first time either mixes too much mortar or lets it sit too long while fussing with layout. The smarter approach is small batches and smaller working areas. Experienced DIYers almost always say the same thing afterward: the floor went better when they slowed down and stopped trying to cover too much area at once.
Then there is the physical side nobody romanticizes enough. Tile work is tough on knees, hands, and patience. People who finish a bathroom floor often mention that knee pads felt optional at the store and mandatory by lunchtime. They also mention how helpful it was to keep a sponge nearby and clean as they worked. Scraping dried mortar out of joints later is the kind of experience that builds character mainly because it destroys joy.
Finally, many DIYers say the most satisfying part is not the last tile. It is the next morning, when the room is quiet, the mortar has cured, and the floor suddenly looks like a real finished surface instead of a construction scene. That moment tends to erase a lot of frustration. You remember the careful layout, the recut pieces, the grout haze battle, and the temporary bathroom chaos, but what sticks most is the feeling that you built something solid with your own hands. And that is why bathroom floor tile remains such a satisfying DIY project, even when it makes you earn every square foot.