Table of Contents >> Show >> Hide
- Why Make a Bamboo Wind Chime?
- What You Need
- How to Choose the Right Bamboo
- Step-by-Step: How to Make a Bamboo Wind Chime
- How to Make Your Bamboo Wind Chime Sound Better
- Common Mistakes to Avoid
- Styling Ideas for a DIY Bamboo Wind Chime
- Experience: What Making a Bamboo Wind Chime Actually Feels Like
- Final Thoughts
There are two kinds of backyard decor: the kind you buy in five minutes, and the kind that quietly makes you look far more crafty than you really are. A bamboo wind chime belongs firmly in the second category. It is simple, inexpensive, surprisingly elegant, and one of those DIY projects that makes guests say, “Wait, you made that?” while you try to act casual about your obvious genius.
If you want a garden accent with a mellow, earthy sound instead of a bright metallic clang, a bamboo wind chime is a fantastic choice. Bamboo has a softer, more natural tone than metal, and because each tube can be cut to a different length, you can create a richer, layered sound that feels relaxing instead of chaotic. In other words, your porch can sound less like a loose toolbox and more like a little outdoor retreat.
This guide will show you exactly how to make a bamboo wind chime from scratch, including how to choose bamboo, cut it safely, arrange the tubes, assemble the hanger, and finish the project so it survives more than one dramatic thunderstorm. We will also cover a few tuning tips, common mistakes, and real-world lessons that make the difference between “handmade charm” and “why is this thing knocking itself to death?”
Why Make a Bamboo Wind Chime?
A DIY bamboo wind chime checks a lot of boxes at once. It is decorative, functional, sustainable-looking, and easy to personalize. You can make one with a minimalist style, a beachy style, a rustic garden look, or a slightly artsy look that says, “I drink coffee outdoors and have opinions about sunlight.”
More importantly, bamboo is ideal for this kind of project. The hollow internodes help amplify sound, while the solid nodes provide natural strength. That combination makes bamboo both lightweight and sturdy, which is exactly what you want in a hanging object that moves around in wind all day. If you are harvesting your own bamboo, mature canes are the better choice because younger ones tend to be softer, wetter, and more likely to crack or warp later.
What You Need
Materials
- 5 to 7 bamboo tubes in different lengths
- 1 round wooden disc, bamboo slice, or small wood top piece for the hanger
- Strong cord, nylon line, waxed thread, or thin outdoor rope
- 1 smaller bamboo piece or wooden striker for the clapper
- 1 wind catcher, such as a flat bamboo piece, wood pendant, or decorative slice
- Exterior wood finish, spar varnish, or outdoor oil
- Optional: wood beads, stain, paint, or a small metal ring for hanging
Tools
- Fine-tooth hand saw, hacksaw, or rotary cutting tool
- Drill with small bits
- Sandpaper in medium and fine grits
- Measuring tape or ruler
- Pencil or marker
- Safety goggles
- Clamps or a stable work surface
How to Choose the Right Bamboo
If you are buying bamboo poles, look for straight, dry canes with minimal splitting and a solid outer surface. If you are cutting your own, choose mature culms rather than fresh baby shoots. Older bamboo is stronger and more stable for craft work. You also want sections with clean internodes, because those hollow sections help create the chime’s tone.
Try to collect bamboo pieces with different diameters and lengths, but not wildly different wall thicknesses. A dramatic mismatch can make one tube sound rich and resonant while the next sounds like it is sulking. For a balanced bamboo wind chime, the tubes should feel like members of the same family, not random distant cousins at a reunion.
If the bamboo is newly cut, let it dry in a well-ventilated area before building. Rushing wet bamboo straight into a finished outdoor project is a great way to invite cracking, shrinking, and future disappointment. Air-drying helps the tubes stabilize and usually improves the sound as well.
Step-by-Step: How to Make a Bamboo Wind Chime
1. Plan Your Chime Size and Sound
Before you cut anything, decide how large you want the finished wind chime to be. A small porch chime might use tubes between 6 and 12 inches long. A medium garden chime may use pieces from 8 to 18 inches. In general, longer bamboo tubes produce deeper tones, while shorter ones create lighter, higher sounds.
A good starting setup is six tubes in graduated lengths. For example, you might cut pieces at 8, 9.5, 11, 12.5, 14, and 15.5 inches. That gives you enough variation for a pleasant sound without turning the project into a physics exam.
2. Cut the Bamboo Tubes
Mark your lengths carefully and cut each bamboo piece cleanly. A fine-tooth saw helps reduce splintering. Try to keep the top cut straight so the tube hangs evenly. For the bottom cut, some makers prefer a slight angle because it can change the tone and add a handmade look. Both straight and angled cuts can work well, so this is one of those moments where perfection can kindly step aside.
Whenever possible, cut so each tube includes a hollow chamber with a clean opening. If a node blocks the section entirely, it will not resonate in the same way. You want each piece to function like a small natural resonator.
3. Sand Every Edge
Do not skip sanding. Fresh-cut bamboo can be surprisingly sharp, and nobody wants a decorative object with the personality of a paper shredder. Smooth the cut ends inside and out, especially around the top where the hanging holes will go. Light sanding also helps finishes absorb more evenly and makes the whole project look polished instead of rushed.
4. Drill the Hanging Holes
Measure about 1 inch down from the top of each tube and mark two opposite holes. Drill slowly and use a bit just large enough for your cord. Predrilling matters because bamboo, like thin wood, can split if you get impatient and try to force hardware through it. Keep the tube stable while drilling and wear eye protection.
If your bamboo walls are thin, go gently and support the tube from underneath. The goal is neat, aligned holes, not an accidental side quest where you turn your best tube into a bracelet.
5. Make the Top Hanger
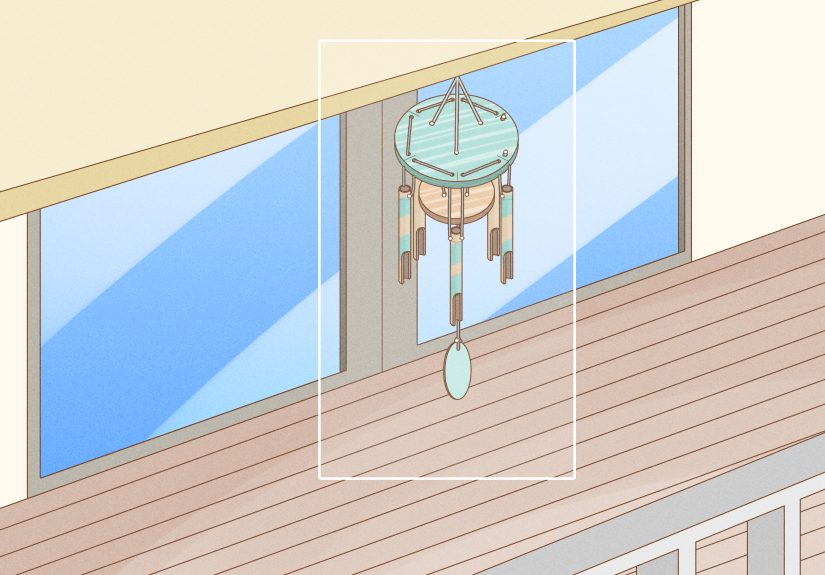
Your top piece can be a wood disc, a thick bamboo slice, or even a small reclaimed wood circle. Drill one center hole for the main hanging cord and evenly space holes around the edge for each tube. If you are using six bamboo tubes, place six outer holes around the perimeter like points on a clock.
This top plate controls the spacing, so measure twice. If the tubes are too close, they will smack into one another constantly. If they are too far apart, the striker may not connect cleanly. You want enough room for movement, but not a tiny bamboo traffic jam.
6. Add the Striker and Wind Catcher
The striker is the center piece that taps the bamboo tubes. A short, lightweight piece of bamboo or wood works well. Drill a center hole through it and suspend it below the top hanger so it sits roughly level with the upper-middle portion of the hanging tubes. Too high and it barely makes contact. Too low and it acts like a confused pendulum with no mission.
Attach the wind catcher below the striker using the same central cord. This is the flat piece that catches the breeze and moves the striker. A narrow bamboo slice, thin wood shape, or decorative pendant works nicely. Keep it light enough to move, but heavy enough to avoid spinning like it has had too much espresso.
7. String the Bamboo Tubes
Thread cord through the holes in each bamboo tube and tie them to the corresponding holes in the top piece. Adjust each tube so the bottoms create a pleasing staggered pattern. Make sure the tubes hang straight and can swing a little without twisting around one another.
At this stage, hang the chime temporarily and test how the striker hits the tubes. You may need to shorten one cord, widen the spacing, or move the striker slightly. This little test run is worth it. A five-minute adjustment now can save you from hours of wondering why only one tube is doing all the work.
8. Finish for Outdoor Use
If your wind chime will live outdoors, give it a protective finish. Exterior oil is easy to apply and gives a natural look, but it usually needs seasonal reapplication. Exterior varnish or spar varnish provides better moisture and UV protection. If you want the bamboo grain to show, a clear outdoor finish is your best friend.
Brush or wipe on thin coats and let the pieces dry fully between applications. Coat all exposed surfaces, especially the cut ends and drilled holes, because those spots are most vulnerable to moisture. A well-finished chime lasts longer, looks better, and is much less likely to age into a sad, flaky relic by mid-summer.
How to Make Your Bamboo Wind Chime Sound Better
Use varied tube lengths
The easiest way to create a pleasing sound is to vary the tube lengths. Longer pieces give deeper notes; shorter pieces sound brighter. A mixed set creates the layered, soothing effect most people want from a handmade garden wind chime.
Balance wall thickness and tube size
If one tube is much thicker or wider than the others, it may dominate the sound. Try to keep the set relatively consistent in material weight, even if the lengths differ.
Place the striker carefully
The striker should contact multiple tubes with gentle movement, not just one favorite. Center placement matters more than people expect.
Hang it in the right spot
Choose a breezy area with some protection from extreme weather. A porch corner, pergola, tree branch, or covered patio usually works better than a fully exposed spot where storms can turn your lovely project into a percussion solo for the entire zip code.
Common Mistakes to Avoid
- Using fresh, wet bamboo: It may crack later as it dries.
- Skipping pilot holes: Thin bamboo can split under stress.
- Ignoring spacing: Tubes need room to move and sound clean.
- Overbuilding the striker: A heavy center piece can make the chime sound clunky.
- No outdoor finish: Weather always gets a vote.
- Hanging too many chimes together: Peaceful can become noisy very quickly.
Styling Ideas for a DIY Bamboo Wind Chime
Once the basic structure is done, you can customize the design in dozens of ways. Leave the bamboo natural for a clean organic look. Add a dark stain for a more dramatic garden style. Paint the wind catcher in muted coastal colors for a beach-house feel. Use wood beads for a boho look, or burn simple patterns into the bamboo if you want a more artisan finish.
You can also personalize the top disc with initials, a short quote, or a simple geometric design. Just remember that subtle usually ages better. There is a fine line between elegant outdoor decor and a wind chime that looks like it lost a bet at craft camp.
Experience: What Making a Bamboo Wind Chime Actually Feels Like
The first time I made a bamboo wind chime, I assumed it would be one of those charming little weekend projects that takes an hour and ends with me smiling gracefully into the sunset. That was adorable. What actually happened was a lot more educational and a lot more real. I spent the first twenty minutes choosing bamboo pieces like I was casting a tiny musical ensemble. One tube looked perfect until I tapped it and it made a dull thunk. Another had a beautiful tone but a hairline split that I had somehow missed. Very quickly, I learned that good sound starts with good material, and good material does not always announce itself with confidence.
Then came the drilling. This was the part where bamboo reminded me that nature is elegant, but not always cooperative. One rushed hole caused a small split near the top of a tube, and that was enough to teach me a permanent lesson about going slowly and predrilling carefully. After that, everything got better. Once I slowed down, measured more carefully, and stopped pretending I was in a speed-building contest, the project became genuinely enjoyable.
The most satisfying moment was hanging all the tubes for the first test. At first, the striker only hit two of them, and the whole thing sounded lopsided. I adjusted the cord lengths, moved the center striker slightly higher, and tried again. Suddenly, there it was: a soft, uneven, beautifully natural sound that felt alive. Not perfect, not factory-tuned, but warm and calming in a way that metal chimes rarely are. It sounded handmade, which is exactly what I wanted.
Over time, I also learned that placement matters almost as much as construction. One version hung in a corner with barely any airflow and stayed almost silent, like a shy guest at a party. Another was hung in a windy open spot and chattered so constantly that it stopped feeling relaxing. The sweet spot was near a covered porch edge where the breeze moved through gently. That placement made the sound occasional and welcome rather than nonstop.
I have also made the mistake of skipping a proper finish. It looked fine at first, then slowly faded and dried out like it had entered a difficult era. After using a better outdoor finish and coating the cut ends more carefully, the next chime held up much better. That experience convinced me that weatherproofing is not the boring part of the project. It is the part that lets you enjoy your work for more than one season.
What I love most about making bamboo wind chimes is that they reward attention instead of perfection. You do not need fancy tools, elite woodworking skills, or the patience of a saint. You just need decent materials, a little care, and a willingness to test, listen, and adjust. Every finished chime has its own character. Some sound deeper, some lighter, some more rhythmic, some almost whispery. That variety is part of the charm. A handmade bamboo wind chime is not supposed to sound like a machine-made instrument. It is supposed to sound like wind, wood, and time slowing down for a minute.
Final Thoughts
If you have been wondering how to make a bamboo wind chime, the good news is that this is one of the most satisfying outdoor DIY projects you can tackle with basic tools and a little patience. With the right bamboo, careful drilling, thoughtful spacing, and a solid outdoor finish, you can create a handmade piece that looks beautiful and sounds even better.
Keep it simple, trust your ears, and do not be afraid to make small adjustments as you go. The best bamboo wind chime is not necessarily the fanciest one. It is the one that catches the breeze, makes you pause for a second, and reminds you that sometimes the nicest home improvement project is the one that does not shout. It just sways a little and gets the point across.