Table of Contents >> Show >> Hide
- What Makes a “Farmhouse” Hanging Towel, Anyway?
- Choose Your DIY Method (and Your Adventure Level)
- Before You Start: Pick the Right Towel (This Matters More Than You’d Think)
- Tools & Supplies (Grab What Matches Your Method)
- DIY Option 1: The Quick Pot Holder Hanging Towel (Beginner-Friendly)
- DIY Option 2: Classic Fabric “Towel Topper” with a Buttonhole (Most Farmhouse-Looking)
- DIY Option 3: Snap-Top Hanging Towel (No-Sew, Still Stays Put)
- Make It Look Professional: Small Details That Matter
- Troubleshooting: When Your Towel Has Opinions
- Care & Cleaning (Because Kitchen Towels Work for a Living)
- FAQ
- Experience-Based Tips From Real Kitchens (The Stuff Tutorials Don’t Always Tell You)
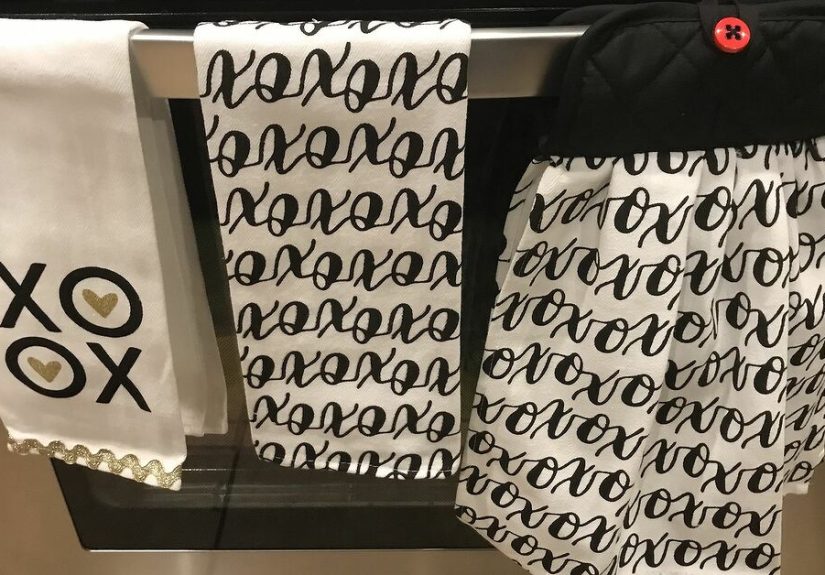
Every kitchen has that one towel that lives a hard life: it dries hands, wipes spills, gets tossed on a counter… then mysteriously ends up on the floor like it’s practicing for the Olympics. A farmhouse hanging kitchen towel fixes the chaos by giving your towel an actual homeon your oven handle, cabinet pull, or towel barwhile also looking charming enough to make your kitchen feel like it has its life together.
In this DIY tutorial, you’ll learn three reliable ways to make a hanging towel (from “I own a sewing machine” to “I own confidence and snaps”). I’ll also show farmhouse-style tweaks that look intentionalnot like your craft bin exploded.
What Makes a “Farmhouse” Hanging Towel, Anyway?
Farmhouse style is basically: simple, cozy, a little vintage, and not trying too hard. Think neutral cottons, ticking stripes, small checks, natural textures, and old-school hardware like wooden or metal buttons. The towel should feel practical and warmlike it bakes bread emotionally.
Choose Your DIY Method (and Your Adventure Level)
All three methods end with a towel that stays put. The difference is how it hangsand how much sewing you want to do.
- Option 1: Pot Holder + Towel (Fastest) Great beginner project, sturdy, giftable.
- Option 2: Fabric “Towel Topper” with Buttonhole (Classic) The prettiest, most farmhouse-looking, and customizable.
- Option 3: Snap-Top No-Sew (Quick Fix) Minimal tools, no machine, still looks tidy.
Before You Start: Pick the Right Towel (This Matters More Than You’d Think)
Best towel types for a hanging towel
- Flour sack / flat weave cotton: Lightweight, lint-minimal, folds neatly, easy to sew.
- Waffle weave: Absorbent, looks upscale-farmhouse, usually less bulky than terry.
- Terry cloth: Great for hand-drying, but thicker to sew and can shed lint; choose it if you want plush function.
Farmhouse-style fabric ideas for the “top”
- Ticking stripe (blue, gray, black, or tan)
- Mini gingham or buffalo check (use sparinglyone bold print per towel is plenty)
- Natural linen blends or textured cottons
- Muslin or canvas for a more rustic look
Pro move: Prewash your towel and fabric before sewing. Kitchen items get washed a lot, and you don’t want your top to shrink into a tiny cowboy hat after laundry day.
Tools & Supplies (Grab What Matches Your Method)
Basic supplies (for all options)
- 1 kitchen towel (tea towel, dish towel, or hand towel)
- Measuring tape or ruler
- Scissors or rotary cutter
- Iron + ironing board (or a flat surface and determination)
- Marking pen/chalk
If sewing (Options 1 or 2)
- Sewing machine (or needle + thread for hand sewing)
- Thread that matches your towel/top fabric
- Pins or clips
- Button (1–1.25 inches works well)
If using snaps (Option 3)
- Snap kit (plastic snaps + pliers, or metal snaps + setting tool)
- Optional: small piece of interfacing or scrap fabric to reinforce snap spots
DIY Option 1: The Quick Pot Holder Hanging Towel (Beginner-Friendly)
This method uses a pot holder as the “top,” which already has structure and a hanging loop. You attach a towel to the bottom, add a button, and use the loop as the closure. It’s sturdy, cute, and takes less time than deciding what to watch while you sew.
Step-by-step
- Pick a pot holder with a loop. Square or rounded styles both work. If it has a little pocket or thick quilting, even better (it grips the towel well).
- Fold your towel to the width you want. Common approach: fold the towel lengthwise, then bring the raw/folded top edge into a width that matches the bottom edge of the pot holder (usually 7–9 inches). You can use pleats (neater) or gathers (softer, “ruffly farmhouse”).
- Pin the towel to the bottom edge of the pot holder. Position the folded/pleated top of the towel under the pot holder’s bottom edge by about 1/2 inch. Keep everything centered.
- Sew one strong seam across. Stitch straight across the pot holder bottom edge to secure the towel. Go slowlayers can be thick. If your machine struggles, lengthen your stitch slightly and use clips instead of pins.
- Add a button for closure. Fold the top of the pot holder down so the loop reaches the front; mark where the loop lands and sew your button there. Now the loop buttons closed around your oven handle.
- Test the hang. Wrap the pot holder around your oven handle, button it, tug gently, and celebrate a towel that refuses to fall like it has self-respect.
Farmhouse touch: Use a wooden button, a black matte button, or a vintage-style metal button. That tiny detail does a lot of design heavy lifting.
DIY Option 2: Classic Fabric “Towel Topper” with a Buttonhole (Most Farmhouse-Looking)
This is the traditional hanging towel style: a fabric top (often rounded at the end) that wraps around a handle and buttons closed. It looks polished and gives you the most room to customize prints, trim, and shape.
Simple pattern (no printer needed)
You can draft an easy topper shape with these measurements:
- Width: 6–7 inches at the bottom (to match your pleated towel top)
- Total length: 12–14 inches
- Top end: rounded (trace a mug or small plate curve)
- Seam allowance: 1/2 inch
Step-by-step
- Cut your fabric. Cut 2 topper pieces (mirror images). Optional but recommended: cut 1 piece of lightweight interfacing to keep the topper crisp.
- Sew the topper. Place fabric right sides together. Sew around the sides and rounded top, leaving the bottom edge open. Trim curves, turn right-side out, and press.
- Topstitch for a clean finish. Sew a neat topstitch around the sewn edges. This keeps it flat and professional-looking.
- Pleat or gather the towel. Fold the towel top into 2–3 pleats until it matches the topper width. (Pleats look more “tailored farmhouse” than gathers.)
- Insert towel into the topper. Slide the towel top about 1/2–3/4 inch into the open bottom of the topper. Pin or clip through all layers.
- Stitch across to secure. Sew a straight seam across the bottom, then sew a second seam 1/4 inch above for extra strength. (Kitchen items get yanked. Reinforce like you mean it.)
- Add a buttonhole. Make a buttonhole near the rounded end, centered. If you don’t love buttonholes, you can sew on a small elastic loop instead and skip the buttonhole entirely.
- Sew on the button. Wrap the topper around your handle, mark where the button should go, then sew it on securely.
Design upgrades that still feel “farmhouse”
- Add a small tag: a simple “handmade” label or a strip of cotton twill tape.
- Use contrast topstitching: cream thread on ticking stripe looks clean and intentional.
- Make it set-worthy: do 2–3 towels in the same palette (stripe + solid + mini-check).
DIY Option 3: Snap-Top Hanging Towel (No-Sew, Still Stays Put)
If sewing isn’t happening today (or ever), snap-top towels are a surprisingly neat solution. You install snaps on the towel so it wraps around an oven handle and closes on itselfno topper needed.
Step-by-step
- Hang the towel where you want it to live. Drape it over your oven handle or towel bar and decide how long you want it to hang.
- Mark snap placement. Bring the two corners/edges together underneath the handle and mark where the snaps should meet (front and back marks matter!). Keep snaps aligned so the towel closes evenly.
- Reinforce (optional but smart). If your towel is thin, iron on a small scrap of interfacing behind each snap area to prevent tearing.
- Install snaps. Use snap pliers (easy) or the included snap-setting tool (still doable). Follow your kit directions and test the snap closure.
- Adjust if needed. If the towel hangs crooked, move one snap slightly inward. It’s tailoring, but for a towel.
Farmhouse twist: Choose neutral snaps (white, black, gray, or tan). Loud neon snaps can make your towel look like it’s headed to a rave, not a rustic kitchen.
Make It Look Professional: Small Details That Matter
- Press as you go. Ironing turns “homemade” into “handmade.” Big difference.
- Use matching hardware. If your kitchen has black handles, use black buttons/snaps. If it’s brushed nickel, choose silver-tone buttons.
- Don’t over-trim. One trim is cute. Three trims looks like the towel joined a marching band.
- Double-stitch stress points. The seam where towel meets topper/pot holder takes the most pulling.
Troubleshooting: When Your Towel Has Opinions
“My towel top is too bulky to sew!”
Switch from gathers to pleats (less bulk), use clips, slow down, and consider a slightly longer stitch length. If you’re sewing terry cloth, a sturdier needle and steady feeding help.
“The towel twists when it hangs.”
Make sure the towel is centered before stitching. For snap towels, check that snaps are placed at equal distances from the edges.
“My buttonhole looks… tragic.”
Two easy fixes: (1) use an elastic loop instead of a buttonhole, or (2) sew Velcro inside the topper (hidden closure). The farmhouse police will not arrest you.
Care & Cleaning (Because Kitchen Towels Work for a Living)
- Wash frequently. Hanging towels get used constantlyaim for every few days, or sooner if it’s been on spill duty.
- Use the right towel for the job. Keep one towel for hands and one for dishes/counters if you can. Less cross-contamination, more peace.
- Prewash + preshrink pays off. Your topper and towel will stay the same size and won’t warp after laundry.
FAQ
What’s the best towel size for a hanging kitchen towel?
A standard dish towel works, but many people prefer a slightly smaller hand towel so it doesn’t bunch or drag. The “best” size is the one that doesn’t smack your knees when you walk past the oven.
Can I do this without a sewing machine?
Yes. The snap-top method is truly no-sew. For the pot holder method, you can hand-sew the towel seam if neededjust use small, tight stitches and reinforce the seam.
Can I make these as gifts?
Absolutelyand they’re the rare DIY gift that people actually use. Pair two towels with a small jar of homemade spice mix or a wooden spoon and you’ve got a cozy farmhouse-ready bundle.
Experience-Based Tips From Real Kitchens (The Stuff Tutorials Don’t Always Tell You)
People don’t fall in love with hanging towels because they’re trendy; they love them because they solve tiny daily annoyances. And when a project lives in your everyday routine, the “small stuff” becomes the difference between “cute for a week” and “why didn’t I do this years ago?” Here are the most common experience-driven lessons DIYers run into once these towels hit real life.
1) The best-looking towel isn’t always the best-working towel. Flat weave and flour sack towels look crisp and farmhouse-perfect, but if your household uses the towel mostly for drying hands, a slightly thicker cotton (or a waffle weave) often feels better day-to-day. Many crafters end up making a “pretty set” for display and a “workhorse set” for heavy usesame topper style, different towel texture. That way you get the aesthetic and the absorbency without sacrificing either.
2) Bulky seams are where enthusiasm goes to die. The first time someone tries to sew a thick terry towel into a thick quilted pot holder, the sewing machine can start sounding like it’s chewing gravel. Makers who stick with it tend to do one of three things: switch to pleats (less bulk than gathers), sew slower with a longer stitch, or choose a thinner towel for the project. If you’re determined to use terry, trimming the towel’s top edge a little (so you’re not folding extra thickness into the seam) can also help.
3) Closure placement is everything. A hanging towel that pops open every time you grab it is basically a towel-shaped prank. People who have the best luck tend to test the closure on the actual handle firstthen mark button/snap placement while it’s wrapped in place. Oven handles vary in thickness, and cabinet pulls can be chunky, so “centered on paper” doesn’t always mean “centered in real life.” The five extra minutes you spend test-wrapping and marking is the difference between “secure” and “why is this towel undoing itself like a dramatic soap opera?”
4) Farmhouse style looks simple because it’s edited. DIYers who love their finished towels usually limit themselves to one “statement” detail: a bold button, a classic stripe, or a small tag. When you add ruffles, lace, ribbon, and a giant novelty print all at once, the towel can start looking more “craft fair avalanche” than farmhouse. The best results often come from a restrained palettecream, black, gray, navy, soft sageplus one texture (like linen-y cotton or twill tape).
5) The towel will tell you where it wants reinforcement. After a few weeks of use, stress points become obvious: the seam where towel meets topper, the button threads, and snap holes. People who make these regularly often do double-stitching by default, use stronger thread, and even add a small hidden patch of fabric inside the topper where the buttonhole sits. It’s not overkill; it’s kitchen reality. A towel gets grabbed with wet hands in a hurrysometimes mid-cookingso durability matters more than perfection.
6) Making a matching “set” is surprisingly satisfying. Many makers say the moment it really clicks is when they create two or three coordinating towels. Suddenly the kitchen looks pulled together in that effortless farmhouse way: one on the oven, one on a hook, one folded on the counter. It’s also practicalwhen one goes in the wash, the kitchen doesn’t look like it lost a battle.
Bottom line: hanging towels become favorites when they’re designed for how you actually live. If you cook a lot, prioritize strength and washability. If you decorate seasonally, swap topper fabrics through the year. Either way, you’ll end up with something that’s both charming and genuinely usefulaka the holy grail of DIY.