Table of Contents >> Show >> Hide
- What You’ll Need
- Before You Start: Decide Your Bouquet Style
- Paper Flower Basics: The Techniques That Make Them Look Real
- Three Reliable Paper Flowers for Bouquets
- Greenery & Leaves: The Secret to a “Real” Bouquet
- How Many Flowers Do You Need?
- Assemble the Bouquet Like a Pro
- Finish the Handle (So It Looks Gift-Ready)
- Troubleshooting: Fix the Most Common Issues
- Care & Storage (Yes, Paper Flowers Need a Little TLC)
- Conclusion: Your Forever Bouquet, Made by You
- Experiences and Lessons from the Craft Table
Fresh flowers are gorgeous… for about five minutes. Then they start the slow, dramatic fade-out like a soap opera character
who just realized they left the oven on. A paper flower bouquet, on the other hand, is the gift that never wilts, never
needs water, and never drops mysterious petals all over your car seat.
In this guide, you’ll learn how to make a paper flower bouquet that looks full, intentional, and “Wait, those aren’t real?”
convincingwhether you’re crafting a bridal-style bouquet, a birthday surprise, or a forever centerpiece for your table.
We’ll cover materials, flower-making methods, bouquet design, and the little finishing tricks that make it feel professional.
What You’ll Need
Paper options (pick one or mix)
- Crepe paper: Best for realistic blooms because it stretches and shapes beautifully.
- Cardstock: Great for crisp petals, rolled flowers, and sturdy “always holds its shape” bouquets.
- Tissue paper: Soft, airy, and perfect for fluffy filler flowersjust handle gently.
- Coffee filters: Surprisingly elegant for layered flowers; easy to tint with watercolor or diluted dye.
Tools & supplies
- Sharp scissors (small detail scissors help)
- Glue (tacky glue or a glue gun) and/or glue dots
- Floral wire or craft wire for stems
- Floral tape (green is classic)
- Pencil, ruler, and optional templates
- Optional shaping helpers: a wooden skewer, pen, or rounded tool for curling
- Ribbon or twine for finishing the bouquet handle
- Optional “greenery”: green paper for leaves, crepe paper strips, or faux leaves
Before You Start: Decide Your Bouquet Style
This is the part where you pretend you’re a florist with a tiny clipboard. Answer two questions:
- Is it hand-tied or vase-ready? Hand-tied bouquets have a wrapped handle. Vase bouquets can have longer stems and a looser shape.
- What’s the vibe? Romantic (roses/peonies), wildflower (daisies + fillers), modern (simple tulips + greenery), or bright party bouquet (mixed colors, big shapes).
Once you know the vibe, choose a color palette. A safe “always looks good” formula: 1 main color, 1 supporting color, and 1 neutral
(white/cream/soft green). If you want drama, add one bold accent (like mustard yellow or deep burgundy).
Paper Flower Basics: The Techniques That Make Them Look Real
1) Petal shaping (aka “give it a heartbeat”)
Flat petals look like… paper. Shaped petals look like flowers. For crepe paper, gently stretch the center of the petal to create a natural cup.
For cardstock, curl the petal edges around a pen or skewer to soften the look. Tiny changes make a huge difference.
2) Fringe centers (fast, classic, and weirdly satisfying)
Many flowers look instantly convincing when you add a textured center. Cut a narrow strip of paper, snip tiny cuts along one edge to create fringe,
then wrap it tightly around the top of a stem wire and glue it in place. Fluff the fringe. Suddenly: flower magic.
3) Clean stems
Wrap wire stems with floral tape to hide glue spots and keep everything neat. Floral tape sticks best when you stretch it slightly as you wrap.
(It’s like the tape wants commitment. Show it you’re serious.)
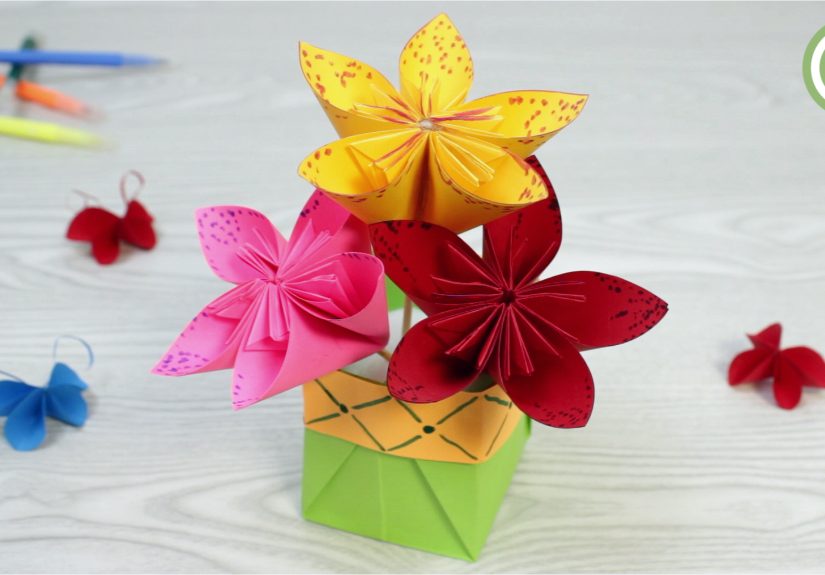
Three Reliable Paper Flowers for Bouquets
A great bouquet usually has variety: a few “hero” flowers, a few medium blooms for texture, and smaller filler flowers to make it look full.
Below are three bouquet-friendly flowers you can make without needing an art degree.
Flower #1: Rolled Paper Rose (best with cardstock)
Rolled roses are bouquet workhorses. They’re sturdy, quick once you get the hang of it, and they look great in look-at-me colors.
- Cut a spiral: Draw and cut a circle (about 4–6 inches wide). Cut inward in a spiral like a cinnamon roll in diagram form.
- Roll it up: Starting from the outer edge, roll the spiral toward the center. Keep it snug.
- Let it relax: Release slightly so it “blooms” into a rose shape.
- Glue the base: The center tail becomes the baseadd glue and press the rolled rose onto it to lock it in.
- Add a stem: Glue the rose onto a wire stem and wrap the base with floral tape.
Quick tip: Make 3–5 roses in slightly different sizes. Real bouquets rarely look like copy-paste clones.
Flower #2: Crepe Paper Peony (big, soft, and “wow”)
Peonies are the volume queens. One good peony can do the work of three smaller flowers and make your bouquet look instantly lush.
- Make a center: Create a fringe strip (about 1/2–1 inch wide) and wrap it around the top of a stem wire. Glue it down.
- Cut petals: Cut several petal shapes in graduating sizessmall, medium, large. Rounded top petals work well.
- Shape each petal: Stretch the center gently and curl the top edge outward with a skewer.
- Layer petals: Glue small petals around the center first, then medium, then large, slightly overlapping.
- Wrap the base: Floral tape over the glued base and down the stem.
Quick tip: For a natural peony look, don’t make every petal perfectly symmetrical. Slight variation reads as “real.”
Flower #3: Simple Daisy (easy filler that brightens everything)
Daisies are cheerful, quick, and perfect to break up a bouquet that’s starting to look too “wedding formal.”
- Cut a circle base: About 1–1.5 inches wide (cardstock is great here).
- Cut petals: Long, narrow ovals (or use a petal strip and cut repeated petals). Make 12–18 petals.
- Shape lightly: Curl petals upward just a touch.
- Glue petals around the base: Overlap slightly so the daisy looks full.
- Add a center: A small crumpled paper ball, a tight fringe roll, or a layered circle works well.
- Add stem and tape: Glue onto wire and wrap with floral tape.
Greenery & Leaves: The Secret to a “Real” Bouquet
Here’s a florist secret you can steal: greenery makes everything look more expensive. Even a simple bouquet looks designed when it has leaves,
little sprigs, or soft filler around the edges.
Easy paper leaves
- Cut leaf shapes (long teardrops for rose leaves, wider ovals for peonies).
- Fold a gentle center crease to mimic a vein.
- Glue leaves to the stem or tape them in place below the bloom.
Design tip: Use at least two greens (a darker and lighter shade) so your bouquet doesn’t look flat.
How Many Flowers Do You Need?
It depends on size and flower type, but here are reliable starting points for a medium hand-tied bouquet:
- 5–7 focal blooms (roses/peonies/tulips)
- 5–8 texture blooms (medium flowers like ranunculus-style shapes, daisies, smaller roses)
- 8–12 filler stems (tiny flowers, buds, and greenery)
If your bouquet looks a little sparse, you usually don’t need more giant flowersyou need more filler and greenery to “complete the picture.”
Assemble the Bouquet Like a Pro
Step 1: Prep your stems
Make sure each flower has a stem length that matches your bouquet style. For hand-tied bouquets, 8–12 inch stems are common.
For vase bouquets, go longer and trim later.
Step 2: Build a base with greenery
Start with 2–3 greenery stems crossed in your hand. This creates a foundation so your bouquet doesn’t look like a bundle of floating flower heads.
Step 3: Add focal flowers first
Place your biggest flowers in a loose triangle (not a tight clump). Rotate the bouquet as you add stems so it forms a natural spiral.
This rotation is the difference between “bouquet” and “bunch of stuff I’m holding.”
Step 4: Add texture blooms
Fill in the gaps between focal flowers with medium blooms. Vary height slightlysome higher, some tucked in.
Avoid lining flowers up at the same level like they’re waiting for a school photo.
Step 5: Add filler and edge greenery
This is where the bouquet becomes photogenic. Add smaller flowers and greenery around the edges to soften the outline.
If your bouquet looks “too round,” add a few stems that extend slightly outward for an organic shape.
Step 6: Secure the bouquet
Once you like the arrangement, wrap floral tape around the stems where your hand naturally grips. Wrap firmly and smooth it down.
Then trim stems evenly at the bottom.
Finish the Handle (So It Looks Gift-Ready)
A wrapped handle makes your bouquet look intentional and polished.
- Cover the taped area: Wrap ribbon around the handle, starting at the top and working down.
- Secure the ends: Use a small dot of glue or a discreet pin (if appropriate for your use).
- Add a bow or tail: Keep it classic, or let ribbon tails drape for a romantic look.
Optional: Wrap the bouquet like a present
If you’re gifting it, wrap the base in pretty paper (kraft paper, tissue, or wrapping paper), then tie with ribbon.
This instantly upgrades the “wow” factor and protects delicate petals during travel.
Troubleshooting: Fix the Most Common Issues
“My flowers look flat.”
Add shaping: curl edges, stretch crepe centers, and build more layers. Flat usually means “not enough dimension.”
“My bouquet looks messy.”
Reduce color chaos. Pull out 1–2 stems that don’t match the palette, and add greenery to create visual breaks.
“My stems are floppy.”
Use thicker wire, double-wire stems, or wrap wire with floral tape more tightly. For heavier blooms, reinforce the stem at the base of the flower.
“The bouquet feels heavy at the top.”
Add more filler lower down and extend a few greenery stems outward. This balances the silhouette.
Care & Storage (Yes, Paper Flowers Need a Little TLC)
- Keep dry: Moisture can warp paper. Store away from humid bathrooms and kitchen steam.
- Avoid direct sun: Bright sun can fade colors over time.
- Dust gently: Use a soft brush or a cool, gentle air setting from a distance.
- Transport tip: Carry in a box with tissue paper support so petals don’t get squished.
Conclusion: Your Forever Bouquet, Made by You
A paper flower bouquet isn’t just a craftit’s a small miracle of patience, scissors, and “how is this actually working?” moments.
Start simple (one flower style + greenery), then level up with multiple blooms, varied sizes, and a color palette that feels intentional.
By the end, you’ll have a bouquet that lasts, photographs beautifully, and earns compliments you can accept on behalf of your glue gun.
Experiences and Lessons from the Craft Table
The first time you try to make a paper flower bouquet, it usually starts with confidence and ends with you holding a slightly lopsided bloom,
wondering if real florists have secret wizard training. That’s normal. Paper flowers have a learning curve, but it’s a friendly onemore like a
gentle hill than a mountain. The biggest “aha” moment most crafters have is realizing that paper flowers don’t look real because the pattern is perfect.
They look real because the shape is alive: curved edges, cupped centers, layered petals, and small imperfections that mimic nature.
Another common experience: you’ll underestimate how much time the bouquet assembly takes. Making a single flower can be quick once you know the steps,
but a bouquet is a whole cast of charactersbig stars, supporting blooms, filler flowers, and greenery. The good news is that bouquets are forgiving.
If one rose comes out a little tight, tuck it deeper in the arrangement. If one peony is an absolute show-off, let it be the focal point and build the
rest around it. Paper bouquets are basically teamwork in flower form.
People also tend to learn that color matters more than they expected. A random handful of “pretty” colors can look busy, but a simple palette makes even
beginner-level flowers look sophisticated. Many crafters end up loving soft gradientslike blush to deep pink, or cream to peachbecause they create depth
without requiring complicated techniques. And once you add two shades of green for leaves, everything suddenly looks more expensive. Greenery is the
craft-world equivalent of seasoning: you don’t always notice it, but you definitely notice when it’s missing.
You may also discover you have a “favorite flower personality.” Some people fall in love with rolled roses because they’re sturdy, predictable, and satisfying
(like making tiny paper cinnamon rolls). Others prefer crepe paper blooms because shaping petals feels almost sculptural. And then there are the tissue-paper
fans who love volume and softnessperfect for making bouquets look full without needing 40 individual petals per flower. The best part is you can mix styles.
A bouquet with a few structured roses plus airy filler flowers often looks more natural than a bouquet where every bloom is made the exact same way.
One very real lesson: your hands get smarter quickly. The first few petals you cut might look awkward, but after a short session, your eye starts adjusting.
You’ll cut smoother curves, make better proportions, and instinctively vary sizes. It’s like handwritingat first you think about every stroke, then it becomes
automatic. And when you finally assemble the bouquet and wrap the handle, there’s a surprising emotional payoff. A finished paper bouquet feels meaningful
because it’s not just “a craft.” It’s a handmade object with time inside it. That’s why paper bouquets make such memorable gifts: they look beautiful, but they
also quietly say, “I spent my time making this for you,” which is basically the most flattering sentence in existence.
Finally, don’t be surprised if you start seeing everything as potential flower material. Leftover wrapping paper? Petals. Coffee filters? Soft blooms.
Scrap cardstock? Tiny filler flowers. Once your brain learns “paper can be flowers,” it doesn’t really unlearn it. And honestly, that’s a delightful problem
to haveright up until you’re saving every scrap because it might become a leaf someday.