Table of Contents >> Show >> Hide
- Why Anklets Are the MVP of DIY Jewelry
- Supplies and Tools You’ll Actually Use
- Step 0: Anklet Sizing (Because Ankles Don’t Do “One Size Fits All”)
- Method 1: Classic Beaded Anklet With Beading Wire + Crimps (Most Durable)
- Method 2: Stretch Anklet (Fast, Comfy, Beginner-Friendly)
- Method 3: Knotted or Macramé Cord Anklet (Beachy + Adjustable)
- Method 4: Simple Chain Anklet (Minimalist, Polished, and Quick)
- Design Ideas That Look Intentional
- Troubleshooting: Fixes for Common Anklet Problems
- Care Tips So Your Anklet Lasts Past the Weekend
- FAQ
- Experience Notes From the Workbench (Extra 500+ Words of Real-World Wisdom)
- 1) Anklets need more flexibility than bracelets
- 2) “Good enough” crimping is the #1 reason DIY anklets fail
- 3) Stretch anklets: keep them light, keep them happy
- 4) Jump rings should never look “almost closed”
- 5) The most “expensive-looking” anklets are usually the simplest
- 6) Plan for real shoes, not imaginary barefoot perfection
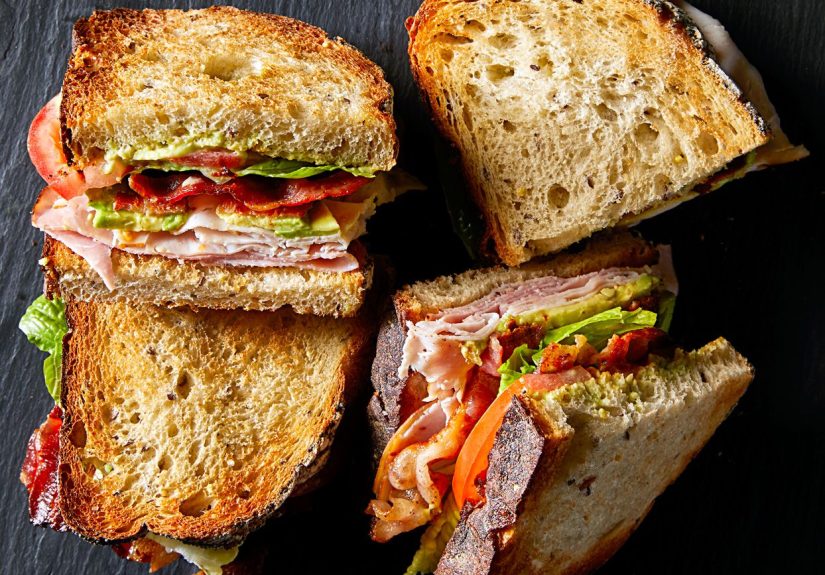
Anklets (aka ankle bracelets) are the tiny, sparkly reminder that your feet deserve accessories too.
They’re also one of the most satisfying DIY jewelry projects: small enough to finish in an evening,
customizable enough to match your entire personality, and forgiving enough that even a “creative measurement”
still looks intentional. (That’s what we call it when you eyeball it and hope for the best.)
In this guide, you’ll learn how to make ankle bracelets using four popular methodsbeading wire with
crimps (durable), stretch cord (fast), knotted/macramé cord (beachy), and chain (minimalist). We’ll cover tools,
sizing, pro finishing techniques, design ideas that don’t scream “middle-school craft fair,” and a big section of
experience-based tips at the end so your anklet actually survives real life.
Why Anklets Are the MVP of DIY Jewelry
Anklets are basically bracelets with a better vacation schedule. They’re lightweight, easy to layer, and you can
make multiple styles without buying a mountain of supplies. Plus, they’re a sneaky way to practice core jewelry
skillslike crimping, knotting, and working with jump ringson a project that doesn’t take three days and a
philosophical crisis.
Supplies and Tools You’ll Actually Use
The “right” supplies depend on the style you’re making. Here’s a practical kit that covers most DIY anklets:
Core materials
- Beads: seed beads, pearls, gemstone rounds, glass beads, or charms
- Stringing material (choose one):
- Beading wire (coated cable wire) for clasped beaded anklets
- Elastic stretch cord for slip-on stretch anklets
- Nylon cord / hemp / waxed cord for knotted or macramé anklets
- Chain for minimalist chain anklets (with optional beads/charms)
- Findings: lobster clasp or toggle clasp, jump rings, and optional extender chain
- Crimp beads or crimp tubes (for beading wire projects)
- Optional upgrades: wire protectors/guardians, crimp covers, bead tips, bead stoppers
Tools
- Measuring tape (or string + ruler)
- Wire cutters/flush cutters (for beading wire/chain)
- Crimping pliers (for crimp beads/tubes)
- Chain-nose pliers (general gripping)
- Two pliers for jump rings (opening/closing properly)
- Scissors (for cord/elastic)
- Beading board or bead mat (optional, but it prevents “bead avalanches”)
Pro tip: If you’re new, start with either a stretch anklet or a beading-wire anklet with a clasp.
Those two styles cover the most common jewelry-making techniques without needing a whole tool shed.
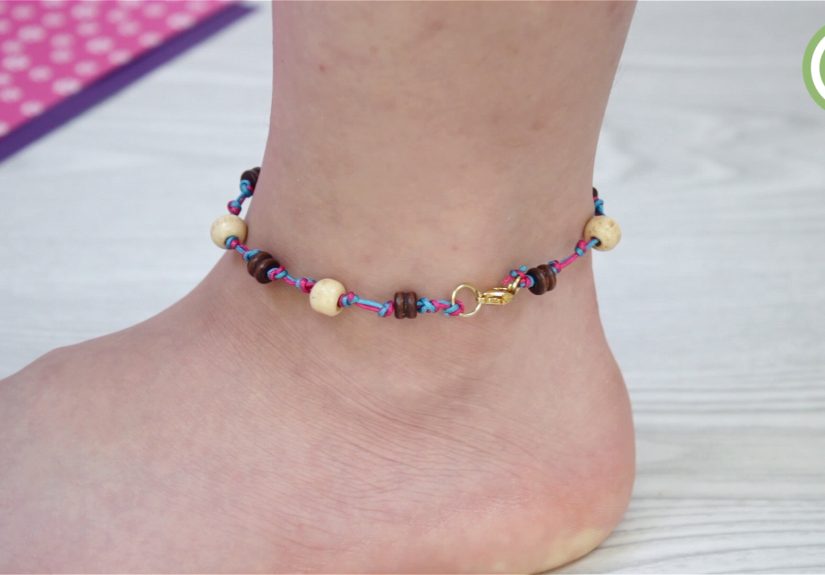
Step 0: Anklet Sizing (Because Ankles Don’t Do “One Size Fits All”)
Anklet size is about comfort and movement. Too tight, and it becomes an ankle grudge. Too loose, and it spins,
catches on shoes, or slides under your foot like it’s trying to start drama.
How to measure
- Wrap a flexible measuring tape around your ankle where you want the anklet to sit (usually just below the ankle bone).
- Keep it snug but not tight. Write down the measurement.
- Add ease based on fit preference:
- Close fit: add about 0.25–0.5 inches
- Comfort fit: add about 0.5–1 inch
- Relaxed/drapey fit: add about 1–1.5 inches
Example: Your ankle measures 8.5 inches. You want a comfortable fit. Add 0.75 inches.
Your target finished length is about 9.25 inches. If you’re adding a clasp, remember that the clasp
and jump rings take up some lengthso measure the finished piece, not just the beads.
If you’re unsure, add an extender chain (1–2 inches) so your anklet can adapt to barefoot days, sneaker
days, and “my feet are slightly swollen because I walked around like a tourist all afternoon” days.
Method 1: Classic Beaded Anklet With Beading Wire + Crimps (Most Durable)
This is the “real jewelry” method: coated beading wire, crimp beads/tubes, and a clasp. It’s strong, neat, and
ideal for anklets that see a lot of movement.
What you’ll need
- Beading wire (choose the largest diameter that fits your bead holes)
- 2 crimp beads or crimp tubes
- 1 clasp + 2 jump rings (optional if clasp has loops)
- Optional: 2 wire protectors/guardians, crimp covers, extender chain
- Crimping pliers + cutters
Step-by-step instructions
- Cut wire with breathing room.
Cut a length of beading wire longer than your target anklet length (give yourself extra so you can work comfortably).
Beginners: more extra is better than “oops, it’s short.” - Attach the first side of the clasp.
Thread on a crimp bead (or tube). If using a wire protector, thread that next. Then thread on one side of the clasp.
Loop the wire back through the protector (if used) and back through the crimp. - Make a tidy loop.
Pull the wire until the loop is snugbut not so tight that the clasp can’t move. Leave a tiny bit of wiggle room to reduce wear.
If possible, pass the wire tail through the next bead or two for extra security. - Crimp like you mean it (two-step crimping).
Place the crimp in the correct notch of your crimping pliers. First compress to form/secure, then use the rounding notch
(if your tool has one) to shape it neatly. Trim excess tail wire close to the crimp (without cutting your main wire). - String your beads.
Lay out a simple pattern first (even a quick “repeat 3 seed beads + 1 accent bead” looks intentional). Then string it all on.
Leave about 0.5 inch un-beaded at the end while you test length. - Test the length before finishing.
This is the “save yourself from regret” step. Wrap it around your ankle (carefully) or measure against your sizing target.
Adjust bead count as needed. - Finish the second side.
Add the second crimp bead (and wire protector if using), attach the other side of the clasp, loop back through the crimp,
and tighten. Before crimping, double-check that the anklet isn’t twisted and that the fit feels right. - Optional: cover and upgrade.
Add a crimp cover to hide a flattened crimp and make it look like a bead. Add an extender chain using jump rings if you want adjustable sizing.
Why this works: Beading wire is a flexible cable, not a threadso you don’t “tie” it.
Crimps mechanically lock the wire in place, giving you a clean, professional finish that stands up to ankle life.
Method 2: Stretch Anklet (Fast, Comfy, Beginner-Friendly)
Stretch anklets are basically the “no clasp, no problem” option. They slide on and off, feel comfy, and are perfect
for seed beads, small rounds, and lightweight charms.
What you’ll need
- Elastic stretch cord (size depends on bead hole size and bead weight)
- Beads (lighter beads = longer-lasting stretch anklet)
- Scissors + optional bead stopper
- Optional: a tiny dab of jewelry glue for knot security (not mandatory, but helpful)
Step-by-step instructions
- Cut more cord than you think you need.
Cut cord longer than your ankle measurement so you have enough length to tie securely. If you cut it “exact,” the knot becomes a wrestling match. - Pre-stretch the cord.
Gently stretch the elastic before stringing. This helps reduce future slack (aka the “why is my anklet suddenly 3 inches longer?” mystery). - String beads and test fit.
String your pattern. Wrap it around your ankle to test. It should stretch over your foot comfortably without feeling like it’s about to snap. - Tie a secure knot.
Use a surgeon’s knot (a double-overhand first pass) or another secure elastic-friendly knot. Pull firmly to set the knot. - Hide the knot.
Trim tails (leave a tiny bit). Slide the knot into a bead with a larger hole, or place the knot under a charm/bead cluster so it’s less visible.
Stretch anklets shine when you keep designs lightweight and avoid sharp-edged beads that can chew through elastic over time.
Method 3: Knotted or Macramé Cord Anklet (Beachy + Adjustable)
If you want that surf-shop, “I definitely own a tote bag made of canvas” vibe, cord anklets are your move.
They’re also great if you want adjustable sizing without adding chain extenders.
Easy knotted cord anklet
- Cut a length of cord long enough to wrap around your ankle plus extra for knots and tails.
- String a few beads (optional) and secure them with knots on either side (simple overhand knots work).
- Finish with a double-knot closure or add a button/loop closure for easy wear.
Macramé sliding closure (adjustable)
A sliding macramé closure lets you tighten/loosen the anklet. You overlap the two ends of your anklet and use a separate
piece of cord to tie a series of square knots around the overlap, creating an adjustable “slider.”
- Overlap the two ends of your anklet so they cross by about 1–2 inches.
- Use a separate piece of cord to tie square knots around the overlapped cords.
- Tie off the slider cord ends and trim/seal them so they don’t fray.
- Add small knots or beads at the anklet’s tail ends so they can’t pull through the slider.
This method is forgiving, fun, and ideal for giftingbecause adjustable jewelry is basically a cheat code for sizing.
Method 4: Simple Chain Anklet (Minimalist, Polished, and Quick)
A chain anklet is the cleanest look with the fewest steps. You can wear it alone, add a single charm, or attach a tiny
beaded drop for movement.
What you’ll need
- Chain (cable, curb, or paperclip-style)
- Lobster clasp
- Jump rings + optional extender chain
- Two pliers + cutters
Step-by-step instructions
- Measure your target length (ankle measurement + ease).
- Cut the chain to length (use cutters meant for metal so you don’t wreck your scissors).
- Attach the clasp with a jump ring. Open jump rings by twisting sideways (like opening a tiny door),
not pulling ends apart front-to-back (which warps the circle and weakens it). - Add an extender chain on the other side if you want adjustable sizing.
- Close jump rings tightly so there’s no visible gap (gaps are how charms escape to start a new life in your carpet).
Design Ideas That Look Intentional
You don’t need a complicated pattern to make a beautiful DIY anklet. In fact, the simplest designs often look the most “boutique.”
Try these:
- Minimalist spacing: tiny seed beads with one larger accent bead every inch
- Color palette rule: pick 1 main color, 1 neutral, 1 metallic
- Single charm moment: add one charm off-center (slightly to the outside ankle) for a modern look
- Texture mix: combine matte beads + shiny beads + one translucent bead for depth
- Layer plan: make two ankletsone chain, one beadedand wear them together
Troubleshooting: Fixes for Common Anklet Problems
“My beading wire is fraying near the clasp.”
Add a wire protector/guardian where the wire meets the clasp loop. That curved area is a friction hotspot, especially on anklets.
“My crimp looks flat and messy.”
Use the correct crimp size and a two-step crimping method (form, then round). If it’s still not cute, add a crimp cover.
Nobody needs to know what happened in the crimping stage.
“My stretch anklet keeps getting loose.”
Pre-stretch your cord before stringing, and make sure the knot is secure. Lightweight beads help; heavy beads can pull elastic out over time.
“My jump ring keeps opening.”
Close jump rings fully with two pliers, and consider using heavier-gauge rings for anklets (they take more stress than bracelets because walking is a thing).
Care Tips So Your Anklet Lasts Past the Weekend
- Remove before rough water: saltwater and chlorine can shorten the life of some materials and finishes.
- Store flat: prevents kinks in wire and keeps chain from tangling.
- Check hardware: clasp and jump rings are small, but they do big workinspect occasionally for gaps or wear.
- Gentle cleaning: wipe with a soft cloth; avoid harsh cleaners unless your materials are specifically rated for it.
FAQ
How long should an anklet be?
A common finished length is around 9 inches, but the best size is your ankle measurement plus a bit of ease.
If you’re gifting, an extender chain makes sizing much easier.
Can I use fishing line to make an ankle bracelet?
Fishing line is tempting because it’s “invisible,” but it’s not ideal for jewelry wear and tear. It can kink, weaken,
and fail at the worst possible time (usually when you’re wearing sandals and feeling confident). Beading wire or elastic
cord is usually a better choice depending on the style.
What’s the most beginner-friendly method?
Stretch anklets are the quickest win. If you want a more professional finish, learn beading wire + crimpingonce you’ve got that skill,
you can make bracelets, necklaces, and anklets with the same technique.
Experience Notes From the Workbench (Extra 500+ Words of Real-World Wisdom)
The difference between an anklet that looks cute in a photo and an anklet that survives three grocery runs, a long walk,
and the occasional “oops I forgot I was wearing it” shower usually comes down to a few tiny decisions. These are the
kinds of lessons crafters tend to pick up after making a couple versionsso you can borrow the wisdom without sacrificing
beads to the DIY gods.
1) Anklets need more flexibility than bracelets
Ankles move constantly, and shoes can bump jewelry in ways wrists don’t experience. That’s why coated beading wire with
a little wiggle room at the clasp loop is so effective. If you pull your loop tight like you’re cinching a backpack strap,
friction concentrates in one spot. A slightly relaxed loop and (ideally) a wire protector help distribute stress.
2) “Good enough” crimping is the #1 reason DIY anklets fail
Many beginners crush a crimp once and call it a day. The issue: a crimp needs to lock the wire strands securely and then
be shaped so it doesn’t snag. The two-step crimp method exists for a reason. Also, matching crimp size to your wire matters.
When the crimp is too large, the wire can slide. When it’s too small, you damage the wire coating and create weak points.
If you ever doubt your crimp, do a gentle but firm tug test before you trim tails and celebrate.
3) Stretch anklets: keep them light, keep them happy
Elastic cord is amazing… until it’s asked to carry the emotional weight of heavy beads and big charms all day. If you want
a chunky gemstone look, consider beading wire with a clasp instead. If you’re committed to elastic, use lighter beads
(seed beads, small glass, tiny pearls), pre-stretch the cord, and tie a knot that’s actually designed for slippery elastic.
And yes, hiding the knot inside a bead with a larger hole is still one of the cleanest finishes.
4) Jump rings should never look “almost closed”
An almost-closed jump ring is basically an invitation for your anklet to become a “mystery missing charm” story. The best habit:
open jump rings with a sideways twist, attach your component, then twist back until the ends meet flush. If you feel a tiny step
where the ends meet, keep adjusting. That seam is where thread, hair, and fabric love to catchand where stress can pry things open.
Two pliers make this easier, faster, and significantly less rage-inducing.
5) The most “expensive-looking” anklets are usually the simplest
It’s easy to assume more beads = better design. But a clean palette and intentional spacing often reads more polished.
Try building your design around a repeatable rhythm (like “three tiny beads + one accent”) or a single focal charm with lots
of negative space. If you want sparkle, use small metallic beads as separators rather than stuffing every millimeter with glitter.
Think of it like seasoning food: you’re aiming for “delicious,” not “I sneezed paprika into the pot.”
6) Plan for real shoes, not imaginary barefoot perfection
Anklets can sit differently with sandals, sneakers, and boots. If you expect to wear your piece daily, give it a little
adjustabilityeither an extender chain (for clasped anklets) or a sliding closure (for cord anklets). This also helps if your
ankle measurement changes slightly through the day. Jewelry that adapts gets worn more. Jewelry that pinches gets exiled to the
“cute but never again” drawer.
If you take only one lesson from this section, let it be this: your finish is your foundation.
Beautiful beads can’t rescue a weak crimp, a gappy jump ring, or a knot that’s one sneeze away from unraveling. Nail the finishing
steps, and your DIY ankle bracelet will look better, feel better, and last longerso you can spend your time making the next one
instead of rebuilding the one that just broke in the parking lot.