Table of Contents >> Show >> Hide
- Why Tile-Topped Stepping Stones Are Such a Smart DIY Project
- Tools and Materials You’ll Need
- Choose the Right Tile Before You Start
- How to Make Tile-Topped Stepping Stones: Step by Step
- Should You Seal Tile-Topped Stepping Stones?
- How to Install the Stepping Stones in Your Yard
- Common Mistakes to Avoid
- Design Ideas for Tile-Topped Stepping Stones
- Final Thoughts
- Extra Experiences and Lessons Learned From Making Tile-Topped Stepping Stones
If your garden path looks a little too plain, a tile-topped stepping stone is the kind of weekend project that adds color, personality, and just enough handmade charm to make people say, “Wait, you made that?” Yes. Yes, you did. And no, you did not need to summon a professional mason, a reality TV film crew, or a mystical backyard fairy with a grout float.
Learning how to make tile-topped stepping stones is one of those satisfying DIY projects that sits right in the sweet spot between practical and playful. You get a functional garden path, but you also get a chance to create miniature works of art underfoot. Broken plates, ceramic tile scraps, pebbles, glass accents, and even old mosaic leftovers can all become part of a design that turns an ordinary walkway into something far more memorable.
The beauty of this project is that it can be as simple or as artistic as you want. You can decorate a plain precast concrete stepping stone with a quick geometric pattern, or go full mosaic mastermind and build a floral design that makes your flowerbeds look like they hired a stylist. Either way, the process is approachable for beginners, affordable compared to buying custom garden décor, and flexible enough to match almost any landscape style.
In this guide, you’ll learn how to choose the right materials, prepare your stone, set tile pieces securely, grout and seal the surface, and place your stepping stones properly in the yard. You’ll also get tips for avoiding common mistakes, handling freeze-thaw weather, and making stones that look good for more than one glorious season.
Why Tile-Topped Stepping Stones Are Such a Smart DIY Project
Tile-topped stepping stones are more than decorative garden candy. They protect grass from foot traffic, reduce muddy shortcuts through planting beds, and add a finished, intentional look to the landscape. That’s especially useful if your yard currently says, “I’m casually evolving,” when what you really want is, “I have a plan.”
They also give new life to leftover materials. A few broken ceramic pieces, a plain concrete base, and some patience can become a custom feature that looks far more expensive than it really is. This is one of the rare DIY projects where imperfections often make the final result better. A slightly irregular mosaic pattern can feel charming instead of flawed, which is terrific news for anyone whose cutting technique is more enthusiastic than precise.
Tools and Materials You’ll Need
- Plain precast concrete stepping stones or homemade concrete bases
- Outdoor-friendly tile pieces, broken ceramic, porcelain, pebbles, or decorative mosaic materials
- Thin-set mortar
- Sanded or suitable grout for your joint size
- Bucket for mixing
- 3/16-inch notched trowel or small tile trowel
- Rubber grout float, spatula, or rubber trowel
- Sponge and clean water
- Safety glasses
- Heavy gloves
- Soft cloth for buffing haze
- Optional grout sealer and concrete sealer
If you are pouring your own concrete stepping stone instead of decorating a store-bought base, add concrete mix, a mold, and a level work surface to the list. That said, using a precast stone is the easiest route for most DIYers and dramatically reduces the chance of turning your first attempt into an accidental abstract sculpture.
Choose the Right Tile Before You Start
Best Tile Choices for Outdoor Stepping Stones
The best materials for this project are durable, low-porosity, and able to handle outdoor conditions. Porcelain is often the top choice because it is dense, water-resistant, and generally better suited to moisture and cold weather than many standard indoor-only options. Floor-rated ceramic pieces can also work well, especially in milder climates. Pebbles, quarry-style pieces, and certain terracotta accents can add texture and visual variety.
If your stepping stones will live in a place with rain, sprinkler splash, or winter freeze-thaw cycles, outdoor-rated or frost-resistant tile is the safest bet. Texture matters too. A tile surface that becomes slick when wet may look elegant, but elegance takes a back seat when somebody skids across the garden carrying a watering can and their dignity.
What to Avoid
Skip thin decorative wall tile that is not rated for floors, ultra-porous pieces that absorb water easily, and glossy indoor materials that could get slippery outdoors. Also avoid making the surface too uneven. A stepping stone should still feel like a stepping stone, not a surprise foot massage from a mosaic made of sharp edges and height differences.
How to Make Tile-Topped Stepping Stones: Step by Step
1. Start With a Design Plan
Before mixing anything, lay out your tile pieces on the stone and experiment with the pattern. This dry-fit stage is where you solve visual problems without the stress of setting material hardening in the bucket. You can create a simple border, a sunburst, a floral motif, or a random broken-tile mosaic with deliberate color balance.
Keep grout lines consistent enough to look intentional, but don’t obsess over perfection. A handcrafted stepping stone should feel handmade. Think “artisanal garden detail,” not “factory floor sample.”
2. Break Tile Safely
If you’re using whole ceramic plates or larger tiles, place them in a shallow box and cover them with a cloth before breaking them with a hammer or tile nippers. Always wear safety glasses and gloves. Broken ceramic can be razor-sharp, and this is not the kind of project where a dramatic blood sacrifice improves the final result.
Sort the pieces by size and color as you go. This will make the design stage easier and keep you from digging through a pile of shards like an archaeologist with a deadline.
3. Prepare the Concrete Base
If you’re using a precast stepping stone, clean it thoroughly first. Dust, dirt, and loose grit interfere with adhesion. Then wet the concrete stone so it is thoroughly damp but not dripping. This step helps prevent the dry concrete from pulling moisture out of the thin-set too quickly.
If you are pouring your own base, mix the concrete carefully and don’t flood it with extra water. A workable mix is important, but too much water weakens the concrete. Pour the mix into your mold, level it, and let it cure properly before adding tile to the top. Some DIYers like embedding decorations while the base is still green, but the most controlled and beginner-friendly approach is usually tiling onto a cured concrete stone with thin-set mortar.
4. Mix and Apply the Thin-Set Mortar
Mix thin-set mortar according to the package directions until it reaches a peanut-butter-like consistency. Spread a layer about 1/4 to 1/2 inch thick over part of the damp stone with a notched trowel. Work in sections rather than coating the whole surface at once. Thin-set has no interest in waiting around while you debate whether the blue shard looks happier next to the yellow one.
Comb the mortar lightly so the tile pieces can settle in with better contact. If one area needs a slightly higher bed to keep the finished surface even, add a little more mortar underneath those pieces.
5. Set the Tile Pieces
Press the tile pieces into the mortar gently but firmly. Leave visible gaps between them for grout. Keep checking the surface height with your hand so one piece doesn’t sit dramatically higher than the others. The goal is visual texture without creating a tripping hazard.
Wipe excess mortar off the tile faces as you go. It is much easier to clean now than later, when it has hardened into the sort of stubborn crust that makes you question every life choice that led to this moment.
6. Let the Stone Dry Overnight
Once the pattern is complete, let the stone rest undisturbed overnight or according to the mortar manufacturer’s cure recommendation. Resist the urge to “just test it real quick.” Freshly set tile does not appreciate confidence exercises.
7. Grout the Surface
Mix the grout to a smooth, spreadable consistency and apply it generously across the tile surface, forcing it into the joints with a rubber float or spatula. For wider joints, sanded grout is often the practical choice because it helps reduce shrinkage and supports the joint better. For very narrow joints or delicate surfaces, follow the grout manufacturer’s recommendation.
Work the grout diagonally across the lines so gaps fill completely. Don’t be shy here. Grout is not frosting, but this is the closest your stepping stone will ever come to being iced like a cake.
8. Clean Off the Grout Haze
After the grout begins to firm up slightly, wipe the surface with a damp sponge. Rinse often and use a light hand so you clean the tile faces without pulling grout out of the joints. Once the surface dries fully, buff away remaining haze with a soft cloth.
Then let the finished stone cure for 24 to 48 hours before moving it into place. Longer is often better if the weather is cool or humid.
Should You Seal Tile-Topped Stepping Stones?
In many cases, yes. Sealing is one of the easiest ways to help the project last longer outdoors. Cement-based grout is porous and can benefit from a quality sealer once it has fully cured. A suitable grout sealer helps reduce moisture penetration and staining, which is especially helpful in wet climates or heavily watered garden beds.
You may also choose to seal the concrete base if the product is designed for exterior use. Sealers are not magic force fields, but they do add a useful layer of protection. Think of them as a raincoat for your hard work.
How to Install the Stepping Stones in Your Yard
Making the stones is only half the job. Installing them correctly is what keeps them comfortable and safe to walk on.
Dry-fit the stones first and test the spacing with an ordinary walking stride. In many gardens, spacing of roughly 3 to 6 inches between stones feels natural, but the best distance depends on the size of the stones and the people using the path. A child’s stride and a tall adult’s stride are not exactly reading from the same script.
Once you like the layout, cut out the turf and dig shallow recesses for each stone. Set each one on about 2 to 3 inches of paver sand so you can level it easily and allow drainage. The top of each stone should sit securely and feel stable underfoot. If the stone rocks, adjust the base before calling it done. Wobbly stepping stones are charming only in fairy tales.
Common Mistakes to Avoid
Using the Wrong Tile
Indoor-only wall tile, highly absorbent pieces, and very slick finishes often fail outdoors or become unsafe when wet.
Adding Too Much Water
Overwatering concrete, mortar, or grout weakens the mix and can lead to poor performance, splotchy color, or surface problems.
Skipping Cure Time
Mortar and grout need time. Rushing the project usually creates loose pieces, weak joints, or finish issues.
Ignoring Surface Height
A dramatic difference in tile thickness can make the stepping stone uncomfortable or unsafe to walk on.
Forgetting About Weather
If your climate freezes, materials need to handle moisture and cold well. Outdoor-rated choices are not optional decoration; they are the difference between long-lasting and one sad spring cleanup.
Design Ideas for Tile-Topped Stepping Stones
- Create a mosaic border with a plain center for a clean, classic look
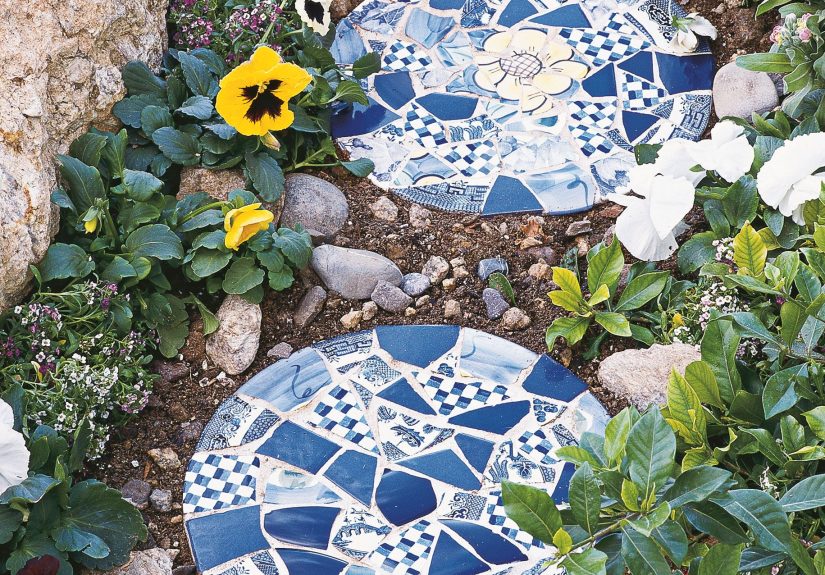
- Use broken blue and green tile for a water-inspired garden path near a pond
- Mix warm terracotta, cream, and stone tones for a cottage garden feel
- Design each stone with a different flower, leaf, or geometric pattern
- Add pebbles around the edges for texture and a more natural transition to the landscape
- Use old dishware for a vintage look that feels personal and one-of-a-kind
Final Thoughts
Once you know how to make tile-topped stepping stones, you can turn a plain path into something personal, durable, and unexpectedly artistic. The project is beginner-friendly, but it still delivers that deeply satisfying feeling of having made something useful with your own hands. Better yet, it is the kind of DIY that ages well. A good stepping stone path does not just decorate the garden; it becomes part of how you move through it, care for it, and enjoy it.
Take your time with the prep, choose materials that can handle the outdoors, and don’t rush the curing and sealing stages. Do that, and your stepping stones will have a much better shot at looking beautiful season after season. And every time someone compliments them, you get to casually say, “Oh, those? I made them.” Which is honestly half the fun.
Extra Experiences and Lessons Learned From Making Tile-Topped Stepping Stones
The most interesting thing about making tile-topped stepping stones is how quickly the project changes from a simple craft into a small design adventure. At first, most people focus on the materials. They think about the tile color, the shape of the stone, or whether the path should curve through the garden bed. But once the process begins, the experience becomes much more tactile and intuitive. You start noticing how different tile fragments catch the light, how some colors disappear against wet mortar while others suddenly come alive, and how even a plain concrete base can feel like a blank canvas waiting for a little personality.
One common experience is realizing that the “perfect” pattern on the table often looks different once it is placed on the stone. Pieces that seemed too bold suddenly become the stars of the design. Tiny filler pieces that felt unimportant turn out to be what gives the mosaic rhythm and balance. This is one reason the dry-fit step matters so much. It saves time, yes, but it also helps you discover the design instead of forcing it.
Another lesson DIYers often learn is that restraint is powerful. It is easy to keep adding colors, textures, and decorative bits because the options are fun. Very fun. Dangerously fun. But some of the best tile-topped stepping stones use only two or three dominant colors with a few accents. When every piece is trying to be the lead singer, the whole path starts to sound like a garage band with no rehearsal.
There is also a practical side to the experience that people rarely appreciate until they have made a few stones. Weight matters. So does thickness. A stone that looks beautiful on the workbench may not feel great once it is moved into the yard and set into the soil. Heavy bases are harder to reposition, and tile pieces that vary too much in depth can make the surface awkward underfoot. After one or two attempts, most DIYers get much better at choosing pieces that are visually dynamic without making the stone lumpy.
Perhaps the best part of the project is what happens after installation. These stepping stones do not stay “new” in the showroom sense. They settle into the garden. They catch a little soil dust. They sit beside mulch, herbs, or creeping thyme. Sun and rain soften the whole scene, and the stones start to feel like they belong there. That is when the project really pays off. You are no longer looking at a craft. You are looking at a path with memory in it.
And that may be the real reason people love making tile-topped stepping stones. They are useful, yes. They are attractive, definitely. But they also record a bit of time and intention. A chipped plate from an old kitchen, leftover tile from a renovation, or colors chosen to match a favorite flower bed can all become part of something you walk across every day. Not many DIY projects manage to be practical, personal, and a little whimsical all at once. This one does, and that is exactly why it keeps winning over gardeners, crafters, and stubbornly optimistic weekend project people everywhere.