Table of Contents >> Show >> Hide
- What Color Is Turquoise (and Why Does It Have So Many “Cousins”)?
- Supplies You’ll Need
- The Secret to Clean Turquoise: Start With the Right Blue
- How to Make Turquoise Paint (The Core Recipe)
- Step-by-Step: Mix Turquoise Paint Like a Pro
- Turquoise Mixing for Different Paint Types
- Quick Recipe Chart: Common Turquoise Variations
- How to Fix Common Turquoise Problems (Without Crying on Your Palette)
- Pro Moves: Match Turquoise to a Photo, Tile, or Paint Chip
- Storing Your Turquoise Mix (So You Don’t Have to Re-Create It From Memory)
- Safety Notes (Quick, Practical, Not Scary)
- Conclusion: Your Turquoise, Your Rules
- Real-World Experiences: What Mixing Turquoise Actually Feels Like (500+ Words of Honest Studio Truth)
Turquoise is that “vacation-water” color that makes you want to book a flight, buy a hammock, and never look at your inbox again. The good news: you don’t need a special tube labeled Turquoise Dreams of a Better Life. You can mix turquoise paint yourselfcleanly, consistently, and in whatever shade you want (aqua, teal, robin’s egg, tropical lagoon, you name it).
This guide walks you through the exact steps to mix turquoise using common paints, explains why mixes sometimes turn swampy, and shows how to tweak your recipe for acrylic, oil, and watercolor. You’ll also get quick “rescue” fixes when your turquoise misbehavesbecause it will, at least once, purely out of spite.
What Color Is Turquoise (and Why Does It Have So Many “Cousins”)?
Turquoise sits between blue and green on the color wheel. That means your turquoise can lean bluer (cooler, more “pool water”) or greener (warmer, more “tropical bay”). It’s closely related to aqua (usually lighter and bluer) and teal (usually darker and greener). In practical terms, turquoise is a family of colors, not a single, fixed recipe.
Your goal isn’t “the one true turquoise.” Your goal is your turquoisethe one that matches your reference photo, your interior palette, your beach painting, or the exact shade your client insists is “more vibey.”
Supplies You’ll Need
Essential paints
- A cool blue (ideal: Phthalo Blue / Cyan-leaning blue)
- A cool green (ideal: Phthalo Green / Blue-leaning green)
- White (Titanium White for opacity; Zinc White for subtler tints if you have it)
Optional “tuning” colors (highly recommended)
- Yellow (to warm turquoise toward aqua/seafoam)
- Red or orange (tiny amounts to mute/neutralize when turquoise is too neon)
- Earth tone like burnt umber (for deeper teal shadows without harsh black)
Tools
- Palette (or disposable palette paper)
- Palette knife (clean mixes, fewer streaks)
- Brush for testing swatches
- Scrap paper/canvas for test strips
- Notebook or phone camera to record recipes
The Secret to Clean Turquoise: Start With the Right Blue
If your turquoise keeps turning dull, gray, or “mysterious pond,” your blue may be too warm. Warm blues (like ultramarine-leaning blues) contain a hidden pull toward purple/red, and red is the natural enemy of bright greens and clean aquas. When you mix a warm blue with green or yellow, you often create a muted, earthy result. That’s not “wrong”it’s just not the crisp turquoise you’re after.
For bright turquoise, choose a cool, green-leaning blue (often labeled phthalo blue, cyan, or “blue green shade”). Pair it with a cool, blue-leaning green (often phthalo green). These pigments are famously strongthink of them as the espresso shots of your paletteso you’ll use small amounts and add white gradually.
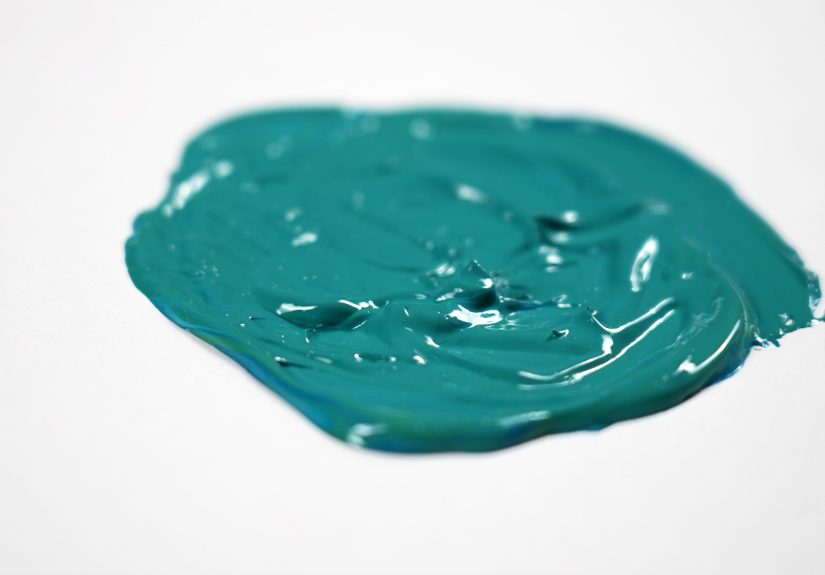
How to Make Turquoise Paint (The Core Recipe)
Here’s the reliable foundation: blue + green + white. You’ll adjust the ratio depending on whether you want a bluer turquoise, a greener turquoise, or a lighter tint.
Core starting ratios (pick one)
- Balanced turquoise: 1 part blue + 1 part green
- Bluer turquoise: 2 parts blue + 1 part green
- Greener turquoise (teal-leaning): 1 part blue + 2 parts green
Then add white to lift the value (lightness) and reveal the turquoise character. Without white, many strong blues/greens can look very dark in mass tonealmost blackishso don’t panic if your first mix looks like deep ocean at midnight.
Step-by-Step: Mix Turquoise Paint Like a Pro
Step 1: Set up a “test lane”
On your palette, reserve a small area for swatches. Every time you tweak your mix, drag a little sample into the test lane. This saves you from guessing (and from remixing the same mistake three times, which is a classic studio hobby).
Step 2: Start with blue
Squeeze out a small puddle of your cool blue. Keep it modest. If you’re using phthalo pigments, “a little” is a real measurement unit.
Step 3: Add green slowly
Add green in tiny increments and mix thoroughly with a palette knife. Stop when the mix sits clearly between blue and green. If it starts shouting “GREEN!” you’ve gone too farno stress, you’ll pull it back with more blue.
Step 4: Add white to reveal the turquoise
Add white in small amounts, mixing fully each time. This is where the magic happens: as the value rises, the color reads as turquoise rather than “deep stain.”
Step 5: Tune the temperature (optional)
- Too blue? Add a touch more green.
- Too green? Add more blue.
- Too cold/icy? Add a pinprick of yellow (seriouslypinprick).
Step 6: Adjust saturation (optional)
If your turquoise is too neon, mute it with the tiniest hint of its complement (a red/orange family color). Go slowly: the goal is “slightly calmer,” not “sad beige.”
Step 7: Record the recipe
Write down your ratio in simple terms (“2 blue : 1 green + 4 whites”) or snap a photo of the piles on your palette before they get blended into modern art.
Turquoise Mixing for Different Paint Types
Acrylic: fastest, easiest, most forgiving
Acrylic is great for turquoise because you can mix quickly, test, adjust, and paint without long drying waits. Use a palette knife to avoid streaks and to keep the mix clean. If the color dries slightly darker than expected, compensate by mixing a touch lighter than your target.
Oil: same ratios, slower rhythm
Oils mix beautifully for turquoiseespecially for water scenesbecause you can make smooth gradients and soft transitions. The main difference is drying time and handling: keep your whites and strong phthalo pigments under control, and avoid overworking the mix on the canvas if you want maximum brightness.
Watercolor: think “dilution first,” then “value control”
In watercolor, turquoise often appears through transparency and dilution rather than heavy white. You can still mix blue + green, but you’ll usually lighten with water. For opaque highlights or pastel turquoises, you can use gouache/white watercolor sparingly.
Quick Recipe Chart: Common Turquoise Variations
| Shade | Mix | Best for |
|---|---|---|
| Classic Turquoise | 1 blue : 1 green + white to taste | General purpose, skies, accents |
| Turquoise Blue (cooler) | 2 blue : 1 green + white | Pool water, reflected light, glass |
| Teal-leaning Turquoise | 1 blue : 2 green + a little white | Deep water, foliage shadows, décor |
| Aqua / Seafoam (warmer, lighter) | Turquoise + more white + tiny yellow | Tropical shallows, beach scenes |
| Dusty Turquoise (muted) | Turquoise + tiny red/orange (or gray mix) | Vintage palettes, interiors, skin-adjacent tints |
How to Fix Common Turquoise Problems (Without Crying on Your Palette)
Problem: “My turquoise looks muddy.”
- Cause: A warm blue (purple-leaning) or too many pigments in the mix.
- Fix: Restart with a cool blue (cyan/phthalo-style). Keep it to 2–3 pigments max (blue, green, white). If you must rescue the current pile, add more of the cleanest blue and green you have, then lighten with white.
Problem: “It’s basically green now.”
- Fix: Add blue in small increments. Test after each mix. Don’t add more white until the hue is rightwhite can make a too-green mix look “minty,” which is cute but not always the assignment.
Problem: “It’s too brightlike a highlighter.”
- Fix: Add a tiny touch of red/orange or a warm earth tone to neutralize. Alternatively, glaze a thin complementary layer over it (especially effective in oils).
Problem: “It got chalky.”
- Cause: Too much white too fast, or an opaque white overwhelming transparent pigments.
- Fix: Add a little more blue/green to restore saturation. In acrylic, consider glazing a thin transparent turquoise layer over the chalky area.
Problem: “It dries darker than it looked.”
- Fix: Mix slightly lighter than your target. Keep a dry test strip nearby and compare once it sets.
Pro Moves: Match Turquoise to a Photo, Tile, or Paint Chip
If you’re trying to match a specific turquoise (say, a kitchen backsplash or a product brand color), treat it like a mini science experiment:
- Start neutral: Mix a balanced turquoise (1:1 blue/green), then add white until the value matches your reference.
- Match hue next: If it’s too blue, add green; too green, add blue.
- Match saturation last: If it’s too vivid, mute with a tiny complementary touch.
- Check under real lighting: Turquoise changes dramatically under warm bulbs vs daylight. Compare in the lighting where it will be seen.
Bonus tip: Make a small “ladder” of swatchessame turquoise mix, but with increasing amounts of white. This gives you instant options for highlights, midtones, and soft transitions.
Storing Your Turquoise Mix (So You Don’t Have to Re-Create It From Memory)
- Acrylic: Store in an airtight container or wrap the palette tightly. A mist of water helps, but don’t flood it.
- Oil: Put mixed paint in a sealed jar or cover it from oxygen exposure. Some artists store piles under plastic wrap.
- Watercolor: Let it dry on your palette; re-wet when needed. Record the pigment combo so you can rebuild it.
Most importantly: label your mix. Future-you deserves that kindness.
Safety Notes (Quick, Practical, Not Scary)
- Keep paint out of food areas (no “snack palette” energy).
- Wash hands after painting, especially before touching your face.
- For oils, handle solvents carefully, ventilate, and store oily rags safely to avoid fire risk.
Conclusion: Your Turquoise, Your Rules
To make turquoise paint, start with a cool blue and a cool green, then lift the mix with white (or water, in watercolor). Tune the hue by nudging the blue/green ratio, and control saturation with tiny complementary adjustments. Most importantly, swatch as you go and write down your recipebecause turquoise is gorgeous, but it is not loyal to your memory.
Once you’ve mixed your first “perfect” turquoise, make a few siblings: a lighter tint, a deeper teal shadow, and a muted dusty version. That mini palette will instantly make your paintings and designs look more intentionaland way more expensive than they have any right to.
Real-World Experiences: What Mixing Turquoise Actually Feels Like (500+ Words of Honest Studio Truth)
The first time most people try to mix turquoise, they expect a cinematic transformation: two colors meet, angels sing, and suddenly the palette looks like a postcard from Maui. What usually happens is… different. You mix blue and green, it turns very dark, and your brain goes, “Did I just invent deep space algae?” That moment is normal. Turquoise often hides in the shadows until you raise the value. Add white slowly and you’ll watch the color step into the light like it’s walking onto a stage, taking a bow, and accepting your apology for doubting it.
Another very real experience: phthalo pigments will humble you. They don’t “blend in.” They take over. You add what you think is a reasonable dab of phthalo green, and suddenly your carefully measured blue puddle is a green tsunami. The trick is to treat phthalo like hot sauce: start with a tiny amount, stir, taste-test (swatch), and only then decide if you want more. This one habitmicro-additions instead of big squeezesmakes your mixes cleaner and saves paint.
Lighting will also mess with you in a way that feels personal. Under warm indoor bulbs, a turquoise mix can look greener and duller. Then you carry the same swatch to a window and it suddenly looks crisp and bright. Artists quickly learn to check turquoise in the lighting where it will live. If you’re painting ocean water that will hang in a sunny room, test in daylight. If you’re painting a mural for a restaurant with warm lighting, test under warm light. Otherwise, you’ll remix forever and still feel “off.”
Matching a specific turquoise (like a brand color or a tile) is its own adventure. The most successful approach is surprisingly calm: match value first (lightness), then hue (blue vs green lean), then saturation (how vivid it is). People often do the oppositechasing the “right” hue while the value is wrongwhich is like trying to match someone’s outfit color in the dark. Once you get the value close with white or dilution, the hue decisions become obvious and much less stressful.
You’ll also discover that turquoise rarely works alone. In paintings, the best turquoise waters usually have a family of related notes: a deeper teal shadow, a midtone turquoise, and a pale aqua highlight. The experience of building those variations is honestly satisfying because it turns a single mixed color into a whole mood. And if you’re doing interiors or crafts, those variations help you keep turquoise from looking flat or “too much.” A slightly muted turquoise next to a bright pop of turquoise looks intentional; two equally bright turquoises can look like a fight at a neon factory.
Finally, there’s a weirdly emotional milestone: the day you stop trying to “get turquoise perfect” and start treating it like a flexible tool. On that day, you’ll mix a turquoise, decide it’s too green, nudge it bluer, lighten it for highlights, deepen it for shadows, and move onconfidently. That’s the real win. Turquoise stops being a mythical color you chase and becomes something you steer. And yes, it’s still vacation-water gorgeous. It just also obeys you now.