Table of Contents >> Show >> Hide
- Why Melting Chocolate Can Be Tricky
- Best Chocolate for Melting
- A Quick Comparison of Melting Methods
- How to Melt Chocolate in the Microwave
- How to Melt Chocolate in a Double Boiler
- How to Melt Chocolate in a Slow Cooker
- The Biggest Mistakes People Make
- How to Fix Melted Chocolate Problems
- Should You Add Oil or Shortening?
- How to Melt Dark, Milk, and White Chocolate
- Do You Need to Temper Chocolate?
- Best Uses for Melted Chocolate
- Real Kitchen Experiences: What Melting Chocolate Actually Feels Like
- Conclusion
Melting chocolate sounds like one of those kitchen tasks that should be hilariously easy. You take chocolate, you apply heat, and suddenly you are a dessert wizard. In reality, melted chocolate can go from glossy and luxurious to grainy and grumpy in what feels like half a blink. One second it looks like a ganache commercial. The next, it looks like mud with trust issues.
The good news is that learning how to melt chocolate is not hard once you understand the rules. Chocolate likes gentle heat, dry tools, patience, and a person who does not panic at the sight of a few unmelted chunks. Whether you want to dip strawberries, drizzle brownies, coat pretzels, swirl fudge, or make a quick chocolate sauce, the method stays pretty simple. Treat chocolate like a fancy guest at dinner: keep things calm, keep things clean, and do not splash water on it.
In this guide, you will learn the best ways to melt chocolate, how to avoid common mistakes, what to do if your chocolate seizes, and which method makes the most sense for your recipe. If you have ever burned a bowl of chocolate in the microwave and then stared at it like it betrayed your family, this article is for you.
Why Melting Chocolate Can Be Tricky
Chocolate is delicate because it contains cocoa solids, sugar, and cocoa butter, and those ingredients do not appreciate rough handling. Too much heat can scorch it. A few drops of water can make it seize and turn thick and clumpy. Even the type of chocolate you use matters. Dark chocolate is usually a little sturdier, while milk chocolate and white chocolate are more sensitive and more likely to overheat.
This is why the best advice for melting chocolate is always the same: low heat, short intervals, and frequent stirring. If that sounds boring, welcome to baking. Boring is often how delicious things happen.
Best Chocolate for Melting
Chocolate bars
Chocolate bars are often the best choice if you want smooth, even melting. Chop them into small, uniform pieces so they heat evenly. Big random chunks melt at different speeds, which means one part can burn while the other part is still sitting there like a stubborn ice cube.
Chocolate chips
Chocolate chips are convenient and already small, so they are easy to melt. That said, some chips contain stabilizers that help them hold their shape in cookies, which can make them a bit less fluid than bar chocolate when melted. They still work well for drizzling, dipping, and quick dessert projects.
Melting wafers or candy coating
If you want ultra-easy dipping for cake pops, pretzels, or candy molds, melting wafers are the low-drama option. They are designed to melt smoothly and set nicely without the same level of fuss as real chocolate. Purists may clutch their aprons, but convenience has its place.
A Quick Comparison of Melting Methods
| Method | Best For | Speed | Risk Level |
|---|---|---|---|
| Microwave | Small to medium batches, quick drizzling, everyday baking | Fast | Medium if you overheat it |
| Double boiler | More control, larger batches, gentle melting | Moderate | Low if you keep water out |
| Slow cooker | Party dipping stations, big batches | Slow | Low to medium |
How to Melt Chocolate in the Microwave
For many home bakers, the microwave is the easiest way to melt chocolate. It is quick, it creates less cleanup, and it works beautifully when you use short bursts and stir often. This is not the time to hit five minutes and wander off to answer a text.
What you need
- Microwave-safe bowl
- Rubber or silicone spatula
- Chopped chocolate or chocolate chips
Step-by-step instructions
- Place the chocolate in a completely dry microwave-safe bowl.
- Microwave at 50% power if your microwave allows it. If not, use very short bursts.
- Heat for 20 to 30 seconds, then stir thoroughly.
- Continue heating in 10- to 20-second bursts, stirring after each one.
- Stop when the chocolate is almost melted. Then stir until the residual heat melts the last few pieces.
That final step is the secret. Chocolate often keeps its shape even while it is melting, so do not rely on appearance alone. Stirring is what tells the truth. If you keep microwaving until every piece visibly disappears, you may end up with overheated chocolate. And overheated chocolate has the emotional range of drywall.
When to use the microwave method
Use the microwave when you want melted chocolate for brownies, cookies, ganache, bark, drizzles, or a quick fruit dip. It is especially handy for smaller amounts because it is efficient and easy to monitor.
How to Melt Chocolate in a Double Boiler
If you want more control, the double boiler method is the classic move. You do not need an actual double boiler, either. A heatproof bowl set over a saucepan of simmering water works just fine. The bowl should sit above the water, not in it. Your chocolate wants steam heat, not a surprise swim lesson.
What you need
- Small saucepan
- Heatproof bowl
- Rubber or silicone spatula
- Chopped chocolate or chips
Step-by-step instructions
- Add about 1 inch of water to a saucepan.
- Bring the water to a gentle simmer, not a wild boil.
- Set the dry bowl on top, making sure the bottom does not touch the water.
- Add the chocolate and stir gently as it melts.
- Once the chocolate is mostly melted, remove the bowl from the heat and stir until smooth.
This method is ideal when you are melting a larger quantity or want steadier, more controlled heat. It is also helpful when working with recipes that need chocolate to stay melted for a little while. Just remember the golden rule: no water in the bowl, no steam sneaking in, no damp spoon from the sink. Chocolate is a diva, and moisture is the enemy.
How to Melt Chocolate in a Slow Cooker
A slow cooker is not usually the first method people think of, but it is useful for parties, dessert tables, or any situation where you want to keep a larger amount of chocolate warm for dipping. Think pretzels, marshmallows, strawberries, or a whole parade of snackable things.
Best slow cooker tips
- Use the low or warm setting.
- Stir often to prevent hot spots.
- Do not cover the cooker if condensation might drip into the chocolate.
- Turn the heat down once everything is melted.
This method is not the fastest, but it is convenient when you need melted chocolate to hang around for a while without turning into a solid brick between guests.
The Biggest Mistakes People Make
1. Using high heat
Chocolate melts at a relatively low temperature, so blasting it with aggressive heat is unnecessary and risky. High heat is how you end up with scorched edges, thick texture, and a kitchen mood that can only be described as “well, that escalated quickly.”
2. Letting water get in
Even a tiny amount of water can make melted chocolate seize. That means it becomes stiff, grainy, and difficult to work with. Dry your bowls, spatulas, and measuring tools thoroughly. If you are dipping fruit, make sure it is fully dry too.
3. Not chopping chocolate evenly
Uniform pieces melt more evenly. A giant chunk next to tiny shards is a recipe for uneven heating and frustration.
4. Walking away
Chocolate rewards attention. It does not need your whole afternoon, but it does need you to stay in the room.
5. Overheating white chocolate
White chocolate is especially sensitive because it contains cocoa butter, milk solids, and sugar but no cocoa solids. Translation: it burns faster and complains louder.
How to Fix Melted Chocolate Problems
What if the chocolate seizes?
If your chocolate turns clumpy and thick because a little water got in, it may not be suitable for dipping anymore. But that does not always mean it is trash. In some cases, adding more warm liquid can turn seized chocolate into a sauce, glaze, or ganache-style mixture. It will not magically become perfect dipping chocolate again, but it can still become dessert instead of disappointment.
What if the chocolate overheats?
If the chocolate looks thick, dull, or grainy from overheating, take it off the heat right away. Transfer it to a cool, dry bowl and stir in a few pieces of unmelted chocolate to lower the temperature. Sometimes that rescue works beautifully. Sometimes the chocolate has chosen chaos. Either way, acting quickly gives you the best chance.
Should You Add Oil or Shortening?
Sometimes. Sometimes not. If you are just melting good-quality chocolate for baking into brownies, cakes, or sauces, you often do not need to add anything. But if you want a thinner consistency for dipping or drizzling, a small amount of neutral oil, coconut oil, or vegetable shortening can help loosen it.
The key is moderation. Too much added fat can change how the chocolate sets. And if you are using specialty candy melts or coating wafers, follow the product directions because those are formulated differently from real chocolate.
One important note: adding oil is not the same as adding water. Fat can help with flow. Water can make the whole thing seize. These two liquids are not kitchen twins. They are not even cousins.
How to Melt Dark, Milk, and White Chocolate
Dark chocolate
Dark chocolate is usually the most forgiving. It melts smoothly and holds up well, making it a favorite for dipping and drizzling.
Milk chocolate
Milk chocolate melts nicely but is a bit more delicate because of the milk solids and added sugar. Use gentle heat and keep a closer eye on it.
White chocolate
White chocolate is the drama queen of the group. It can scorch quickly, so use very low heat, short microwave intervals, and lots of stirring. Stop heating while it still has small lumps and let residual warmth do the rest.
Do You Need to Temper Chocolate?
Not always. If you are melting chocolate to stir into batter, make ganache, or drizzle over cookies, tempering is usually unnecessary. But if you want a shiny finish and a firm snap for dipped candies or molded treats, tempering matters. Without it, the chocolate can harden with a dull finish or develop bloom, which is that whitish streaky look that makes people think something went terribly wrong.
The good news is that bloom is more of a beauty issue than a safety issue. The chocolate is usually still fine to eat. It just looks like it had a rough week.
Best Uses for Melted Chocolate
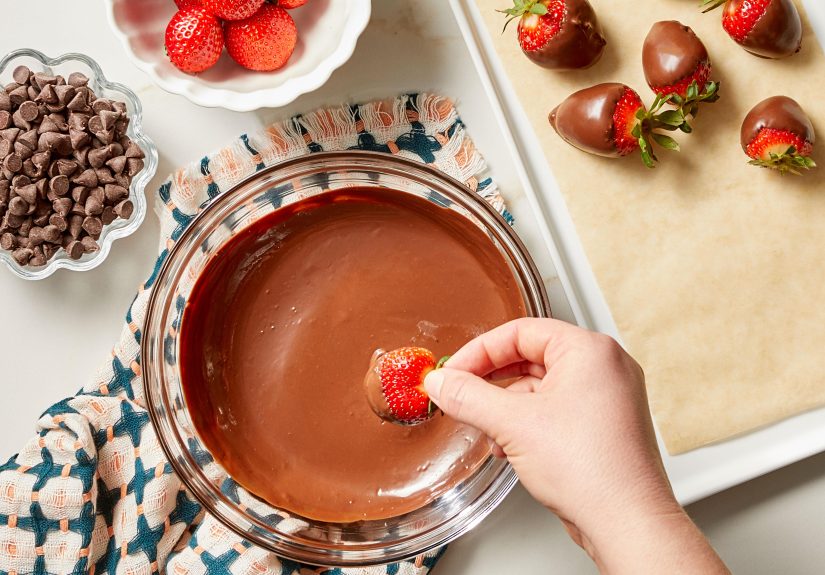
- Chocolate-covered strawberries
- Dipped pretzels and cookies
- Brownie and cake drizzles
- Ganache for cakes and cupcakes
- Chocolate bark with nuts or dried fruit
- Fondue and dessert dips
- Molded candies and truffles
Once you know how to melt chocolate properly, you unlock a whole category of desserts that instantly look fancier. A basic tray of pretzels becomes a party snack. Strawberries become date-night food. A spoon and a bowl become, technically, a personal problem.
Real Kitchen Experiences: What Melting Chocolate Actually Feels Like
If you have never melted chocolate before, the experience can feel oddly dramatic for something that starts in a baking aisle and ends in a bowl. The first time many people try it, they assume chocolate behaves like butter. It does not. Butter practically throws itself into a puddle the second it sees heat. Chocolate is more mysterious. It sits there in the bowl, looking almost unchanged, and makes you wonder whether anything is happening at all. Then you stir it once and suddenly it transforms into something glossy and smooth. It is one of the most satisfying little kitchen magic tricks.
A lot of home bakers learn the hard way that patience matters more than power. You put the bowl in the microwave, wait 30 seconds, pull it out, and think, “No way this is enough.” So you give it another long blast. That is usually the moment the chocolate decides to become thick, streaky, or burned around the edges. The lesson arrives fast: melted chocolate is not impressed by confidence. It prefers restraint.
There is also a very specific kind of heartbreak that comes from a single drop of water. Maybe you rinsed a spoon too quickly. Maybe steam sneaked up from the pan. Maybe the strawberries looked dry but were secretly plotting against you. However it happens, seized chocolate is one of those kitchen moments that makes you freeze and stare. It looks wrong instantly. Instead of smooth ribbons, you get a stiff, grainy mess that feels like the dessert version of a flat tire.
But here is the encouraging part: most people get better at melting chocolate almost immediately. After one or two tries, you start noticing the signals. You learn that chocolate often finishes melting off the heat. You learn that stirring matters more than extra heat. You learn that a dry bowl is not optional, and that white chocolate needs the gentlest handling of all. Before long, the whole process stops feeling intimidating and starts feeling pleasantly routine.
There is also something weirdly calming about it. Chopping a bar into neat little pieces, setting up a bowl, stirring slowly, watching the texture change from matte chunks to glossy silk, all of that feels a little luxurious even if you are standing in sweatpants at 9:30 p.m. making a last-minute drizzle for brownies. Melting chocolate makes ordinary desserts feel intentional. It makes your kitchen smell amazing. It turns quick recipes into things that look bakery-worthy with very little effort.
And then there is the confidence boost. Once you can melt chocolate well, a whole bunch of recipes suddenly stop looking complicated. Chocolate-dipped fruit, bark, truffles, drizzled popcorn, decorated cookies, ganache-topped cakes, all of it starts to feel doable. You stop seeing melted chocolate as a risky side quest and start seeing it as a useful tool. That is usually the point where people begin getting a little too confident and dipping absolutely everything in sight. Pretzels, marshmallows, potato chips, espresso spoons, maybe a questionable number of strawberries. Honestly, that is part of the fun.
So if your first bowl of melted chocolate is not perfect, welcome to the club. Almost everyone learns by making one batch that is too hot, too thick, or slightly seized. The trick is not avoiding every mistake forever. The trick is understanding what chocolate needs and responding before the problem gets bigger. Once you do that, melted chocolate stops being a fussy project and becomes what it should have been all along: one of the easiest ways to make dessert feel special.
Conclusion
If you want to know how to melt chocolate successfully, remember the essentials: use gentle heat, keep everything dry, stir often, and stop heating before the chocolate is completely melted. The microwave is ideal for speed and convenience, while the double boiler is perfect for extra control. For large batches, a slow cooker can keep the party going without turning your chocolate into a brick.
Once you understand those basics, melted chocolate becomes much less intimidating and much more fun. You do not need a pastry degree, a marble slab, or a dramatic French soundtrack. You just need a bowl, some patience, and the willingness to stir like you mean it.