Table of Contents >> Show >> Hide
- Meet the Camellia: The Evergreen Show-Off
- Choosing the Right Camellia for Your Garden
- Planning the Perfect Spot
- Step-by-Step: How to Plant a Camellia
- Watering, Feeding, and Ongoing Camellia Care
- Pruning Camellias for Shape and Blooms
- Growing Camellias in Containers
- Common Camellia Pests and Problems
- Design Ideas: Using Camellias in the Landscape
- Real-World Experiences Growing Camellias
If you’ve ever wanted roses that bloom in winter and don’t complain about the weather, camellias are your shrub. These glossy evergreens light up the garden from fall through early spring with perfectly shaped blooms in white, pink, and red. With the right spot and a bit of thoughtful care, a camellia can outlive you, your pets, and probably your favorite pair of gardening gloves.
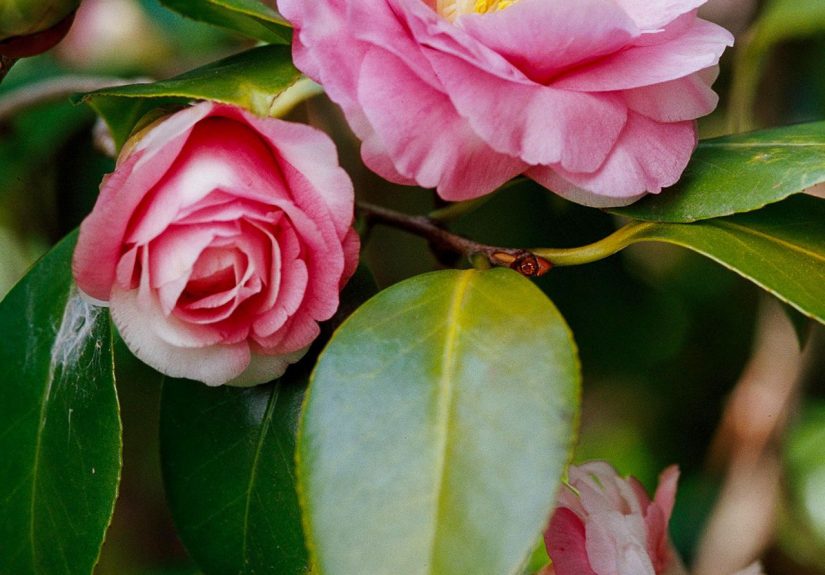
Meet the Camellia: The Evergreen Show-Off
Camellias are broadleaf evergreen shrubs or small trees, most commonly Camellia japonica and Camellia sasanqua. They’re hardy in roughly USDA Zones 7–9, with some cultivars stretching a bit colder or warmer depending on protection and microclimate. These shrubs are prized for:
- Winter and early spring color: Many varieties bloom from late fall through early spring, when almost nothing else is flowering.
- Glossy foliage: Dark green, leathery leaves provide year-round structure in borders and foundation plantings.
- Long lifespan: Once established, camellias can live for decades with minimal fuss.
The secret to camellia care is not complicated: give them the right light, the right soil, and don’t let them sit in water or dry out completely. Nail those basics and the rest is fine-tuning.
Choosing the Right Camellia for Your Garden
Before you start digging holes, decide what kind of camellia works for your climate and your design plans.
C. japonica vs. C. sasanqua
- Camellia japonica: Large, formal blooms; prefers partial shade and protection from hot afternoon sun; typically blooms winter to early spring; great as specimen shrubs.
- Camellia sasanqua: Smaller leaves and flowers, but masses of them; tolerates more sun; usually earlier bloom (fall to early winter); often used as hedges or espalier.
Check plant tags for mature size. Some camellias stay in the 4–6 foot range; others want to become full-blown small trees. Your foundation planting does not need a 15-foot shrub sneaking up on the eaves.
Check Your Hardiness Zone
Most garden camellias thrive in USDA Zones 7–9. In colder regions, look for cold-hardy selections or grow camellias in containers you can shelter during the worst freezes. Good sitinglike a protected eastern wallcan make a borderline zone workable.
Planning the Perfect Spot
Light: Bright but Gentle
Camellias love bright, indirect light or dappled shade, like the understory beneath tall, open-canopy trees. Morning sun with afternoon shade is ideal.
- Too much hot afternoon sun → scorched, yellowing leaves and stressed plants.
- Too much deep shade → sparse growth and fewer flower buds.
- C. sasanqua tolerates more sun than C. japonica, so it’s the better choice for brighter sites.
Soil: Slightly Acidic, Rich, and Well-Drained
Camellias are classic “acid-loving” shrubs, similar to azaleas and rhododendrons. They want:
- pH: Ideally around 5.5–6.5 (slightly acidic).
- Texture: Loose, organically rich soil that holds moisture but never stays soggy.
- Drainage: Absolutely essentialwaterlogged roots are a fast track to root rot.
If you have heavy clay, improve the soil with compost and pine bark fines or consider raised beds. In very alkaline soils, mix in peat moss or plant in large containers with an acid-loving potting mix.
Step-by-Step: How to Plant a Camellia
1. Prep the Site
- Test your soil pH if you can, and amend to reach that sweet spot around 5.5–6.5.
- Loosen a wide area of soil, at least 2–3 times the width of the root ball, to encourage roots to spread.
- Remove rocks, construction debris, and any compacted layers that could trap water.
2. Dig the Hole (But Not Too Deep)
Camellias hate being planted too low. Their roots are relatively shallow and need oxygen.
- Dig the hole just as deep as the root ball and about twice as wide.
- Set the plant so that the top of the root ball sits 1–2 inches above the surrounding soil level.
- Backfill with the native soil mixed with compost; gently firm to eliminate air pockets but don’t stomp it like you’re making grapes into wine.
3. Water In and Mulch
After planting, water deeply to settle the soil. Then apply 2–3 inches of mulchpine bark, pine needles, or shredded leaves work well. Keep mulch a couple of inches away from the trunk to avoid rot.
Watering, Feeding, and Ongoing Camellia Care
Watering: Consistently Moist, Not Swampy
Camellias like even moisture, especially during bud formation and bloom. Letting them dry out completely can cause buds to drop, while constant sogginess invites root problems.
- Aim for about 1 inch of water per week from rain or irrigation during active growth and while flower buds are forming.
- Water deeply rather than giving frequent shallow sprinkles.
- Container camellias dry out fastercheck the top 2–3 inches of soil and water when it feels dry.
Fertilizing Camellias
Overfeeding a camellia is like overfeeding a toddler: you’ll get a lot of drama. Light, timed feeding is best.
- Use a slow-release, acid-forming fertilizer labeled for camellias or azaleas.
- Apply in early spring after flowering, and again in late spring or early summer, following label directions.
- Stop fertilizing by late summer (around August) so new growth can harden off before winter.
Yellowing leaves with dark green veins can indicate iron deficiency from high pH; address the soil first, then use chelated iron if needed.
Pruning Camellias for Shape and Blooms
The good news: camellias are naturally well-behaved. Many need only minimal pruning. But a little strategic trimming keeps them dense, healthy, and floriferous.
When to Prune
- Best time: Just after the plant finishes flowering and before new growth and buds begin forming for the next season.
- Pruning too late in summer can remove next year’s flower buds.
- Light shaping or removing dead/diseased wood can be done anytime.
How to Prune
- Start by removing dead, crossing, or inward-growing branches.
- Thin congested areas to improve air circulation, cutting back to a leaf joint.
- For overgrown shrubs, you can cut back up to one-third (or more in stages) to strong side branches.
Always use clean, sharp tools, and avoid pruning in very hot or very cold weather, which can stress the plant.
Growing Camellias in Containers
If your soil is terrible, your yard is tiny, or you rent, container camellias are your friend.
- Choose a wide, heavy pot with drainage holescamellias are long-term residents, not seasonal bedding.
- Use a high-quality potting mix formulated for acid-loving plants.
- Set the plant slightly high in the pot and avoid burying the stem.
- Place the container where it gets morning sun and afternoon shade.
- Water when the top couple of inches of soil feel dry, and let excess drain freely.
In colder zones, roll containers into a sheltered spot, like an unheated garage or against a protected wall, during hard freezes.
Common Camellia Pests and Problems
Tea Scale and Other Insects
Tea scale is the most notorious camellia pest. These tiny insects feed on leaf undersides, causing yellow, chlorotic patches on top and a dull, unhealthy appearance.
- Check the undersides of leaves for tiny, brown or white, armored-looking bumps.
- Light infestations can be managed with horticultural oil sprays applied to leaf undersides.
- For severe cases, repeated treatments and better cultural care (proper watering, light, and fertility) help the plant recover.
Bud Drop
Few things are more discouraging than fat buds dropping before they open. Common causes include:
- Irregular watering or drought stress during bud development.
- Waterlogging and root stress.
- Sudden temperature swings or late freezes.
Mulch, consistent moisture, and protection from harsh wind can dramatically reduce bud drop.
Leaf Yellowing
Yellow leaves can mean different things:
- Old leaves yellowing and dropping in spring → normal turnover.
- General yellowing, especially on new leaves → possible alkaline soil or nutrient imbalance.
- Yellow spots with green veins → iron deficiency from high pH.
Start by checking drainage and pH, then adjust feeding. Healthy roots solve many “mystery” symptoms.
Design Ideas: Using Camellias in the Landscape
Camellias are versatile in garden design and can play many roles:
- Specimen shrub: A single camellia near an entryway becomes a winter focal point.
- Evergreen hedge: Plant a row of C. sasanqua for a flowering privacy screen.
- Woodland edge: Combine camellias with azaleas, hostas, and ferns for a layered shade border.
- Container accents: Large pots flanking a porch or patio provide four-season structure and seasonal color.
Because camellias are so long-lived, it’s worth spending extra time on placement. Think about mature size, bloom color against your house, and how the shrub looks from key viewpoints (kitchen window, back patio, street).
Real-World Experiences Growing Camellias
Ask a group of camellia lovers about their shrubs and you’ll hear the same pattern: a few early mistakes, a couple of “aha” moments, and then years of easy enjoyment. Here are experience-based lessons many gardeners share.
Lesson 1: Plant High or Pay Later
One of the most common regrets is planting camellias too deep. Gardeners often say their camellias “just sat there” or declined slowly for several years. Digging around the base later often reveals that soil or mulch has crept up over the root flare.
When plants are set slightly high, they tend to establish faster and get fewer disease issues. Gardeners who replant failing shrubs a bit higher almost always see a noticeable improvement the next season, with richer foliage and more flower buds.
Lesson 2: Afternoon Shade Really Does Matter
Another frequent experience: a struggling, yellowing camellia in full afternoon sun. After a couple of seasons of crispy leaves and disappointing blooms, many gardeners end up moving the shrub to a spot with morning sun and dappled afternoon light.
Once moved, these plants often respond dramaticallydenser foliage, fewer burned leaves, and bigger, longer-lasting blooms. The takeaway from countless backyards: if your summers are hot, treat afternoon shade as non-negotiable, especially for C. japonica.
Lesson 3: Consistent Watering Beats Heroic Rescue
Busy gardeners sometimes forget that camellias, especially in containers or new plantings, dry out faster than they think. A common story is a camellia that looked great in early summer, then dropped buds in late summer or early fall when watering schedules got irregular.
Many growers now swear by simple systems: a weekly “deep watering day,” soaker hoses on timers, or grouping camellias with other moisture-loving shrubs. Once that steady routine is in place, bud drop becomes rare, and blooms become reliably abundant.
Lesson 4: Light, Timed Feeding Is Enough
Camellias don’t need heavy feeding to perform. Gardeners who used high-nitrogen fertilizers too often often report lots of lush foliage but surprisingly few flowersand sometimes tender growth that winter damage wipes out.
The happiest stories come from those who switched to a slow-release acid-loving fertilizer applied once or twice a year, combined with generous organic mulch. The shrubs look more balanced, with steady growth, glossy leaves, and abundant blooms without the “sugar rush and crash” of overfertilizing.
Lesson 5: Prune with the Calendar, Not on Impulse
Almost every camellia grower has a tale of “the year I pruned at the wrong time.” A shrub that was cut back hard in midsummer may look beautifully shaped, but it often produces few or no flowers the following season because the buds were removed.
Once gardeners get into the habit of pruning right after floweringoften marking it on the calendarthe problem disappears. They enjoy strong new growth and plentiful buds, and their camellia becomes one of the most reliable winter highlights in the yard.
Lesson 6: Camellias Reward Patience
Finally, experienced growers emphasize that camellias are long-term investments. They may take a few years to settle in and reach their full potential, but once they do, they can be the backbone of your landscape. Many gardeners talk about shrubs planted decades earlier that still bloom faithfully each year, becoming family landmarks that anchor memories of holidays, photos, and shared moments.
If you’re willing to give your camellia the right start and a bit of consistent care, the long-term payoff is huge: months of flowers when the rest of the garden is sleeping, evergreen structure, and a plant that can easily outlast a few garden trends.