Table of Contents >> Show >> Hide
- Meet Hay-Scented Fern: What It Is (and Why Gardeners Use It)
- Best Growing Conditions
- Where to Plant It (Pick the Right “Mission”)
- How to Plant Hay-Scented Fern: Step-by-Step
- Care and Maintenance: Keep It Happy (Without Overdoing It)
- Managing Spread: The “Friendly Bully” Strategy
- Propagation: How to Get More (or Share the Wealth)
- Troubleshooting Common Problems
- Design Ideas and Practical Examples
- Wrap-Up: The Best Way to Succeed With Hay-Scented Fern
- Gardeners’ Experiences: What It’s Like to Grow Hay-Scented Fern (Real-World Lessons)
- 1) “It solved my bare-shade problem… faster than I expected.”
- 2) “It’s deer-resistant, which is great… until it’s the only thing left.”
- 3) “Edges matter. Without edges, it becomes a lifestyle.”
- 4) “In heat, it can look roughso I moved it (and it forgave me).”
- 5) “The scent is realand it’s oddly satisfying.”
- 6) “It’s my go-to ‘problem-solver’ plant, but I treat it with respect.”
If you’ve ever wished your shady yard would “just fill itself in” (without you hauling in ten truckloads of mulch and
emotionally negotiating with patchy grass), hay-scented fern might be your new best frond.
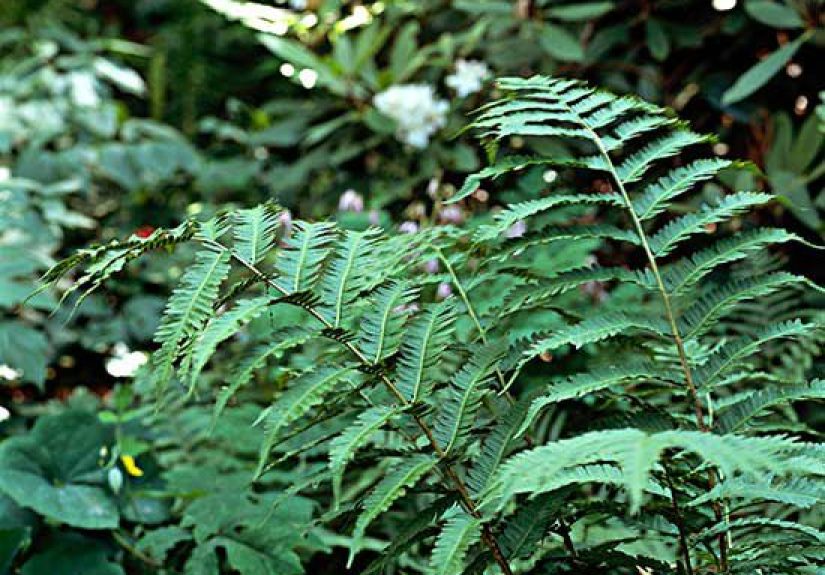
Officially known as Dennstaedtia punctilobula, this native fern forms airy, light-green colonies that look like
nature’s lace doilyuntil you brush past it and it politely perfumes you with a fresh-cut, hay-like scent.
It’s tough, adaptable, and famously enthusiastic about spreading, which is wonderful when you want a living carpet…
and less wonderful when you plant it like a “cute accent” next to delicate shade perennials.
This guide walks you through how to plant and grow hay-scented fern the smart way: choosing the right site, planting
correctly, keeping it happy, and (very importantly) keeping it in its lane when it gets ambitious.
Meet Hay-Scented Fern: What It Is (and Why Gardeners Use It)
Hay-scented fern is a deciduous fern native to much of the eastern United States, commonly found in open woods,
wooded banks, slopes, and forest edges. It typically grows about 1.5–2 feet tall, with soft, finely divided fronds
that create a feathery, layered texture. When fronds are bruised or crushedespecially later in the seasonyou may
notice the signature “new-mown hay” fragrance that inspired its common name.
Why it earns a spot in real-life landscapes
- Shade groundcover: It can knit together a lush understory where turf fails.
- Erosion help: Dense colonies can stabilize slopes and woodland edges.
- Low drama (mostly): Few pest/disease problems, and deer usually ignore it.
- High texture, low fuss: It adds movement and softness under trees and along paths.
One honest warning up front: hay-scented fern spreads by rhizomes and can form thick stands. In forests, dense fern
layers can reduce tree seedling regeneration. In gardens, that translates to: it can outcompete smaller neighbors if
you give it unlimited real estate. The key is pairing the plant with the right job.
Best Growing Conditions
Light
Hay-scented fern performs best in partial shade to full shade, especially in typical garden conditions. It can handle
more sun if the soil stays consistently moist, but in hot summer climates, strong sun can lead to stressed, ragged
fronds by late summer. Think: “woodland dapple” or “morning sun, afternoon shade.”
Soil
Aim for humus-rich, well-drained soil that holds moisture without becoming swampy. Slightly acidic to neutral soil is
usually fine, and this fern is known to tolerate a wide range of soil textures (including sandy or rocky sites) once
established. If your soil is compacted clay, you’ll get better results by improving drainage and adding organic
matter before planting.
Moisture
“Moist” is the sweet spotespecially during establishment. Once mature, hay-scented fern can tolerate some dryness,
but drought will reduce vigor and can make fronds look tired (the botanical version of a bad hair day).
Hardiness
It’s generally hardy in colder climates and commonly listed for USDA hardiness zones in the 3–8 range. In very warm
regions with intense summer heat, prioritize shade and consistent moisture for best performance.
Where to Plant It (Pick the Right “Mission”)
Before you plant, decide what you want hay-scented fern to do. This is not just philosophicalit’s practical.
The plant’s spreading habit is a feature when you want coverage, and a bug when you wanted “one nice fern.”
Great places to use hay-scented fern
- Under deciduous trees where turf struggles and leaf litter is constant.
- Woodland edges and naturalized shade gardens.
- Shady slopes for a living, rooty “net” that helps hold soil.
- Wide borders where you want a soft, consistent ground layer.
Places to avoid (unless you like surprise renovations)
- Small, tightly curated perennial beds with delicate plants that can’t compete.
- Near tiny woodland wildflowers you’re trying to preserve as individual clumps.
- Right up against property lines unless you’re containing it with edging/barriers.
How to Plant Hay-Scented Fern: Step-by-Step
When to plant
Plant in spring after the ground is workable or in early fall while soil is still warm.
These windows help roots establish without battling extreme heat or deep freezes.
1) Prep the planting area
- Clear weeds and grass: Especially important if you’re planting for groundcover. Remove existing sod thoroughly.
- Loosen the soil: Work the top 6–8 inches to improve root penetration and drainage.
- Add organic matter: Mix in compost or shredded leaf mold to boost moisture-holding and soil structure.
- Check drainage: If water sits for hours after rain, amend with organic matter and consider planting on a slight mound.
2) Planting depth (potted plants)
- Dig a hole about as deep as the pot and 2–3 times as wide.
- Slide the fern out gently and loosen circling roots.
- Set the plant so the crown (where fronds emerge) sits level with the surrounding soil.
- Backfill, firm lightly, and water deeply.
3) Planting bare-root or divisions
Hay-scented fern is often shared as divisionsbecause once you have it, you’ll have it. If you’re planting a division:
- Soak roots briefly if they seem dry.
- Plant with the crown just at or slightly below soil level.
- Water thoroughly and keep evenly moist for the first few weeks.
4) Spacing for a lush groundcover
For faster coverage, space plants about 18–24 inches apart. For a slower, more “controlled” fill-in,
use 24–36 inches. Remember: rhizomes will do their thing once the plant is comfortable.
5) Mulch (yes, even though it becomes its own mulch)
Apply a 2–3 inch layer of shredded leaves, pine fines, or compost around new plantingskeeping mulch pulled back from
the crown. Mulch moderates soil moisture and temperature, which helps establish that first-year root system.
Care and Maintenance: Keep It Happy (Without Overdoing It)
Watering
During the first growing season, water whenever the top inch of soil dries outespecially during dry spells. Once
established, it’s more forgiving, but consistent moisture keeps fronds looking fresh and full. If planted in a
brighter site, regular watering matters more.
Fertilizing
Ferns generally don’t need heavy feeding. If your soil is poor, a spring top-dressing of compost is usually enough.
If you must fertilize, use a light handtoo much nitrogen can push weak, floppy growth.
Pruning and cleanup
- Midseason tidying: Remove ragged or browned fronds to keep colonies looking neat.
- Fall/winter: Fronds typically yellow and die back. You can leave them for winter texture and wildlife cover, then cut back in late winter/early spring.
Seasonal reality check
In cooler climates, hay-scented fern often stays attractive through much of the season. In hotter regions, fronds can
look rough by late summerespecially in sun or dry soil. That’s not a personal failure; it’s the plant telling you
it wants more shade, more moisture, or fewer heat-wave vibes.
Managing Spread: The “Friendly Bully” Strategy
Hay-scented fern spreads via underground rhizomes and can form dense colonies. In the right place, that’s exactly
the point. In the wrong place, it becomes that neighbor who borrows a cup of sugar and leaves with your entire
pantry.
Containment options that actually work
- Define an edge: Install metal/plastic edging or a root barrier to slow rhizomes.
- Create a mowing line: Where appropriate, maintain a crisp border you can cut back regularly.
- Plant it where it can roam: Large shade areas, woodland edges, or slopes where “cover” is the goal.
- Thin annually: In spring, lift and remove creeping sections to keep a colony sized to your space.
What to plant with it
If you want companions, choose plants that are either tall/strong enough to hold their own or occupy a different
season/niche. Good pairings in a woodland-style design often include sturdy natives like:
- Solomon’s seal (Polygonatum)
- Foamflower (Tiarella)
- Wild ginger (Asarum)
- Shade-tolerant sedges (Carex)
- Other robust ferns (placed with intention, not wishful thinking)
Propagation: How to Get More (or Share the Wealth)
Division (the easiest method)
In early spring or early fall, dig up a section of the colony with a sharp spade. Look for pieces with visible crowns
and healthy roots. Replant immediately at the same depth, water well, and keep evenly moist until new growth resumes.
Transplanting “patches” for quick results
If you’re filling a large area, you can transplant several small patches and let them knit together. This can be more
budget-friendly than planting dozens of potsespecially if you’re dividing from an existing stand (yours or a
generous friend’s).
Spore propagation (for the patient and curious)
Ferns reproduce by spores rather than seeds. Spore growing is possible, but it’s slower and more technical than most
home gardeners need. If your goal is groundcover, division gives you predictable, fast results.
Troubleshooting Common Problems
Fronds browning or crisping
- Likely cause: Too much sun or not enough moisture.
- Fix: Increase watering, add mulch, or relocate divisions to a shadier spot.
Colony looks thin or patchy
- Likely cause: Compacted soil, severe drought, or heavy competition from roots/weeds.
- Fix: Top-dress with compost, keep evenly moist, and weed thoroughly during establishment.
It’s taking over everything
- Likely cause: You gave it the perfect conditions and no boundaries.
- Fix: Install edging, thin aggressively in spring, and remove rhizome runners beyond the desired line.
Design Ideas and Practical Examples
Example 1: The “Shady Slope Saver”
On a north-facing slope under deciduous trees, hay-scented fern can act like a living blanket. Plant divisions in a
staggered pattern 18–24 inches apart, mulch well the first year, and keep moisture steady through summer. Within a
couple of seasons, you can get a cohesive carpet that reduces bare-soil erosion and looks intentionally “woodland
chic” rather than “where did my lawn go.”
Example 2: The “Path-Edge Softener”
Along a shaded path, use hay-scented fern as a repeating texturejust give it a defined border. A simple metal edge
(or a trench edge you refresh) can keep fronds from wandering into your walkway while still giving that lush, layered
look on the garden side.
Example 3: The “Under-Tree Groundcover That Isn’t Turf”
If you have a patch under maples or oaks where grass surrenders every summer, replace the struggle with strategy.
Remove sod, improve soil with compost and leaf mold, then plant hay-scented fern in drifts. The fern tolerates root
competition better than many shade perennials and can create a stable, attractive understory.
Wrap-Up: The Best Way to Succeed With Hay-Scented Fern
The secret to growing hay-scented fern isn’t a fancy fertilizer or a mystical moon-phase planting schedule. It’s
simple: match the plant to the job. Give it shade (or gentle sun with moisture), decent drainage, organic-rich soil,
and enough space to spreador boundaries if space is limited. Treat it as a hardworking native groundcover, and it’ll
reward you with soft texture, reliable coverage, and that unexpectedly pleasant “fresh hay” moment when you brush
past.
Gardeners’ Experiences: What It’s Like to Grow Hay-Scented Fern (Real-World Lessons)
Garden advice sounds tidy on paper: “Plant in shade, water weekly, enjoy.” Then real weather happens. Real soils
happen. Real deer happen. And sometimes real ferns happenspecifically, the kind that politely expands until it’s
holding a meeting in every square foot of your woodland bed. Here are common, experience-based lessons gardeners
often share after living with hay-scented fern for a few seasons.
1) “It solved my bare-shade problem… faster than I expected.”
Many gardeners first try hay-scented fern out of desperation: nothing else will grow under the trees, mulch keeps
sliding downhill, and the area looks like a sad, shady moonscape. The fern often succeeds where fussier plants fail,
especially when you start with multiple divisions rather than a single pot. The first year can feel modestsome new
fronds, slow settling-in, not a lot of wow. Then year two and three arrive, and suddenly the colony starts stitching
itself together. The “experience” takeaway: if you want coverage, plant more than one and give it time; the payoff is
usually exponential.
2) “It’s deer-resistant, which is great… until it’s the only thing left.”
In areas with heavy deer browsing, gardeners often notice a pattern: deer ignore hay-scented fern while nibbling
tastier understory plants. Over time, the fern can become more dominant simply because it’s not being eaten back.
The practical lesson here isn’t “never plant it”it’s “plan the neighborhood.” If deer pressure is high, combine
hay-scented fern with other deer-resistant plants, and avoid pairing it with a bunch of delicate favorites that will
be browsed down to stubs. Otherwise, the fern becomes the only tenant still paying rent.
3) “Edges matter. Without edges, it becomes a lifestyle.”
Gardeners who love hay-scented fern tend to love it in big, intentional sweeps. Gardeners who regret it often planted
it like a polite clump in a mixed bed. The best real-world trick is creating an edge you can maintain: a mowing line,
a trench edge, or physical edging material. Once you do that, the plant becomes far easier to live with. Think of it
like adopting a dog: it’s wonderful, but you still need a fence if you don’t want it making friends with every
neighbor on the block.
4) “In heat, it can look roughso I moved it (and it forgave me).”
In warmer summers or sunnier exposures, gardeners often report that fronds can look ragged by late summer. The good
news is that the plant is generally resilient. Common solutions include adding a deeper mulch layer to keep roots
cooler, increasing watering during hot stretches, or relocating divisions to a shadier site in early fall. Many
gardeners find that the fern rebounds beautifully the following spring once it’s in conditions it prefers. The
lesson: don’t judge it harshly in August; evaluate the site and adjust.
5) “The scent is realand it’s oddly satisfying.”
The “hay scent” sounds like marketing until you brush past a mature stand and notice a sweet, grassy aroma. Gardeners
often describe it as a small surprise that makes a shade garden feel more immersivelike the plant is participating
in the experience, not just sitting there looking green. It’s not a perfume bomb, but it’s one of those tiny,
pleasant details that makes people lean in and ask, “What is that?”
6) “It’s my go-to ‘problem-solver’ plant, but I treat it with respect.”
The most satisfied growers tend to use hay-scented fern strategically: large areas, difficult shade, slopes, and
places where low-maintenance coverage matters more than botanical collecting. They’ll also tell you the same thing:
the plant is easyand it’s assertive. When you respect that (by giving it the right assignment and a boundary
when needed), it becomes one of the most dependable shade garden tools you can plant.