Table of Contents >> Show >> Hide
- Before You Craft: Recycle vs. Reuse (A Quick Reality Check)
- Best Packaging to Recycle Into a Basket Core
- Materials and Tools
- Project Option A: The Recycled-Base Coiled Rope Basket (No-Sew)
- Project Option B: The Rope-Wrapped Shipping Box Container (Sharper, Boxier, Brilliant)
- Project Option C: The Sewn Coiled Rope Basket (For the “This Will Last Forever” Crowd)
- Pro Tips for a Basket That Doesn’t Look “Homemade (Derogatory)”
- Design Upgrades That Make It Look Store-Bought
- Recycling-Smart Notes So Your Craft Stays Eco-Friendly
- FAQ: Quick Answers for Common “Wait, Can I…?” Questions
- Bonus: of Real-World Rope Basket Lessons (a.k.a. Things I Learned the Sticky Way)
- Conclusion
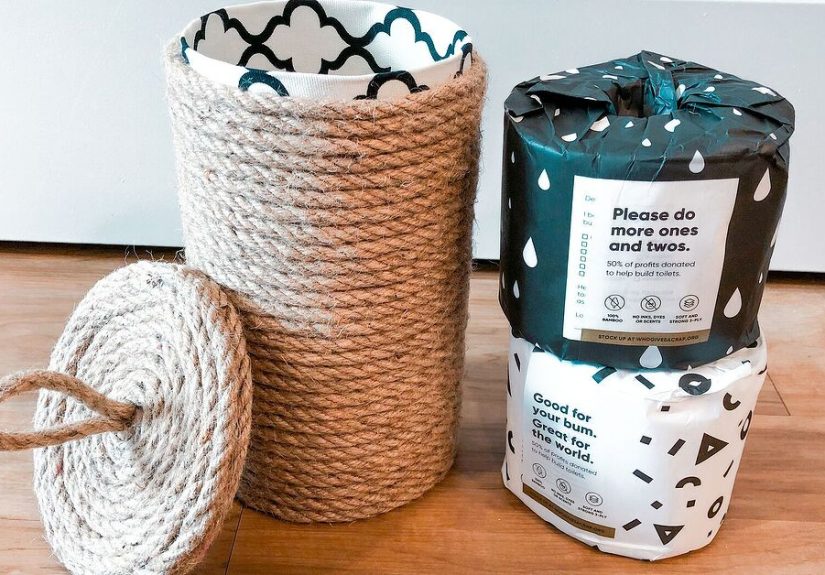
If your house has a “box corner” (you know, the place where shipping boxes go to retire), congratulations:
you’re already 50% of the way to a ridiculously cute DIY rope basket container.
The other 50% is rope, a little glue (or a few stitches), and the willingness to finally admit
you were never “going to break down those boxes later.”
This project is a triple win: you recycle packaging by turning it into a sturdy basket base,
you get stylish storage that looks like it wandered out of a boutique, and you reduce clutter without buying
another “organizing bin” that will… also need organizing.
Before You Craft: Recycle vs. Reuse (A Quick Reality Check)
Recycling is great. Reusing is often even betterespecially for packaging that’s clean and structurally sound.
Cardboard is typically a high-performing recycling material, while many plastics are… let’s call them “aspirational”
recyclers. That’s why upcycling packaging into something useful (like a basket you’ll use daily) can be a smart move.
The goal here isn’t perfection; it’s progress. And also: a place to store your chargers that aren’t all in a single
drawer tangled like headphone spaghetti from 2012.
Best Packaging to Recycle Into a Basket Core
Your rope basket will be stronger, straighter, and less likely to collapse dramatically in front of guests if you start
with the right packaging “skeleton.”
1) Corrugated Cardboard Shipping Boxes (The MVP)
Corrugated cardboard (the thick stuff with the wavy layer inside) is perfect for bases, inserts, and structural rings.
Choose pieces that are clean, dry, and not oily. If the box is damp or smells like last night’s pizza,
it’s not basket materialit’s a plot twist.
2) Paperboard (Cereal Boxes, Shoe Boxes, Gift Boxes)
Paperboard is thinner, smoother, and great for wrapping the inner walls, creating dividers, or making lightweight
“liners” that help your basket keep a crisp shape. It’s also easier to cut neatly, which your fingers will appreciate.
3) Paper Padded Mailers (A Secret Liner Superstar)
Those newer paper padded mailers (that don’t have poppable bubbles) can be turned into a soft-ish inner liner or used
as cushioning between cardboard layers. They’re also handy for covering rough seams so your basket doesn’t snag fabric.
4) What to Avoid
- Food-soiled cardboard with chunks or heavy residue (small grease stains are different than “this box hosted a lasagna”).
- Wax-coated or plastic-lined paper (common in some takeout packaging).
- Wet cardboard (it warps, weakens, and becomes the craft equivalent of soggy cereal).
- Flexible plastic packaging as a structural core (save it for proper drop-off programs if available, not as your basket backbone).
Materials and Tools
You can keep this project budget-friendly by combining recycled packaging with a few basic supplies.
Here are two supply lists: No-Sew (Hot Glue) and Sewn (More Durable).
No-Sew (Fast, Fun, Slightly Addictive)
- Cotton rope, cotton clothesline, or thick piping cord (¼” to ⅜” is a great range)
- Hot glue gun + glue sticks
- Cardboard (corrugated) for a base and optional support ring
- Scissors or a sharp utility knife
- Painter’s tape or masking tape
- Optional: fabric dye, acrylic paint, or spray paint (for rope color)
- Optional: bowl/bucket to use as a mold for shape
Sewn (Stronger and More “Heirloom-ish”)
- Cotton rope or cotton cording (piping cord works beautifully)
- Sewing machine with a zigzag stitch (or a sturdy needle + heavy thread for hand sewing)
- Clips or clothespins (to hold coils together while sewing)
- Cardboard base insert (optional but helpful)
Project Option A: The Recycled-Base Coiled Rope Basket (No-Sew)
This version gives you that classic “coiled rope basket” look, with a recycled cardboard base to add stiffness.
It’s perfect for storing mail, toys, toiletries, or the emotional support snacks you keep “out of sight.”
Step 1: Build a Strong Base From Packaging
- Cut two or three identical circles from corrugated cardboard (6–10 inches wide is a good starting size).
- Glue the circles together with a thin layer of hot glue (or white glue if you can wait for drying).
- Wrap the edge with masking tape to smooth it. This keeps the rope from snagging on raw corrugated edges.
Pro move: If you want a heavier-duty basket, cut an extra cardboard “donut ring” (a ring-shaped piece)
to glue under the rim later. It acts like a beltexcept your basket won’t complain after brunch.
Step 2: Start the Rope Coil
- Cut the rope end cleanly. Add a dab of hot glue to prevent fraying.
- Make a tight spiral about the size of a quarter, gluing as you go.
- Once the coil is stable, glue it to the center of your cardboard base.
Step 3: Coil Outward to Cover the Base
Work in short glue sections (about 1–2 inches at a time). Press the rope firmly into place as you coil.
Your goal is a flat “rope disk” fully covering the cardboard.
Step 4: Turn the Corner and Build the Walls
- When the base is fully covered, start stacking the rope on top of the last row.
- Glue along the top edge of the previous coil, then press the next coil into it.
- For a clean shape, wrap around a bowl or bucket (optional). Put parchment paper on it if you’re worried about glue transfer.
Step 5: Finish the Rim Like You Mean It
- When you reach your desired height, cut the rope leaving 4–6 inches.
- Tuck the end under the last coil and glue securely.
- If you want a “finished” look, add a simple wrap of thread around the end (like a mini whip finish).
Step 6: Add Handles (Cute, Not for Carrying Bricks)
For decorative handles, glue leather belt strips or folded rope loops to the sides. If you plan to lift the basket
while it’s full, stitch the handles through the coils for strength.
Project Option B: The Rope-Wrapped Shipping Box Container (Sharper, Boxier, Brilliant)
Want a rope basket container that keeps crisp cornersperfect for shelves, closets, and “I swear I’m organized” vibes?
Use a cut-down shipping box as the core.
Step 1: Cut Your Box to Size
- Pick a sturdy corrugated box and cut it down to your desired height (4–8 inches is great for shelves).
- Reinforce the top rim with an extra strip of cardboard folded over the edge and taped down.
Step 2: Wrap the Box in Rope (Like a Cozy Sweater)
- Start at the bottom corner. Hot glue the rope end and begin wrapping around the base.
- Keep rows snug and aligned. If they drift, gently push them back into place.
- Continue up the sides. Work in short glue sections so you don’t end up with hardened glue “speed bumps.”
Step 3: Finish the Top Edge
Fold a final rope row over the rim and glue inside. This hides cardboard edges and makes the basket look finished.
Add a paperboard liner (like from a cereal box) if you want the inside to look smooth and bright.
Project Option C: The Sewn Coiled Rope Basket (For the “This Will Last Forever” Crowd)
If you’ve got a sewing machine, the sewn coiled rope basket is sturdy enough for heavier items (like craft supplies or
those mystery cables you refuse to label). You can still incorporate recycled packaging as a base insert.
How It Works
- Coil the rope into a small spiral and hold it together with clips.
- Sew a zigzag stitch over the seam where two coils meet, slowly building the base outward.
- When the base is wide enough, “tilt” the coil upward to form walls and keep sewing around.
- Slip a cardboard base insert inside the finished basket if you want extra stiffness without visible cardboard.
Pro Tips for a Basket That Doesn’t Look “Homemade (Derogatory)”
- Use consistent pressure: Pull the rope gently as you coil so rows sit tight and even.
- Glue less than you think: Too much glue squeezes out and leaves shiny spots.
- Make the base flatter: If it starts to bowl upward, flip it over and press while the glue is still warm (carefully).
- Add hidden structure: A cardboard ring under the rim or a cardboard disk under the base keeps the shape crisp.
- Work clean: Put a scrap cardboard “glue blotter” nearby so you don’t drip glue on the rope face.
Design Upgrades That Make It Look Store-Bought
Dye or Paint the Rope (Without Drama)
Cotton rope takes dye well. You can dip-dye for an ombré look, brush dye onto the walls, or paint details after the basket is built.
Let it dry fully before useunless you want your basket to also function as modern art on your countertop.
Add a Liner Using Recycled Packaging
Turn paper padded mailers into a neat liner: cut them open, trim to fit, and glue or stitch them inside.
For extra polish, cover the inside with paperboard from a cereal box, then line over it with fabric.
Create Dividers for “Container Boss Energy”
Use strips of thick paperboard to create compartments: one for mail, one for keys, one for whatever tiny thing your dog keeps stealing.
Recycling-Smart Notes So Your Craft Stays Eco-Friendly
The most sustainable basket is the one you’ll actually use. But you can make your project greener with a few simple habits:
- Start with clean packaging (dry cardboard, minimal residue).
- Remove packing materials like plastic air pillows, foam, or loose fill before you upcycle the box.
- Know your local rules for recycling. Symbols help, but local acceptance is the real boss.
- Handle film plastics properly: many require store drop-off programs rather than curbside pickup.
FAQ: Quick Answers for Common “Wait, Can I…?” Questions
How much rope do I need for a DIY rope basket container?
It depends on size and rope thickness. As a ballpark, a small 4–5 inch basket might use around 10 yards,
while a larger 6-inch-deep basket can use 20+ yards. If you’re unsure, buy extrarope is cheaper than regret.
Can I use jute instead of cotton rope?
Yes, especially for a rustic look. Just know jute can be scratchier and sheds more. Cotton tends to look cleaner and feel softer.
Is hot glue strong enough?
For light-to-medium storage, absolutely. For heavy loads or true handles you’ll lift, stitching (even hand stitching) is more durable.
Can I use a pizza box for the base?
Only if it’s truly clean (no crumbs, no sauce, minimal grease). For crafts, “kinda clean” becomes “smells weird later.”
Choose the cleanest cardboard you can.
Bonus: of Real-World Rope Basket Lessons (a.k.a. Things I Learned the Sticky Way)
The first time you make a rope basket, you’ll feel like a crafting genius. The second time, you’ll realize you’re basically
running a tiny rope factory out of your living room. By the third basket, you’ll look at every cardboard box like it’s
auditioning for a makeover montage.
Here’s what experience teaches fast: your glue gun has opinions. If you try to glue six inches at once,
the glue will cool before you press the rope down, and then the rope will lift like a stubborn corner of contact paper.
The fix is simpleshort glue lines, steady pressure, and taking tiny breaks so you don’t end up with a basket and a mild
existential crisis.
My favorite “recycled packaging” trick is making a double-layer base: one cardboard circle for stiffness,
another slightly smaller circle on top to create a subtle “foot.” It makes the basket sit flatter and feel more finished.
If you add a strip of paperboard around the inner wall (like a collar), the sides stay straighterespecially on taller baskets.
This is the difference between “handmade artisanal storage” and “why is my basket leaning like it’s had a long day?”
I’ve also learned the hard way that some packaging is emotionally attached to being packaging. Thin, floppy boxes (looking at you,
certain snack multipacks) can work, but only if you reinforce them. Sandwich them between sturdier cardboard layers or reserve them
for liners, not structure. Your basket should hold stuff, not simply suggest the concept of holding stuff.
Color experiments are where things get fun. Dip-dyeing rope looks amazing, but it also reveals how impatient you are. If you coil
rope that’s even slightly damp, the basket can warp as it dries. The fix is boring but effective: let the rope dry completely,
preferably overnight. If you’re desperate, a hair dryer helps, but it turns your craft session into a wind tunnel audition.
One surprise win: using a paper padded mailer as an inner liner makes the basket feel softer and hides rough seams.
Cut it open, flatten it, trim it, and glue it inside like wallpaper. If you want to be fancy, add a fabric liner on top.
Suddenly your basket is less “utility bin” and more “I have my life together,” which is the entire point of storage anyway.
Last lesson: make a basket for the spot where clutter is born. Mail baskets belong near the door. Bathroom baskets belong where you
actually get ready. A rope basket on a shelf in a closet is fine, but a rope basket where the chaos happens? That’s the real magic.
Because the best DIY storage isn’t the prettiest basketit’s the basket you reach for without thinking.
Conclusion
Turning recycled packaging into a DIY rope basket container is one of those rare crafts that’s practical, stylish,
and genuinely satisfying. Start with clean cardboard, choose a method that fits your patience level (glue for speed, sewing for strength),
and make it yours with color, liners, and little structural upgrades. The best part? Every basket you make is one less “mystery pile”
on your counterand one more proof that packaging can have a second life that’s way better than the recycling bin.