Table of Contents >> Show >> Hide
- Clean or Remove? How to Tell When Grout Has to Go
- Tools and Safety Gear for Grout Removal
- Prep Work: Set Yourself Up for Success
- Method 1: How to Remove Grout Manually (Slow but Safe)
- Method 2: How to Remove Grout With an Oscillating Tool (Faster, Still Controlled)
- Other Power Tool Options (Use With Caution)
- Special Situations: Tricky Grout Areas
- Clean-Up and Prep for Regrouting
- Common Grout Removal Mistakes to Avoid
- Real-World Experience: What It’s Actually Like to Remove Grout
- 1. The First 10 Minutes Are the Most Intimidating
- 2. Manual vs. Power Tools: It’s Not Either/Or
- 3. The Dust Is Real – Plan for It
- 4. Tile Chips Usually Happen When You Rush
- 5. Old Grout Can Tell You a Story
- 6. Working in Sections Keeps You Sane
- 7. The Payoff Is in the Regrout
- 8. Your Future Self Will Appreciate Sealer
At some point, every tiled bathroom, kitchen, or entryway hits the “yikes” stage: grout that’s dark, cracked, or just refusing to look clean no matter how hard you scrub. When grout reaches that point, it’s often not a cleaning problem anymore – it’s a grout removal problem.
Removing grout from between tiles sounds intense, like something you’d only do if you had a tile wizard on speed dial. But with the right tools, safety gear, and a bit of patience (plus maybe a good audiobook), a determined DIYer can absolutely handle it.
In this guide, you’ll learn when grout actually needs to be removed, what tools work best (manual and power), step-by-step methods, and real-world tips to avoid cracked tiles, dusty disasters, and regret. By the end, you’ll know exactly how to remove grout from between tiles safely and efficiently – and how to prep for a fresh, clean regrout.
Clean or Remove? How to Tell When Grout Has to Go
Before you start grinding away, make sure your grout really needs to be removed. Sometimes a deep clean with grout cleaner, baking soda paste, or a vinegar and water solution is enough to restore light discoloration and surface stains. If the grout is still structurally solid and just dingy, cleaning and sealing might be all you need.
However, removal is usually the best move if:
- The grout is cracked or crumbling. Pieces pop out when you run your fingernail along the line, or you see gaps and missing sections.
- Discoloration is severe and permanent. Grout looks dark brown, black, or yellow in spots no matter how much you scrub.
- There are moisture issues. You see mildew, mold, or loose tiles, especially in showers or high-moisture areas.
- The grout has shrunk away from the tile edges. This allows water to seep behind tiles and can damage your wall or subfloor over time.
If any of this sounds like your bathroom or kitchen, it’s time to remove the old grout and start fresh. The good news: you don’t always have to strip out every last grain. For most regrouting jobs, removing grout to at least two-thirds of its depth is enough for new grout to bond well.
Tools and Safety Gear for Grout Removal
You’ve got two main paths: manual grout removal tools and power tools. The “right” choice depends on your project size, your comfort level with tools, and how much time you want to spend on your knees questioning your life choices.
Safety Gear (Non-Negotiable)
- Safety glasses or goggles: Tiny grout chips can fly – protect your eyes.
- Dust mask or respirator: Grout dust is not a new flavor of air. Wear a mask.
- Work gloves: Protects your hands from sharp edges and tools.
- Knee pads: Optional, but your future self will thank you if you’re working on floors.
- Hearing protection: If you’re using oscillating tools, grinders, or saws, earplugs are a smart idea.
Manual Grout Removal Tools
Best for small areas, delicate tiles, and thin grout lines.
- Grout saw: A small hand tool with a carbide or diamond-coated blade designed to scrape grout from joints.
- Carbide grout rake: Similar to a grout saw but sometimes with interchangeable tips.
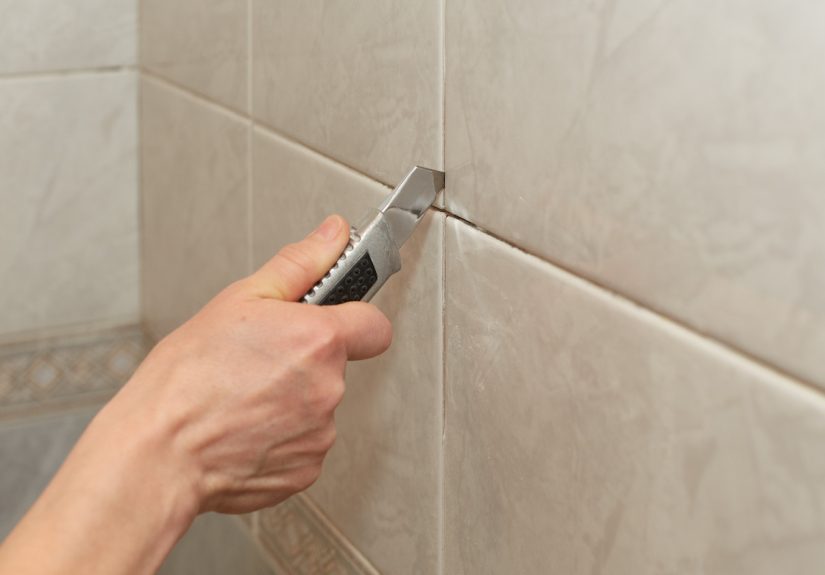
- Utility knife: Useful for scoring grout or cleaning out loose areas (but don’t force it – blades break).
- Narrow screwdriver, awl, or pick: For picking out stubborn chunks or cleaning corners.
Power Grout Removal Tools
Best for larger areas, thick grout, or if you’d like to finish before your next birthday.
- Oscillating multi-tool with grout removal blade: The go-to for many pros. With a carbide or diamond segment blade, it grinds out grout quickly while giving decent control.
- Rotary tool (like a Dremel) with grout removal bit: Great for wall tiles, tight areas, and detailed work if you have a steady hand.
- Reciprocating saw with grout blade: Can speed up removal on large, open areas but requires care to avoid damaging tiles.
- Angle grinder with diamond blade: Very fast, but also the most aggressive. Usually best left to experienced DIYers or pros, especially on floor tiles.
You don’t need all of these. For most homeowners, a simple combo like grout saw + oscillating tool covers almost everything.
Prep Work: Set Yourself Up for Success
A little prep prevents a lot of mess and tile heartbreak. Before you start removing grout:
- Clean the tile surface. Wipe down the area to remove soap scum, dust, and loose debris so you can see what you’re doing.
- Protect nearby surfaces. Lay down drop cloths or plastic sheeting in tubs, on countertops, or across floors.
- Mask sensitive materials. If you’re working around metal trim or delicate stone, use painter’s tape to add a little buffer.
- Ventilate the area. Open windows or run a fan to clear out dust.
- Gather a vacuum and damp rags. You’ll need these to clean out joints as you work.
Method 1: How to Remove Grout Manually (Slow but Safe)
Manual grout removal is slower, but it gives you maximum control and reduces the risk of chipping tile. It’s a solid choice for small bathrooms, backsplash repairs, or expensive tile you really don’t want to replace.
Step 1: Score the Grout Lines
Use a utility knife or the tip of your grout saw to lightly score along the grout line. This helps guide the tool and reduces the chance of accidentally slipping onto the tile surface.
Step 2: Saw Along the Grout Joint
Hold your grout saw at about a 45-degree angle to the grout line. Apply firm but controlled pressure and move the tool back and forth in short strokes. Let the abrasive edge do the work – if you’re white-knuckling the handle, you’re pressing too hard.
Work in small sections (a foot or two at a time). After a few passes, you’ll start to see the grout breaking up into dust and small chunks.
Step 3: Clean Out the Debris
Stop periodically to vacuum out the joints or use a small brush and shop vac. This clears your view so you can see how deep you’ve gone and avoids grinding loosened pieces over and over.
Step 4: Watch Your Depth
Aim to remove at least two-thirds of the grout depth. This gives new grout enough room to bond without forcing you to dig all the way down to the substrate. If you see the edges of tiles or hit something that looks like thinset mortar or backer board, you’ve gone far enough – stop.
Step 5: Detail the Corners and Edges
Use a narrow pick, awl, or small screwdriver to clean out corners where your grout saw couldn’t reach. Be gentle around tile edges; prying sideways like you’re opening a paint can is a great way to chip glaze.
Manual removal takes time, but it’s very forgiving. If you’re nervous about breaking tiles or new to DIY, this method is a good starting point.
Method 2: How to Remove Grout With an Oscillating Tool (Faster, Still Controlled)
For larger areas or thick, sanded grout, an oscillating multi-tool with a grout blade is hard to beat. It removes grout quickly but still gives more control than an angle grinder or full-size saw.
Step 1: Install the Grout Blade
Choose a carbide or diamond-coated segment blade designed specifically for grout removal. Match the blade width to your grout joints: a 1/16" or 1/8" blade is typical for many wall tiles and standard joints.
Step 2: Start in an Inconspicuous Area
Begin behind a door, in a corner, or somewhere less visible. This gives you time to practice your control, angle, and pressure before you move to the center of the shower wall everyone sees.
Step 3: Use Light, Controlled Pressure
Hold the tool so the blade is centered in the grout line, slightly angled (often 30–45 degrees). Turn on the tool and let it come up to speed before you gently place the blade on the grout.
Move slowly along the joint. The oscillating motion grinds the grout into dust. Don’t force the blade – pushing too hard increases the chance of slipping onto the tile or overheating the tool.
Step 4: Work in Short Sections
Grind a short stretch, then stop and vacuum the dust. Check your depth and adjust as needed. If you’re removing grout around floor tiles, take extra care at corners where three or four tiles meet – it’s easy to clip a tile edge if you rush.
Step 5: Finish by Hand
After the oscillating tool has done the heavy lifting, go back with a grout saw or pick to clean corners and stubborn spots. This combination gives you speed and precision.
Other Power Tool Options (Use With Caution)
If you’re handling a large floor or heavy-duty renovation, you may see pros using:
- Rotary tools with grout bits for tight spots and detailed work.
- Reciprocating saws with carbide-grit blades to remove long grout lines quickly.
- Angle grinders with diamond blades to cut out grout in big open areas.
These methods can be incredibly efficient, but they come with higher risk of chipping or cutting into tile if your hand slips. If you’re not already comfortable with these tools, stick to an oscillating tool or manual methods.
Special Situations: Tricky Grout Areas
Removing Grout Around a Single Damaged Tile
If your goal is just to replace one cracked tile:
- Remove the grout completely around that one tile to isolate it.
- Take extra care in corners; once the grout is gone, the tile will be more fragile.
- After grout removal, you can crack the tile with a hammer and chisel and lift it out in pieces without disturbing the neighbors.
Dealing With Narrow or Unsanded Grout Lines
Thin grout lines are harder to clean out without damage. A narrow manual grout saw or a very thin oscillating blade is better than oversized tools. Sometimes it’s safer to do most of the work by hand and only use power tools for the wider joints.
Vertical Surfaces and Shower Walls
When working on walls:
- Work from the top down so falling dust doesn’t bury your freshly cleaned joints.
- Use lighter pressure; wall tiles are often thinner and more fragile than floor tiles.
- Keep a vacuum handy – dust in enclosed showers builds up fast.
Clean-Up and Prep for Regrouting
Once the grout has been removed to the right depth and you’ve cleaned up the big chunks, spend some time on thorough cleanup. This step matters if you want your new grout to bond well and look smooth.
- Vacuum all joints. Use a shop vac with a narrow nozzle to suck out fine dust and loose grit.
- Wipe tiles with a damp sponge. This removes surface dust so your new grout doesn’t get contaminated.
- Check depth and consistency. Walk the area and inspect the joints. Any spots that look shallow or uneven should be touched up now.
- Let everything dry completely. Before applying new grout, surfaces should be dry (especially in showers and wet areas).
After that, you’re ready to regrout, seal, and admire your work every time you walk into the room.
Common Grout Removal Mistakes to Avoid
- Skipping safety gear. Flying chips and fine dust are part of the job. Goggles and a mask aren’t optional.
- Using too much force. Pushing harder doesn’t make grout removal faster; it just makes tile breakage more likely.
- Using the wrong blade width. A blade that’s wider than your grout line will chew into tile edges.
- Digging too deep. Once you’re below two-thirds depth, you’re mostly just increasing the risk of hitting mortar, waterproofing, or backer board.
- Skipping cleanup between passes. Grinding on loosened dust creates extra friction and hides what you’re doing.
- Trying to rush a huge job in one day. Grout removal is tedious. Breaking the job into sections keeps you safer and more accurate.
Real-World Experience: What It’s Actually Like to Remove Grout
On paper, grout removal sounds like a straightforward checklist: grab a grout saw, scrape, vacuum, repeat. In real life, it’s a mix of progress, dust, minor regrets, and eventual satisfaction. Here are some experience-based lessons that don’t always make it into the instruction manual.
1. The First 10 Minutes Are the Most Intimidating
The first time you drag a grout blade between tiles, your brain screams, “Are we allowed to do this?” The tiles make scratchy noises, dust appears, and you’re convinced you’ve ruined the bathroom. In reality, that sound is normal – it’s the grout breaking up, not (usually) the tile. After a few minutes, you get a feel for the right pressure, and your nerves calm down.
2. Manual vs. Power Tools: It’s Not Either/Or
DIYers often start with one method and switch halfway through when they realize they misjudged the job. A small backsplash or a couple of cracked joints? Manual tools are perfect. A full shower or a big tiled floor? That’s where an oscillating tool earns its keep. Many people end up using both: power tools for long straight runs, and manual tools for corners, edges, and any tile they’re scared to crack.
3. The Dust Is Real – Plan for It
Even with careful work, grout removal creates a surprising amount of dust. It settles on faucets, shelves, shampoo bottles, and your soul. Taping off nearby areas, covering drains, and keeping a shop vac right next to you makes a huge difference. Some people even hold the vacuum nozzle near the blade while they work to catch dust at the source.
4. Tile Chips Usually Happen When You Rush
Almost every “I cracked a tile” story has a similar plot: someone was tired, frustrated, or trying to finish “just one more row” before stopping. That’s when the tool slips, the blade catches the edge, and a tiny chip or full crack appears. Taking breaks, changing positions, and stopping when your hand starts to cramp are unglamorous but very effective strategies.
5. Old Grout Can Tell You a Story
As you remove grout, you’ll sometimes uncover surprises: discolored mortar, damp spots, or evidence of previous patch jobs. If you see dark, damp material or crumbling backer board behind shower grout, it can be a sign of water infiltration. That’s the moment to slow down and decide if the job is still a simple regrout or if it’s time to talk to a pro about bigger repairs.
6. Working in Sections Keeps You Sane
Instead of trying to remove grout from an entire bathroom in one go, divide it into zones: the back wall of the shower, the side wall, the floor, the niche, and so on. Finish removing grout from one section – including cleanup – before starting the next. This not only keeps the mess manageable but also gives you visible wins along the way.
7. The Payoff Is in the Regrout
Grout removal itself doesn’t look glamorous. The magic happens when you regrout: suddenly the lines are crisp, the color is consistent, and the whole room looks cleaner and newer. Many homeowners are surprised how much a simple regrout changes the look of a shower or floor without replacing a single tile.
8. Your Future Self Will Appreciate Sealer
After you’ve gone through all the effort to remove old grout and apply new, don’t skip grout sealer (assuming you’re using a type that needs sealing). A quick sealing job can make future cleaning easier and help prevent stains, cracking, and moisture problems – and save you from repeating this whole adventure any time soon.
Bottom line: learning how to remove grout from between tiles is part technique, part patience, and part mindset. If you prepare your tools, protect your tiles, and accept that progress may be measured in inches, you’ll end up with cleaner lines, stronger grout, and a bathroom or kitchen that looks newly refreshed without a full remodel.