Table of Contents >> Show >> Hide
- Step 1: Know Your Bathtub Faucet Type
- Step 2: Gather Your Tools and Materials
- Step 3: Turn Off the Water and Protect the Work Area
- Step 4: Remove the Old Tub Spout
- Step 5: Prep the Pipe and Wall for the New Faucet
- Step 6: Install the New Tub Spout or Faucet
- Step 7: Seal Around the Spout
- Step 8: Turn the Water Back On and Test
- Common Problems When Replacing a Bathtub Faucet (and How to Fix Them)
- When to Call a Plumber Instead of DIY
- Real-World Experiences: What Replacing a Bathtub Faucet Is Really Like
- Conclusion: A Small Project with Big Payoff
If your bathtub faucet drips all night, sprays water at weird angles, or sends more water to the tub than the shower, it’s trying to tell you something: it’s time for a change. The good news? Learning how to replace a bathtub faucet is one of those DIY jobs that looks scary, but is actually very manageable once you know the steps. With a few basic tools, a free afternoon, and a little patience, you can swap out that tired old tub spout and faucet trim and give your bathroom an instant refresh.
In this guide, we’ll walk through everything from identifying your faucet type to removing a stubborn spout, choosing the right replacement, and installing it without leaks. Whether you’re dealing with a simple tub-only faucet or a tub-and-shower combo with a diverter, we’ll cover the essentials so you can handle the job like a prowithout paying one.
Step 1: Know Your Bathtub Faucet Type
Before you grab a wrench and start twisting, you need to know what you’re working with. Tub spouts and bathtub faucets come in a few common types, and your replacement needs to match your setup.
Diverter vs. Non-Diverter Spouts
- Diverter spout: This is the kind with a little lever or knob you pull up to send water from the tub spout to the showerhead. If you have a shower-tub combo, you almost certainly have a diverter spout.
- Non-diverter spout: No lever, no knobjust water straight into the tub. These are common in tub-only setups or in systems where the diverter is located in the valve or handle, not in the spout.
Slip-On vs. Threaded Spouts
The way your spout attaches to the plumbing behind the wall matters a lot when it’s time to replace it:
- Slip-on spout: Slides over a smooth piece of 1/2-inch copper pipe and is held in place with a small set screw underneath. If you see a tiny screw hole on the underside of the spout near the wall, you probably have this type.
- Threaded spout: Screws onto a threaded pipe (called an IPS nipple). There’s no set screw; instead, the spout spins on and off the threads.
You can usually confirm your spout type by shining a flashlight at the underside near the wall. No set screw? Very likely threaded. Visible set screw? Slip-on. If you’re still unsure, you’ll know for sure once you start removing it.
Step 2: Gather Your Tools and Materials
Replacing a bathtub faucet doesn’t require a full plumber’s toolbox, but having the right basics on hand will make your life easier. You’ll typically need:
- New bathtub faucet or tub spout (match diverter type and installation style)
- Adjustable wrench or pair of slip-joint pliers
- Allen (hex) wrench set for slip-on spout set screws
- Plumber’s (PTFE) tape for threaded spouts
- Utility knife or razor to cut caulk
- Putty knife or scraper to remove old caulk
- Silicone caulk rated for bath and shower use
- Old towel or rag to protect the tub surface
- Bucket or small container to catch residual water
Optional but helpful: a flashlight, penetrating oil for stuck spouts, and safety glasses if you’ll be cutting or scraping around tile.
Step 3: Turn Off the Water and Protect the Work Area
Many tub faucets don’t have individual shutoff valves in the wall, so you’ll usually need to turn off the water at the main shutoff for the house. Once the water is off, open the tub faucet to relieve pressure and drain any water left in the line.
Next, protect your tub. Lay down a folded towel under the spout area. This keeps tools and the old spout from scratching your tub and saves you from that “I just ruined the finish” moment.
Step 4: Remove the Old Tub Spout
The exact process for bathtub faucet replacement depends on whether you have a slip-on or threaded spout, but the first step is the same: break the caulk seal.
Cut the Caulk and Inspect the Spout
Run a sharp utility knife around the edge where the spout meets the wall. This breaks the seal so the spout can move freely. Gently pry away any loose caulk with a putty knife.
Look under the spout near the wall. If you see a small screw hole, you’ve got a slip-on spout. If you don’t, you’re dealing with a threaded spout.
Removing a Slip-On Tub Spout
- Locate the set screw underneath the spout. It’s usually a small hex screw.
- Insert the correct Allen wrench and turn counterclockwise to loosen it. You don’t have to remove it completelyjust back it off enough that the spout can slide off.
- Gently pull the spout straight off the pipe. If it’s stuck, wiggle it back and forth while pulling outward. Avoid twisting too aggressivelythat can deform the copper pipe.
Removing a Threaded Tub Spout
- Wrap the spout with a rag to protect the finish. Clamp your adjustable wrench or pliers over the rag near the base of the spout.
- Turn the spout counterclockwise. It may take a good bit of force at first, especially if mineral deposits or old thread sealant are holding it in place.
- Once it loosens, unscrew the spout by hand and pull it away from the wall. You should see a threaded pipe nipple sticking out.
If the spout is really stuck, a little penetrating oil on the threads and a few minutes of patience can help. Just be careful not to twist so hard that you damage the pipe behind the wall.
Step 5: Prep the Pipe and Wall for the New Faucet
With the old spout off, take a close look at what you’re working with. For a slip-on spout, the exposed copper pipe should be smooth and free of burrs or deep scratches. For a threaded spout, the pipe threads should be intact and not rusted away.
- Use sandpaper or an abrasive pad to lightly clean a copper pipe so the new slip-on spout can slide on easily.
- For threaded pipes, clean off old Teflon tape or pipe dope. If the threads are badly damaged, you may need to replace the nipple (which may require access behind the wall).
- Scrape away any remaining caulk on the wall and wipe the area clean so the new caulk can adhere properly later.
This is also the moment to check pipe length. Your new spout’s instructions will tell you how far the pipe should project from the finished wall. If it’s too short or too long, you may need to adjust or replace the pipe or nipple.
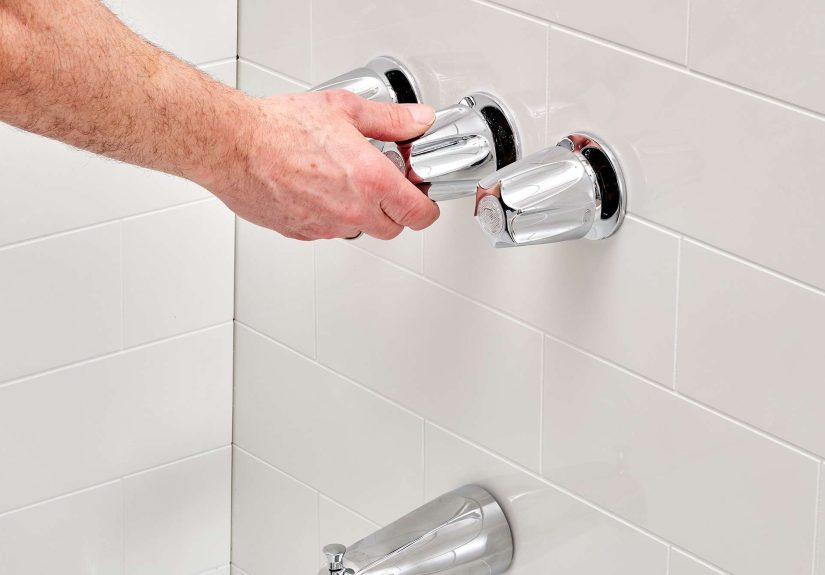
Step 6: Install the New Tub Spout or Faucet
Now the fun, satisfying part: putting the new bathtub faucet in place.
Installing a New Slip-On Spout
- Confirm that the pipe length matches the manufacturer’s specs. Too long and the spout won’t sit flush; too short and it may not seal.
- Slide the new spout onto the pipe, making sure the opening for the set screw is on the bottom.
- Push the spout firmly against the wall until it’s snug and straight.
- Tighten the set screw with the Allen wrench. Snug is good; cranking down like you’re tightening lug nuts on a truck is not.
Installing a New Threaded Spout
- Wrap the clean pipe threads with plumber’s tape. Wrap clockwise as you face the pipe, so the tape doesn’t unwind when you screw on the spout.
- Start the spout by hand, threading it clockwise until it’s snug against the wall.
- Use a rag and wrench to gently tighten the last bit, stopping when the spout is firmly against the wall and pointing straight down. Don’t over-tighten; you can crack the spout or even twist the pipe in the wall.
Many modern tub spouts come with adapters that let them work with both slip-on and threaded connections. Always follow the manufacturer’s specific directions for the model you bought.
Step 7: Seal Around the Spout
Even a perfect installation can leak water behind the wall if you skip the caulk. Use a high-quality bath and shower silicone to seal the top and sides where the spout meets the wall.
- Run a thin bead of silicone around the top and sides of the spout’s base.
- Avoid sealing the very bottom if the spout has a weep holethis tiny opening lets trapped water escape.
- Smooth the bead with a damp finger or caulk tool, then wipe away excess for a neat finish.
Step 8: Turn the Water Back On and Test
Turn the main water supply back on and slowly open the tub faucet. Watch for leaks:
- Check around the base of the spout where it meets the wall.
- For threaded spouts, look for water seeping from the underside of the spout or from the wall.
- If you have a diverter, pull it up to send water to the shower and check that water isn’t still pouring from the tub spout.
If you see a slow drip or seep from the spout threads, turn off the water, remove the spout, and rewrap the threads with fresh plumber’s tape before reinstalling.
Common Problems When Replacing a Bathtub Faucet (and How to Fix Them)
Problem 1: The Spout Is Stuck and Won’t Budge
If the spout feels welded to the wall, check for hidden caulk or grout first. Carefully cut around the base again and inspect for a set screw you may have missed. For threaded spouts, a little penetrating oil and a steady, firm twist with a wrench usually does the trick. Just don’t use so much force that you risk snapping the pipe.
Problem 2: Water Still Comes Out of the Spout in Shower Mode
This usually means the diverter inside the spout isn’t fully sealing, or you got a spout that doesn’t match your system’s pressure or design. Double-check that you installed the correct spout type (diverter vs. non-diverter) and that it’s pushed fully onto the pipe or threaded on tightly. If the diverter is faulty out of the box, you may need to exchange the spout.
Problem 3: The New Spout Doesn’t Sit Flush Against the Wall
Inconsistent pipe length is a classic headache. If the pipe is too long for a threaded spout, you may need to replace the nipple with a shorter one. If it’s too short for a slip-on spout, an adapter or a different style of spout may be required. Always measure and compare with the manufacturer’s recommended projection from the wall.
Problem 4: Drips Continue Even After Replacing the Spout
If you replaced the tub spout to fix a drip and it still leaks when the faucet is off, the issue may be in the valve or cartridge behind the wall, not the spout itself. In that case, you’ll need to repair or replace the faucet’s internal components rather than the spout alone.
When to Call a Plumber Instead of DIY
Replacing a bathtub faucet or tub spout is a great first plumbing project, but there are times when calling a pro is the smarter play:
- The pipe inside the wall spins or feels loose when you try to remove the spout.
- You discover damaged or corroded pipes that need cutting and soldering.
- Your faucet valve is buried in a tiled wall with no access panel and you suspect a deeper issue.
- You’re not comfortable working with plumbing at all and want peace of mind.
If you’re dealing with any of these scenarios, paying for an hour or two of professional time is cheaper than fixing a hidden leak or water damage later.
Real-World Experiences: What Replacing a Bathtub Faucet Is Really Like
On paper, learning how to replace a bathtub faucet looks like a clean, five-step process. In the real world, it’s often more like a sitcom episodewith a few surprises, some awkward contortions, and a big payoff at the end when everything finally works.
Many first-time DIYers say the most intimidating part isn’t the plumbing itself, but the fear of “messing something up” behind the wall. The reality? As long as you turn the water off, work carefully, and don’t force anything that clearly doesn’t want to move, you’re unlikely to create a catastrophe. Most tub spout replacements are straightforward once you identify the connection type and match it with the right replacement hardware.
One common experience: buying a pretty new spout purely for its finish and style, then discovering it doesn’t fit your existing pipe. That’s why measuring pipe length and checking whether you need a threaded or slip-on model is such a big deal. Seasoned DIYers will tell you they now bring photos, measurements, and even the old spout to the store to avoid the “three trips to the plumbing aisle” ritual.
Another frequent story involves the stuck spout that absolutely refuses to budge. People often start gently, then gradually escalate their efforts, alternating between patience and muttered commentary about whoever installed it decades ago. The turning point usually comes when they carefully cut away the hidden bead of caulk or finally spot a tiny set screw they missed the first time. Once that obstacle is gone, the spout slides or twists off and suddenly the whole project feels doable again.
There’s also the “bonus” discovery phase. When the old spout comes off, it’s not unusual to see mineral buildup, rust, or a pipe that was cut sloppily and left with rough edges. While it’s not the most glamorous moment, it’s incredibly useful. Cleaning mineral deposits, smoothing pipe edges, and refreshing thread sealant are simple steps that dramatically reduce the risk of leaks and drips later. Many homeowners say this is the point where they start to feel more like confident DIYers than nervous beginners.
On the positive side, lots of people are surprised by how big of a visual upgrade a new bathtub faucet can be. A fresh, modern spout and matching handle trim instantly make an older tub look cleaner and more intentional, especially if you coordinate the finish with your showerhead, towel bars, and other fixtures. It’s one of those relatively low-cost, low-skill updates that delivers outsized impactperfect when you want a mini bathroom makeover without tearing out tile or replacing the tub.
Perhaps the biggest “aha” moment for most DIYers comes during the final test. After turning the water back on and seeing everything run without leaks, there’s a real sense of accomplishment. You didn’t just replace a shiny piece of metalyou improved how your bathroom works every single day. And the next time you hear a drip, see a worn-out handle, or notice a fixture that’s past its prime, you’ll know it’s not some mysterious plumbing puzzle. It’s just another straightforward project you’ve already proven you can handle.
So if you’re on the fence about tackling bathtub faucet replacement yourself, remember this: the hardest part is often simply deciding to start. Once you’ve turned off the water, laid down a towel, and picked up your tools, you’re not just fixing a faucetyou’re leveling up your DIY skills. And that confidence sticks around long after the caulk has dried.
Conclusion: A Small Project with Big Payoff
Replacing a bathtub faucet isn’t just about stopping drips or upgrading a dated fixture. It’s a smart, approachable DIY project that improves your bathroom’s function, helps prevent hidden leaks, and gives your space a cleaner, more polished look. By identifying your faucet type, taking your time with removal, prepping the pipe correctly, and installing the new spout according to the manufacturer’s instructions, you can get pro-level results without hiring a plumber.
The next time you hear that relentless drip or see a corroded tub spout, you’ll know exactly what to doand you might even find yourself volunteering to help friends and family with their own bathtub faucet replacements. Just don’t forget to bring your Allen wrenches and plumber’s tape.