Table of Contents >> Show >> Hide
- What “Bleach Tie-Dye” Actually Does (and Why Results Vary)
- Before You Start: Fabric, Color, and Common Sense
- How to Tie Dye with Bleach: 15 Steps (Adult-Supervised)
- Troubleshooting: When Your Shirt Has Opinions
- Care Tips So Your Design Stays Sharp
- Safer Ways to Get the “Reverse Tie-Dye” Look (Without Chlorine Bleach)
- Experience Notes: What People Usually Learn After Their First Bleach Tie-Dye (and Wish They Knew Earlier)
- You’ll think you want super high contrast… until you see it
- The smell is a clue, not a challenge
- Black shirts rarely become whiteand that’s not failure
- Less liquid, more patience
- Rubber band placement is basically your design tool
- Rinsing and washing are where the “pro” results come from
- The best first project is a shirt you don’t worship
Regular tie-dye is like throwing a color party on your shirt. Bleach tie-dye (a.k.a. “reverse tie-dye”) is the plot twist: you start with a darker garment and remove color to reveal lighter tones and warm, vintage-y surprises. It’s dramatic. It’s unpredictable. It’s also a chemical projectso the “cool pattern” part only counts if you do the “smart safety” part first.
Quick safety note: Household chlorine bleach can irritate skin, eyes, and lungs, and it can create dangerous fumes if mixed with other cleaners. If you’re under 18, don’t handle bleach yourselfdo the folding/tying/design, and have a responsible adult handle the bleach, rinsing, and cleanup.
What “Bleach Tie-Dye” Actually Does (and Why Results Vary)
Most dark shirts are dyed with colorants that can be “discharged” (partially removed) by bleach. That discharge doesn’t always turn fabric pure white. Often, it shifts to orange, tan, pink, or a pale yellowespecially on black garments. Think of it as uncovering the shirt’s secret understory.
Two things control how your final pattern looks:
- How the fabric is bound (spiral, stripes, scrunch, pleats) and where bleach can reach.
- How reactive the dye is (some dyes lift quickly; others barely budge or lift to unexpected colors).
Before You Start: Fabric, Color, and Common Sense
Pick the right garment (or you’ll be sad in HD)
Best: 100% cotton and cotton-heavy blends usually give the most noticeable “reverse” effect. Trickier: polyester-heavy fabrics often resist bleaching or lighten unevenly.
Also check the care label. Many items specifically warn against chlorine bleach, and some materials can be damaged (or become weirdly crunchy) when exposed.
Choose your vibe: subtle vintage or high-contrast chaos
- Subtle: gentler discharge, softer shapes, more “sun-faded thrift find.”
- Bold: higher contrast, sharper lines, more “I made this on purpose and I’m proud of it.”
Set up a safe workspace
Bleach projects should be done outdoors or in a very well-ventilated area. Protect surfaces. Wear old clothes. Use gloves and eye protection. Keep pets and little kids far away from the “science zone.”
How to Tie Dye with Bleach: 15 Steps (Adult-Supervised)
These steps focus on a safe, controllable process without giving risky “chemistry recipe” instructions. Your adult helper should follow the bleach label and safety directions for any dilution, contact time, and disposal guidance.
- Step 1: Decide who’s the “Bleach Captain.”
If you’re a teen, this should be an adult. You can be the Design Director. They handle the chemical part.
- Step 2: Pick a garment you can afford to experiment on.
Start with a thrifted or old cotton tee. Your first attempt is a learning experience, not a museum piece.
- Step 3: Read the care label and do a quick fabric reality check.
If it says “do not bleach,” take that seriously. Some fabrics and finishes don’t play nice with chlorine bleach.
- Step 4: Prewash the garment (skip fabric softener).
Prewashing removes finishes, oils, and residues that can block the effect or cause blotches.
- Step 5: Gather supplies and protect everything.
At minimum: rubber bands or string, disposable gloves, eye protection, a protected work surface, and a way to rinse thoroughly. Add a bucket/tub and old towels if you want fewer surprises.
- Step 6: Ventilation check.
Outdoors is ideal. Indoors? Open windows, use fans, and don’t work in a tiny bathroom like it’s a secret spy mission.
- Step 7: Plan your pattern (and keep it simple).
Beginner-friendly options:
- Scrunch: crumple into a tight mound for an all-over “cloud” effect.
- Stripes: accordion fold and band at intervals.
- Spiral: twist from the center and band into wedges.
- Step 8: Bind it firmlybut not like you’re mad at it.
Tight binds create stronger contrast and more white(ish) lines. Looser binds create softer transitions.
- Step 9: Do a tiny test on a hidden area or scrap (highly recommended).
Different dyes lift differently. A small test can tell you whether you’ll get creamy tan, pumpkin orange, or “barely changed at all.”
- Step 10: Choose an application approach for control.
There are a few common approaches (spritzing, painting, soaking). The adult Bleach Captain should choose based on the garment, the workspace, and the label directionsaiming for slow, controlled changes rather than flooding the fabric.
- Step 11: Apply gradually and watch the reaction.
Reverse tie-dye is not a “set it and forget it” crockpot recipe. The change can speed up quickly. Monitoring prevents over-lightening and fiber damage.
- Step 12: Stop at “a little lighter than you want.”
Fabric can continue changing as it sits damp. If you want pale tan, don’t wait until it’s already pale tanstop a bit earlier.
- Step 13: Rinse thoroughly (and safely).
The goal is to remove bleach residue. Rinse until water runs clear, keeping runoff away from plants, grass, and anything you like.
- Step 14: Wash separately right away.
Use a full wash cycle. Don’t toss it in with your favorite hoodie unless you want your hoodie to become part of the art project.
- Step 15: Dry, assess, and optionally add color back in.
Some makers overdye the lightened areas with fabric dye for a “reverse + rainbow” look. If you do, follow the dye manufacturer’s directions for best colorfast results.
Troubleshooting: When Your Shirt Has Opinions
“It didn’t lighten much.”
- The fabric may be polyester-heavy or treated with a finish.
- The dye may be bleach-resistant.
- Your application may have been too light or too brief (another reason the test step matters).
“It turned orange!”
Totally normal on many black or navy dyes. Lean into it: orange-on-black can look like a spicy sunset. If you want cooler tones, try a different base color (charcoal, brown, deep green) or plan to overdye later.
“The pattern looks blotchy.”
- Prewash next time.
- Bind more evenly.
- Apply more consistently (slow and controlled wins).
“The fabric feels rough or weakened.”
That’s usually a sign of over-processing. Stop earlier, rinse sooner, and avoid aggressive exposure. Also: not every garment is meant to survive chemistry class.
Care Tips So Your Design Stays Sharp
- First few washes: wash separately in cold water.
- Turn inside out: helps reduce fading and abrasion.
- Avoid harsh additives: don’t stack strong products on top of a bleach-processed garment.
- Air-dry when you can: gentler on fibers.
Safer Ways to Get the “Reverse Tie-Dye” Look (Without Chlorine Bleach)
If you love the aesthetic but want fewer chemical concerns, consider:
- Color remover made for fabric: some brands sell dye removers designed for textiles (still use ventilation and follow directions).
- High-contrast fabric paint: use a tie-dye fold and apply paint to raised areas for a graphic effect.
- Traditional tie-dye kits: bright color, less hazard, and your laundry won’t smell like a public pool.
Experience Notes: What People Usually Learn After Their First Bleach Tie-Dye (and Wish They Knew Earlier)
Bleach tie-dye has a personality. Actually, it has several personalities, and it picks one based on your fabric, your dye, and whether Mercury is in retrograde. Here are common “experience-based” lessons makers often reportso you can skip a few rookie moments and get to the part where strangers ask, “Where did you buy that?”
You’ll think you want super high contrast… until you see it
In your head, you’re imagining crisp lightning bolts on black cotton. In real life, extreme contrast can look harsh if the pattern is busy. Many people end up loving the “vintage fade” look more than the ultra-bright discharge. That’s why stopping a bit early is such a popular move: it keeps the shirt looking intentional instead of “oops, I fought the fabric and the fabric won.”
The smell is a clue, not a challenge
If the odor is strong, ventilation isn’t optional. Makers often learn fast that “I’ll just do it near an open window” is not the same as “this is properly ventilated.” The best experiences happen outside, with a fan moving air away from youbecause crafting should end with selfies, not watery eyes.
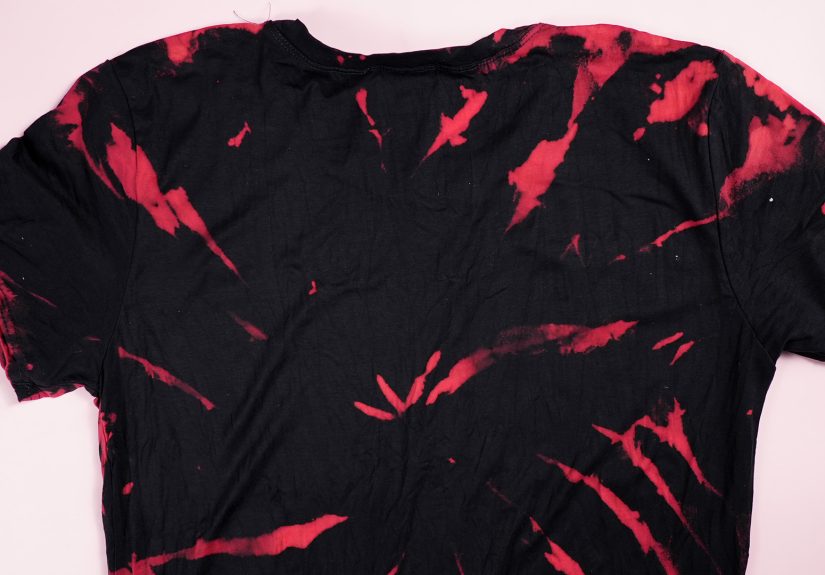
Black shirts rarely become whiteand that’s not failure
One of the biggest surprises: black often lifts to orange, tan, or a pale rust color. People sometimes panic and assume they ruined it. But that warm lift can be gorgeousespecially with patterns like spirals and scrunch designs that look like marbled stone. If you want cooler tones, experienced crafters often choose charcoal, brown, deep green, or even purple bases instead of true black.
Less liquid, more patience
Flooding the fabric tends to blur edges and create big, uneven blooms. A calmer approachapplying gradually and watching the changeoften produces cleaner lines. Makers who do this a lot treat it like developing a photo: check frequently, adjust slowly, and stop before it goes too far. The “best” shirts usually come from controlled steps, not a bleach tsunami.
Rubber band placement is basically your design tool
After a first try, people realize the ties matter as much as the folds. Tight bands create bright lines; loose ones create gentle transitions. Many experienced makers plan rubber band placement like they’re mapping a tiny city: “This intersection will be bright; this neighborhood stays dark.” If you want a more graphic look, you often need firmer binding and fewer folds. If you want something soft and atmospheric, scrunch and bind lightly.
Rinsing and washing are where the “pro” results come from
A lot of beginners focus on the cool pattern moment and treat rinsing like an afterthought. People who get consistently good results treat rinsing and washing as part of the art. Thorough rinsing helps prevent ongoing lightening in random spots later. Washing separately saves other laundry from accidental “bonus design features.”
The best first project is a shirt you don’t worship
This is the universal wisdom: start with something inexpensive. A thrifted cotton tee removes pressure and makes experimentation fun. Once you learn how your favorite base colors liftand which folds you like bestyou can graduate to nicer blanks. The craft gets way more enjoyable when you’re not emotionally attached to the outcome.
Bottom line: bleach tie-dye rewards calm prep, steady monitoring, and good cleanup. Do those three things, and you’re not just making a shirtyou’re making a wearable “I did that” moment.