Table of Contents >> Show >> Hide
- Why Transferring Images to Glass Is Different
- What You’ll Need
- Before You Start: Print Like You Mean It
- The 14 Steps to Transfer an Image Onto Glass
- Step 1: Pick the right glass (and decide where the image will live)
- Step 2: Wash with hot soapy water
- Step 3: Degrease with rubbing alcohol
- Step 4: Choose (and edit) an image that will actually transfer well
- Step 5: Print on a laser printer or make a dry-toner photocopy
- Step 6: Protect your workspace (because transfer medium does not respect your furniture)
- Step 7: Apply a generous, even layer of transfer medium
- Step 8: Place the image medium-side down on the glass
- Step 9: Burnish from the center out to remove bubbles
- Step 10: Let it dry fully (yes, fully)
- Step 11: Wet the paper and wait a minute or two
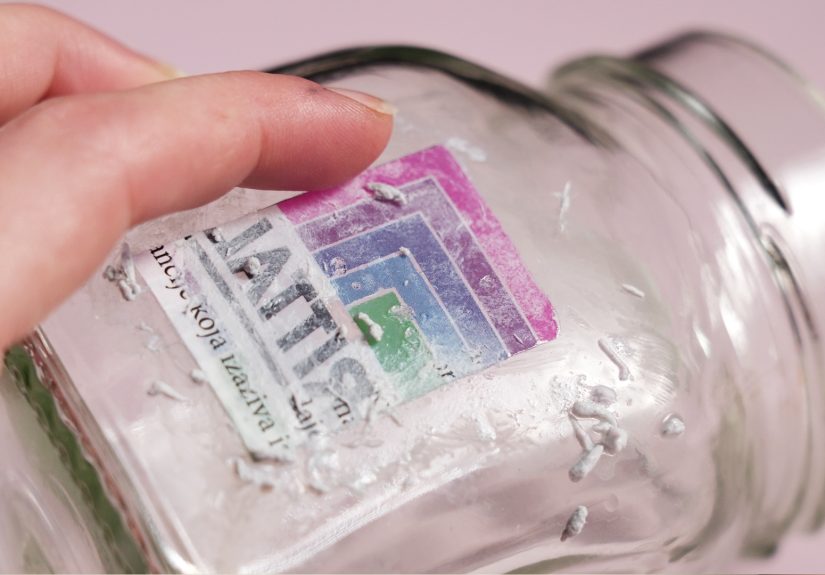
- Step 12: Rub the paper off in gentle circular motions
- Step 13: Let it dry, then remove the “paper haze” (the part everyone panics about)
- Step 14: Seal (optional) and cure before heavy handling
- Which Transfer Medium Should You Use?
- Troubleshooting: Fix the Most Common Problems
- Design Ideas That Look Expensive (Even If You’re Using a Pickle Jar)
- Sealing and Longevity: Keeping Your Transfer Looking Good
- Real-World Experiences: What Actually Happens at the Craft Table (The Extra You Asked For)
- Conclusion
Glass is basically the diva of DIY surfaces: gorgeous, reflective, and absolutely willing to show every smudge, bubble, and “oops” you make along the way.
The good news? With the right image, the right print, and a little patience (plus a tiny bit of “don’t touch that yet!” self-control), you can transfer an image onto glass so cleanly it looks like it was printed there.
This guide walks you through a reliable, beginner-friendly method using image transfer medium (the kind made specifically for lifting printed toner from paper and bonding it to a hard surface).
You’ll also get troubleshooting, sealing advice, and project ideasbecause once you learn this, you will start looking at every jar, vase, and picture frame in your house like it owes you a makeover.
Why Transferring Images to Glass Is Different
Glass is nonporous and super slick, which means adhesives don’t “sink in” the way they do on wood or paper. That’s why technique matters:
you need a medium that can grab the printed image, cure fully, and then survive the paper-removal step without the whole thing sliding off like a cartoon banana peel.
What You’ll Need
- Glass item: jar, vase, frame glass, glass block, ornament, candle holdersmooth works best
- Image transfer medium made for hard surfaces (or photo transfer mediumnotes included)
- Laser print or photocopy of your image on regular copy paper (not photo paper)
- Foam brush or soft flat brush (foam reduces brush marks)
- Brayer (roller) or an old gift card/credit card for smoothing
- Spray bottle with water + a small bowl of water
- Paper towels and a soft cloth
- Rubbing alcohol (isopropyl) for final degreasing
- Scissors or craft knife for trimming
- Optional sealer: clear acrylic spray, water-based polyurethane, or a compatible clear topcoat
Before You Start: Print Like You Mean It
The single biggest factor in a crisp glass transfer is the print type.
Most image-transfer mediums work best with dry toner (laser printer or photocopier), because toner sits on top of the paper and can be lifted/embedded by the medium.
Inkjet ink often smears or refuses to transfer cleanly unless you use a method designed specifically for inkjet.
Also: if your image includes words, dates, or anything you’d like to read in the correct direction, mirror the image before printing.
Forgetting this is a rite of passagelike gluing your fingers together in kindergarten, but with more adult sighing.
The 14 Steps to Transfer an Image Onto Glass
Step 1: Pick the right glass (and decide where the image will live)
Choose a smooth, clean piece of glass. Flat glass is easiest, curved glass is doable (you’ll just burnish more carefully).
Decide whether the transfer will go on the outside (best for display pieces) or the inside/back (great for ornaments or framed pieces where the glass protects the image).Step 2: Wash with hot soapy water
Give the glass a real washhot water, dish soap, and a thorough rinse. Even “clean-looking” glass can have invisible oils that mess with adhesion.
Dry completely with a lint-free cloth.Step 3: Degrease with rubbing alcohol
Wipe the area you’ll transfer onto with rubbing alcohol and let it air-dry.
This removes any leftover oils from soap residue, fingerprints, or that mysterious kitchen-film that appears when you’re not looking.Step 4: Choose (and edit) an image that will actually transfer well
High-contrast images transfer best. If your photo is super soft and dreamy, it may transfer “super soft and ghostly.”
Consider bumping contrast slightly, sharpening a touch, and simplifying backgrounds.
If the image includes text, mirror/flip it horizontally now.Step 5: Print on a laser printer or make a dry-toner photocopy
Use regular copy paper. Avoid photo paper and avoid printing directly onto glossy stock.
Trim the image to size. If you like a vintage look, gently tear the edges instead of cutting perfectly straight.Step 6: Protect your workspace (because transfer medium does not respect your furniture)
Put down wax paper, freezer paper (shiny side up), or a craft mat.
Keep your brayer/old card, spray bottle, and paper towels within reachonce the medium is on, you’ll want to move smoothly.Step 7: Apply a generous, even layer of transfer medium
Brush the transfer medium onto the printed side of the paper (the side with the image).
Aim for an even coatno bald spots, no heavy ridges. Coverage matters more than elegance here.Pro tip: Use a foam brush to reduce brush lines that can show up later like tiny, annoying zebra stripes.
Step 8: Place the image medium-side down on the glass
Carefully flip the coated paper onto the glass with the medium touching the glass.
Position it exactly where you want itmost transfer mediums don’t love being slid around once they make contact.Step 9: Burnish from the center out to remove bubbles
Use a brayer or an old gift card to press the paper down, working from the center outward.
Your goal is full contact: no air bubbles, no lifted corners, no “tiny mountains of trapped regret.”Step 10: Let it dry fully (yes, fully)
Walk away. Seriously. Let the transfer dry for about 24 hours (or the time recommended by your specific medium).
If it’s still even slightly damp, the paper-removal step can pull the image right back off the glass.Step 11: Wet the paper and wait a minute or two
Once it’s dry, spray the back of the paper with water or dampen it with a wet sponge.
Let the water sit for 1–2 minutes so the paper fibers soften.Step 12: Rub the paper off in gentle circular motions
Use your fingertips or a soft damp cloth and rub in slow circles. The paper will pill up and roll away.
Don’t rushpaper comes off in layers, and “fast” is how you accidentally rub off the image too.Step 13: Let it dry, then remove the “paper haze” (the part everyone panics about)
After the first rub, the transfer may look cloudy. That’s usually paper fibers still clinging on.
Let the glass dry completely; then re-wet lightly and rub againgentlyuntil the haze fades.
This may take a couple rounds, especially on larger images.Step 14: Seal (optional) and cure before heavy handling
Many transfer mediums don’t require a topcoat, but a sealer can add durabilityespecially for frequently handled items.
If you seal, use a compatible clear topcoat (spray sealer is popular because it avoids brush marks).
Let everything cure before gifting, washing, or putting it into service as your new favorite kitchen jar.Care note: For anything that will be washed, plan on gentle hand washing unless you’re using products specifically labeled for dishwasher-safe finishes.
Which Transfer Medium Should You Use?
Option A: Clear Image Transfer Medium (great for glass)
Clear image transfer mediums are designed for hard surfaces like glass and can reduce that “paper halo” look around the image.
They typically prefer dry-toner prints and regular copy paper for best results.
Option B: Photo Transfer Medium (works well, but glass can be picky)
Photo transfer mediums can also work on glass, but some crafters prefer a “decal” approach for extra controlcreating the transfer film first, then applying it to glass.
If your first attempt slides or lifts, don’t assume you’re cursed. You may just need the decal method for your particular glass shape or product.
Troubleshooting: Fix the Most Common Problems
“My image smeared.”
Usually this means you used an inkjet print (or the medium wasn’t compatible with the ink), you moved the paper after placing it,
or you pressed too aggressively while burnishing. Next time, use a dry-toner print and keep the paper still once it lands.
“There are bubbles or blank spots.”
That’s incomplete contact. Burnish more firmly from the center out, and make sure your medium coat is even (no dry patches).
Curved glass needs extra smoothing and sometimes smaller images to avoid wrinkling.
“It looks cloudy after I removed the paper.”
Cloudiness is often leftover paper fiber. Let the piece dry fully, then do a second gentle wet-and-rub pass.
The key word is gentle. You’re exfoliating the paper, not sanding a deck.
“The paper won’t come off.”
You might not have soaked it long enough. Wet the paper, wait a minute or two, and try again.
Also: thick paper is harder to removeregular copy paper is your friend.
“The whole transfer lifted.”
This usually happens when the medium wasn’t fully dry before you started the water step, or the glass wasn’t degreased.
Give it the full dry time, and do the alcohol wipe every time.
Design Ideas That Look Expensive (Even If You’re Using a Pickle Jar)
- Memory jar: transfer a photo onto a snack jar for keepsakes or kitchen storage with personality
- Thrifted vase upgrade: vintage botanicals or family photos on plain glass vases
- Ornaments: tiny transfers on flat glass ornaments or discs
- Picture frame glass: transfer onto the glass itself for a “floating image” effect
- Bathroom apothecary jars: labels + images for a spa vibe
Sealing and Longevity: Keeping Your Transfer Looking Good
If your glass piece will sit on a shelf and look pretty, you may not need much protection.
If it will be handled often, a topcoat can help.
Spray sealers are popular for a smooth finish, while brush-on water-based polyurethane is commonly used for hard-wearing protection on home items.
Whatever you use, apply thin coats and follow dry times so you don’t trap moisture or create tacky finishes.
Real-World Experiences: What Actually Happens at the Craft Table (The Extra You Asked For)
Let’s talk about the part no one posts in the “after” photo: the messy middle. The first time I tried transferring an image onto glass, I was convinced I’d done everything right
clean jar, nice print, medium brushed on like frosting. Then I got impatient. I told myself, “It feels dry enough,” which is the crafting equivalent of saying,
“This roller coaster seems safe.” I started the wet step early and watched a corner of the image lift like it was trying to escape the project entirely.
Lesson learned: dry time is not a suggestion. If a tutorial says 24 hours, it means “24 hours,” not “overnight-ish if you believe in yourself.”
The second surprise was the “paper haze panic.” After rubbing the paper off, my image looked cloudy and I thought I’d ruined it again.
But here’s the thing: paper comes off in layers, and tiny fibers like to cling for dear life. The fix was boring (and therefore powerful):
let it dry completely, then do a second gentle wet-and-rub pass. On the next round, the haze faded and the image snapped into focus.
Now I treat that haze like a phase, not a failure. If your transfer looks a little foggy, don’t immediately launch it into the trash like a dramatic reality-TV moment.
I’ve also learned that curved glass has opinions. A perfectly flat frame glass transfers like a dream. A rounded jar?
Suddenly you’re dealing with wrinkles and edges that want to lift. My workaround is to use slightly smaller images, round the corners when trimming,
and burnish in slow passes rather than trying to “one-and-done” it. If I’m doing a big label-style transfer on a jar, I sometimes tape one edge in place first
(like hinging a poster) so I can lower it gradually and smooth as I go. It’s not fancyit’s just controlled chaos.
One of my favorite “happy accidents” happened when I intentionally tore the paper edges instead of cutting them cleanly.
The transfer looked more vintage and less like a sticker. That tiny choice made a thrift-store vase look like boutique décor.
I’ve also tried warming the room slightly (nothing extremejust not cold and damp), and it helped the medium dry more evenly.
Humidity is sneaky; it can turn “dry overnight” into “dry sometime next week.”
Finally, I’ll say this: you will get better fast. The first transfer teaches you what “thick enough” actually looks like.
The second teaches you how much pressure is “burnish” and how much is “smear city.”
By the third, you’ll start pre-mirroring text without even thinking about it, and you’ll keep wax paper around like it’s a household staple.
The best part is the moment someone picks up your glass piece and asks, “Wait… how did you get that photo on there?”
That’s when you casually shrug like a crafting wizard, even though you know the truth: it was 40% skill, 60% patience, and 100% refusing to touch it before it dried.
Conclusion
Transferring an image onto glass isn’t hardit’s just specific. Clean the glass like you’re prepping it for a spy mission, use the right kind of print,
apply a smooth coat of transfer medium, and let it dry fully before you do the water-and-rub reveal.
Once you get the hang of it, you can turn ordinary glass into personalized gifts, stylish storage, and décor that looks way more expensive than it was.
And if your first attempt is a little wonky? Congratulations. You’re officially doing crafts correctly.