Table of Contents >> Show >> Hide
- What Is Coconut Coir (and Why Is Everyone Talking About It)?
- Choosing the Right Type of Coir
- Step 1: Prep Coir the Right Way (Rinse, Hydrate, and Sometimes Buffer)
- How to Use Coconut Coir in Seed Starting
- How to Use Coconut Coir in Potting Mix for Containers
- How to Use Coconut Coir in Garden Beds and Raised Beds
- Coir in Hydroponics, Grow Bags, and Soilless Growing
- Can You Use Coconut Coir as Mulch?
- Troubleshooting: Common Coir Problems (and Fixes)
- How to Buy Better Coir (Quality Checklist)
- Quick “Cheat Sheet” for Using Coconut Coir
- Conclusion
- Real-World Garden Experiences (Lessons, Wins, and “Oops” Moments)
Coconut coir (a.k.a. “coco coir,” “coir pith,” or the dramatic stage name “coco peat”) is the fluffy, brown stuff made from coconut husks. Think of it as the coconut’s way of saying, “I’m more than just piña coladas.” In the garden, coir shines as a peat-moss alternative, a moisture manager, and a potting-mix team playerwhen you prep it correctly and don’t expect it to magically fertilize your tomatoes.
This guide covers what coir is, why gardeners love it, when it can annoy you (salts, I’m looking at you), and exactly how to use it in seed starting, containers, raised beds, and even hydroponic-style growing. We’ll keep it practical, a little funny, and very plant-friendly.
What Is Coconut Coir (and Why Is Everyone Talking About It)?
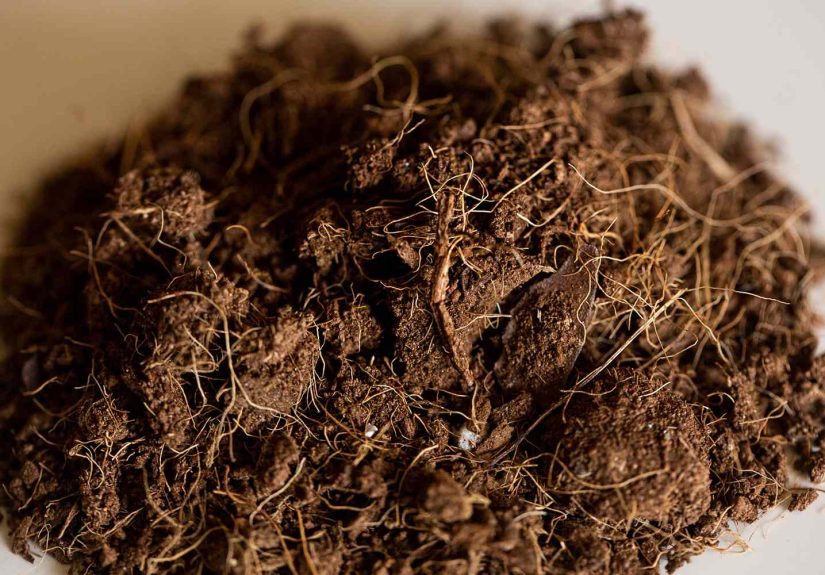
Coconut coir is the fibrous material from the outer husk of coconuts, processed into horticultural products like fine “dust/pith,” longer fibers, chips/chunks, or compressed bricks. In other words: it’s a byproduct that got a second career in gardeningand honestly, it’s doing great.
What coir does well
- Holds water while still keeping air in the root zone (roots want moisture and oxygen).
- Re-wets more easily than some other dry media, so it doesn’t stay stubbornly dry forever.
- Improves soil structure in both heavy clay (more air space) and sandy soil (better moisture retention).
- Lasts relatively long because it breaks down slowly.
What coir does not do
- Provide a complete nutrient buffet. Coir is not fertilizer. It’s more like the plate.
- Automatically arrive “ready to use.” Some products contain excess salts and need rinsing (or buffering).
- Fix bad drainage by itself. If you use coir alone in a pot, you can still end up with soggy roots.
Choosing the Right Type of Coir
The best coir form depends on what you’re doing. Here’s a quick matchmaker:
Coir pith (fine “coco peat” / “coir dust”)
Fine texture, excellent for seed starting blends and potting mix recipes. It holds a lot of moisture, which is greatuntil you forget to add perlite and your seedlings start practicing synchronized “damping off.”
Coir fiber (stringy fibers)
Adds structure and air pockets to mixes. Often used in basket liners and some specialty mixes.
Coir chips/chunks
Chunkier, more air space, often used in orchid-style mixes or blends where you want drainage and root aeration.
Compressed bricks/blocks
Convenient and economical to ship. You hydrate them into fluffy coir at homelike a garden sponge that’s been on a diet.
Step 1: Prep Coir the Right Way (Rinse, Hydrate, and Sometimes Buffer)
Not all coir is created equal. Some is thoroughly washed and low-salt; some may carry higher levels of sodium and chloride depending on processing. High salts can stress plants and interfere with nutrient uptake. So the safest default is: hydrate and rinse, and consider buffering if you’re using coir as a major component (especially in containers or soilless growing).
How to hydrate a coir brick
- Put the brick in a wheelbarrow, tote, or large bucket.
- Add water gradually (warm water speeds things up).
- Let it sit 10–20 minutes, then break it apart as it loosens.
- Keep adding water until it’s fully expanded and fluffy.
Pro tip: Coir can expand about 5–6× its dry volume when soaked, so don’t hydrate it in a container that’s already fullunless you enjoy surprise “garden volcano” moments.
How to rinse coir (simple version)
- Hydrate the coir fully.
- Place it in a colander, perforated tote, or fabric grow bag.
- Run clean water through it until drainage runs clearer.
- Let excess water drain (aim for “damp sponge,” not “swamp thing”).
When to buffer coir (and what buffering means)
Buffering is most relevant when coir is a primary growing medium (containers, grow bags, hydroponic-style setups). Coir can hold onto certain nutrients (especially potassium) and may initially “grab” calcium and magnesium from your fertilizer solution or soil. Buffering helps saturate coir’s exchange sites with calcium/magnesium so your plants don’t get shortchanged later.
A practical home approach:
- After rinsing, soak hydrated coir in water amended with a cal-mag product or calcium/magnesium source (per label).
- Let it sit several hours to overnight.
- Drain, then use in your mix.
If that sounds like a lot: for many home gardens using coir as one ingredient (not 100% coir), a solid rinse plus balanced fertilizing is often enough. But for sensitive crops, seedling production, or high-coir container mixes, buffering pays off.
How to Use Coconut Coir in Seed Starting
Coir is popular in seed-starting mixes because it’s fine-textured, holds moisture well, and tends to be clean. The goal with seeds is simple: steady moisture + oxygen + low disease pressure.
Easy DIY seed-starting mix (reliable and beginner-friendly)
Try this classic “thirds” formula:
- 1/3 coconut coir (or peat alternative)
- 1/3 perlite, vermiculite, or coarse sand
- 1/3 pasteurized compost or pasteurized soil (optional, but helpful)
If you want a lighter, more soilless feel, skip compost/soil and use a finer blend: coir + vermiculite/perlite. Keep it airyseedling roots hate being suffocated.
Seed-starting success tips (the stuff people learn the hard way)
- Don’t pack coir down in trays. Over-compressing reduces air space and can lead to uneven wetting.
- Watch the surface. Coir can dry on top even if it’s moist below. For tiny seeds sown on the surface, a light sprinkle of vermiculite helps keep consistent moisture contact.
- Start feeding at the right time. Once seedlings have true leaves, begin a gentle fertilizer program (coir itself doesn’t supply complete nutrition).
How to Use Coconut Coir in Potting Mix for Containers
Containers are where coir really earns its keep. Coir improves water management, but your mix needs three things: moisture retention, drainage, and nutrition. Coir covers the first one beautifully.
Container mix recipe: general-purpose
- 40% coconut coir (prepped/rinsed)
- 30% compost (or quality composted bark-based potting component)
- 20% perlite or pumice
- 10% worm castings (optional, for biology and mild nutrition)
Add a slow-release fertilizer (per label) or plan on liquid feeding regularly. Coir-based mixes may need slightly different nutrition than peat-based mixesespecially calcium/magnesium awareness for fruiting crops.
Container mix recipe: “I forget to water sometimes” blend
- 50% coir
- 25% compost
- 25% perlite/pumice
This one holds moisture well but stays airy. Great for herbs, annuals, and patio veggiesjust don’t skip fertilizer.
What not to do in containers
- Don’t use straight coir for most potted plants. It holds water and can compact over time without structure additives.
- Don’t assume “wet” means “healthy.” Roots need oxygen; always include a drainage component (perlite/pumice/bark).
- Don’t ignore salts. If you see leaf-tip burn or stalled growth, measure the mix’s EC if possible and flush as needed.
How to Use Coconut Coir in Garden Beds and Raised Beds
In beds, coir functions like a structural amendmenthelping clay loosen up and helping sandy soil hold water longer. The trick is using a reasonable amount and mixing it thoroughly into the root zone.
For clay-heavy soil (compaction problems)
Spread 1–2 inches of hydrated coir over the bed and incorporate into the top 6–8 inches. Pair it with compost for biology and nutrients. You’re aiming for “crumbly chocolate cake,” not “pottery class.”
For sandy soil (water disappears instantly)
Use a similar approach: 1–2 inches of coir plus compost, mixed into the top layer. Coir helps retain moisture, but compost is your long-term nutrient and microbial support.
Raised bed refresh strategy
Each season, top-dress with compost and a modest amount of coir (especially if your bed dries quickly), then lightly fork in. Coir breaks down slowly, so you don’t need to add it aggressively every year.
Coir in Hydroponics, Grow Bags, and Soilless Growing
Coir is widely used as a soilless medium because it balances air and water well. But soilless systems are less forgiving: your fertilizer program matters more, and coir prep matters a lot.
Best practices for high-coir systems
- Start with washed/low-salt coir (and rinse anyway if you’re unsure).
- Buffer before planting if coir is the main medium.
- Use a complete fertilizer that includes calcium and magnesium (or supplement appropriately).
- Monitor pH (many growers target mildly acidic ranges in soilless culture; follow your crop’s best practices).
Can You Use Coconut Coir as Mulch?
Coir isn’t a classic chunky mulch like wood chips, but it can be used in a few ways:
- Coir mats/liners: helpful for basket liners and sometimes as a weed-suppressing surface layer in small areas.
- Light top-dressing: a thin layer can reduce surface crusting in some beds, but it’s not as durable as wood mulch.
If your goal is weed control and evaporation reduction, wood chips often do a better job for less money. Use coir where its structure and re-wetting advantage matter most: mixes and soil amendment.
Troubleshooting: Common Coir Problems (and Fixes)
Problem: Seedlings stall or leaves look pale
Likely causes: low fertility (coir isn’t nutrient-rich) or calcium/magnesium imbalance in high-coir mixes. Fix: start a gentle, balanced feeding program; consider cal-mag support for demanding crops.
Problem: Leaf tips burn, growth looks “salty”
Likely causes: coir salts or fertilizer salts building up. Fix: flush containers with clean water until runoff is clearer; use lower-salt coir next time; rinse/buffer up front.
Problem: The mix stays wet forever
Likely causes: too much coir, not enough aeration material, or compacting. Fix: add perlite/pumice/bark; avoid pressing the mix down; ensure containers have adequate drainage holes.
Problem: The surface dries out quickly
This is common with coir, especially in seed trays. Fix: bottom-water when possible; use humidity domes early; add a light vermiculite layer for tiny surface-sown seeds.
How to Buy Better Coir (Quality Checklist)
- Look for “washed” or “low EC” on product descriptions when available.
- Avoid mystery bargain bricks if you’re growing sensitive seedlings (cheap coir can cost you in lost plants).
- Smell test: it should smell earthy/neutral, not funky or chemical.
- Texture match: fine for seed starting, chunkier blends for orchids or extra-aerated containers.
Quick “Cheat Sheet” for Using Coconut Coir
- Seed starting: coir + perlite/vermiculite; keep airy; don’t pack; begin feeding after true leaves.
- Containers: coir + compost + perlite/pumice; add fertilizer; watch Ca/Mg for fruiting crops.
- Garden beds: 1–2 inches incorporated into top 6–8 inches, paired with compost.
- Soilless/hydro: rinse + buffer + complete nutrition + pH awareness.
Conclusion
Coconut coir is one of the most useful “supporting actors” in modern gardening: it improves moisture management, increases root-zone air space, and works beautifully in mixesespecially when you rinse it and treat it like a structural ingredient, not a fertilizer. Use it where it matters (seed starting, containers, bed amendments), pair it with compost and aeration materials, and keep an eye on salts and nutrition. Your plants will do the rest with fewer tantrums and better roots.
Real-World Garden Experiences (Lessons, Wins, and “Oops” Moments)
Gardeners’ experiences with coconut coir tend to follow a familiar storyline: excitement, a brief learning curve, and then a “Where have you been all my life?” phase. Here are the most common patterns people reportand what they typically do to turn coir into a long-term success.
1) The seed-starting breakthrough: fewer soggy disasters
A lot of gardeners first meet coir through seed starting, often after battling heavy backyard soil or a dense mix that stays wet and invites fungal issues. Coir-based blends can feel “lighter” and more breathable, and seedlings often pop up more uniformly when moisture is steady. The big discovery, though, is that coir doesn’t like being mashed down into trays. People who gently fill cells (instead of pressing like they’re packing a suitcase) tend to get stronger roots and fewer weak, spindly seedlings.
One practical habit that shows up again and again: bottom-watering. Because coir can dry a little on the surface, gardeners often find that watering from below keeps moisture consistent without blasting tiny seeds out of place. When surface-sown seeds are involved (like petunias or certain herbs), many gardeners add a whisper-thin layer of vermiculite to keep the seed-to-medium contact just rightlike tucking the seed in with a breathable blanket.
2) Containers that forgive missed waterings (within reason)
Container gardeners often love coir because it helps pots stay evenly moist longerespecially in hot, sunny patios where containers can dry out fast. People frequently notice that plants “bounce back” better after a dry spell when coir is part of the mix, partly because coir re-wets more readily than some peat-heavy blends that can get stubbornly hydrophobic. The win is obvious: fewer midday droops and less panic watering.
The “oops” moment? Using too much coir without enough drainage material. When gardeners go heavy on coir but forget perlite/pumice/bark, they can end up with a mix that stays wet too longespecially in humid weather or shady spots. The fix is simple and very common: add aeration (perlite/pumice) and stop compressing the potting mix. Once they do, coir becomes that reliable moisture manager they wanted in the first place.
3) Raised beds: coir helps, but compost still runs the show
In raised beds, gardeners often treat coir as a “structure booster.” People with sandy beds notice the soil holds moisture longer and watering becomes less frequent. People with clay-heavy gardens say the soil feels easier to work and less prone to turning into a brick when it dries. The most successful experiences usually involve combining coir with compost: coir improves physical properties, while compost provides nutrients and biology.
A common lesson learned is not to use coir as a substitute for fertility. Gardeners who expect coir alone to “feed” plants often see pale leaves or slow growth and then realize: coir is the house; nutrients are the furniture. Once they add compost, balanced fertilizer, or a planned feeding routine, performance improves quickly.
4) The salt mystery (and why rinsing becomes a ritual)
Some gardeners have a dramatic first run with coir: seedlings refuse to thrive, leaf tips burn, or growth stalls for no obvious reason. After a little digging, they discover the issue was salts in the coir product. This is why experienced coir users tend to default to rinsingespecially for bricks of unknown origin or bargain products.
Once rinsing becomes part of the routine, the problem usually disappears. People who go further into high-coir mixes, grow bags, or hydroponic-style systems often add buffering to prevent calcium/magnesium hiccups later. The takeaway from experienced users is consistent: prep coir like you prep a cast-iron pando it once, do it right, and everything sticks less (including plant problems).
If you’re new to coir, start small: try it in a seed-starting blend or a few containers, note how it behaves in your climate, then scale up. Coir rewards “observe and adjust” gardenersbasically the people who already keep notes on which tomato tasted best and why the basil bolted out of spite.