Table of Contents >> Show >> Hide
- Why a recycled glass mosaic memorial hits different
- Planning the memorial: story first, pattern second
- Gathering materials: what you actually need (and what you’ll buy anyway)
- Safety first: because “memorial” should not include a trip to urgent care
- Prepping the wall (or panel): the unglamorous step that makes everything last
- Choosing thin-set, adhesive, and grout for glass mosaics
- Building the mosaic: my step-by-step process
- Grouting: the messy makeover stage
- Sealing and weatherproofing: helping it survive real life
- What it cost and how long it took (a reality check)
- Common mistakes (I made them so you don’t have to)
- Why it mattered: the emotional side of making a memorial
- FAQ: quick answers for first-time mosaic makers
- Extra : What I learned while making a recycled glass mosaic memorial
- Conclusion
It started the way most questionable DIY decisions begin: I was holding a jar of “someday” glasssea-glass
leftovers, bottle bottoms, a few broken holiday ornaments, and that one mysterious blue shard that looked
too pretty to throw away and too sharp to keep near living things.
A friend had recently lost someone important, and I wanted to do something that didn’t feel like a generic
sympathy card (no offense to sympathy cards, but they always read like they were written by a polite robot
who has never met grief). I kept thinking about how memories worksharp at first, then softened by time,
then suddenly bright again when the light hits just right. That’s basically recycled glass, too.
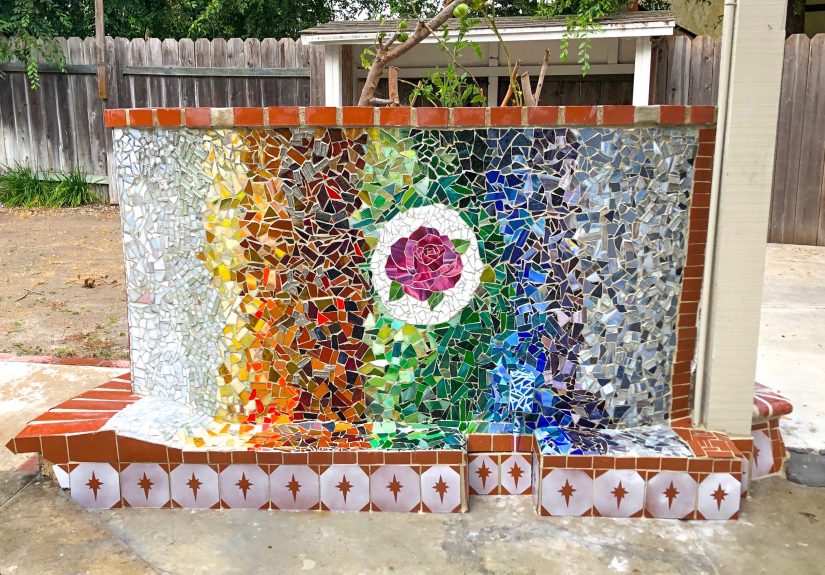
So I made a mosaic wall memorial: a small, weather-resistant art piece meant to live outdoors, catch the sun,
and quietly remind you that love doesn’t vanishit just changes shape. Also: I got to turn “trash” into
something that looks expensive, which is my favorite kind of magic.
Why a recycled glass mosaic memorial hits different
A mosaic memorial is personal without being loud. It doesn’t demand attention; it rewards it. Glass mosaic
pieces hold light like tiny time capsules, and using recycled glass adds a second layer of meaning: what was
broken becomes part of a bigger picture. If you’ve ever tried to “move on” from a loss, you know that’s the
whole deal.
Practically speaking, glass mosaic tiles (and repurposed glass) are also durable, low-maintenance, and ideal
for outdoor mosaic artif you choose the right setting materials and grout. That “if” is doing a lot of work
there, like me pretending I didn’t buy three kinds of grout before reading the label.
Planning the memorial: story first, pattern second
Before touching mortar, I picked a simple theme that matched the person being remembered. Think symbols
that read clearly from a distance: a heart, a hummingbird, a constellation, a wave, a favorite flower, a
musical note, a mountain silhouette. Tiny details can exist (mosaics love tiny details), but the main design
should “land” in two seconds.
Design choices that work especially well with recycled glass
- Sunburst or halo patterns (glass loves radiating light).
- Botanical shapes (leaves and petals hide imperfect cuts beautifully).
- Abstract gradients (great if your glass colors are random, like mine).
- Simple lettering (one name, initials, a short phrase, or a date).
I sketched my layout on paper first, then made a rough “color map.” Not a masterpiecemore like a treasure
map drawn by someone who is 40% sentimental and 60% easily distracted by shiny things.
Gathering materials: what you actually need (and what you’ll buy anyway)
Here’s the essentials list for a DIY mosaic wall memorial using recycled glass. The key is picking
outdoor-appropriate materials so freeze/thaw, rain, and sun don’t turn your tribute into a crumbling science
experiment.
Core materials
- Base/backer: cement board, exterior-rated concrete panel, or a prepared masonry wall.
- Setting material: polymer-modified thin-set mortar (bright white is great for glass).
- Glass pieces: recycled glass, glass mosaic tiles, stained-glass scraps, tumbled glass.
- Grout: appropriate for joint width; consider stain-resistant options for outdoors.
- Optional sealer: for cement-based grout (not typically needed for epoxy grout).
Tools that saved my sanity
- Tile nippers or glass mosaic cutter
- Wet saw (helpful, not mandatory, but it makes cleaner cuts)
- Notched trowel, margin trowel, mixing bucket
- Grout float, sponges, microfiber cloth
- Painter’s tape, pencil/marker, straightedge
- Safety glasses, cut-resistant gloves, and a mask (glass dust is not a personality trait you want)
Safety first: because “memorial” should not include a trip to urgent care
Cutting glass creates sharp edges, tiny chips, and sometimes a surprise shard that shoots off like it’s
auditioning for an action movie. Wear safety glasses every time you cut or nip. Gloves help too, especially
if you’re handling lots of small pieces.
If you grind or sand glass edges, do it wet or with good dust control. Also: keep pets, kids, and curious
adults who “just want to see” out of the cutting zone. I learned this after my neighbor wandered over in
sandals. Sandals. Around glass. I aged five years in ten seconds.
Prepping the wall (or panel): the unglamorous step that makes everything last
A mosaic wall memorial can go directly onto a stable masonry wall, or onto a panel (like cement board)
that you later mount. For beginners, a panel is easier because you can build flat on a table, control
weather exposure, and move it if needed.
What “good prep” looks like
- The surface is clean, solid, and not dusty, oily, or flaking.
- For panels: edges are sealed/finished and the panel is thick/stiff enough not to flex.
- The wall area is flat enough that your glass pieces won’t “teeter” during setting.
- You’ve planned drainage and movement (outdoor installations expand and contract).
I wiped everything down, lightly dampened the surface (thin-set likes a cooperative substrate), and taped a
border so I could keep my design centered. This was the moment my project transformed from “crafty” to
“construction-adjacent,” which is a vibe I only tolerate because it works.
Choosing thin-set, adhesive, and grout for glass mosaics
Glass is beautiful, but it’s also picky. Using the right mortar and grout matters more than your artistic
talentbecause the most gorgeous mosaic still fails if it debonds, cracks, or lets water creep behind it.
Thin-set vs. craft adhesive
For outdoor mosaic art (or anything that gets wet), a cement-based, polymer-modified thin-set mortar is the
standard choice. It bonds strongly, handles moisture better than many craft glues, and is designed for tile
environments. A bright white mortar is especially nice for glass mosaic tiles because it keeps colors crisp
instead of muddy.
Sanded vs. unsanded grout (and why glass makes this spicy)
Grout selection depends on joint width and tile surface. Narrow joints often point toward unsanded grout,
while wider joints typically call for sanded grout for strength. Glass can scratch, so if you’re using
sanded grout with delicate glass, test firstor choose a grout designed to be gentle on tile surfaces.
For an exterior mosaic wall memorial, stain resistance and weather performance matter. Some people prefer
epoxy grout outdoors because it’s more resistant to stains and water compared to cement-based grout. The
trade-off is that epoxy grout can be less forgiving to apply (translation: it will humble you).
Building the mosaic: my step-by-step process
1) Dry layout like a puzzle (but with sharper consequences)
I arranged my recycled glass pieces on the table first. I grouped colors, set aside “hero pieces” (the
prettiest shards), and created a consistent flow so the design didn’t look like a recycling bin exploded.
Tip: take a photo of your dry layout before you start setting. When you inevitably bump the table, you can
rebuild without relying on memory and hope.
2) Cut and shape the glass (with patience and snacks)
Some recycled glass cuts cleanly; some behaves like it’s offended you asked. I used tile nippers for small
shaping and a wet saw for straighter cuts. When working with glass mosaic sheets, scoring and snapping
techniques can help, but practice on scraps first.
I also rounded a few sharp points by lightly smoothing edges (wet methods help reduce dust). Perfection
isn’t requiredmosaics are forgivingbut safety is non-negotiable.
3) Mix thin-set in small batches
Thin-set mortar has a working time. If you mix a giant bucket “to save time,” you will instead create a
bucket-shaped rock that you will keep as a reminder of your hubris. I mixed smaller batches and only spread
as much as I could cover before it skinned over.
4) Set the glass pieces
I spread a thin layer of mortar with a notched trowel, then pressed each piece in, twisting slightly to
ensure contact. I kept spacing fairly consistent so grouting would be easier and the finished surface would
look intentional (not like I dropped a handful of gems and committed to the outcome).
For translucent glass, mortar color can show through. Bright white thin-set helps keep the mosaic luminous.
I also made sure mortar didn’t ooze too high between pieces; excess mortar makes grouting harder.
5) Let it cureno “just one more piece” moves
Once everything was in place, I walked away. This is the hardest step for DIY people. You want to poke it,
adjust it, whisper encouragement to it. Don’t. Let the mortar cure according to product directions and your
environment (temperature and humidity affect cure time).
Grouting: the messy makeover stage
Grout is where mosaics stop looking like a craft project and start looking like a finished installation. It
also reveals every gap you pretended was “artistic.”
How I grouted without losing my mind
- I taped off the surrounding area (future me deserves nice things).
- I mixed grout to a peanut-butter consistency.
- I used a rubber float to pack grout into joints from multiple angles.
- I waited a short time, then wiped gently with a damp sponge.
- I buffed haze with a microfiber cloth once it began to set.
If you’re working with mixed glass textures, test your sponge pressure. Too aggressive and you’ll pull grout
from joints. Too gentle and you’ll leave haze. My method was “soft wipe, panic, soft wipe again.”
Sealing and weatherproofing: helping it survive real life
Whether you need a sealer depends on the grout type and location. Many cement-based grouts benefit from
sealing to reduce staining and water absorption. Epoxy grout generally doesn’t require sealing.
Because this was a memorial meant to live outdoors, I also planned for water management: sloped surfaces
shed water, vertical surfaces drain naturally, and edges should be finished so moisture doesn’t soak into
vulnerable areas. If you’re mounting a panel, use appropriate exterior mounting hardware and keep the panel
off direct ground contact.
What it cost and how long it took (a reality check)
If you already have tools, a recycled glass mosaic project can be surprisingly budget-friendly. If you don’t
have tools, it’s still doablebut your first mosaic may accidentally become a tool-collection strategy.
Example budget (small memorial panel)
- Recycled glass: free to low-cost (depending on how fancy your “trash” is)
- Cement board panel: modest cost
- Polymer-modified thin-set mortar: moderate cost
- Grout (and optional sealer): modest to moderate
- Safety gear (glasses, gloves): worth every penny
Timeline-wise, the artistic part is quick; the cure times make it longer. My rough schedule:
- Design + sorting glass: 1–2 evenings
- Cutting + dry layout: 1 evening (or three, if you’re sentimental and easily distracted)
- Setting glass: 1 day
- Cure: overnight to a couple days (depending on materials)
- Grout + cleanup: 1 day
- Final cure + install: 1 day
Common mistakes (I made them so you don’t have to)
- Using indoor glue outdoors: it may fail with moisture and temperature swings.
- Skipping safety gear: glass chips don’t care about your confidence.
- Spreading too much mortar at once: it skins over and weakens bond.
- Letting mortar ooze into joints: it fights your grout later.
- Rushing grout cleanup: haze is the glitter of tile workforever.
- Ignoring movement: exterior surfaces move; plan accordingly.
Why it mattered: the emotional side of making a memorial
The project changed halfway through. At first, it was “I’m making a mosaic.” Then it became “I’m sorting
memories into colors.” Every shard had a story: a bottle from a celebration, a piece of window glass from a
renovation, a sea-glass pebble from a trip. I wasn’t just arranging materials; I was arranging moments.
And the quiet beauty of it? You can do it slowly. Grief is not a deadline-friendly emotion. A mosaic lets
you work one piece at a time, take breaks, and return when you’re ready. No one can rush you when you’re
holding tiny glass triangles like a dragon guarding its treasure.
FAQ: quick answers for first-time mosaic makers
Can I use bottle glass without special tools?
Yes, but choose your glass carefully. Some bottle glass is thick and temperamental. Tile nippers and glass
cutters help. Always wear eye protection, and test on scrap pieces first.
Do I have to seal the mosaic?
The glass itself doesn’t need sealing, but grout sometimes doesespecially cement-based grout in outdoor
or stain-prone areas. Follow the product guidance for your specific grout.
What if my glass edges are sharp?
Avoid placing sharp edges where hands might touch. You can smooth edges by carefully grinding or selecting
tumbled glass. For memorials in public or high-touch spaces, prioritize safety and durability.
Extra : What I learned while making a recycled glass mosaic memorial
I wish I could tell you the process was serene: me, a cup of tea, sunlight streaming in, and the gentle
clink of glass pieces falling perfectly into place like destiny. The truth is more like: me, hunched over a
table, whispering “please behave” to a shard of green glass while my playlist aggressively shuffled to a
breakup song I did not consent to.
The first surprise was how physical the project felt. I thought it would be mostly “art,” but it’s also
mixing, lifting, wiping, measuring, and repeatedly washing your hands because grout somehow teleports onto
your elbows. If you’re making a mosaic wall memorial, set your workspace up like you’re cooking a holiday
meal: everything within reach, trash bin nearby, water ready, and a plan for when you inevitably drop
something sticky on something important.
The second surprise was how much the glass guided the story. I started with a sketch, but the recycled
pieces had opinions. A bright amber fragment became a focal point because it caught the light like a tiny
sunset. A soft blue shard insisted on being part of the background gradient. And a milky-white pieceonce a
broken ornamentended up near the center because it felt like the right kind of quiet. If you’re using
recycled glass mosaic materials, leave room for improvisation. You’re not “losing control”; you’re letting
the medium do what it does best: reflect.
I also learned that memorial projects don’t need to be heavy to be meaningful. I added one small hidden
detail that made me smile: a single tiny star-shaped piece tucked into the corner. The person being
remembered was known for leaving “little surprises” for peoplenotes, jokes, small thoughtful gestures.
That star became my inside joke with them. Every time I see it, it feels like a wink from the universe.
Technically, I learned to respect cure times like they’re sacred. I used to think “dry” meant “done.” With
thin-set and grout, “dry” can be a stage, not a finish line. Letting things cure fully made the difference
between a sturdy installation and a fragile one. I also learned to keep my grout lines consistent because,
once grouted, your design becomes a single visual field. Uneven spacing screams louder after grout, like
your mosaic is suddenly narrating its own flaws.
The biggest lesson, though, was this: mosaics are a gentle way to practice patience with broken things.
Recycled glass is imperfect by definition. Some pieces are oddly shaped; some colors don’t match; some
edges chip. And yet, when you step back, the whole piece becomes more beautiful because of that variety.
Making a mosaic memorial reminded me that grief works the same way. It doesn’t “resolve” into a neat,
flawless pattern. It becomes part of the bigger picturesometimes sharp, sometimes soft, sometimes glowing
unexpectedly in the late afternoon sun.
Conclusion
A recycled glass mosaic wall memorial is more than a DIY projectit’s a story built from light, patience,
and pieces that refuse to be wasted. With the right thin-set, grout, and safety habits, you can create
outdoor mosaic art that lasts through seasons while holding meaning that lasts even longer. And if you
accidentally end up with glitter-like grout haze on your face? Congratulations. You made art the honest way.